Synchronization features in Android application
Go 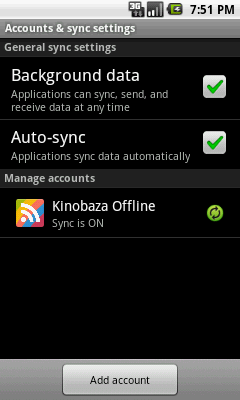
When developing many Android applications, it is required to organize the process of data synchronization with the data on the server. There are two main ways how this synchronization can be implemented.
The first method - the classic (the most popular and easiest) - using AlarmManager and Service . For example, as described in this article .
The second way - “correct” (but so far, apparently, rarely used by anyone) - using the SyncAdapter .
When developing my application, I initially tried to implement the “right” (i.e. second method).
How to implement it - just below. I will talk first about the difficulties and peculiarities I encountered in its implementation.
')
First of all, this method is poorly described in the documentation. Although the Android developer site is an example of implementation , a better example (with explanations) will be an article on this link .
For this synchronization method to work, it is necessary to create a separate type of account specifically for your proposal (if existing accounts, for example, Google accounts are not suitable), and this is the topic for a separate article (for example, see here ).
This account will be available in the Settings / Accounts & Sync section. Creating (and deleting) an account will be possible not only from your application, but also from this section. There you can create several accounts for your application (does this need your application?). For each account you need a name (for OAuth accounts, you have to use fake names).
In this case, the incorrectly written account code reloads both the device and the emulator - it is difficult to test. At the same time, if you created only the code responsible for the account, and want to test it, it will not work - without the fully written SyncAdapter code, the device will reboot when entering Accounts & Sync.
What if your synchronization process does not need an account? You have to create a dummy account.
If your application synchronizes data with existing databases - phone contacts, calendar events or, for example, photos, then everything is simpler (and most of the examples on the network are about this type of synchronization). If synchronization will be done with your data, then you need to create your own ContentProvider .
What if your application does not want to share its base with other applications? We 'll have to create a dummy- ContentProvider , for example, like this .
If everything is done, and even your SyncAdapter is written (see below as), now synchronization will automatically start when the data in the local database has changed.
If the synchronization needs to be started manually, then there is the function requestSync () for this, below will be written about the limitations of the function. If you need to start synchronization automatically, then there is another function for this - addPeriodicSync () . Although it only works on Android 2.2 or higher. But this function works fine - for example, if there is no Internet connection at the time of synchronization, then synchronization will occur automatically at the moment it appears.
What do you need to do to implement synchronization using a SyncAdapter ? (translation of the answer with StackOverflow)
For this, you need to specify the synchronization service in AndroidManifest.xml:
where name is the name corresponding to the name of the class to synchronize (about this - just below); exported - makes the service available to other components (including ContentResolver , which is used to interact with the synchronization service); intent-filter allows you to intercept an event that requires synchronization (it occurs, for example, when synchronization is requested by the RequestSync () function of your ContentResolver 'a).
For example:
Your class must extend the Service , it must have an instance variable AbstractThreadedSyncAdapter . It must implement public IBinder onBind (Intent) and must return a SyncAdapterBinder .
Quite a lot should be implemented in this class, because This service provides a standard interface for the Android SyncAdapter .
mySyncAdapter is the place where the synchronization logic itself is contained. When synchronization time arrives, onPerformSync () is called.
In paragraph 1, in the AndroidManifest.xml file, in the name field we specified the value that forms the link between ContentAuthority and the account. AndroidManifest.xml refers to another xml file. In our example, this is sync_myapp.xml :
This file tells Android that the SyncAdapter we created will sync contacts.
All values of the strings in contentAuthority must match the values of what will be synchronized. If synchronization will occur with your own base, then with your value. If with any existing databases (for example, with contacts or calendar events), then with standard values. For example, the above com.android.contacts value identifies standard contacts.
The accountType value must also match either your value or the standard value. If you create your own account type, you will need to create an AccountAuthenticator subclass to authorize on your server (see the article already mentioned above). The com.google value in our example identifies that we are using a Google Account.
Finally, you can turn on the synchronization process. This can be done either in the Settings / Accounts & Sync section, or programmatically in your application:
To implement synchronization, it must be enabled not only for your application - you need global permission for synchronization (in the Settings / Accounts & Sync section, the corresponding checkbox must be attached).
If one of these conditions is not met, the RequestSync () call will not lead to anything immediately, however, the requested synchronization will be executed later - as soon as synchronization is enabled. Although there is a way around this.
Additionally, you can enable periodic automatic synchronization.
And so, what is good (+) and bad (-) synchronization with a SyncAdapter compared to ASyncTask ?
(+) following the standards (your application is in the list of all synchronized applications)
(+) support for multiple accounts
(+) ease of implementation of automatic synchronization (when the rest is all written)
(+) automatic synchronization when an Internet connection appears
(+) convenience in synchronization with standard databases (contacts, calendar, etc.)
(-) need to create an account
(-) lack of full documentation
(-) complexity of implementation and testing
(-) need for Android 2.2 and higher for automatic periodic syncs
(-) the need to create your own ContentProvider
So, I chose ASyncTask for synchronization in my application (although the code for the SyncAdapter was already written almost completely) - first of all, I didn’t want to be limited to Android version 2.2.
When developing many Android applications, it is required to organize the process of data synchronization with the data on the server. There are two main ways how this synchronization can be implemented.
The first method - the classic (the most popular and easiest) - using AlarmManager and Service . For example, as described in this article .
The second way - “correct” (but so far, apparently, rarely used by anyone) - using the SyncAdapter .
When developing my application, I initially tried to implement the “right” (i.e. second method).
How to implement it - just below. I will talk first about the difficulties and peculiarities I encountered in its implementation.
')
Features of synchronization implementation using SyncAdapter
First of all, this method is poorly described in the documentation. Although the Android developer site is an example of implementation , a better example (with explanations) will be an article on this link .
For this synchronization method to work, it is necessary to create a separate type of account specifically for your proposal (if existing accounts, for example, Google accounts are not suitable), and this is the topic for a separate article (for example, see here ).
This account will be available in the Settings / Accounts & Sync section. Creating (and deleting) an account will be possible not only from your application, but also from this section. There you can create several accounts for your application (does this need your application?). For each account you need a name (for OAuth accounts, you have to use fake names).
In this case, the incorrectly written account code reloads both the device and the emulator - it is difficult to test. At the same time, if you created only the code responsible for the account, and want to test it, it will not work - without the fully written SyncAdapter code, the device will reboot when entering Accounts & Sync.
What if your synchronization process does not need an account? You have to create a dummy account.
If your application synchronizes data with existing databases - phone contacts, calendar events or, for example, photos, then everything is simpler (and most of the examples on the network are about this type of synchronization). If synchronization will be done with your data, then you need to create your own ContentProvider .
What if your application does not want to share its base with other applications? We 'll have to create a dummy- ContentProvider , for example, like this .
If everything is done, and even your SyncAdapter is written (see below as), now synchronization will automatically start when the data in the local database has changed.
If the synchronization needs to be started manually, then there is the function requestSync () for this, below will be written about the limitations of the function. If you need to start synchronization automatically, then there is another function for this - addPeriodicSync () . Although it only works on Android 2.2 or higher. But this function works fine - for example, if there is no Internet connection at the time of synchronization, then synchronization will occur automatically at the moment it appears.
How to implement synchronization using the SyncAdapter
What do you need to do to implement synchronization using a SyncAdapter ? (translation of the answer with StackOverflow)
1. Notify Android that the application supports synchronization
For this, you need to specify the synchronization service in AndroidManifest.xml:
<service android:name=".sync.mySyncService" android:exported="true"> <intent-filter> <action android:name="android.content.SyncAdapter" /> </intent-filter> <meta-data android:name="android.content.SyncAdapter" android:resource="@xml/sync_myapp" /> </service> where name is the name corresponding to the name of the class to synchronize (about this - just below); exported - makes the service available to other components (including ContentResolver , which is used to interact with the synchronization service); intent-filter allows you to intercept an event that requires synchronization (it occurs, for example, when synchronization is requested by the RequestSync () function of your ContentResolver 'a).
2. Create a service (service) to find the SyncAdapter 'a
For example:
public class mySyncService extends Service { private static mySyncAdapter mSyncAdapter = null; public SyncService() { super(); } @Override public void onCreate() { super.onCreate(); if (mSyncAdapter == null) { mSyncAdapter = new mySyncAdapter(getApplicationContext(), true); } } @Override public IBinder onBind(Intent arg0) { return mSyncAdapter.getSyncAdapterBinder(); } } Your class must extend the Service , it must have an instance variable AbstractThreadedSyncAdapter . It must implement public IBinder onBind (Intent) and must return a SyncAdapterBinder .
Quite a lot should be implemented in this class, because This service provides a standard interface for the Android SyncAdapter .
3. Create a class SyncAdapter for direct synchronization
mySyncAdapter is the place where the synchronization logic itself is contained. When synchronization time arrives, onPerformSync () is called.
4. To carry out binding (binding) between account type and Content Authority
In paragraph 1, in the AndroidManifest.xml file, in the name field we specified the value that forms the link between ContentAuthority and the account. AndroidManifest.xml refers to another xml file. In our example, this is sync_myapp.xml :
<?xml version="1.0" encoding="utf-8" ?> <sync-adapter xmlns:android="http://schemas.android.com/apk/res/android" android:contentAuthority="com.android.contacts" android:accountType="com.google" android:userVisible="true" /> This file tells Android that the SyncAdapter we created will sync contacts.
All values of the strings in contentAuthority must match the values of what will be synchronized. If synchronization will occur with your own base, then with your value. If with any existing databases (for example, with contacts or calendar events), then with standard values. For example, the above com.android.contacts value identifies standard contacts.
The accountType value must also match either your value or the standard value. If you create your own account type, you will need to create an AccountAuthenticator subclass to authorize on your server (see the article already mentioned above). The com.google value in our example identifies that we are using a Google Account.
5. Enable synchronization for the created pair of Account - ContentAuthority
Finally, you can turn on the synchronization process. This can be done either in the Settings / Accounts & Sync section, or programmatically in your application:
ContentResolver.setSyncAutomatically(account, AUTHORITY, true); To implement synchronization, it must be enabled not only for your application - you need global permission for synchronization (in the Settings / Accounts & Sync section, the corresponding checkbox must be attached).
If one of these conditions is not met, the RequestSync () call will not lead to anything immediately, however, the requested synchronization will be executed later - as soon as synchronization is enabled. Although there is a way around this.
Additionally, you can enable periodic automatic synchronization.
findings
And so, what is good (+) and bad (-) synchronization with a SyncAdapter compared to ASyncTask ?
(+) following the standards (your application is in the list of all synchronized applications)
(+) support for multiple accounts
(+) ease of implementation of automatic synchronization (when the rest is all written)
(+) automatic synchronization when an Internet connection appears
(+) convenience in synchronization with standard databases (contacts, calendar, etc.)
(-) need to create an account
(-) lack of full documentation
(-) complexity of implementation and testing
(-) need for Android 2.2 and higher for automatic periodic syncs
(-) the need to create your own ContentProvider
So, I chose ASyncTask for synchronization in my application (although the code for the SyncAdapter was already written almost completely) - first of all, I didn’t want to be limited to Android version 2.2.
Source: https://habr.com/ru/post/118450/
All Articles