Variables in Photoshop or how to import external PSD files into easy
While working on large projects with multiple layouts and object types, even a minimal change in a repeating component can take time. Going through a variety of layouts and adjusting the color or pattern of such a repeating element can be debilitating. Of course, if you have an apprentice who does all the dirty work for you, then you are definitely lucky, but what do we freelancers do?
Do we need only to demolish this flour? Well, now not! Recently, I discovered an approach that will allow designers to say goodbye to opening 23 PSD files just for the sake of changing the color of an element in the header. Instead, we can act wisely, like our colleagues, developers, and import external files with something called “Variables” .
This will put the reusable component in a separate file and simply import it into all layouts. Now, when we need to make a change, we will just make it in one place.
For our needs, we just need to replace the pixels, since we just need to import the external component into our layout.
')
Typically, a component has many states (for example, authorized / unauthorized). Therefore, style sheets are created for the component to show its state. Ideally, I would like to import the component style page and quietly place it into the layout. This would allow us to get a file that is both style and embedded, imported into all layouts where this component is available.
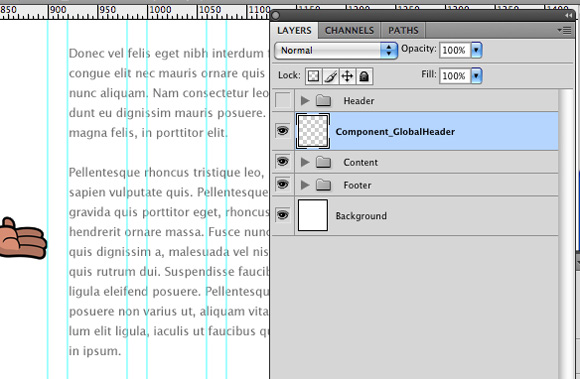
I made a fake style page for the global title and called it Component_GlobalHeader.psd . In order to follow all the steps, please download it.
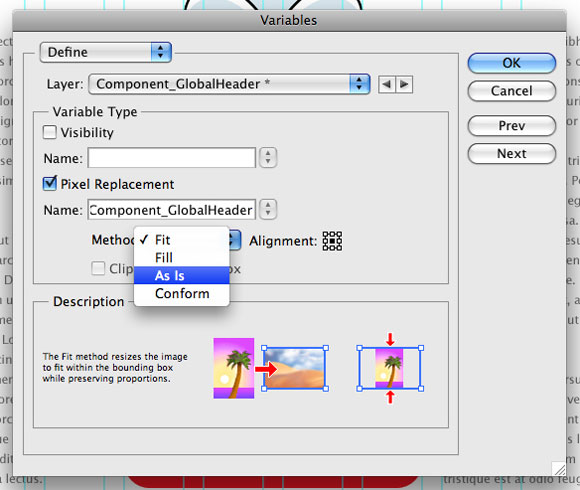
First, always check that you selected the exact layer you want. This can be seen in the “Layer” field. If the layer is set incorrectly, then a mess can arise.

Since we are focusing on imports, go straight to “Pixel replacement (Replacement of pixels)” . In the Name field , enter the same name as the layer and file. It is better to call everything the same, because it will help in the organization in the future.

Now let's go to the “Method” field. We are going to choose a scaling method when replacing an image. The options are as follows:
“As Is (As is)” is what we need, since we don’t want to perform any manipulations on the external file.
“Alignment” can be left as it is, in the center, but this is a matter of preference, and also depends on the component itself. I used to align with the top left corner. It all depends on you.
"Clip to Bounding Box (Trimming on the frame)" , perhaps, should be left disabled.
Click "Next (Next) . "
Since we have not yet created the data sets, let's start by creating the first one. To do this, click on the small icon with a floppy disk (near the trash can). Now that we have created a set, let's call it something. Yeah, right. Let the name be the name of the variable, layer and external file. As I said, they should be identical.
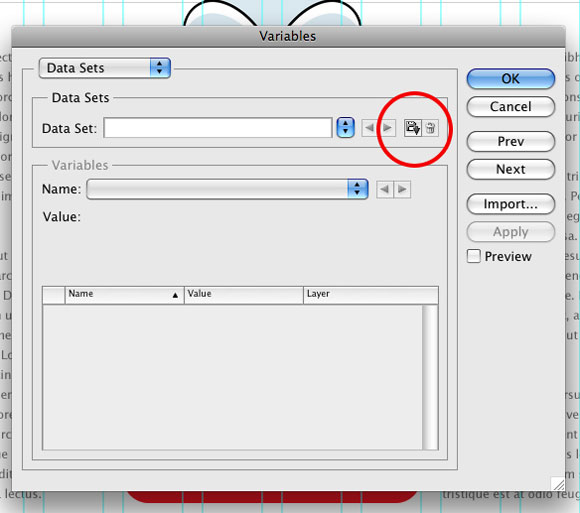
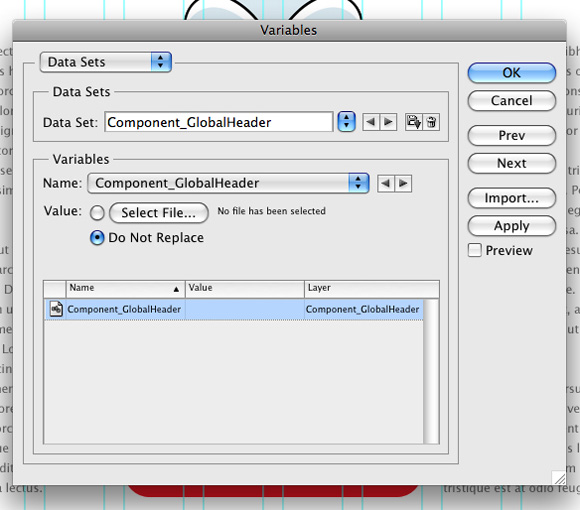
That's it, now we can upload an external file. Click on the file selection button in the “Value” section and select Component_GlobalHeader.psd . Notice, if you have a tick "Preview (Preview)" , you will see how your component appeared in the layout. Above all things: always click “Apply” before clicking “OK” . If this is not done, all that we have done will be lost and we will have to start over. Therefore, first “Apply” , then “OK” .

We imported the external component into our layout! Hooray! But wait ... we see the whole huge layer, and we only need part of it.


The main disadvantage is that after changes to the component and saving the file, these changes will not be automatically made to the layout. This means that you always have to “Apply data sets” when opening the layout. Although I have not tried this solution, it seems to me that it is possible to create some action that will open the PSD and automatically apply the sets.
Another disadvantage is the file structure. Moving a file breaks the entire system, causing an error when applying sets. Since this is all not logical, I did not find a way to deal with this problem. one
Nevertheless, I believe that this system will save countless hours of exhausting mechanical labor. And you should know when to use it. Basically it will fit for projects containing more than 15 layouts.
And one more thing: if my translation of menu items differs from localization, write to me in a personal and I will correct it.
Do we need only to demolish this flour? Well, now not! Recently, I discovered an approach that will allow designers to say goodbye to opening 23 PSD files just for the sake of changing the color of an element in the header. Instead, we can act wisely, like our colleagues, developers, and import external files with something called “Variables” .
This will put the reusable component in a separate file and simply import it into all layouts. Now, when we need to make a change, we will just make it in one place.
What are variables in Photoshop?
This is how the technical description of Adobe sounds.The variable is mainly used to set the elements in the template for later replacement. There are three ways to set a variable:
- visibility variable - shows or hides the contents of the layer;
- pixel substitution - variables that replace layer pixels with image pixels from another file;
- Text Replacement - Variables that replace a string in a text layer.
For our needs, we just need to replace the pixels, since we just need to import the external component into our layout.
')
Let's get started
Step One: File Preparation
At this stage, we need to decide which components will be used as variables. Often, creating a variable is best suited for repeating components in multiple layouts. These can be "caps", "basements", widgets, etc. In our example, we will use the global header.Typically, a component has many states (for example, authorized / unauthorized). Therefore, style sheets are created for the component to show its state. Ideally, I would like to import the component style page and quietly place it into the layout. This would allow us to get a file that is both style and embedded, imported into all layouts where this component is available.
I made a fake style page for the global title and called it Component_GlobalHeader.psd . In order to follow all the steps, please download it.
Step Two: Creating the Basics
Open the site layout and create a new layer. Call it the same name as the style page, i.e. Component_GlobalHeader . This is the layer into which we will import the contents of the external file.Step Three: Create a Variable
It's time to create a variable. This can be done by choosing Image → Variables → Define . Before you pops up a window in which we set some parameters.First, always check that you selected the exact layer you want. This can be seen in the “Layer” field. If the layer is set incorrectly, then a mess can arise.
Since we are focusing on imports, go straight to “Pixel replacement (Replacement of pixels)” . In the Name field , enter the same name as the layer and file. It is better to call everything the same, because it will help in the organization in the future.
Now let's go to the “Method” field. We are going to choose a scaling method when replacing an image. The options are as follows:
- Fit (Fit) - scales in such a way that the image fits in the container (some parts of the container may remain empty);
- "Fill (Filling)" - scales in such a way that the image fits into the container as a whole (some parts of the image may go beyond the container);
- “As Is (As is)” - scaling is not applied;
- Conform (Fixture) - scales the image disproportionately in such a way that it completely fills the container.
“As Is (As is)” is what we need, since we don’t want to perform any manipulations on the external file.
“Alignment” can be left as it is, in the center, but this is a matter of preference, and also depends on the component itself. I used to align with the top left corner. It all depends on you.
"Clip to Bounding Box (Trimming on the frame)" , perhaps, should be left disabled.
Click "Next (Next) . "
Step Four: Import
In order to import a file, you need to select or create a new “Data set (Data Set)” . Data sets are collections of variables and related information. You select a dataset for each individual file, so if you have multiple widgets in one file, you only need one set with a name, for example, sidebar_widgets .Since we have not yet created the data sets, let's start by creating the first one. To do this, click on the small icon with a floppy disk (near the trash can). Now that we have created a set, let's call it something. Yeah, right. Let the name be the name of the variable, layer and external file. As I said, they should be identical.
That's it, now we can upload an external file. Click on the file selection button in the “Value” section and select Component_GlobalHeader.psd . Notice, if you have a tick "Preview (Preview)" , you will see how your component appeared in the layout. Above all things: always click “Apply” before clicking “OK” . If this is not done, all that we have done will be lost and we will have to start over. Therefore, first “Apply” , then “OK” .
We imported the external component into our layout! Hooray! But wait ... we see the whole huge layer, and we only need part of it.
Step Five: Disguise
Since we do not need the entire component page in the layout, we can easily mask the necessary part by hiding the rest. We will do this by creating a new fill layer with the same dimensions as the part of the component we need. Now all we need is to drag the mask onto the component layer. You will see how the entire layout is filled with the contents of the layer, as we have removed its mask. Just remove this layer.Step Six: Update
Now that we are working with an external file, let me explain the beauty of it. Suppose that the red indicator of the current page is no longer rushing to you, but instead of not going to want blue. Easily! Open your external file and change the color to blue, save it and return to the layout. Now select Image → Apply Data Sets and select the data set that you need to update. You will immediately see the changes.disadvantages
Thinking about the potential of the method, do not forget that it is still a hack. Until Adobi decides to create an embedded system for importing external PSD files, we will never have a reliable way to do this.The main disadvantage is that after changes to the component and saving the file, these changes will not be automatically made to the layout. This means that you always have to “Apply data sets” when opening the layout. Although I have not tried this solution, it seems to me that it is possible to create some action that will open the PSD and automatically apply the sets.
Another disadvantage is the file structure. Moving a file breaks the entire system, causing an error when applying sets. Since this is all not logical, I did not find a way to deal with this problem. one
Nevertheless, I believe that this system will save countless hours of exhausting mechanical labor. And you should know when to use it. Basically it will fit for projects containing more than 15 layouts.
Conclusion
This example is just the tip of the iceberg. You can discover the full potential of this method yourself. Be creative and experiment. Why not add all the widgets using just one dataset?Afterword
It seems to me that many do not know about it. The article is relevant in its own way against the backdrop of today's battles Photoshop vs. Indizayn. For example, I don’t want to switch to Indizayn and such a system makes work a lot easier, and also brings Photoshop closer to its “competitor” a step. I hope that my work was helpful to you.And one more thing: if my translation of menu items differs from localization, write to me in a personal and I will correct it.
Notes
1. skriv : "You can make Action and drive it into ScriptEventManager to update all layers when opening a document." ↑Source: https://habr.com/ru/post/118363/
All Articles