Development of mobile applications on PhoneGap and jQuery Mobile

PhoneGap is an OpenSource platform that allows you to develop mobile applications for HTML, JavaScript and CSS for various platforms (almost without changing the application code). Among them are iOS, Android, Blackberry, WebOS, Symbian and Windows Mobile on the way. Its charm is that it does not require development skills for a specific platform. You write your application in JavaScript, use HTML and CSS for markup. You write a mobile application as a regular website or web service.
The PhoneGap engine extends the browser API and adds the following features: access to the accelerometer, access to the camera (so far only photos), access to the compass, access to the list of contacts, recording and listening to audio files, provides access to the file system, allows working with different HTML5 repositories localStorage, Web SQL, etc., and also allows you to safely access any cross-domain address.
In addition to the platform, PhoneGap has, while free, an application builder for all devices in one click.
jQuery Mobile
I think everyone knows, but I remind you again. jQuery Mobile is a jQuery add-on that allows you to develop mobile web sites and mobile web applications without any problems.
')
If you know HTML, JavaScript, CSS, jQuery and have problems with Java, Objective-C and others, but want to try your hand at mobile development, then this article is for you.
We will create a mobile application for Android (iOS requires much more effort for a test application: Mac Only, I need a developer certificate) called Tumblr Reader (I didn’t want to create another habrareader).
Installing a software package for development
If you have the Eclipse + ADT Plugin, then this part can be skipped. Original article .
Detailed article .
1. Download and install Eclipse Classic
2. Download and install the Java Platform (JDK)
3. Download and install the Android SDK
Run the SDK Manager, select all modules and install them all (it takes 20 minutes)
4. Install ADT Plugin
5. Configure the ADT Plugin - you need to specify the path to the Android SDK, otherwise it will not work
6. Download the latest version of PhoneGap (at the time of writing it was 0.9.4)
Creating an Android Emulator
Open the SDK Manager (it can open various windows, close them), select Virtual devices, click New ...
Create an emulator as shown in the screenshot:
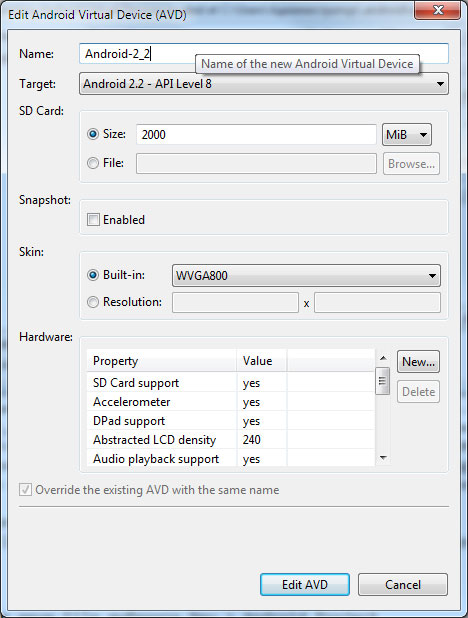
Important: Android 2.2 is required. If you are under Windows and there are not ANSI characters in the username, then after creating the
c:\Users\\.android\avd\Android-2_2.avd do the following: move c:\Users\\.android\avd\Android-2_2.avd to some other folder, for example, in c:\Android\Android-2_2.avd , open the Android-2_2.ini and change path= to the appropriate one.Creating a project
1. Launch Eclipse from the File menu select
New > Android Project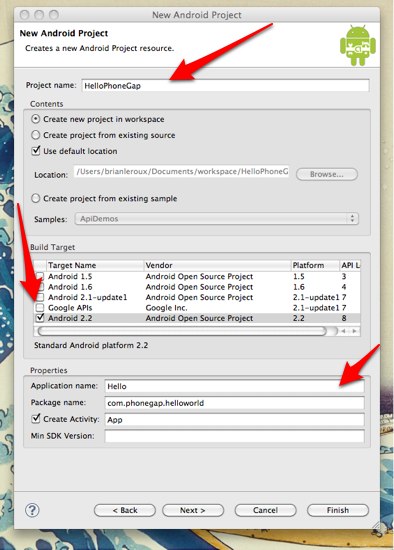
Screenshot from the official tutorial
2. In the root directory of the project, create 2 folders / libs and / assets / www
From the phonegap-0.9.4 archive, copy phonegap.jar to / libs
Run Git checkout in / assets / www from the repository: git: //github.com/azproduction/phonegap-tumblr-reader.git or download it from github.com/azproduction/phonegap-tumblr-reader/archives/master and unpack it into / assets / www In the repository ready application, so you do not have to copy-paste from the article.
3. Add
phonegap.jar to the Build Path. To do this, right-click on the project root, select Properties, select Java Build Path from the list, select the Libraries tab, click Add JARs ... and specify the path to phonegap.jar
4. Open the file
TumblrReader.java , which lies in the folder src /4.1. Replace
Activity with DroidGap4.2. Replace
setContentView() with super.loadUrl("file:///android_asset/www/index.html");4.3. Add
import com.phonegap.*;
6. Open AndroidManifest.xml, add the following code (it gives access to certain resources) we only need
android.permission.INTERNET : <supports-screens android:largeScreens="true" android:normalScreens="true" android:smallScreens="true" android:resizeable="true" android:anyDensity="true" /> <uses-permission android:name="android.permission.INTERNET" /> If you experiment with API, then add all the options:
<uses-permission android:name="android.permission.CAMERA" /> <uses-permission android:name="android.permission.VIBRATE" /> <uses-permission android:name="android.permission.ACCESS_COARSE_LOCATION" /> <uses-permission android:name="android.permission.ACCESS_FINE_LOCATION" /> <uses-permission android:name="android.permission.ACCESS_LOCATION_EXTRA_COMMANDS" /> <uses-permission android:name="android.permission.READ_PHONE_STATE" /> <uses-permission android:name="android.permission.INTERNET" /> <uses-permission android:name="android.permission.RECEIVE_SMS" /> <uses-permission android:name="android.permission.RECORD_AUDIO" /> <uses-permission android:name="android.permission.MODIFY_AUDIO_SETTINGS" /> <uses-permission android:name="android.permission.READ_CONTACTS" /> <uses-permission android:name="android.permission.WRITE_CONTACTS" /> <uses-permission android:name="android.permission.WRITE_EXTERNAL_STORAGE" /> <uses-permission android:name="android.permission.ACCESS_NETWORK_STATE" /> In the activity tag, add
android:configChanges="orientation|keyboardHidden"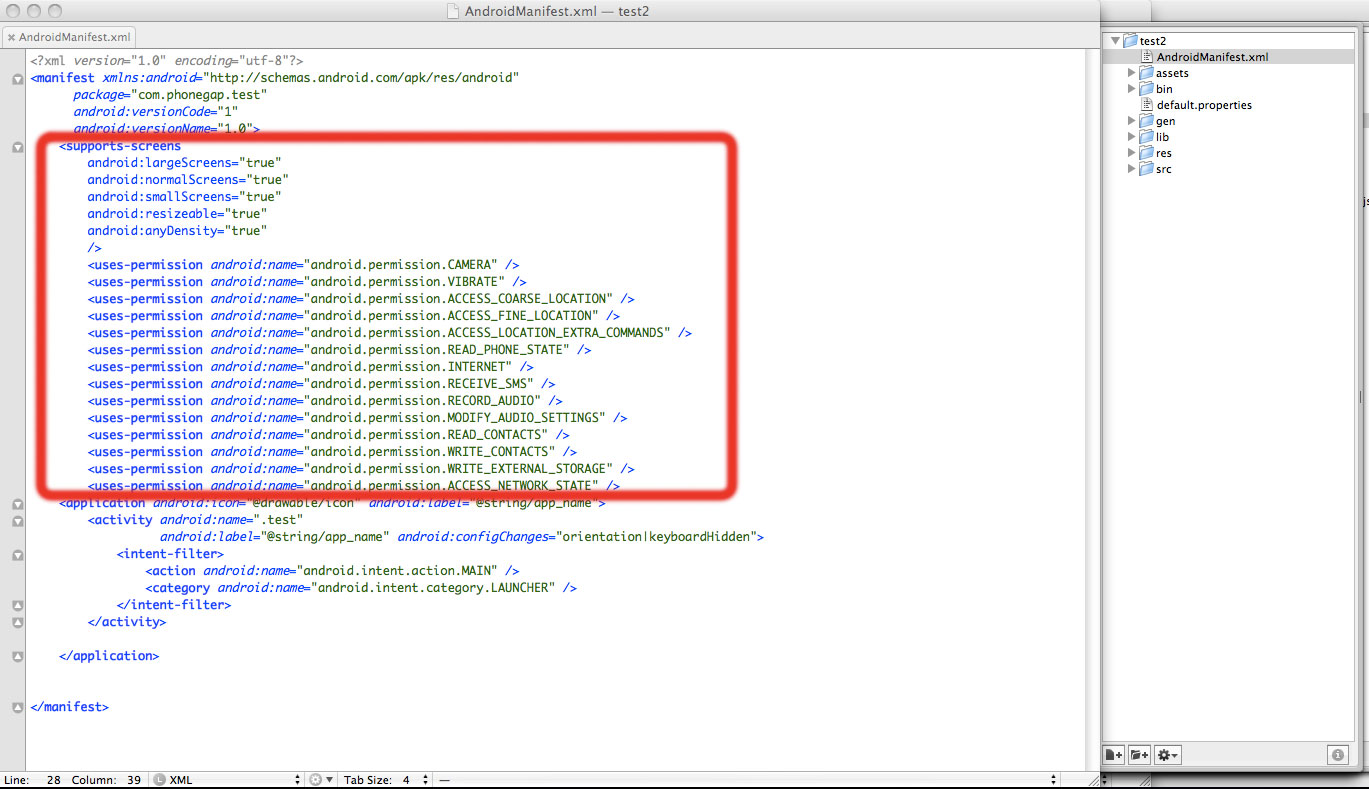
7. Run your application in the emulator:
Run As > Android Application If you did everything correctly, then the emulator should open with your application.Create Tumblr Reader
The rest of the article describes the phased creation of the application. Eclipse can now collapse and open your favorite editor. Eclipse will need to restart the application in the emulator.
Skeleton application index.html
I do not dwell on the principles of creating jQuery Mobile pages. You can read it yourself.
Create
index.html in the /assets/www folder <!DOCTYPE HTML> <html> <head> </head> <body> </body> </html> We connect the necessary scripts
<head> <title>Tumblr Reader</title> <!-- jQuery Mobile --> <link rel="stylesheet" href="libs/jquery.mobile.css" /> <link rel="stylesheet" href="css/main.css" /> <!-- jQuery & jQuery Mobile --> <script type="text/javascript" charset="utf-8" src="libs/jquery.js"></script> <script type="text/javascript" charset="utf-8" src="libs/jquery.mobile.js"></script> <!-- phonegap --> <script type="text/javascript" charset="utf-8" src="libs/phonegap.js"></script> <!-- --> <script type="text/javascript" charset="utf-8" src="js/main.js"></script> </head> Add jQuery Mobile page to the body - “List of small images” aka Dashboard
<!-- --> <div data-role="page" id="dashboard"> <div data-role="header" data-position="fixed"> <!-- options --> <a href="#options" data-icon="gear">Options</a> <h1>Dashboard</h1> </div> <div data-role="content"> <div class="ui-grid-b" id="dashboard-list"> <!-- --> </div> </div> </div> When you click on a small image, a page with a large one will open; we add the “Big Picture” page.
<!-- --> <div data-role="page" id="dialog"> <div data-role="header"> <!-- --> <a data-rel="back" data-icon="back">Back</a> <h1>Image</h1> <!-- - --> <!-- about:blank --> <a href="about:blank" data-icon="search" data-theme="b" id="full-image">Full</a> </div> <div data-role="content"> <!-- about:blank --> <p><img src="about:blank" /></p> </div> </div> By default, the images will be loaded from design.tumblr.com (the first thing that came to mind), add a settings page so that the name can be changed:
<!-- --> <div data-role="page" id="options"> <div data-role="header"> <h1>Options</h1> </div> <div data-role="content"> <div data-role="fieldcontain"> <label for="name">Tumblr user:</label> <!-- Tumblr --> <input type="text" name="name" id="options-name" value="" /> </div> <!-- " " --> <a data-role="button">Ok</a> </div> </div> Full version github.com/azproduction/phonegap-tumblr-reader/blob/master/index.html
The skeleton is ready, add some css (css / main.css file)
#dashboard-list div, #dialog p { text-align: center; } Application logic js / main.js
First, let's examine the Tumblr API in the JSON output section. The JSON format is described a little: by reference.
http://%user%.tumblr.com/api/read/json JavaScript will come to us like this: var tumblr_api_read = {/* - ... */} It’s a pity that it’s not pure JSON (P), but we have jQuery.getScript that will fix everything for us. Nothing more is known about the format. From the source, it became clear that
tumblr_api_read.tumblelog.title is the blog header, and tumblr_api_read.posts is an array of posts of the format: [{ 'type': 'photo', 'photo-url-1280': 'http://...', 'photo-url-250': 'http://...', 'photo-url-75': 'http://...', /* - */ }, ...] We will only use these fields, so the rest do not describe.
Render to draw a list of pictures
Each picture will be:
<div class="ui-block-a"> <a href="#dialog"> <img data-full-src="http://..." data-big-src="http://..." src="http://..." /> </a> </div> Render code:
/** * * * @param {Object} posts * * @returns {String} */ var render = function (posts) { var view = '', // .. // index = 0; // posts.forEach(function(post){ // if (post.type !== 'photo') { return; } view += '<div class="ui-block-' + suffix[index % 3] + '">' + // dialog '<a href="#dialog">' + '<img data-full-src="' + post['photo-url-1280'] + '" data-big-src="' + post['photo-url-250'] + '" src="' + post['photo-url-75'] + '" />' + '</a>' + '</div>'; index++; }); return view; }; Data Loader with Tumblr API
Loader jerks URL
http://%user%.tumblr.com/api/read/json and gets the relevant data, using the data we draw a list of pictures. /** * * * @param {String} [user='tumblr'] */ var load = function (user) { user = user || 'tumblr'; // $.mobile.pageLoading(); // var timeoutId = window.setTimeout(function () { $.mobile.pageLoading(true); }, 3000); // $.getScript('http://' + user + '.tumblr.com/api/read/json', function (data, status) { // if (status === 'success'){ // $dashboard.find('h1').text(tumblr_api_read.tumblelog.title); // $('#dashboard-list').html(render(tumblr_api_read.posts)); } else { // - alert('Error occurred while loading ' + user); } // $.mobile.pageLoading(true); // window.clearTimeout(timeoutId); }); }; Application initializer
It initializes the username from localStorage, performs preloading, and performs other trivial operations.
var init = function () { // 1 , if (init.called) { return; } init.called = true; // $dashboard = $('#dashboard'); $dashboardList = $('#dashboard-list'); $dialogImg = $('#dialog').find('img'); $fullImg = $('#full-image'); $options = $('#options'); $optionsName = $('#options-name'); // $dashboardList.delegate('a', 'click', function () { var $img = $(this).find('img'); // $dialogImg.attr('src', $img.data('big-src')); $fullImg.attr('href', $img.data('full-src')); }); // currentUser = window.localStorage.getItem("tumblr-reader-user") || 'design'; // $optionsName.val(currentUser); // $options.find('a').click(function () { var newUser = $optionsName.val(); // if (currentUser !== newUser) { // currentUser = newUser; // window.localStorage.setItem("tumblr-reader-user", currentUser); // load(currentUser); } // $.mobile.changePage('#dashboard'); }); // load(currentUser); }; init.called = false; // , document.addEventListener("deviceready", init, true); // $(init); Source main.js: github.com/azproduction/phonegap-tumblr-reader/blob/master/js/main.js
Now our application is completely ready and you can run it in the Emulator
Run As > Android Application , if you made minor edits and do not want to reassemble the application, simply open index.html in any WebKit browser.Building an application for all platforms in PhoneGap Build
1. You need to send a request on the build.phonegap.com page (I received an answer in 5 minutes)
2. An email will come to your email address with beta code use it in build.phonegap.com/people/sign_up
3. Once logged in, go to build.phonegap.com/apps
4. Select the upload an archive or index.html file option.
5. Pack the contents of / assets / www in .zip and send the archive, instead of the archive you can use my git repository
6. Click Create, wait a bit while PhoneGap Build builds the application for all platforms
Now your application is available for download build.phonegap.com/apps/9296 (my build)
Links
1. If you are too lazy to collect and download anything you can see the application online.
2. Download the finished application for Android, webOS, Symbian here (you need to register in PhoneGap Build) iOS requires a certificate, Blackberry requires special file names, so they are not.
3. Download without registering Android 1 (Building PhoneGap Build requires unnecessary rights), Android 2 (manual assembly requires only
android.permission.INTERNET ), webOS , Symbian4. The Tumblr Reader repository on GitHub
Documentation
1. PhoneGap Documentation
2. Wiki PhoneGap: Android Eclipse Quickstart
3. Tumblr API
4. jQuery Mobile Docs
I have demonstrated a simple application that can work as a web page, you can try to create something more complex using the phone's API. Suggestions, suggestions, criticism is welcome!
Source: https://habr.com/ru/post/118059/
All Articles