In-app purchasing or internal payments in Android applications
What is it all about?
With the version of the application Android Market 2.3.0 for developers of applications for the Android platform, it has been possible to provide users with payments within the applications themselves. Now you can sell levels and artifacts, videos, music, plug-ins, etc., using only the built-in tools of the platform. Let's see how this can be done.
What do we need?
')
As usual, the favorite IDE, Android SDK and sample application .
It will also be useful to imagine what a Service, BroadcastReceiver and, of course, Activity are.
We also need permission in the manifest file -
<uses-permission android:name="com.android.vending.BILLING"/> , nothing will work without it.How does this work in principle?
Everything works through the service in the Android Market application. He is able to send requests for details of a certain thing that the user wants to buy, to purchase, to receive answers about the success or failure of the purchase, and so on. All information about the things you sell should be entered through the Developer Console for a specific application. As soon as we received a signal of a successful purchase, we can start downloading content from our server.
How does all this work?
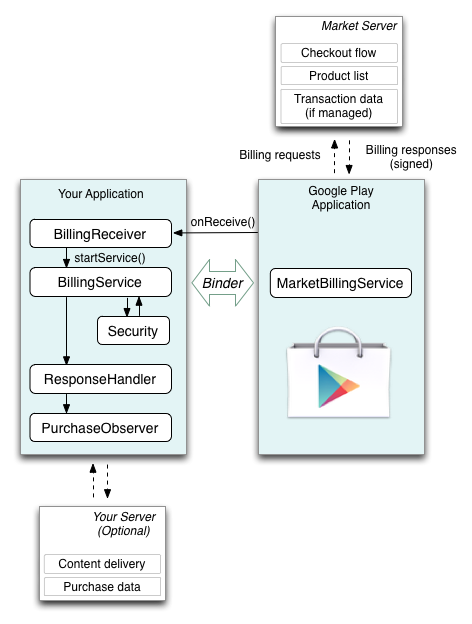
On the server in the market information is stored about things that you can buy. The client application of the market interacts with the server. Our application interacts with it.
Our application will consist of at least:
- BillingService. This is a service that is associated with the application of the market, and sends him all the information about the operations and receives answers to them, in case they are synchronous.
- BillingReceiver. Receives asynchronous responses from the market app.
- PurchaseObserver. An entity that will notify the UI of changes in the status of purchases.
What messages do we send to the market?
First, we need to connect our BillingService with the market application in order to call the MarketBillingService's sendBillingRequest method. The service interface is described in the IMarketBillingService.aidl file, you can download it
The method itself takes a parameter Bundle, in which all information is stored. The most important is the parameter with the key "BILLING_REQUEST". It defines the type of request. They are:
•
CHECK_BILLING_SUPPORTED — check availability of in-app billing.•
REQUEST_PURCHASE — Purchase request.•
GET_PURCHASE_INFORMATION - getting information about changes in the purchase status.•
CONFIRM_NOTIFICATIONS — Confirmation that a notification has been received from the market application.•
RESTORE_TRANSACTIONS - recovery of transactions for items already purchased.What are the answers?
The method synchronously returns a response, which is also a Bundle. It contains:
•
RESPONSE_CODE - response code•
PURCHASE_INTENT - PendingIntent , in order to start activating a purchase.•
REQUEST_ID — The ID of the request sent.In the case of asynchronous responses (received through the BillingReceiver), they contain the following:
•
com.android.vending.billing.RESPONSE_CODEAnswer code. The market confirms the success or failure of sending the request.
•
com.android.vending.billing.IN_APP_NOTIFYAlert that purchase status has changed. After this message you need to send a request with the type
GET_PURCHASE_INFORMATION to get the info.•
com.android.vending.billing.PURCHASE_STATE_CHANGEDAnd here comes the detailed information about the purchase. It includes a nonce, a list of orders, with product identifiers, their states, and so on.
The sequence in the purchase will be as follows:
1. We send
REQUEST_PURCHASE2. We get a synchronous answer
3. Launch the Shopping Activity (also built into the Market app)
4. We receive asynchronous message
IN_APP_NOTIFY5.
GET_PURCHASE_INFORMATION6. We get a synchronous answer
7. We receive the asynchronous answer
PURCHASE_STATE_CHANGED8. Ship
CONFIRM_NOTIFICATIONS9. We get a synchronous answer
Or maybe look better at the code?
So, the main points in the code:
1. Connect to the market.
In onCreate () in BillingService we write:
try {
boolean bindResult = getApplicationContext().bindService(
new Intent( "com.android.vending.billing.MarketBillingService.BIND" ),
this ,
Context.BIND_AUTO_CREATE);
if (bindResult) {
Log.i(TAG, "Service bind successful." );
} else {
Log.e(TAG, "Could not bind to the MarketBillingService." );
}
} catch (SecurityException e) {
Log.e(TAG, "Security exception: " + e);
}

// :
@Override
public void onServiceConnected(ComponentName componentName, IBinder iBinder) {
Log.i(TAG, "MarketBillingService connected." );
marketService = IMarketBillingService.Stub.asInterface(iBinder);
runPendingRequests();
}

* This source code was highlighted with Source Code Highlighter .
2. Sending requests.
In the sample application, a class hierarchy has been created for queries, and this is correct. The most important thing about them is deferred shipping. The fact is that bindService happens asynchronously, which means we get the link to MarketBillingService much later than onCreate () ends, and even later than trying to execute queries for the first time. Therefore, we do this:
/**
* Run the request, starting the connection if necessary.
*
* @return this request if the request was not executed in order to queue it.
*/
public final AbstractRequest runRequest() {
if (runIfConnected()) {
return null ;
}
return this ;
}

/**
* Try running the request directly if the service is already connected.
*
* @return true if the request ran successfully; false if the service
* is not connected or there was an error when trying to use it
*/
public boolean runIfConnected() {
if (service.isConnected()) {
try {
requestId = run();
if (requestId >= 0) {
service.addRequest(requestId, this );
}
return true ;
} catch (MyException e) {
onException(e);
}
}
return false ;
}

* This source code was highlighted with Source Code Highlighter .
Returning the request is necessary to remember it in the list of pending requests in the service. Then, when we get a link to MarketBillingService in onServiceConnected (), we will try to send all requests again.
3. UI Alert
In BillingService we will store a link to a certain entity that stores a Handler from our UI. Then upon receiving the answers you can do the following:
private void notifyGui( int messageId, PurchasedItem item) {
if (observer != null ) {
observer.notifyGui(messageId, item);
} else {
// NotificationBar
}
}

* This source code was highlighted with Source Code Highlighter .
Important: do not forget to reset the observer of the service from your Activity when you exit it and restore this link. This is done like this:
@Override
protected void onUserLeaveHint() {
if (billingService != null ) {
unbindService( this );
billingService.resetEventDispatcher();
billingService = null ;
}
super.onUserLeaveHint();
}

@Override
public void onServiceConnected(ComponentName componentName, IBinder iBinder) {
//Connected to BillingService
if (componentName.getShortClassName().equals(serviceClassName)) {
billingService = ((BillingService.LocalBinder) iBinder).getService();
billingService.setObserver( new PurchaseObserver());
try {
billingService.checkBillingAvailability();
} catch (MyException e) {
Log.e(TAG, "Billing unavailable" , e);
Toast.makeText( this , "Billing unavailable" , Toast.LENGTH_LONG).show();
}
}
}

* This source code was highlighted with Source Code Highlighter .
4. Launch an Activity Purchase.
Take a look at the PurchaseObserver class example. There is a public void startBuyPageActivity method (PendingIntent pendingIntent, Intent intent). PendingIntent - this is what we received a response from the market. And Intent is just new Intent ().
What does this method do?
In fact, an instance of your Activity is passed to this class. Further away from her, through reflection, an attempt is made to get the startInstentSender method. This method appeared only in Android 2.0. If it is, then the method is invoked, and the Activity is launched in the Activity stack of our application. If the method is not found, then the Activity starts in a separate stack.
But what about security?
The issue of security is a topic for a separate article, and there are already many. In the sample application, the Security class is responsible for security. I can only say that you need to verify purchases not in the application (as was done in the example), but on your own server, in order not to give the verification logic to the hands of potential owners of apk.
PS Based on developer.android.com/guide/market/billing/billing_overview.html
Source: https://habr.com/ru/post/117944/
All Articles