Introduction to Core Graphics on iOS
I recently discovered that there are no articles on working with Core Graphics in iOS, as well as I did not find similar articles in Russian. The Apple site for developers has documentation on working with 2D graphics in the iOS - Core Graphics Framework Reference, which includes 400 pages of documentation, useful as a reference, but does not give an initial idea of working with views and drawing. So I decided to write an introductory article on working with 2D graphics in iOS.
Cocoa Touch is not known to include AppKit, which provides classes and methods for working with the interface on Mac OS X. Instead of AppKit on the iOS platform, 2D uses the low-level Core Framework Core Graphics framework, which is also part of the Mac OS X SDK, but is used less frequently , since C functions and memory management are not as convenient and flexible as Objective-C classes in AppKit. In addition, it is obvious that when working with Core Graphics, you have to write more code that is more difficult to expand and maintain. In this article, we will create a Custom View and explore the capabilities of the framework.
First we need to create an application and add a Custom View to it, on which we will next draw our objects.
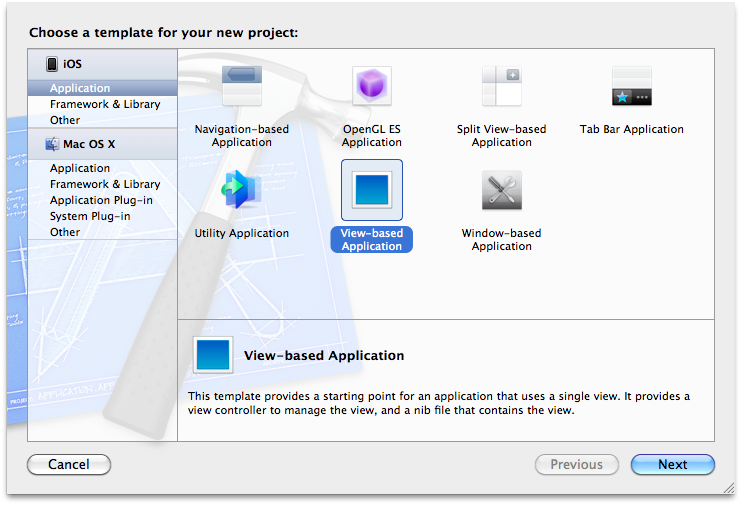
Create an Xcode View-based Application and call it Graphics.
')
Next we add our View (Cmd + N) and call it MyCanvas,

which will be an Objective-C class and a UIView subclass.
All “drawing” happens in the method:
Remember that we never call the -drawRect: method directly. We only implement this method, which is executed when the View is initialized.
To update the content, when we need to update this View or some part of it (aRect), we use the UIView methods.
respectively.
Draw a simple square using the drawRect: method. All drawing takes place in a context, which determines where drawing takes place. To get the context, the C function UIGraphicsGetCurrentContext is used. In iOS, the center of coordinates when drawing is in the upper left corner, and not in the lower left, as in Mac OS X.
There is no need to clear the context in this case, since we will not redraw our graphics, however it is good practice to clear graphic elements before drawing. Please note that after cleaning the View will turn black.
The CGContextSetRGBFillColor function sets the fill color for a given context, and the CGContextFillRect function draws a square.
Now we will launch our application in the simulator (Cmd + R), and as we see, nothing happened. The fact is that we have not created our View and have not added it to the hierarchy.
There are two ways to create a View, including Custom View - Interface Builder and directly using code. As for IB, it's simple, add a UIView element by dragging and set the Custom Class: MyView to it in the Identity Inspector.
To create our View we will manually create it in GraphicsViewController.m:
AddSubview: is used to add a View to the hierarchy. RemoveFromSuperview: is removed from the hierarchy. In this case, the first method is sent to the superview, and the second type, which needs to be deleted.
More information about working with memory will be discussed at the end of the article, here I just note that you need to keep in mind when we release the top view in the hierarchy, we also release all of its subviews, and if we turn to them later, the application will crash.
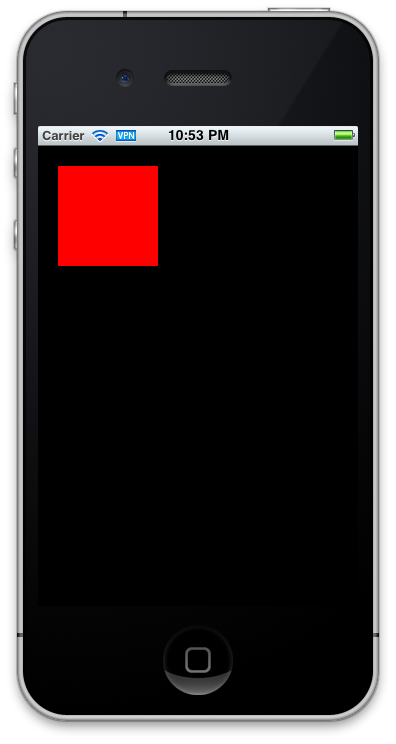
Now, if we launch our application, we will see a red square with indents of 20 points.
When drawing, we use points (pt), not pixels (px), so that the dimensions are the same for Retina and a regular display. Work with pixels is also possible. To determine the type of screen for a specific device, use the property @property CGFloat contentScaleFactor; which returns the “scale” (how many pixels are in a point for a given view on the screen). The value can be 2.0 for retina or 1.0 for a regular screen.
Consider working with other primitives:
1) The circle with blue fill is created by the CGContextFillEllipseInRect method, and fits into the rectangle, so you can create ellipses.
2) A circle without a fill with a green outline and a line thickness of 3, the thickness of the line is specified by the CGContextSetLineWidth method, and a circle without a fill is drawn by the CGContextStrokeEllipseInRect method.
3) A triangle inscribed in a red square is drawn by points from an array.
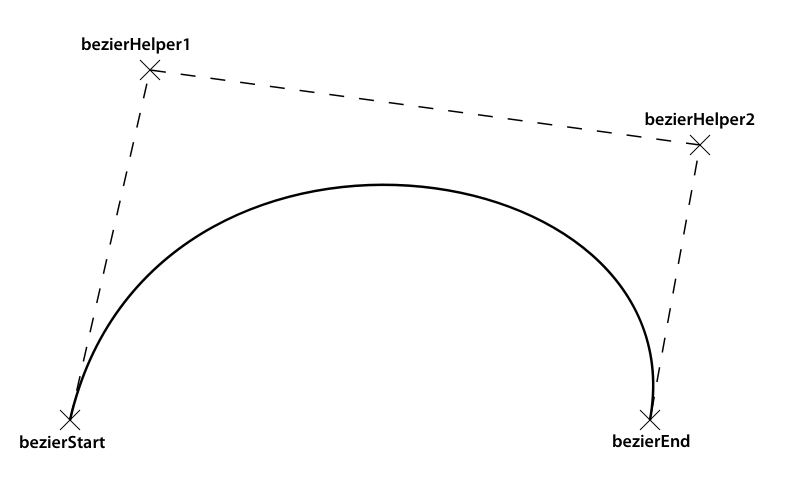
4) Bezier spline. In this case, you need to set the starting and ending points, as well as the coordinates of the points that define the curvature. For those who are not familiar with Bezier curves, a short crash course:
Set points with separate CGpoints so as not to be confused:
Draw a more complex element, for example, a sinusoid:
In the 5th line we added 380 points to shift the function vertically down.
As a result, the screen of our iPhone after launching the application will look like this:

The most convenient way to display text on the screen is to use the UILabel object, which has many methods for converting text. However, there are situations when you need to draw text in the -drawRect method, for example, if we want to rotate the text.
Drawing with Core Graphics:
You can use a UIFont object to select the font, size, display style, metrics. And using the [UIFont familyNames] method, you can get an array of available fonts.
If we want to use UILabel and create it programmatically and not in Interface Builder, we will add the following code to our GraphicsViewController.m:
To release views from memory, do not use [myView release]; Instead, create a releaseOutlets method:
And call this method from viewDidUnload and dealloc:
A slightly weird expression self.myView = nil; in fact, easily explained if you look at the setter that the synthesize myView command synthesizes for us:
If anObject = nil, then the method last line in the method assigns myView to nil, and the previous one releases the current View from memory, which is what we wanted to do.
This is a brief introduction to CoreGraphics, I hope it will be useful to someone.
Links for further study:
View Programming Guide for iOS
Core Graphics Framework Reference
Introduction
Cocoa Touch is not known to include AppKit, which provides classes and methods for working with the interface on Mac OS X. Instead of AppKit on the iOS platform, 2D uses the low-level Core Framework Core Graphics framework, which is also part of the Mac OS X SDK, but is used less frequently , since C functions and memory management are not as convenient and flexible as Objective-C classes in AppKit. In addition, it is obvious that when working with Core Graphics, you have to write more code that is more difficult to expand and maintain. In this article, we will create a Custom View and explore the capabilities of the framework.
Beginning of work
First we need to create an application and add a Custom View to it, on which we will next draw our objects.
Create an Xcode View-based Application and call it Graphics.
')
Next we add our View (Cmd + N) and call it MyCanvas,
which will be an Objective-C class and a UIView subclass.
All “drawing” happens in the method:
- (void)drawRect:(CGRect)rect
{
//
}
Remember that we never call the -drawRect: method directly. We only implement this method, which is executed when the View is initialized.
To update the content, when we need to update this View or some part of it (aRect), we use the UIView methods.
-(void)setNeedsDisplay;
-(void)setNeedsDisplayInRect:(CGRect)aRect;
respectively.
Draw a simple square using the drawRect: method. All drawing takes place in a context, which determines where drawing takes place. To get the context, the C function UIGraphicsGetCurrentContext is used. In iOS, the center of coordinates when drawing is in the upper left corner, and not in the lower left, as in Mac OS X.
- (void)drawRect:(CGRect)rect
{
// context
CGContextRef context = UIGraphicsGetCurrentContext();
CGContextClearRect(context, rect); // context

CGContextSetRGBFillColor(context, 255, 0, 0, 1);
CGContextFillRect(context, CGRectMake(20, 20, 100, 100));
}
There is no need to clear the context in this case, since we will not redraw our graphics, however it is good practice to clear graphic elements before drawing. Please note that after cleaning the View will turn black.
The CGContextSetRGBFillColor function sets the fill color for a given context, and the CGContextFillRect function draws a square.
Now we will launch our application in the simulator (Cmd + R), and as we see, nothing happened. The fact is that we have not created our View and have not added it to the hierarchy.
There are two ways to create a View, including Custom View - Interface Builder and directly using code. As for IB, it's simple, add a UIView element by dragging and set the Custom Class: MyView to it in the Identity Inspector.
To create our View we will manually create it in GraphicsViewController.m:
- (void)viewDidLoad
{
[super viewDidLoad];
MyCanvas *myView = [[MyCanvas alloc] initWithFrame:self.view.bounds];
[self.view addSubview:myView];
}
AddSubview: is used to add a View to the hierarchy. RemoveFromSuperview: is removed from the hierarchy. In this case, the first method is sent to the superview, and the second type, which needs to be deleted.
More information about working with memory will be discussed at the end of the article, here I just note that you need to keep in mind when we release the top view in the hierarchy, we also release all of its subviews, and if we turn to them later, the application will crash.
Now, if we launch our application, we will see a red square with indents of 20 points.
When drawing, we use points (pt), not pixels (px), so that the dimensions are the same for Retina and a regular display. Work with pixels is also possible. To determine the type of screen for a specific device, use the property @property CGFloat contentScaleFactor; which returns the “scale” (how many pixels are in a point for a given view on the screen). The value can be 2.0 for retina or 1.0 for a regular screen.
Consider working with other primitives:
1) The circle with blue fill is created by the CGContextFillEllipseInRect method, and fits into the rectangle, so you can create ellipses.
CGContextSetRGBFillColor(context, 0, 0, 255, 1);
CGContextFillEllipseInRect(context, CGRectMake(30, 140, 80, 80));
2) A circle without a fill with a green outline and a line thickness of 3, the thickness of the line is specified by the CGContextSetLineWidth method, and a circle without a fill is drawn by the CGContextStrokeEllipseInRect method.
CGContextSetRGBStrokeColor(context, 0, 255, 0, 1);
CGContextSetLineWidth(context, 3.0);
CGRect circleRect = CGRectMake(140, 20, 100, 100);
CGContextStrokeEllipseInRect(context, circleRect);
3) A triangle inscribed in a red square is drawn by points from an array.
CGContextSetRGBStrokeColor(context, 255, 0, 255, 1);
CGPoint points[6] = {CGPointMake(70, 20), CGPointMake(120, 120),
CGPointMake(120, 120), CGPointMake(20, 120),
CGPointMake(20, 120), CGPointMake(70, 20)};
CGContextStrokeLineSegments(context, points, 6);
4) Bezier spline. In this case, you need to set the starting and ending points, as well as the coordinates of the points that define the curvature. For those who are not familiar with Bezier curves, a short crash course:
Set points with separate CGpoints so as not to be confused:
CGPoint bezierStart = {20, 260};
CGPoint bezierEnd = {300, 260};
CGPoint bezierHelper1 = {80, 320};
CGPoint bezierHelper2 = {240, 320};
CGContextBeginPath(context);
CGContextMoveToPoint(context, bezierStart.x, bezierStart.y);
CGContextAddCurveToPoint(context,
bezierHelper1.x, bezierHelper1.y,
bezierHelper2.x, bezierHelper2.y,
bezierEnd.x, bezierEnd.y);
CGContextStrokePath(context);
Draw a more complex element, for example, a sinusoid:
CGContextSetRGBStrokeColor(context, 255, 255, 255, 1);
int y;
for(int x=rect.origin.x; x < rect.size.width; x++)
{
y = ((rect.size.height/6) * sin(((x*4) % 360) * M_PI/180)) + 380;
if (x == 0) CGContextMoveToPoint(context, x, y);
else CGContextAddLineToPoint(context, x, y);
}
CGContextStrokePath(context);
In the 5th line we added 380 points to shift the function vertically down.
As a result, the screen of our iPhone after launching the application will look like this:
Work with text
The most convenient way to display text on the screen is to use the UILabel object, which has many methods for converting text. However, there are situations when you need to draw text in the -drawRect method, for example, if we want to rotate the text.
Drawing with Core Graphics:
char *txt = "My CG text"; // ,
CGContextSelectFont(context, "Helvetica", 18.0, kCGEncodingMacRoman); //
CGContextSetTextDrawingMode(context, kCGTextFill); // : kCGTextFill () kCGTextStroke ()
CGContextShowTextAtPoint(context, 20, 280, txt, strlen(txt)); //
You can use a UIFont object to select the font, size, display style, metrics. And using the [UIFont familyNames] method, you can get an array of available fonts.
If we want to use UILabel and create it programmatically and not in Interface Builder, we will add the following code to our GraphicsViewController.m:
UILabel *scaleNumber = [[UILabel alloc] initWithFrame:CGRectMake(160, 140, 140, 21)]; // , View
scaleNumber.textColor = [UIColor yellowColor]; //
scaleNumber.backgroundColor = [UIColor colorWithWhite:0 alpha:0]; // , ( )
scaleNumber.text = @"Vitaly Ishkulov"; //-
scaleNumber.adjustsFontSizeToFitWidth = YES; // , , , ( , )
[myView addSubview:scaleNumber]; // View
[scaleNumber release]; // , / myView
Conclusion and a few words about working with memory
To release views from memory, do not use [myView release]; Instead, create a releaseOutlets method:
- (void)releaseOutlets {
self.myView = nil;
}
And call this method from viewDidUnload and dealloc:
- (void)viewDidUnload
{
[super viewDidUnload];
[self releaseOutlets];
// Release any retained subviews of the main view.
// eg self.myOutlet = nil;
}
- (void)dealloc
{
[self releaseOutlets];
[super dealloc];
}A slightly weird expression self.myView = nil; in fact, easily explained if you look at the setter that the synthesize myView command synthesizes for us:
- (void)setMyView:(MyCanvas *)anObject
{
if (anObject != myView) {
[myView release];
myView = [anObject retain];
}
}
If anObject = nil, then the method last line in the method assigns myView to nil, and the previous one releases the current View from memory, which is what we wanted to do.
This is a brief introduction to CoreGraphics, I hope it will be useful to someone.
Links for further study:
View Programming Guide for iOS
Core Graphics Framework Reference
Source: https://habr.com/ru/post/117824/
All Articles