Comparing images and generating picture differences in ruby
Surely you've seen the new image viewing modes that Github rolled out last month. This is a really neat way to show the difference between two versions of a picture. In this article I will try to explain how you can easily compare images using only Ruby and ChunkyPNG .
In the simplest version, the search for differences comes down to traversing each pixel in the first picture and checking if this pixel is in the second one. The implementation might look something like this:
After loading two images, we go around each pixel in the first one, and if it is present in the second, we add it to the
')


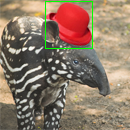
Works! In the final image there is a frame around the hat, which we added to the photo and as a result we see that almost 9% of the pixels in the photo have changed their meaning.
The problem with this approach is that it only identifies changes without measuring them. There is no difference, the pixel has become only a bit darker, or it has a completely different color. If we apply this code to a slightly darkened version of the photo, the result will look like this:


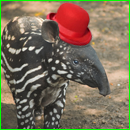
It turns out that the two photos are completely different, although by eye they are almost the same. To get a more accurate result, we need to measure the difference between the pixel values.
As before, we go through all the pixels in the images. If they are different, then we apply the ΔE * metric and store the result in the
Now we have a more accurate picture of the differences. If you look at the result, you will see that less than 3% of the photo has changed.
Again, we save the result - and this time it already shows differences in shades of gray. Stronger changes are darker in color.


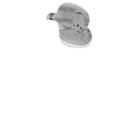
And now let's try those two images in which the second was slightly darker.


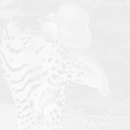
Fine. Now our program knows that the photos are only slightly different, and not completely different. If you look closely, you can even see the specific areas where the image is different.
Using this method, the comparison of two photos on the left gives a picture of the differences in the image on the right, clearly showing the changes:


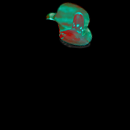
Since colors are compared by channels (R, G, and B) instead of one color, three values are returned. This means that the resulting picture is color, but such a comparison for each channel separately may adversely affect the accuracy of the result.
In the simplest version, the search for differences comes down to traversing each pixel in the first picture and checking if this pixel is in the second one. The implementation might look something like this:
require 'chunky_png' images = [ ChunkyPNG::Image.from_file('1.png'), ChunkyPNG::Image.from_file('2.png') ] diff = [] images.first.height.times do |y| images.first.row(y).each_with_index do |pixel, x| diff << [x,y] unless pixel == images.last[x,y] end end puts "pixels (total): #{images.first.pixels.length}" puts "pixels changed: #{diff.length}" puts "pixels changed (%): #{(diff.length.to_f / images.first.pixels.length) * 100}%" x, y = diff.map{ |xy| xy[0] }, diff.map{ |xy| xy[1] } images.last.rect(x.min, y.min, x.max, y.max, ChunkyPNG::Color.rgb(0,255,0)) images.last.save('diff.png') After loading two images, we go around each pixel in the first one, and if it is present in the second, we add it to the
diff array. After that, draw a frame around the area in which there are differences:')

Works! In the final image there is a frame around the hat, which we added to the photo and as a result we see that almost 9% of the pixels in the photo have changed their meaning.
pixels (total): 16900
pixels changed: 1502
pixels changed (%): 8.887573964497042%
The problem with this approach is that it only identifies changes without measuring them. There is no difference, the pixel has become only a bit darker, or it has a completely different color. If we apply this code to a slightly darkened version of the photo, the result will look like this:

pixels (total): 16900
pixels changed: 16900
pixels changed (%): 100.0%
It turns out that the two photos are completely different, although by eye they are almost the same. To get a more accurate result, we need to measure the difference between the pixel values.
Calculating color difference
To calculate the differences in color, we will use the ΔE * (“Delta E”) metric. There are three different formulas for this metric, but we will take the first one ( CIE76 ), because it is the simplest, and we don’t need something abstruse. The metric ΔE * was created for the color space LAB , which corresponds most closely to human vision. In this example, we will not convert colors to LAB, but simply work in the RGB color space (note that this means that our results will not be as accurate). If you are interested in how different color spaces differ, see this demo .As before, we go through all the pixels in the images. If they are different, then we apply the ΔE * metric and store the result in the
diff array. We also apply this result to calculate the gray value that will be used in the final comparative image. require 'chunky_png' include ChunkyPNG::Color images = [ ChunkyPNG::Image.from_file('1.png'), ChunkyPNG::Image.from_file('2.png') ] output = ChunkyPNG::Image.new(images.first.width, images.last.width, WHITE) diff = [] images.first.height.times do |y| images.first.row(y).each_with_index do |pixel, x| unless pixel == images.last[x,y] score = Math.sqrt( (r(images.last[x,y]) - r(pixel)) ** 2 + (g(images.last[x,y]) - g(pixel)) ** 2 + (b(images.last[x,y]) - b(pixel)) ** 2 ) / Math.sqrt(MAX ** 2 * 3) output[x,y] = grayscale(MAX - (score * MAX).round) diff << score end end end puts "pixels (total): #{images.first.pixels.length}" puts "pixels changed: #{diff.length}" puts "image changed (%): #{(diff.inject {|sum, value| sum + value} / images.first.pixels.length) * 100}%" output.save('diff.png') Code: Gist .Now we have a more accurate picture of the differences. If you look at the result, you will see that less than 3% of the photo has changed.
pixels (total): 16900
pixels changed: 1502
image changed (%): 2.882157784948056%
Again, we save the result - and this time it already shows differences in shades of gray. Stronger changes are darker in color.

And now let's try those two images in which the second was slightly darker.
pixels (total): 16900
pixels changed: 16900
image changed (%): 5.4418255392228945%
Fine. Now our program knows that the photos are only slightly different, and not completely different. If you look closely, you can even see the specific areas where the image is different.
What does Github do?
Github uses the tone difference mode , which is familiar from photo editors such as Photoshop. This is a fairly simple method. We go around each pixel in two images and calculate their difference over the RGB channels: require 'chunky_png' include ChunkyPNG::Color images = [ ChunkyPNG::Image.from_file('1.png'), ChunkyPNG::Image.from_file('2.png') ] images.first.height.times do |y| images.first.row(y).each_with_index do |pixel, x| images.last[x,y] = rgb( r(pixel) + r(images.last[x,y]) - 2 * [r(pixel), r(images.last[x,y])].min, g(pixel) + g(images.last[x,y]) - 2 * [g(pixel), g(images.last[x,y])].min, b(pixel) + b(images.last[x,y]) - 2 * [b(pixel), b(images.last[x,y])].min ) end end images.last.save('diff.png') Code: Gist .Using this method, the comparison of two photos on the left gives a picture of the differences in the image on the right, clearly showing the changes:

Since colors are compared by channels (R, G, and B) instead of one color, three values are returned. This means that the resulting picture is color, but such a comparison for each channel separately may adversely affect the accuracy of the result.
Source: https://habr.com/ru/post/117789/
All Articles