Create an application for Windows Phone 7 from start to finish. Part 4. Creating a new project, adding pages
Previous part
After you have created the thumbnails for the pages of your application and have determined the navigation paths, you can start creating the application in Visual Studio 2010 Express for Windows Phone.
In this part you will learn:
')

After you create a project, Solution Explorer will look like the following image.
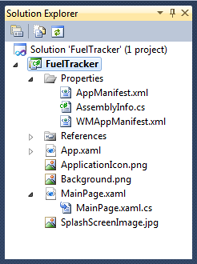
The Silverlight for Windows Phone project contains the following files:
Windows Phone apps are based on the Silverlight page model, where users can navigate between screens that display different content. To create each screen of your application, as a rule, a separate page is created.
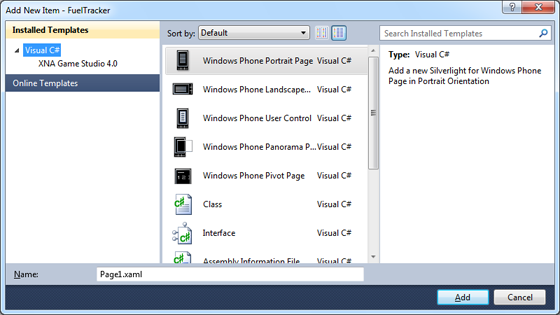
You can add pages to your project using the Add New Item dialog box.
When you create a new Windows Phone Application project in Visual Studio, a standard start page with the name MainPage is created automatically. You can move or rename this page, but if you do this, you should also change the NavigationPage property of the DefaultTask element in the WMAppManifest.xml file.
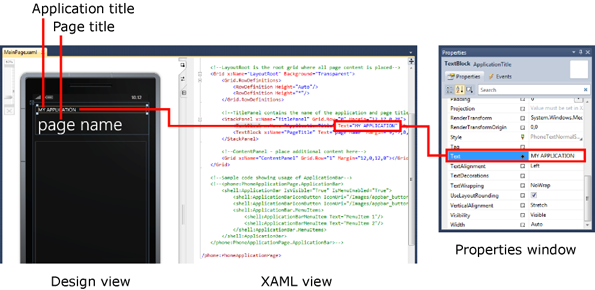
By default, the page has the name of the application and the name of the page. The page title is an additional non-scrollable title for the page. You can change these names in the XAML view or in the Properties window.
To add title information:
The application name in the title bar must be in upper case. Use all lowercase letters for most of the rest of the text in the application, including page headings and list names.
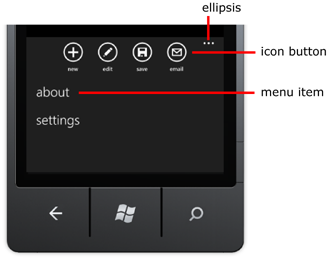
The application bar is a good place to display common tasks or navigation tools that are always visible, regardless of whether the page is scrolled or the on-screen keyboard is displayed. In the application bar you can use the ApplicationBarIconButton and ApplicationBarMenuItem controls. You should use buttons for the most common tasks and menus for less common tasks or tasks that are difficult to clearly express with the help of the icon. You are limited to four buttons on the application bar and five five menu items. The following image shows an example of an application bar in an expanded state.
Interface Design Recommendation:
Use the application bar to perform common application tasks. Put less frequently performed actions in the application panel menu.
When creating new pages, the XAML file automatically includes a commented out section that you can use to quickly add an application bar.
To add an application bar:
In the application panel, any text you add is automatically displayed in lower case.
There are several application bar icons that are installed along with the Windows Phone Developer Tools . You can find these icons in one of the following places:

Below is shown how the icons of the application bar look like with a dark and light theme.
To add an icon to the application bar:
Next part
After you have created the thumbnails for the pages of your application and have determined the navigation paths, you can start creating the application in Visual Studio 2010 Express for Windows Phone.
In this part you will learn:
- How to create a new Windows Phone project in Visual Studio.
- How to add new pages to your application.
- How to set page properties.
- How to add a panel application.
- How to add application bar icons.
')
Creating a new Silverlight project for Windows Phone
- Make sure you have Windows Phone Developer Tools installed.
- In Visual Studio, create a new project.
- In the New Project dialog box , select Silverlight for Windows Phone , and then select the project template.
After you create a project, Solution Explorer will look like the following image.
The Silverlight for Windows Phone project contains the following files:
| Project file | Description |
|---|---|
| AppManifest.xml | This is the application manifest file required to create an application package. As a rule, there is no need to edit this file. |
| AssemblyInfo.cs | This file contains build information such as the name and version of the metadata. |
| WMAppManifest.xml | This is the application manifest file that contains the mobile application metadata. This file is mainly used in the process of publishing an application in the Windows Phone Marketplace. |
| App files | These files are used to define application-level logic. The App class is required to display the user interface. |
| MainPage.xaml | This is the file of the standard start page used to create the user interface. |
| MainPage.xaml.cs | This code-behind (separated code) file contains the logic for the standard start page. The MainPage class is derived from PhoneApplicationPage. |
| ApplicationIcon.png Background.png SplashScreenImage.jpg | The default icon and image files that you can later replace. |
Adding new pages
Windows Phone apps are based on the Silverlight page model, where users can navigate between screens that display different content. To create each screen of your application, as a rule, a separate page is created.
You can add pages to your project using the Add New Item dialog box.
When you create a new Windows Phone Application project in Visual Studio, a standard start page with the name MainPage is created automatically. You can move or rename this page, but if you do this, you should also change the NavigationPage property of the DefaultTask element in the WMAppManifest.xml file.
Setting page properties
By default, the page has the name of the application and the name of the page. The page title is an additional non-scrollable title for the page. You can change these names in the XAML view or in the Properties window.
To add title information:
- In design mode, select the application name or page name.
- In the XAML view mode or in the Properties window, change the Text property.
The application name in the title bar must be in upper case. Use all lowercase letters for most of the rest of the text in the application, including page headings and list names.
Adding an application bar
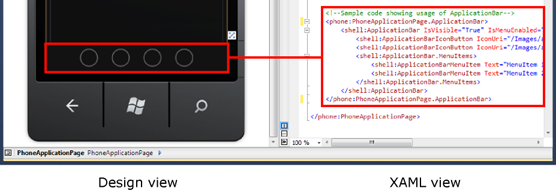
The application bar is a good place to display common tasks or navigation tools that are always visible, regardless of whether the page is scrolled or the on-screen keyboard is displayed. In the application bar you can use the ApplicationBarIconButton and ApplicationBarMenuItem controls. You should use buttons for the most common tasks and menus for less common tasks or tasks that are difficult to clearly express with the help of the icon. You are limited to four buttons on the application bar and five five menu items. The following image shows an example of an application bar in an expanded state.
Interface Design Recommendation:
Use the application bar to perform common application tasks. Put less frequently performed actions in the application panel menu.
When creating new pages, the XAML file automatically includes a commented out section that you can use to quickly add an application bar.
To add an application bar:
- In the XAML view, uncomment the Application Bar.
- Change the buttons, menu items and text as you like.
Tip:< phone:PhoneApplicationPage.ApplicationBar > < shell:ApplicationBar IsVisible ="True" IsMenuEnabled ="True" > < shell:ApplicationBarIconButton IconUri ="/Images/fillup.png" Text ="add fill-up" Click ="FillupButton_Click" IsEnabled ="False" /> < shell:ApplicationBarIconButton IconUri ="/Images/car.png" Text ="add car" Click ="CarButton_Click" /> </ shell:ApplicationBar > </ phone:PhoneApplicationPage.ApplicationBar > * This source code was highlighted with Source Code Highlighter .
< phone:PhoneApplicationPage.ApplicationBar > < shell:ApplicationBar IsVisible ="True" IsMenuEnabled ="True" > < shell:ApplicationBarIconButton IconUri ="/Images/fillup.png" Text ="add fill-up" Click ="FillupButton_Click" IsEnabled ="False" /> < shell:ApplicationBarIconButton IconUri ="/Images/car.png" Text ="add car" Click ="CarButton_Click" /> </ shell:ApplicationBar > </ phone:PhoneApplicationPage.ApplicationBar > * This source code was highlighted with Source Code Highlighter .< phone:PhoneApplicationPage.ApplicationBar > < shell:ApplicationBar IsVisible ="True" IsMenuEnabled ="True" > < shell:ApplicationBarIconButton IconUri ="/Images/fillup.png" Text ="add fill-up" Click ="FillupButton_Click" IsEnabled ="False" /> < shell:ApplicationBarIconButton IconUri ="/Images/car.png" Text ="add car" Click ="CarButton_Click" /> </ shell:ApplicationBar > </ phone:PhoneApplicationPage.ApplicationBar > * This source code was highlighted with Source Code Highlighter .< phone:PhoneApplicationPage.ApplicationBar > < shell:ApplicationBar IsVisible ="True" IsMenuEnabled ="True" > < shell:ApplicationBarIconButton IconUri ="/Images/fillup.png" Text ="add fill-up" Click ="FillupButton_Click" IsEnabled ="False" /> < shell:ApplicationBarIconButton IconUri ="/Images/car.png" Text ="add car" Click ="CarButton_Click" /> </ shell:ApplicationBar > </ phone:PhoneApplicationPage.ApplicationBar > * This source code was highlighted with Source Code Highlighter .< phone:PhoneApplicationPage.ApplicationBar > < shell:ApplicationBar IsVisible ="True" IsMenuEnabled ="True" > < shell:ApplicationBarIconButton IconUri ="/Images/fillup.png" Text ="add fill-up" Click ="FillupButton_Click" IsEnabled ="False" /> < shell:ApplicationBarIconButton IconUri ="/Images/car.png" Text ="add car" Click ="CarButton_Click" /> </ shell:ApplicationBar > </ phone:PhoneApplicationPage.ApplicationBar > * This source code was highlighted with Source Code Highlighter .< phone:PhoneApplicationPage.ApplicationBar > < shell:ApplicationBar IsVisible ="True" IsMenuEnabled ="True" > < shell:ApplicationBarIconButton IconUri ="/Images/fillup.png" Text ="add fill-up" Click ="FillupButton_Click" IsEnabled ="False" /> < shell:ApplicationBarIconButton IconUri ="/Images/car.png" Text ="add car" Click ="CarButton_Click" /> </ shell:ApplicationBar > </ phone:PhoneApplicationPage.ApplicationBar > * This source code was highlighted with Source Code Highlighter .< phone:PhoneApplicationPage.ApplicationBar > < shell:ApplicationBar IsVisible ="True" IsMenuEnabled ="True" > < shell:ApplicationBarIconButton IconUri ="/Images/fillup.png" Text ="add fill-up" Click ="FillupButton_Click" IsEnabled ="False" /> < shell:ApplicationBarIconButton IconUri ="/Images/car.png" Text ="add car" Click ="CarButton_Click" /> </ shell:ApplicationBar > </ phone:PhoneApplicationPage.ApplicationBar > * This source code was highlighted with Source Code Highlighter .< phone:PhoneApplicationPage.ApplicationBar > < shell:ApplicationBar IsVisible ="True" IsMenuEnabled ="True" > < shell:ApplicationBarIconButton IconUri ="/Images/fillup.png" Text ="add fill-up" Click ="FillupButton_Click" IsEnabled ="False" /> < shell:ApplicationBarIconButton IconUri ="/Images/car.png" Text ="add car" Click ="CarButton_Click" /> </ shell:ApplicationBar > </ phone:PhoneApplicationPage.ApplicationBar > * This source code was highlighted with Source Code Highlighter .< phone:PhoneApplicationPage.ApplicationBar > < shell:ApplicationBar IsVisible ="True" IsMenuEnabled ="True" > < shell:ApplicationBarIconButton IconUri ="/Images/fillup.png" Text ="add fill-up" Click ="FillupButton_Click" IsEnabled ="False" /> < shell:ApplicationBarIconButton IconUri ="/Images/car.png" Text ="add car" Click ="CarButton_Click" /> </ shell:ApplicationBar > </ phone:PhoneApplicationPage.ApplicationBar > * This source code was highlighted with Source Code Highlighter .< phone:PhoneApplicationPage.ApplicationBar > < shell:ApplicationBar IsVisible ="True" IsMenuEnabled ="True" > < shell:ApplicationBarIconButton IconUri ="/Images/fillup.png" Text ="add fill-up" Click ="FillupButton_Click" IsEnabled ="False" /> < shell:ApplicationBarIconButton IconUri ="/Images/car.png" Text ="add car" Click ="CarButton_Click" /> </ shell:ApplicationBar > </ phone:PhoneApplicationPage.ApplicationBar > * This source code was highlighted with Source Code Highlighter .
In the application panel, any text you add is automatically displayed in lower case.
Application bar icons
There are several application bar icons that are installed along with the Windows Phone Developer Tools . You can find these icons in one of the following places:
- On 32-bit operating systems: C: \ Program Files \ Microsoft SDKs \ Windows Phone \ v7.0 \ Icons
- On 64-bit operating systems: C: \ Program Files (x86) \ Microsoft SDKs \ Windows Phone \ v7.0 \ Icons
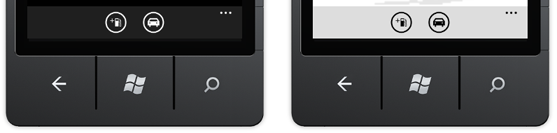
- Size 48 pixels by 48 pixels.
- Should be white on a transparent background.
- It does not include a circle image, as it is displayed by the application panel.
Below is shown how the icons of the application bar look like with a dark and light theme.
To add an icon to the application bar:
- Add file icons to the project and set the Build Action to Content .
- In XAML code, set the IconUri property for the ApplicationBarIconButton element to the relative URI of the image, as shown in the following snippet.
* This source code was highlighted with Source Code Highlighter .
- < shell: ApplicationBarIconButton IconUri = "/ Images / appbar.save.rest.png"
- Text = "Save Car" Click = "SaveButton_Click" />
Next part
Source: https://habr.com/ru/post/117574/
All Articles