Voice translator for Mac OS X
In the recent past, only in science fiction films one could see the “miracle of the box” in which one speaks, and as a result one hears the translation of what was said in another language. But progress is underway ...
I have been waiting for a long time for Google to open the API of its speech recognition service (the company uses it in its products). A few months ago I turned over “this is your Internet,” but to no avail. And the other day I see a topic on Habré. Use Google Voice Search in your .NET application ! I was incredibly happy. The topic refers to the original Accessing Google speech API / Chrome 11 article. All carefully studied and "scratched" the source code of Chrome.
Google Speech Recognition API is still unofficial and has become available to the public thanks to the Chrome browser.
')
The options for its use are truly endless. And if you combine this with the morphological modules, then you can freak out just the freaky affairs in the field of voice control.
To demonstrate and create a “frame engine” (for my further needs), I made a “Voice Translator” for Mac OS X in a couple of days. This is a symbiosis of technologies Google, Microsoft (pronunciation) and the open project ffmpeg (conversion to flac). This is a voice translator - no typing. Just say the phrase and listen to its translation. Yes, the quality of recognition may not be perfect, but on short, clear phrases it is quite acceptable.
Here is the video of the program:
As usual, I will divide this topic into two parts. One for ordinary users who want to "play around" with this program. Another for developers (I will provide the source code of the base project).
You can download the program here (Mac OS X 10.6+).
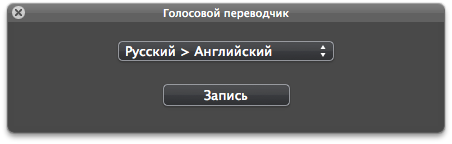
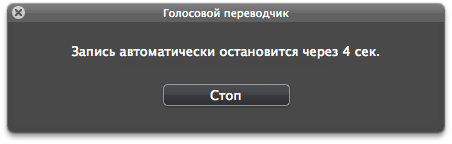
The program interface is very simple. Choose the right language direction (in this demonstration project I made only two directions, but the services support a much larger number of languages). Click the "Record" button and say the phrase. Recording will automatically stop after 5 seconds or you can stop it yourself. Everything - listen to the translation :).
Source code on github .
The project uses the already assembled ffmpeg binary converter to convert the recorded sound into flac. If you want to transfer the project to iOS, you can use the static library from the libFlac project.
For the HUD interface, the project uses the already assembled BGHUDAppKit framework .
JSON framework is used for processing JSON.
Additionally (for simplicity) some classes from the Google Data API are used .
Sound is recorded using the standard QTKit library (QuickTime Kit).
Here is the initialization code for the audio data capture session:
Now, to start writing to the file we are performing:
To finish recording:
After we receive the sound file, we convert it to flac format using ffmpeg:
After conversion, we start the recognition process. It is implemented in a separate GoogleASR class. An object of this class sends a request (asynchronously) to https://www.google.com/speech-api/v1/recognize , processes the result and informs the delegate of the recognition content or informs about the error. The processing of the response from the server is very correct - it is completely (algorithm) copied from the Chrome browser. There is only one main method in the class:
Next, we pass the recognized text to the GoogleTranslate class object. It translates the text and tells the delegate the result of the translation or informs about the error. The main method:
Next comes the object of the MicrosoftTTS class. It receives audio data and sends it to the delegate or informs about the error. The main method:
Do not forget to get your Bing AppID from Microsoft (this is done for free) and insert it into the MicrosoftTTS class, into SpeechURL.
Experiment!
I have been waiting for a long time for Google to open the API of its speech recognition service (the company uses it in its products). A few months ago I turned over “this is your Internet,” but to no avail. And the other day I see a topic on Habré. Use Google Voice Search in your .NET application ! I was incredibly happy. The topic refers to the original Accessing Google speech API / Chrome 11 article. All carefully studied and "scratched" the source code of Chrome.
Google Speech Recognition API is still unofficial and has become available to the public thanks to the Chrome browser.
')
The options for its use are truly endless. And if you combine this with the morphological modules, then you can freak out just the freaky affairs in the field of voice control.
To demonstrate and create a “frame engine” (for my further needs), I made a “Voice Translator” for Mac OS X in a couple of days. This is a symbiosis of technologies Google, Microsoft (pronunciation) and the open project ffmpeg (conversion to flac). This is a voice translator - no typing. Just say the phrase and listen to its translation. Yes, the quality of recognition may not be perfect, but on short, clear phrases it is quite acceptable.
Here is the video of the program:
As usual, I will divide this topic into two parts. One for ordinary users who want to "play around" with this program. Another for developers (I will provide the source code of the base project).
FOR USERS
You can download the program here (Mac OS X 10.6+).
The program interface is very simple. Choose the right language direction (in this demonstration project I made only two directions, but the services support a much larger number of languages). Click the "Record" button and say the phrase. Recording will automatically stop after 5 seconds or you can stop it yourself. Everything - listen to the translation :).
FOR DEVELOPERS
Source code on github .
The project uses the already assembled ffmpeg binary converter to convert the recorded sound into flac. If you want to transfer the project to iOS, you can use the static library from the libFlac project.
For the HUD interface, the project uses the already assembled BGHUDAppKit framework .
JSON framework is used for processing JSON.
Additionally (for simplicity) some classes from the Google Data API are used .
SOUND RECORDING
Sound is recorded using the standard QTKit library (QuickTime Kit).
Here is the initialization code for the audio data capture session:
BOOL success = NO ;<br/>
<br/>
mCaptureSession = [ [ QTCaptureSession alloc ] init ] ;<br/>
<br/>
QTCaptureDevice * audioDevice = [ QTCaptureDevice defaultInputDeviceWithMediaType : QTMediaTypeSound ] ;<br/>
<br/>
if ( ! audioDevice ) <br/>
{ <br/>
[ mCaptureSession release ] , mCaptureSession = nil ;<br/>
<br/>
[ textLabel setStringValue : NSLocalizedString ( @ "AudioError" , @ "" ) ] ;<br/>
[ button setHidden : YES ] ;<br/>
[ popUp setHidden : YES ] ;<br/>
[ textLabel setHidden : NO ] ;<br/>
} <br/>
<br/>
success = [ audioDevice open : NULL ] ;<br/>
<br/>
if ( ! success ) <br/>
{ <br/>
[ mCaptureSession release ] , mCaptureSession = nil ;<br/>
<br/>
[ textLabel setStringValue : NSLocalizedString ( @ "AudioError" , @ "" ) ] ;<br/>
[ button setHidden : YES ] ;<br/>
[ popUp setHidden : YES ] ;<br/>
[ textLabel setHidden : NO ] ;<br/>
} <br/>
<br/>
mCaptureAudioDeviceInput = [ [ QTCaptureDeviceInput alloc ] initWithDevice : audioDevice ] ;<br/>
success = [ mCaptureSession addInput : mCaptureAudioDeviceInput error : NULL ] ;<br/>
<br/>
if ( ! success ) <br/>
{ <br/>
[ mCaptureSession release ] , mCaptureSession = nil ;<br/>
[ mCaptureAudioDeviceInput release ] , mCaptureAudioDeviceInput = nil ;<br/>
<br/>
[ textLabel setStringValue : NSLocalizedString ( @ "AudioError" , @ "" ) ] ;<br/>
[ button setHidden : YES ] ;<br/>
[ popUp setHidden : YES ] ;<br/>
[ textLabel setHidden : NO ] ;<br/>
} <br/>
<br/>
mCaptureMovieFileOutput = [ [ QTCaptureMovieFileOutput alloc ] init ] ;<br/>
success = [ mCaptureSession addOutput : mCaptureMovieFileOutput error : NULL ] ;<br/>
<br/>
if ( ! success ) <br/>
{ <br/>
[ mCaptureSession release ] , mCaptureSession = nil ;<br/>
[ mCaptureAudioDeviceInput release ] , mCaptureAudioDeviceInput = nil ;<br/>
[ mCaptureMovieFileOutput release ] , mCaptureMovieFileOutput = nil ;<br/>
<br/>
//error handler <br/>
} <br/>
<br/>
[ mCaptureMovieFileOutput setDelegate : self ] ;<br/>
<br/>
[ mCaptureMovieFileOutput setCompressionOptions : [ QTCompressionOptions compressionOptionsWithIdentifier : @ "QTCompressionOptionsHighQualityAACAudio" ] forConnection : [ [ mCaptureMovieFileOutput connections ] objectAtIndex : 0 ] ] ;<br/>
<br/>
[ mCaptureSession startRunning ] ; <br/>
Now, to start writing to the file we are performing:
[ mCaptureMovieFileOutput recordToOutputFileURL : path ] ;To finish recording:
[ mCaptureMovieFileOutput recordToOutputFileURL : nil ] ;CONVERSION
After we receive the sound file, we convert it to flac format using ffmpeg:
NSTask * aTask = [ [ NSTask alloc ] init ] ;<br/>
NSMutableArray * args = [ NSMutableArray array ] ;<br/>
<br/>
[ args addObject : @ "-i" ] ;<br/>
[ args addObject : @ "record.m4a" ] ;<br/>
[ args addObject : @ "-acodec" ] ;<br/>
[ args addObject : @ "flac" ] ;<br/>
[ args addObject : @ "-ac" ] ;<br/>
[ args addObject : @ "1" ] ;<br/>
[ args addObject : @ "-ar" ] ;<br/>
[ args addObject : @ "16000" ] ;<br/>
[ args addObject : @ "record.flac" ] ;<br/>
[ aTask setCurrentDirectoryPath : recordPath ] ;<br/>
[ aTask setLaunchPath : [ [ [ NSBundle mainBundle ] resourcePath ] stringByAppendingPathComponent : @ "ffmpeg" ] ] ;<br/>
[ aTask setArguments : args ] ;<br/>
[ aTask launch ] ;<br/>
[ aTask waitUntilExit ] ;<br/>
[ aTask release ] ;
COMMUNICATION WITH NETWORK SERVICE
After conversion, we start the recognition process. It is implemented in a separate GoogleASR class. An object of this class sends a request (asynchronously) to https://www.google.com/speech-api/v1/recognize , processes the result and informs the delegate of the recognition content or informs about the error. The processing of the response from the server is very correct - it is completely (algorithm) copied from the Chrome browser. There is only one main method in the class:
- ( void ) speechRecognition : ( NSString * ) flacPath language : ( NSString * ) languageNext, we pass the recognized text to the GoogleTranslate class object. It translates the text and tells the delegate the result of the translation or informs about the error. The main method:
- ( void ) translate : ( NSString * ) text from : ( NSString * ) inLanguage to : ( NSString * ) outLanguageNext comes the object of the MicrosoftTTS class. It receives audio data and sends it to the delegate or informs about the error. The main method:
- ( void ) textToSpeech : ( NSString * ) text language : ( NSString * ) languageDo not forget to get your Bing AppID from Microsoft (this is done for free) and insert it into the MicrosoftTTS class, into SpeechURL.
Experiment!
Source: https://habr.com/ru/post/117570/
All Articles