Create an application for Windows Phone 7 from start to finish. Part 3. Defining your application
Previous part
After you have decided on the idea of the application for Windows Phone, you need to define the tasks, pages and navigation flow.
In this part you will learn:
Reflecting on the tasks that the user can perform using your application, you will determine the capabilities of your application. Below are some ways to start designing an application.
')

The following are some of the user tasks that were originally created when designing the Fuel Tracker application as an example.
To implement your list of user tasks, you need to define pages and navigation paths in more detail. You can do this by creating a navigation prototype. You can start thinking about how pages might look, but for now you don’t need to define specific controls. Your attention should be focused on creating a user-friendly navigation model. The following steps describe how to create a prototype.
Pressing the "Back" button on the first page of the application should close the application.
Pressing the "Back" button on other pages should return to the previous page of the application.
Tip:
If you have Expression Studio Ultimate installed, you can use the SketchFlow features to create navigation prototypes.
The Fuel Tracker application consists of three pages and a photo selection window. The following image shows pages and navigation paths.
Try to keep the navigation model as simple as possible. When the Fuel Tracker application was originally designed, buttons were presented on each page to jump to any other page. This led to the following issues:
In this model, the first page is reused, while the other pages are recreated with each visit. Other pages are data entry pages, but since they are not reused, they are treated as modal dialog boxes. Users can either click the Save button to save the changes and go to the first page, or they can click the Back button to cancel the changes and go back.
You need to start thinking about the data that the application will use and how to organize it. You can start by listing the required data and try to group them logically. The following table shows some of the data required for the Fuel Tracker application. This will help you identify the controls that are needed in your application, and how you will transfer data from the user interface to the business logic of your application. In the "Data Mapping" and "Creating Data Classes" sections, you will learn more about how to display data in the user interface and how to create data classes for your application.
Next part
After you have decided on the idea of the application for Windows Phone, you need to define the tasks, pages and navigation flow.
In this part you will learn:
- How to define user tasks for your application.
- How to identify pages and navigation paths.
- How to start thinking about your data.
Custom Tasks
Reflecting on the tasks that the user can perform using your application, you will determine the capabilities of your application. Below are some ways to start designing an application.
- Make a list of tasks that users can complete.
- Prioritize the list so that you know what you need to implement immediately and what you can leave for later versions.
- If you work in a team, let everyone make their own individual list of user tasks. Discuss them in a team and try to group them.
- Create thumbnails of the pages that your application can contain, and how the user can navigate between them.
- Experiment with the various existing applications for Windows Phone to see what you like and dislike about them.
')
The following are some of the user tasks that were originally created when designing the Fuel Tracker application as an example.
| Custom task | A priority |
|---|---|
| Enter refueling information (vehicle refueling process) | one |
| Entering information about the car | one |
| View the history of refills | one |
| View the kilometer / liter report | one |
| Data entry for multiple vehicles | 2 |
| Save the location of gas stations | 2 |
| Gas station placement map | 2 |
| Switching units of measurement (US or metric) | 3 |
| View price / liter report | 3 |
Pages and navigation paths
To implement your list of user tasks, you need to define pages and navigation paths in more detail. You can do this by creating a navigation prototype. You can start thinking about how pages might look, but for now you don’t need to define specific controls. Your attention should be focused on creating a user-friendly navigation model. The following steps describe how to create a prototype.
- Create thumbnails representing the pages of your application. Each page should allow the user to perform at least one task.
- Add navigation tools, such as hyperlinks, buttons, or buttons on the application bar, to your sketches.
- Test page navigation with the help of navigation tools and the Back button.
Pressing the "Back" button on the first page of the application should close the application.
Pressing the "Back" button on other pages should return to the previous page of the application.
Tip:
If you have Expression Studio Ultimate installed, you can use the SketchFlow features to create navigation prototypes.
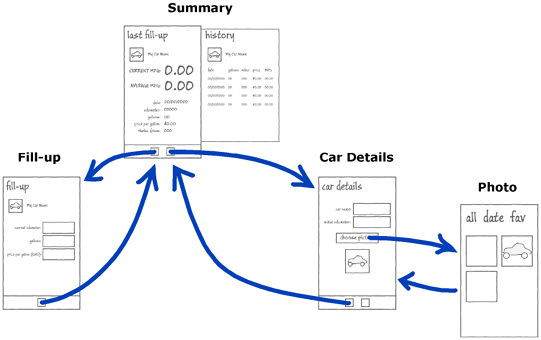
The Fuel Tracker application consists of three pages and a photo selection window. The following image shows pages and navigation paths.
Try to keep the navigation model as simple as possible. When the Fuel Tracker application was originally designed, buttons were presented on each page to jump to any other page. This led to the following issues:
- When you go to a page by pressing the navigation button (as opposed to the “Back” button), a new instance of the page is created, even if you have previously visited this page. This is not a problem for read-only pages displaying information. But for data entry pages, users expect to see partially entered data in place when they return.
- When you go to a page, and then click the Back button, users expect to go to the previous page. However, one of the principles of interface design is that clicking on the “Back” button on the first page should close the application. This is a little inconvenient if the user navigates to the first page from any other page.
In this model, the first page is reused, while the other pages are recreated with each visit. Other pages are data entry pages, but since they are not reused, they are treated as modal dialog boxes. Users can either click the Save button to save the changes and go to the first page, or they can click the Back button to cancel the changes and go back.
Data thinking
You need to start thinking about the data that the application will use and how to organize it. You can start by listing the required data and try to group them logically. The following table shows some of the data required for the Fuel Tracker application. This will help you identify the controls that are needed in your application, and how you will transfer data from the user interface to the business logic of your application. In the "Data Mapping" and "Creating Data Classes" sections, you will learn more about how to display data in the user interface and how to create data classes for your application.
| Group | Data |
|---|---|
| Car | Title A photo Initial odometer reading History of gas stations |
| Refueling | date Odometer reading Amount of fuel Fuel price |
Source: https://habr.com/ru/post/117548/
All Articles