Improving the Java application interface
 Good afternoon, habrazhitel!
Quite a lot of different fragmented information exists on the topic of working with Swing and graphics in the Internet, as well as on the interface of Java applications. Someone insists that Java is morally obsolete and there is no point in writing Java desktop applications, someone with foaming at the mouth proves the opposite. At the same time, work is underway, applications are being written and other problems arise. In the previous article, I have already provided a small list of useful libraries for exceptional cases, but it often happens that no third-party library allows you to do what you need. At this very moment it is worth thinking about the possible need for writing your own components.
So, in this post I tried to explain the most important and significant in my opinion points on working with Swing and graphics - how to create components, how to stylize the interface, what you shouldn’t do and much more ...
')
Twisted in the clouds
I think that many are holding back from studying or developing Java questions “how to make the design of your application bright and memorable?” And “is this possible in Java?” And alas, there is practically no major resource on this topic that fully or completely at least partially shed light on the situation.
Therefore, today I will try to answer these questions and dispel illusions about the “gray” interfaces, the lack of components, the “scary” design, and other things that any developer has probably encountered. Indeed, not having enough wit or a desire to find answers - nothing will come of it. But it is precisely this that attracts me to this language, for having enough knowledge and, even more importantly, the desire, it is possible to realize quickly and easily what you need, since the opportunities provided to you are actually quite wide.
What do we have?
Perhaps we should start with the basics, pushing off from which it will be possible to discuss "higher matter."
If you know well enough such things as Swing and LaF and how they are arranged, I suggest not to waste time and go straight to the next chapter of the topic.
So, building a Java application interface is based on the Swing library, which contains all the basic components that can be found in various operating systems. They may look different, have slightly different functional features (on different operating systems), but in fact - they perform the same purpose. These are components such as buttons (JButton), text fields (JTextField, JPasswordField), labels (JLabel), text areas (JTextArea, JEditorPane), scrolls (JScrollBar, JScrollPane), etc.
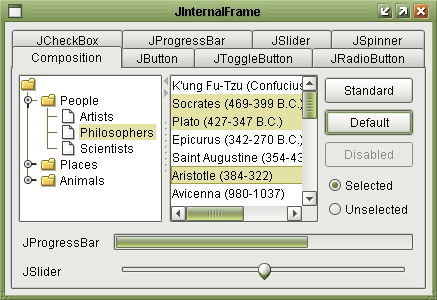
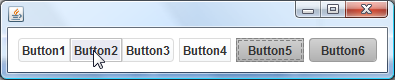
Swing in the "basic configuration" allows you to use several different LaFs (Look and Feel, you can also call them "skins" for Swing) to change the appearance of all components of your application "at once" - Metal LaF (standard Java-style), Nimbus LaF (just a separate specific style), System LaF (the style of your OS). However, there are many separately added LaF'ov decorated in full-fledged libraries that can be easily and quickly used in any project.
Each individual component has the ability to specify a UI class that determines how it will be drawn and sometimes what functionality it will have, it all depends on the implementation. LaF directly determines the UI for the entire tree of components available in your application. You can either use LaF, or change the style of individual components by asking them UI. You can also set a specific LaF (system, for example) and then, if necessary, change the UI of individual elements.
I will cite several resources with various custom LaFs that can be quickly adapted for use:
Selected best-known and well-developed styles
Tiny LaF - an analog of the classic style of Windows XP

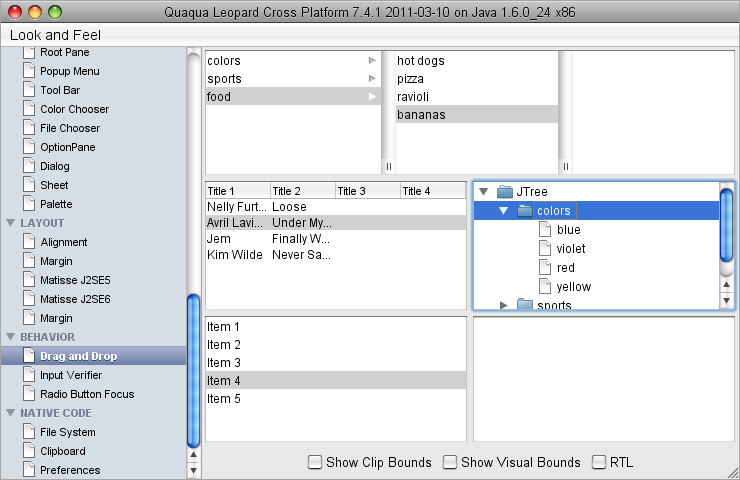
Quaqua LaF - Mac OS X analog interface with a variety of options for customizing components
Substance LaF
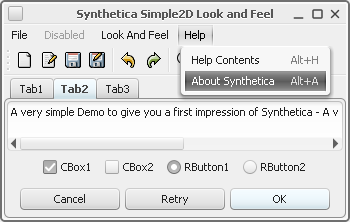
Synthetica LaF
Alloy laF
Jgoodies
Multiple style sets
Set # 1 is a site dedicated to various well-known LaF for Java applications.
Set # 2 - a small article with a list of different LaF
Set # 3 is another LaF article.
It is also important to note that not all LaFs can be used under any OS. Some specialize in certain operating systems, like Quaqua LaF, for example. It is, of course, possible to run it under Windows or Linux, and at first glance there will be no problems, but some components can cause errors during operation, up to and including the crash of the JVM. Some other styles may not run at all on a non-designed OS. Some styles are forbidden to use on certain operating systems under a license agreement.
Third-party developments
As practice shows, if everything is completely done from scratch, there will not be enough power from the funds to develop and maintain the entire pile of components in order and up to date. Therefore, one way or another, you have to resort to using third-party libraries. Sometimes, to fully rely on the functionality available in them, if it suits you completely, sometimes it’s just to use the most successful parts of the library for your own purposes.
Therefore, before proceeding to the description of the handwriting / editing of interface elements, I find it logical to bring available, supported and quite popular libraries. So, let's see what developments exist in this area (I advise you to go to these sites for review):
SWT ( site ) ( manual / docks ) ( examples ) ( download )
License: EPL
Supported Platforms: Windows / Linux / MacOSX / Solaris and some others
SWT is a wrapper for convenient use of the native components of different operating systems. Swing and SWT components cannot be directly combined, but there are several libraries designed for this (for example, this one ).
SwingX ( website ) ( manual / docks ) ( download )
License: LGPL 2.1
Supported platforms: All java-supported platforms
Enough old and well-known library with an extended set of Swing-components. At the moment, the project is in some kind of transition state.
Jide ( site ) ( manual / docks ) ( download demo )
License: Commercial / GPL with classpath exception
Supported platforms: All java-supported platforms
One of the best commercial libraries, providing the widest range of various components.
Additionally
Probably you may find the libraries mentioned in my previous article useful for developing applications using more complex elements (flash / video, etc.). I can only add another library, which I also used in several projects - JavaLayer - it allows you to play mp3 files and mp3 streams. It is easy to use, does not require any native things, cross-platform and does not eat the resources of the machine.
Of course, there are some other libraries (both commercial and free), but they are either morally obsolete or contain very few useful things. So, you have already looked at what LaF can be used, what are the different ready-made components in different libraries, but in the end - you are still not satisfied - some of the components have the wrong style, the libraries have already managed to become obsolete ten times, fatal ones are found errors inside libraries, support gives slack ... What to do? Definitely take one free designer and code into your own hands! ..
So, first take a deep breath, exhale, calm down - there is nothing wrong with writing your own components. This must be realized once and for all. You also need to realize that the duration of writing a particular component or UI for it depends only on its complexity, the complexity of the designer’s work and your knowledge as a Java programmer. There is also a clear boundary - when it is worth doing this and when it is not worth it - it depends on the timing, the resources available and other factors that are not well known, but this is a completely different topic. So, I think now you are ready to continue.
Writing Your UI
First, I will devote some time to this moment, since some tricky components are not always necessary, but rather stylized standard ones. It is in such cases that you should resort to writing your own small UI class to the J component, especially since all standard Swing components, without exception, have Basic-UI classes that allow you to quickly and without any hassle to create your own styling for the component. I will give a small example of creating a UI for JSlider.
To begin, create a class that overrides BasicSliderUI, and describe its appearance with available images:
public class MySliderUI extends BasicSliderUI
{
public static final ImageIcon BG_LEFT_ICON =
new ImageIcon ( MySliderUI. class .getResource ( "icons/bg_left.png" ) );
public static final ImageIcon BG_MID_ICON =
new ImageIcon ( MySliderUI. class .getResource ( "icons/bg_mid.png" ) );
public static final ImageIcon BG_RIGHT_ICON =
new ImageIcon ( MySliderUI. class .getResource ( "icons/bg_right.png" ) );
public static final ImageIcon BG_FILL_ICON =
new ImageIcon ( MySliderUI. class .getResource ( "icons/bg_fill.png" ) );
public static final ImageIcon GRIPPER_ICON =
new ImageIcon ( MySliderUI. class .getResource ( "icons/gripper.png" ) );
public static final ImageIcon GRIPPER_PRESSED_ICON =
new ImageIcon ( MySliderUI. class .getResource ( "icons/gripper_pressed.png" ) );

public MySliderUI ( final JSlider b )
{
super ( b );

//
b.addChangeListener ( new ChangeListener()
{
public void stateChanged ( ChangeEvent e )
{
b.repaint ();
}
} );
b.addMouseListener ( new MouseAdapter()
{
public void mousePressed ( MouseEvent e )
{
b.repaint ();
}

public void mouseReleased ( MouseEvent e )
{
b.repaint ();
}
} );
}

//
protected Dimension getThumbSize ()
{
return new Dimension ( GRIPPER_ICON.getIconWidth (), GRIPPER_ICON.getIconHeight () );
}

//
public void paintThumb ( Graphics g )
{
int positionX = thumbRect.x + thumbRect.width / 2;
int positionY = thumbRect.y + thumbRect.height / 2;
g.drawImage ( isDragging () ? GRIPPER_PRESSED_ICON.getImage () : GRIPPER_ICON.getImage (),
positionX - GRIPPER_ICON.getIconWidth () / 2,
positionY - GRIPPER_ICON.getIconHeight () / 2, null );
}

// «»
public void paintTrack ( Graphics g )
{
if ( slider.getOrientation () == JSlider.HORIZONTAL )
{
//
g.drawImage ( BG_LEFT_ICON.getImage (), trackRect.x,
trackRect.y + trackRect.height / 2 - BG_LEFT_ICON.getIconHeight () / 2, null );
g.drawImage ( BG_MID_ICON.getImage (), trackRect.x + BG_LEFT_ICON.getIconWidth (),
trackRect.y + trackRect.height / 2 - BG_MID_ICON.getIconHeight () / 2,
trackRect.width - BG_LEFT_ICON.getIconWidth () - BG_RIGHT_ICON.getIconWidth (),
BG_MID_ICON.getIconHeight (), null );
g.drawImage ( BG_RIGHT_ICON.getImage (),
trackRect.x + trackRect.width - BG_RIGHT_ICON.getIconWidth (),
trackRect.y + trackRect.height / 2 - BG_RIGHT_ICON.getIconHeight () / 2, null );

//
g.drawImage ( BG_FILL_ICON.getImage (), trackRect.x + 1,
trackRect.y + trackRect.height / 2 - BG_FILL_ICON.getIconHeight () / 2,
thumbRect.x + thumbRect.width / 2 - trackRect.x - BG_LEFT_ICON.getIconWidth (),
BG_FILL_ICON.getIconHeight (), null );
}
else
{
// jar'
}
}
}thumbRect - rectangle gripper
trackRect - slider "path" rectangle
In fact, most of the necessary redrawing is caused by the Basic-UI class itself, and you do not need to worry about it (for example, when you click on the gripper or drag it).
In this UI, I cheated a little and did not override the calculateTrackRect () method, which defines the dimensions of the slider's “path”. I just centered the rendered images in the center of the available sizes. But it is a matter of taste. Another question is that the preffered size will be calculated on the basis of the size of the gripper and the path, just in this case the gripper is any more the path.
So, in this simple way, we got a completely new looking slider. Now, to use it in the application, it is enough to set it as a UI for any JSlider:
JSlider mySlider = new JSlider ();
mySlider.setUI ( new GuiSliderUI ( mySlider ) );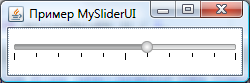
The full code with an example and graphics can be taken here (it also has a vertical slider version, the original java classes are inside the jar).
Understandably, every single Basic-UI (BasicButtonUI, BasicTextFieldUI, BasicTableUI, BasicTabbedPaneUI, etc.) has its own features for rendering parts of a component, but there’s nothing difficult to figure out and it’s easy to understand. commented and described.
To logically end the conversation about UI, I’ll add that for all known J-components besides Basic-UI there are implementations for various LaFs, for example: WindowsSliderUI, MetalSliderUI and others. Usually they are called according to the name of the library or its purpose (for native OS components, for example, OsnameComponentUI). Sometimes they can be used without installing general LaF, but not always - there is such a possibility or not depends entirely on the implementation of the library (for example, if you install LaF, styles are loaded, without which individual UIs simply will not work).
So, in this example, I used ready-made graphics to create a neat visual component, but you can draw a great visual component using only standard Java tools, or rather Graphics2D tools - this will be discussed further ...
Work with Graphics2D
Head above, I just casually mentioned the work with graphics, and it was precisely with its means that the individual parts of the slider were drawn. But this is only the very top of the possibilities that Grahics2D provides us with.
I note that in all the methods of “paint” (as well as “paintComponent”, “print” and others) comes Graphics, not Grahics2D, however you can without fear of casting it to Grahics2D if you work with any J- component or its successor. Why did this happen? This, so to speak, is a small remnant of the old parts of which Swing has grown and I don’t think it's worth going deep into it at the moment. This issue is covered in more detail in the Skipy article about internal Swing.
I will also say at once that in this chapter there are only a few options for using graphics - in fact, the area of its use is much wider. Just in more detail about the graphics and everything connected with it is likely to be discussed in my next topic on Java (with a positive outcome of this and there is interest among readers, of course). But enough spoilers, back to the topic ...
So what do we have? What opportunities does the Graphics2D give us?
I will list the main ones:
- Work with primitive forms (ellipse, rectangle, arc, curve, polygon and others)
- Working with text (drawing, counting text sizes, etc.)
- Work with images (work with fonts, drawing, scale, change, etc.)
- Ability to customize the filling of rendered shapes / forms
- Ability to customize the course of drawing (stroke)
- Ability to transform drawn objects (rotate, scale, shear, translate)
- Ability to restrict drawing to specific areas (clip)
- Ability to customize different modes of "combining" graphics (composite)
- Ability to adjust the quality of rendering (Rendering Hints)
- Ability to print
I will say right away - when working with graphics, most likely over time you will have to use all the tools provided, without exception, to achieve the best visual effect. A detailed description of what and how can be found here - this is the official Graphics2D tutorial. It should be more than enough to get you up to speed.
I have already given a small example of writing my UI, but there are other options for customizing the interface. Each individual J-component produces its Lightweight-drawing using the paint () method, which can be easily redefined and changed. Directly (not always, but more often) it is better not to use it (I will not go into details, since this is a whole topic for a separate topic). For the following example, use the paintComponent () method. Consider how it can be applied closer ...
I will begin with an example - a text field with a visual feedback in the absence of content:
JTextField field = new JTextField()
{
private boolean lostFocusOnce = false ;
private boolean incorrect = false ;

{
//
addFocusListener ( new FocusAdapter()
{
public void focusLost ( FocusEvent e )
{
lostFocusOnce = true ;
incorrect = getText ().trim ().equals ( "" );
repaint ();
}
} );
addCaretListener ( new CaretListener()
{
public void caretUpdate ( CaretEvent e )
{
if ( lostFocusOnce )
{
incorrect = getText ().trim ().equals ( "" );
}
}
} );
}

protected void paintComponent ( Graphics g )
{
super.paintComponent ( g );

//
if ( incorrect )
{
Graphics2D g2d = ( Graphics2D ) g;

//
g2d.setRenderingHint ( RenderingHints.KEY_ANTIALIASING,
RenderingHints.VALUE_ANTIALIAS_ON );

//
Insets insets;
if ( getBorder () == null )
{
insets = new Insets ( 2, 2, 2, 2 );
}
else
{
insets = getBorder ().getBorderInsets ( this );
}

//
GeneralPath gp = new GeneralPath ( GeneralPath.WIND_EVEN_ODD );
gp.moveTo ( insets.left, getHeight () - insets.bottom );
for ( int i = 0; i < getWidth () - insets.right - insets.left; i += 3 )
{
gp.lineTo ( insets.left + i,
getHeight () - insets.bottom - ( ( i / 3 ) % 2 == 1 ? 2 : 0 ) );
}

//
g2d.setPaint ( Color.RED );
g2d.draw ( gp );
}
}
};
The full code of the example can be found here .
Thus, it is possible to expand any available component by quickly redefining and adding to the drawing method, without having to write individual cumbersome UIs or full-fledged components. Plus, this example can be quite easily rendered into a separate class and used as a ready element for its interface.
Another advantage of this method is that you get independent of the current installed application / component LaF / UI - it will always work. Naturally, for some specific UI, you may need a slightly different rendering - whether to support it or not - it's up to you.
Although often it would be desirable to make the interface brighter and more attractive, it is not always necessary to invent new components for this — you can use standard tools. I will give an example of customization of the simplest checkbox with an animated change of states and background. This time I will again (yes, you can beat me with sticks) using the prepared images from the designer’s skilled hands.
8 16x16 images are taken as the basis - 4 states of the checkbox background and 4 states of the daw (5 actually, but the 5th will be added programmatically):

The standard checkbox, of course, does not have the ability to set sprites for animating states, and besides, we need to superimpose images of the daws on the background in different variations. To do this, we add a separate method:
public static List <ImageIcon> BG_STATES = new ArrayList <ImageIcon> ();
public static List <ImageIcon> CHECK_STATES = new ArrayList <ImageIcon> ();

static
{
//
for ( int i = 1; i <= 4; i++ )
{
BG_STATES.add ( new ImageIcon (
MyCheckBox. class .getResource ( "icons/states/" + i + ".png" ) ) );
}

// ""
CHECK_STATES.add ( new ImageIcon (
new BufferedImage ( 16, 16, BufferedImage.TYPE_INT_ARGB ) ) );

//
for ( int i = 1; i <= 4; i++ )
{
CHECK_STATES.add ( new ImageIcon (
MyCheckBox. class .getResource ( "icons/states/c" + i + ".png" ) ) );
}
}

private Map< String , ImageIcon> iconsCache = new HashMap< String , ImageIcon> ();

private synchronized void updateIcon ()
{
//
final String key = bgIcon + "," + checkIcon;
if ( iconsCache.containsKey ( key ) )
{
//
setIcon ( iconsCache. get ( key ) );
}
else
{
//
BufferedImage b = new BufferedImage ( BG_STATES. get ( 0 ).getIconWidth (),
BG_STATES. get ( 0 ).getIconHeight (), BufferedImage.TYPE_INT_ARGB );
Graphics2D g2d = b.createGraphics ();
g2d.drawImage ( BG_STATES. get ( bgIcon ).getImage (), 0, 0,
BG_STATES. get ( bgIcon ).getImageObserver () );
g2d.drawImage ( CHECK_STATES. get ( checkIcon ).getImage (), 0, 0,
CHECK_STATES. get ( checkIcon ).getImageObserver () );
g2d.dispose ();

ImageIcon icon = new ImageIcon ( b );
iconsCache.put ( key, icon );
setIcon ( icon );
}
}
The resulting component will be very easy to modify the radio button for example, or add more transition states to it for smoother animation, etc.
Actually, the full working code and images are laid out separately here .
Thus, there are quite a few ways to customize items (even I probably don’t know / don’t guess about some of them). Which way to choose - depends on the situation - what needs to be obtained, what changes can be made in an existing component, etc.
At the end of this chapter, I will give one more example of a fully modified UI button with animation, the ability to round individual corners, the ability to customize the style and some other improvements. Here are a few screenshots with the final appearance (of course, the animation is not visible here):
I will not lie, it took a lot of time for this UI button, but it was created without the help and hints of the designer using the pure means of Graphics2D and Swing. Here you can download and explore the full surs and demo of this UI, if you are interested. It uses a fairly wide range of Graphics2D features and applies some tricks that can often be useful.
So, I think there is enough talk about graphics - I’ll talk about it in more detail in future topics, but for now I’ll give you some interesting material that I have accumulated over quite a long time of “communication” with Swing and Graphics2D.
DnD and GlassPane
I think the first is that you are all more than aware of the problems associated with it. As for the second, you probably heard about the GlassPane by chance, or maybe even saw this old image (which is still relevant, by the way) about the arrangement of various layers of standard frames. What is there and why did I remember about it? And all the more, how are the DnD and GlassPane related, you ask? That's exactly how to connect them and what can come of it I want to tell in this chapter.
Well, let's start in order - what do we know about DnD?
Some Swing components have ready-made implementations for a dredge (JTree and JList for example) - for others you can easily add your own. In order not to rush words to the wind - I will give a small example of a DnD string from a label:
JLabel label = new JLabel ( " DnD" );
label.setTransferHandler ( new TransferHandler()
{
public int getSourceActions ( JComponent c )
{
return TransferHandler.COPY;
}

public boolean canImport ( TransferSupport support )
{
return false ;
}

protected Transferable createTransferable ( JComponent c )
{
return new StringSelection ( ( ( JLabel ) c ).getText () );
}
} );
label.addMouseListener ( new MouseAdapter()
{
public void mousePressed ( MouseEvent e )
{
if ( SwingUtilities.isLeftMouseButton ( e ) )
{
JComponent c = ( JComponent ) e.getSource ();
TransferHandler handler = c.getTransferHandler ();
handler.exportAsDrag ( c, e, TransferHandler.COPY );
}
}
} );In fact - TransferHandler scans for what kind of data during the dredge the component gives and how the component uses the incoming data when dredging it.
But what to do if you need to track the sequence of user actions during the dragging?
To do this, there is a separate opportunity to hang the listener:
DragSourceAdapter dsa = new DragSourceAdapter()
{
public void dragEnter ( DragSourceDragEvent dsde )
{
// -
}

public void dragExit ( DragSourceEvent dse )
{
// -
}

public void dropActionChanged ( DragSourceDragEvent dsde )
{
//
}

public void dragOver ( DragSourceDragEvent dsde )
{
//
}

public void dragMouseMoved ( DragSourceDragEvent dsde )
{
//
}

public void dragDropEnd ( DragSourceDropEvent dsde )
{
//
}
};
DragSource.getDefaultDragSource ().addDragSourceListener ( dsa );
DragSource.getDefaultDragSource ().addDragSourceMotionListener ( dsa );I will give for more understanding a small example of this “effect” - a frame with several Swing components on it. When you click on any part of the window, the effect of a “recognizable” circle will appear, which is visible on top of all elements. What is most interesting - a similar effect does not eat up resources and does not require a large pile of code. Do not believe? - watch the demo and take a look at the source code embedded in the jar.
By the way, there is a rather interesting library on this topic, at the same time providing additional scrolling functionality and several other goodies - JXLayer ( off site ) ( description # 1 description # 2 description # 3 ). Unfortunately, projects hosted on the java site are not in the best condition right now, so you have to refer to individual resources.
So now we will combine everything that I have already described in this chapter and, finally, we will do something full. For example - display dredge panel with components inside the window:
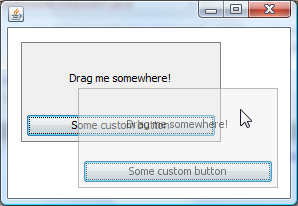
When the panel dredges for the label, a translucent copy of the panel appears showing where exactly the panel will be placed at the end of the dredge. You can also cancel the move with the ESC key.
A working example and source code can be found here .
Of course, to implement this particular functionality, it would not be worthwhile to resort to using DnD - there are shorter ways. However, it all depends on the situation. This option allows you to draw a drag independently of other components in the window. You can also, on the basis of it, for example, implement a drag panel between application windows.
AWTUtilities
Since some future innovations from 7K have been included in JDK6 for quite some time, I cannot ignore them, since with their help it is possible to do a lot of things with much less effort.
So, we are interested in several methods from AWTUtilities:
- AWTUtilities.setWindowShape (Window, Shape) - allows you to set a specific shape for any window (be it a circle or a cunning polygon). To set the form correctly, the window should not be decorated with the native style (setUndecorated (true)).
- AWTUtilities.setWindowOpacity (Window, float) - allows you to set the window transparency from 0 (fully transparent) to 1 (opaque). The window can be decorated with native style.
- AWTUtilities.setWindowOpaque (Window, boolean) - allows you to completely hide the display of the background and window design, but any component placed on it will be visible. To set this parameter correctly, the window as well as in claim 1 should not be decorated with native style.
What does this give us? In fact - a wide range of possibilities. The windows of your application, you can set any tricky forms that you only need, make "holes" in the middle of the application, create custom shadows under the window, make pleasant-looking popaps, etc., etc.
If I go to the specifics - I never use setWindowShape, because the form specified by the window is strictly clipped around the edge and does not look very nice. SetWindowOpaque comes to the rescue - by hiding the design and background of a window, you can create absolutely any windows using a container with a custom drawn background. I will give a small example of use (it also has some techniques from the previous chapters of the post):
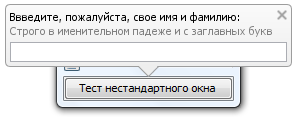
Here you can get a working jar with the source code. Honestly, I spent no more than ten minutes on this example (of these, I wondered about five minutes how to arrange the elements within the dialogue :). Naturally, this is just one of the options for accepting these new features - in fact, they are much more.
The only nasty little thing about using AWTUtilities is unstable work on Linux systems. Those. Not everywhere and not always correctly processes the transparency of windows. Not sure if this is a current JDK problem or an OS.
Creating your own interactive components
I already superficially talked about how to create components, UI and some "bells and whistles" for the interface of my application, but what to do if we need to add a functional part to a component or create our own completely new component with some kind of functionality and styling? To stylize standard components and to make separate parts of a new component a rather long and tedious task, all the more so with the slightest change in one of the components, the whole scheme can go. In such cases, it is worth making your component from scratch.
So, as a basis it is best to take the best JComponent and using paint-methods to draw its contents. In fact, JComponent itself is a blank canvas with some wired improvements for drawing and ready-made standard methods setEnabled / setFont / setForeground / setBackground, etc. How to use (and whether to use them) is up to you. Everything that you add to the drawing methods will become part of the component and will be displayed when you add it to any container.
By the way, a small digression, since we are talking about containers, any heir and the JComponent itself are containers, i.e. may contain other components that will be located depending on the installed component of the layout. What is going on with the drawing of child components lying in this one and how is it related to the drawing of this component? Earlier, I did not go into details on how Jcomponent's paint methods are arranged and connected, but now I will describe it in detail ...

In fact, the paint () method contains the calls of three separate methods — paintComponent, paintBorder, and paintChildren. Of course, in addition, it handles some “special” cases of drawing, such as printing or redrawing a particular area. These three methods are always invoked in the sequence shown in the image above. Thus, the component itself is first drawn, then the border is drawn over and then the child components are drawn, which in turn also call their paint () method, etc. Naturally, there are also various optimizations that prevent unnecessary rendering, but I will write more about this later.
The component is drawn, but is static and represents only an image. We need to handle the ability to control them with the mouse and various hotkeys.
To do this, first, you need to add the appropriate listeners (MouseListener / MouseMotionListener / KeyListener) to the component itself and process the individual actions.
In order not to explain everything on your fingers, I will give an example of a component that allows you to visually resize the ImageIcon transmitted to it:
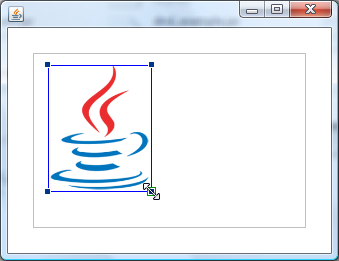
Here you can take a working example with the source code inside.
When creating this component, I would highlight a few important points:
- We determine the functionality and appearance of the component - in this case, this is the area with the image placed on it, the border around the image and 4 resisers in the corners. Each resizer allows you to resize the image. It is also possible to move the image across the region, “grabbing” it for the center.
- We determine all the parameters necessary for the component to work — in this case, the image itself and its “reference” points (upper left and lower right corners). There are also a number of variables that will be needed in the implementation of resize and image dredge.
- We cast a blank for the component (preferably a separate class, if you are going to use it more than once) - in this case, create the class ImageResizeComponent, define all the parameters necessary for drawing, override the paintComponent () method and draw the contents. We also override the getPreferredSize () method so that the component itself can determine its “desired” size.
- We implement the functional part of the component - in this case, our MouseAdapter will be enough for us to implement resize and move. — — , — . , — mouseMoved() .
Of course, I just described my steps when creating components - they are not something mandatory and can be easily expanded and supplemented.
Important to remember
There are a few things that are worth with any work with interface elements in Swing - I’ll give them in this separate small chapter.
- / Event Dispatch «» . Event Dispatch :
, , listener' (ActionListener/MouseListener .) .SwingUtilities.invokeLater ( new Runnable()
{
public void run ()
{
//
}
} ); - paint- , .
- — paint , , setEnabled(enabled). paint . ( ). .
- Event Dispatch . SwingUtilities.invokeLater().
- , , . /. , Event Dispatch .
- repaint() ( repaint(Rectangle) – ), repaint Event Dispatch . revalidate() ( Event Dispatch ). updateUI() ( ), , UI UI LaF'.
- A full installation of LaF to the entire application will cancel any of your manually defined UI components during operation and install on top of them the UI that LaF installs offers. Therefore, it is better to install LaF when loading an application before opening any windows and displaying visual elements.
I think that this list can be supplemented with several more points, but they will already be very specific / optional.
Results
Using, combining and varying the above possibilities and features of working with interfaces it is possible to achieve any desired result. It is only necessary to show a little imagination in this matter. I hope even the basic examples of this post gave you a lot of food for thought and may have helped with something.
I would also like to add that it is possible that the title of the article may seem too loud and not fully disclosed to you - indeed, I am still not a designer or a usability specialist. I just offer you the tools / methods that will expand and improve the application interface. Immediately a large (not necessarily all) part of the work of creating graphics for the slider / button or determining the overall style of the components and the application itself always remains for the designer - this will not go anywhere.
Here are all the examples of the article in a single "bottle". From the initial window, you can select the desired example:
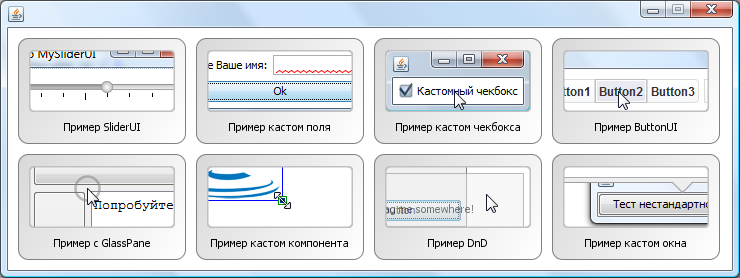
As well as the sources of this latest "general" example.
In conclusion, I want to cite several sources (some of them have already been mentioned in the article) that may help in studying the topics described here or simply may interest you:
- About installing and using Look and Feel
- Detailed fish description with Graphics2D in Java
- Wonderful article from Skipy about Swing's internal components
- Some interesting Swing tutorials
- Apple guidelines — Java-, , —
- , Java
If there are any flaws or errors - I will be happy to add and fix.
Special thanks to Source Code Highlighter for the readable code highlighting.
Update1: A new jar component has been laid out for resizing images with fixes.
Update2: A new jar of custom dialogue has been posted with corrections and smooth appearance / hiding
Update3: A common jar has been posted with all the article examples and all sources separately
Source: https://habr.com/ru/post/117430/
All Articles