Draw widgets in the title bar
It's no secret that today the population is dominated by widescreen monitors and they are forced to save the number of pixels vertically. This spawned a fashion for drawing controls right in the window title. Now you won’t surprise anyone, but, nevertheless, I haven’t found a solution to this problem anywhere on Qt, so now we’ll fix it:
In the dark dungeons of our qutIM lab , the ToolFrameWindow class was born, which is in many ways similar to such classes as QMainWindow and QToolBar. WinAPI ordeal I will not describe, do not want to clutter the article. To achieve this effect, it is necessary to expand the client area to the whole window and process the cursor position with your hands so that you can move and resize the window. At the same time, transparency disappears, QtDWM helps us to return it.
')
First of all, you need to give it a widget, for which we will draw in the button header, this is done through a call to the setCentralWidget method
This is done in such a way that it is as easy as possible to ensure the transfer of already existing code and not create difficulties on other platforms.
Buttons are added to the header using the addAction method, you can also add empty space addSpace or add the separator addSeparator.
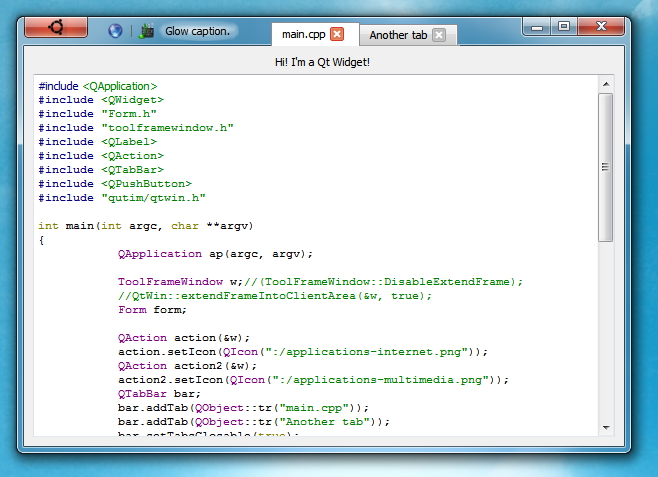
Especially for adding all this ugliness, the addWidget method was provided, when adding, you can specify an alignment through Qt :: Aligment, which allows you to make buttons like in the screenshot. As for the button itself, it is made from QPushButton using qss styles, in particular, border-image helped a lot
To draw a glow under the text, I tried using QGraphicsDropShadowEffect, but the glow strength was too small. This led to some confusion, but I remembered the good old border-image and decided to make a knight's move: draw the glow as a picture and impose it as a border-image
It turned out not quite perfect, there is still much to strive for in choosing the right parameters and dimensions of the glow, but in general this solution is quite simple and at the same time flexible.
I want to note that Qt sometimes breaks the roof of the fact that the widget's space has expanded due to the title. For example, now pos () can take negative values, although this should ideally not be.
One small screenshot:
The bravest can try this plugin. But he is still not frankly endorsed, we will talk about it later.
Many thanks to dtf for the war with APIs and for the implementation of all winAPI methods. The library code is available in gitorious (download habrahabr tag). The license is currently GPLv2. To use it in your code, just copy the necessary files to your project, the test program is located in the wincaption directory.
In the dark dungeons of our qutIM lab , the ToolFrameWindow class was born, which is in many ways similar to such classes as QMainWindow and QToolBar. WinAPI ordeal I will not describe, do not want to clutter the article. To achieve this effect, it is necessary to expand the client area to the whole window and process the cursor position with your hands so that you can move and resize the window. At the same time, transparency disappears, QtDWM helps us to return it.
Next, I would like to describe the principle of its use:
')
First of all, you need to give it a widget, for which we will draw in the button header, this is done through a call to the setCentralWidget method
ToolFrameWindow w;
Form form;
w.setCentralWidget(&form);

* This source code was highlighted with Source Code Highlighter .
ToolFrameWindow w;
Form form;
w.setCentralWidget(&form);

* This source code was highlighted with Source Code Highlighter .
ToolFrameWindow w;
Form form;
w.setCentralWidget(&form);

* This source code was highlighted with Source Code Highlighter .
This is done in such a way that it is as easy as possible to ensure the transfer of already existing code and not create difficulties on other platforms.
Adding action:
Buttons are added to the header using the addAction method, you can also add empty space addSpace or add the separator addSeparator.
QAction action(&w);
w.addSpace(16);
w.addAction(&action);
w.addSeparator();

* This source code was highlighted with Source Code Highlighter .
QAction action(&w);
w.addSpace(16);
w.addAction(&action);
w.addSeparator();

* This source code was highlighted with Source Code Highlighter .
QAction action(&w);
w.addSpace(16);
w.addAction(&action);
w.addSeparator();

* This source code was highlighted with Source Code Highlighter .
Adding tabs, buttons, labels and other widgets:
Especially for adding all this ugliness, the addWidget method was provided, when adding, you can specify an alignment through Qt :: Aligment, which allows you to make buttons like in the screenshot. As for the button itself, it is made from QPushButton using qss styles, in particular, border-image helped a lot
QPushButton btn;
btn.setIcon(QIcon( ":/ubuntu.png" ));
btn.setStyleSheet( "QPushButton { "
"border: 5px;"
"border-image: url(:/button.png);"
"}" );
btn.setMinimumSize(64, 22);
btn.setMaximumSize(64, 22);

* This source code was highlighted with Source Code Highlighter .
QPushButton btn;
btn.setIcon(QIcon( ":/ubuntu.png" ));
btn.setStyleSheet( "QPushButton { "
"border: 5px;"
"border-image: url(:/button.png);"
"}" );
btn.setMinimumSize(64, 22);
btn.setMaximumSize(64, 22);
* This source code was highlighted with Source Code Highlighter .To draw a glow under the text, I tried using QGraphicsDropShadowEffect, but the glow strength was too small. This led to some confusion, but I remembered the good old border-image and decided to make a knight's move: draw the glow as a picture and impose it as a border-image
QLabel lbl(QObject::tr( "Glow caption. Text with glow" ));
lbl.setStyleSheet( "QLabel {border-image: url(:/background.png);border: 5px; }" );

* This source code was highlighted with Source Code Highlighter .
It turned out not quite perfect, there is still much to strive for in choosing the right parameters and dimensions of the glow, but in general this solution is quite simple and at the same time flexible.
I want to note that Qt sometimes breaks the roof of the fact that the widget's space has expanded due to the title. For example, now pos () can take negative values, although this should ideally not be.
Conclusion
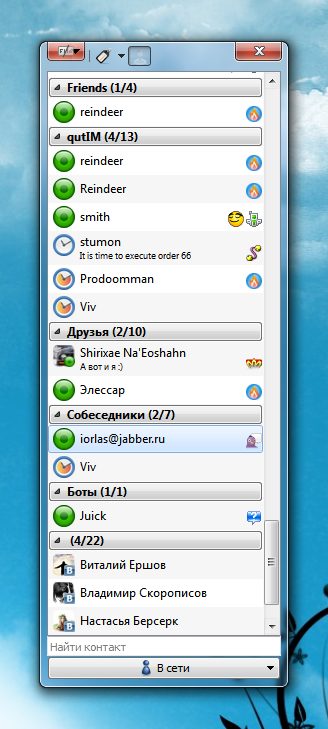
One small screenshot:
The bravest can try this plugin. But he is still not frankly endorsed, we will talk about it later.
Many thanks to dtf for the war with APIs and for the implementation of all winAPI methods. The library code is available in gitorious (download habrahabr tag). The license is currently GPLv2. To use it in your code, just copy the necessary files to your project, the test program is located in the wincaption directory.
Source: https://habr.com/ru/post/116752/
All Articles