Getting started with the Facebook SDK for iOS
Today, an important element of the application is the ability to tell your friends, colleagues, and the whole world what you are doing, where and why. Social networks help us in this. Networks, in turn, try to facilitate the work of the programmer and create their SDK. We will now look at the Facebook SDK for the iOS platform.
When I started to deal with the Facebook SDK about a year ago, there was also a version called facebook-iphone-sdk. She is still working. But I began to notice strange glitches in the application and decided to check whether something new had happened. This project turned out to be conserved, and now it is recommended that developers use facebook-ios-sdk, where, as stated, it is still easier. And as it turned out, they did not lie.
Download the SDK from here - https://github.com/facebook/facebook-ios-sdk
')
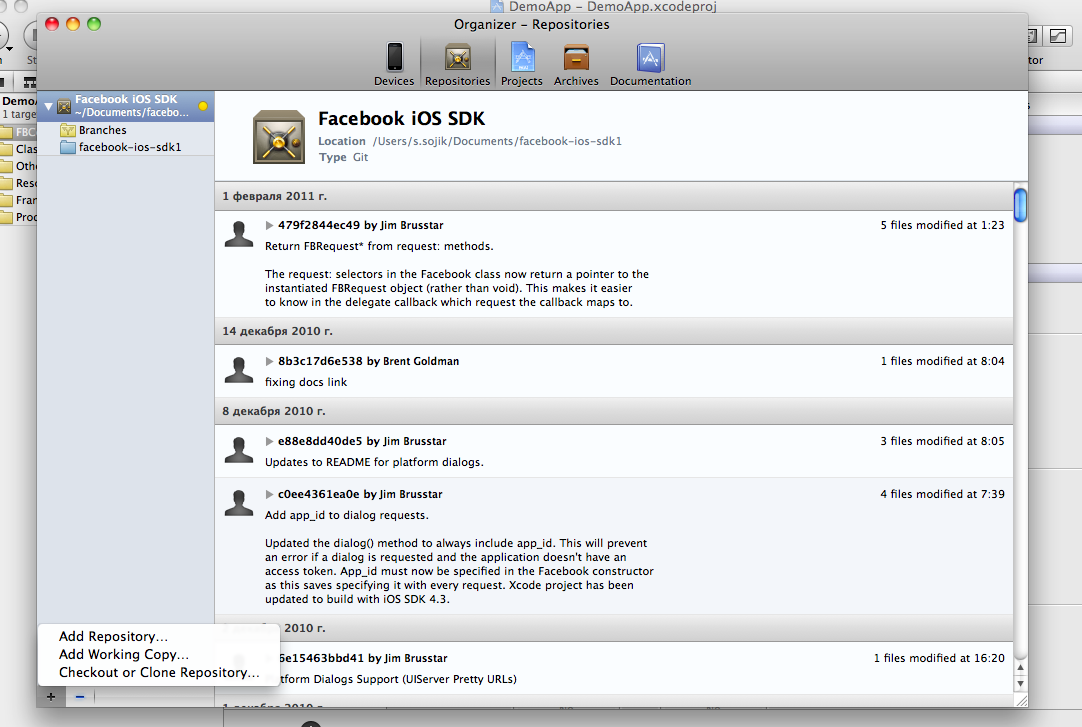
Xcode 4.0 users can directly download the SDK from the development environment. To do this, open Organizer, go to the Repositories section, and after the plus sign in the lower left corner, select Checkout or Clone Repository.
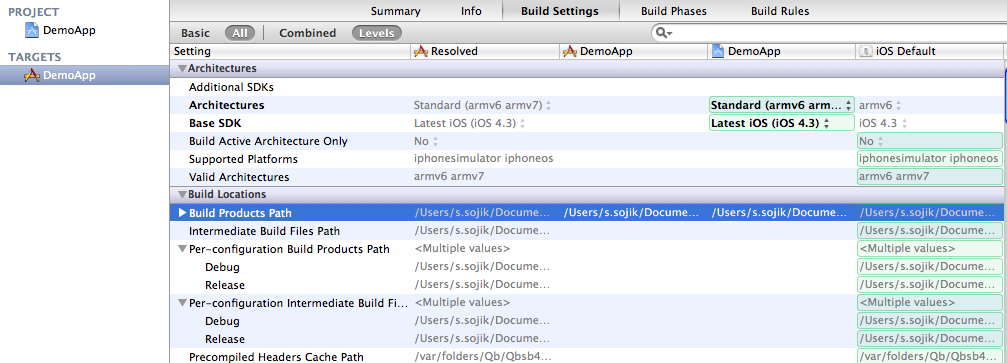
In the Sample directory there is a demo application, which we will refine a little and deal with it on the way. But he immediately had a problem when trying to start it. Some project parameters interfere with its compilation in the new Xcode4 and an error is reported about the wrong architecture. It is necessary to enter the project parameters and just kill everything in the Architecture section and then restore the project to only two parameters:
Architectures - Standard (arms6, arms7)
BaseSDK - Latest iOS (iOS 4.3)
If it didn’t work, then below I’m attaching a working draft.
After that, our project starts being built, starts up in the simulator and immediately “crashes”, signaling to the console - “2011-03-29 11: 49: 02.301 DemoApp [3098: 207] missing app id!”. All because we did not specify the id of our application.
Go to http://www.facebook.com/developers/ and either choose your existing application or click the button "+ Create a new application." After a simple registration, the system will notify you, among other things, the “application ID”. He and only we need it in the new version of the SDK. In the file DemoAppViewController.m we can see the following text:
Replace nil with our application id. Do not forget that this is a string. Let FOR EXAMPLE our id be 11111111111
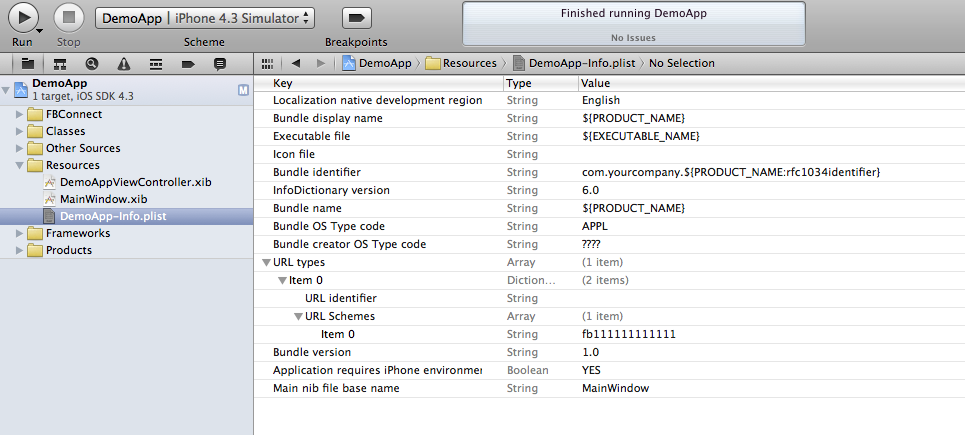
Go to the configuration file Resources / DemoApp-Info.plist and replace the fb value [your-app-id] in the picture with our fb11111111111 - and you should not be confused by the brackets, you need to put the value without them!
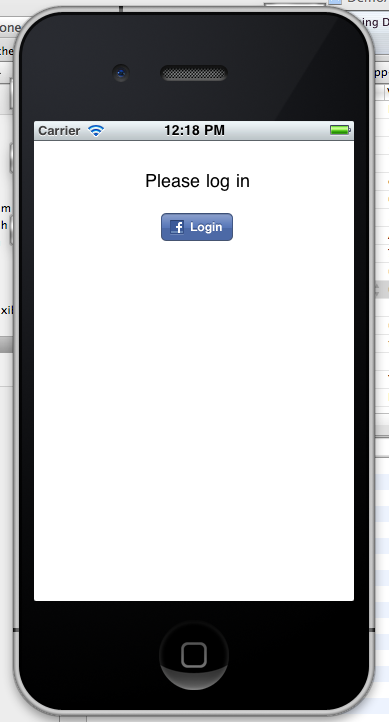
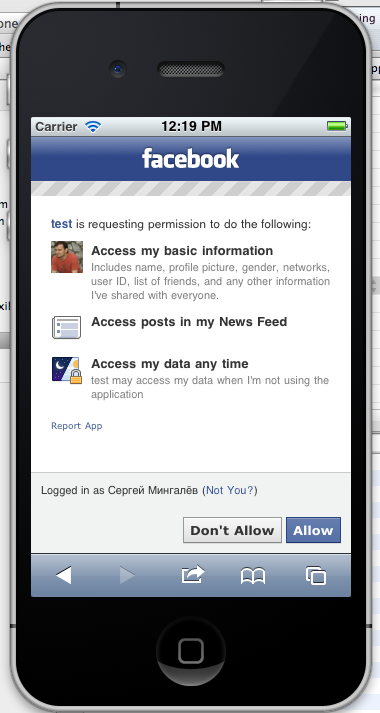
Everything! Now we have a fully working application. We can run and learn what it can do. Immediately after launching, we see an invitation to enter. After typing the email and password, a screen appears asking us if we allow this application to access our data. Click Allow and get into a very minimal design of the program. Let's stop on this to find out how it all works now.

First, take a look at the XIB file.

It is extremely simple - 5 buttons. When you start the application, only FBLoginButton is shown - it is controlled by the class of the same name, which is added to the project. Take a look at the viewDidLoad method
Notice how simple the Facebook class object is now initialized - you need the application id and that's it.
when the button is pressed, the method is called:
And if we have not logged in yet, we call the method:
where _permissions is setting permissions for various actions on facebook. In our example, we ask for permissions when initializing our controller.
according to the documentation here - http://developers.facebook.com/docs/authentication/permissions/ , read_stream is the right to read the tape, and offline_access is the ability of your application to remain attached for much longer. Without this right, access tokens will burn quickly enough. We will return to this topic later. By the way, it was the confirmation of these rights that was requested from us when we pressed the Allow button above.
The second important point here is that we have identified ourselves, our class, (self) as a delegate and will receive messages from the facebook object as they become available.
Another very important point relates to how we return to our application after authorization. Remember, we entered some parameters above into the Resources / DemoApp-Info.plist file. And if we look at the DemoAppAppDelegate.m file, we will see a small method there, which is responsible for returning to our application.
Thus, to summarize. If you make an application from scratch, then for the SDK to work successfully you should
1. Specify the app ID in the code
2. Specify the app ID in the parameters file of your application.
3. In * AppDelegate.m of your application implement the method
Without the last two items, you will not be returned to your application after the login window.
Depending on what you returned to the application with, one of the three methods that we have registered as a delegate is called.
Since we successfully logged in, all our other buttons appeared on the screen. You can study for yourself what they do; we will return to them in more detail later. For example, the “Call Graph API” button will show you your first and last name, and the “Call REST API” button will show you the first and last name of a person in id = 4, namely Mike Zuckerberg. Attempts to find out who is hiding under id = 1 were unsuccessful and the application crashed. So, anyone can explore this question on their own. And while I was writing the last paragraph I had to press the Login button again at least several times. What can be done so that once logged in to the application, you do not need to log in to facebook again. Now this will do. All we need to do is save the values of two variables in NSUserDefaults. viewDidLoad will look like this here:
we check whether the session is valid (isSessionValid) with the accessToken and expirationDate parameters saved in our NSUserDefaults. If yes, then we are already logged in and can perform further actions.
we add to the fbDidLogin and fbDidLogout methods respectively
fbDidLogin - write parameters
fbDidLogout - reset them
We run our application, log in, check our name - everything is fine. Without pressing Logout, we stop our application and start it again - we see that we are still on Facebook - we check our name - everything works. Let me remind you that it was for this that we were right in asking for the right @ "offline_access". This version of the project can be downloaded below.
And in conclusion of today's article, let's see how the query mechanism and response processing work.
Facebook is urging us to use the GRAPH API, rather than using the old REST API, which is nonetheless still supported. On this page ( http://developers.facebook.com/docs/reference/api/ ) we can see examples of using the GRAPH API and see the output of information for you. In the demo program, facebook uses this request:
for example, they show what the output will be with such a request
graph.facebook.com/btaylor
{
"Id": "220439",
"Name": "Bret Taylor",
"First_name": "Bret",
"Last_name": "Taylor",
"Link": " www.facebook.com/btaylor ",
"Username": "btaylor",
"Gender": "male",
"Locale": "en_US"
}
This means that we will receive an NSDictionary in response and will be able to get our full name using the key “name”. After we sent the request and assigned the recipient of the response, we need to make the methods responsible for receiving the response. For receiving an unprocessed (raw) response is responsible
and the parsed answer accepts:
The answer (result) can be a number, string, array or dictionary. If the answer came to us at once as NSArray, then several answers came to us at once and we need to break them down into separate answers. In this case, when we asked to tell who we are (me) are, the answer comes to the NSDictionary and there is no owner key, and therefore this line is called:
Let's complicate things. For example, I want to get in the application information about what the user likes. Change the request according to the documentation for:
If you look at the Facebook site for the output of this request, you will see that the answer is the NSDictionary with only one data key. It will correspond to an array of NSDictionary objects with the keys “name”, “category”, “id”, “created_time”. It is also important not to forget to add “user_likes” to the requested rights, otherwise an empty NSDictionary object will return to our response!
To accept this answer, we will rewrite our method.
If we received the answer in the form of NSDictionary, and there is a value by the key “data”, then we go through this array, looking into each object and check if there are any pages among the facebook pages that the user likes, with the name Steve Jobs. I was so, so the application gave me "You like Steve".
I’ll stop on this for now, although I would like to tell you what interesting options there are for forming a message on the wall from the application. But apparently it will be next time.
The project is original , but with amendments in the properties to run in Xcode4
Project with added ability to save session
Project with a modified request
Only you will need to put your appID in them :)
ps and I also love formatting code on Habré :)
When I started to deal with the Facebook SDK about a year ago, there was also a version called facebook-iphone-sdk. She is still working. But I began to notice strange glitches in the application and decided to check whether something new had happened. This project turned out to be conserved, and now it is recommended that developers use facebook-ios-sdk, where, as stated, it is still easier. And as it turned out, they did not lie.
Download the SDK from here - https://github.com/facebook/facebook-ios-sdk
')
Xcode 4.0 users can directly download the SDK from the development environment. To do this, open Organizer, go to the Repositories section, and after the plus sign in the lower left corner, select Checkout or Clone Repository.
In the Sample directory there is a demo application, which we will refine a little and deal with it on the way. But he immediately had a problem when trying to start it. Some project parameters interfere with its compilation in the new Xcode4 and an error is reported about the wrong architecture. It is necessary to enter the project parameters and just kill everything in the Architecture section and then restore the project to only two parameters:
Architectures - Standard (arms6, arms7)
BaseSDK - Latest iOS (iOS 4.3)
If it didn’t work, then below I’m attaching a working draft.
After that, our project starts being built, starts up in the simulator and immediately “crashes”, signaling to the console - “2011-03-29 11: 49: 02.301 DemoApp [3098: 207] missing app id!”. All because we did not specify the id of our application.
Go to http://www.facebook.com/developers/ and either choose your existing application or click the button "+ Create a new application." After a simple registration, the system will notify you, among other things, the “application ID”. He and only we need it in the new version of the SDK. In the file DemoAppViewController.m we can see the following text:
// Your Facebook APP Id must be set before running this example
// See www.facebook.com/developers/createapp.php
// Also, your application must bind to the fb[app_id]:// URL
// scheme (substitue [app_id] for your real Facebook app id).
static NSString* kAppId = nil;
Replace nil with our application id. Do not forget that this is a string. Let FOR EXAMPLE our id be 11111111111
static NSString* kAppId = @"11111111111";Go to the configuration file Resources / DemoApp-Info.plist and replace the fb value [your-app-id] in the picture with our fb11111111111 - and you should not be confused by the brackets, you need to put the value without them!
Everything! Now we have a fully working application. We can run and learn what it can do. Immediately after launching, we see an invitation to enter. After typing the email and password, a screen appears asking us if we allow this application to access our data. Click Allow and get into a very minimal design of the program. Let's stop on this to find out how it all works now.
First, take a look at the XIB file.
It is extremely simple - 5 buttons. When you start the application, only FBLoginButton is shown - it is controlled by the class of the same name, which is added to the project. Take a look at the viewDidLoad method
/**
* Set initial view
*/
(void)viewDidLoad {
// facebook
_facebook = [[Facebook alloc] initWithAppId:kAppId];
[self.label setText:@"Please log in"];
//
_getUserInfoButton.hidden = YES;
_getPublicInfoButton.hidden = YES;
_publishButton.hidden = YES;
_uploadPhotoButton.hidden = YES;
_fbButton.isLoggedIn = NO;
[_fbButton updateImage];
}
Notice how simple the Facebook class object is now initialized - you need the application id and that's it.
_facebook = [[Facebook alloc] initWithAppId:kAppId];when the button is pressed, the method is called:
/**
* Called on a login/logout button click.
*/
- (IBAction)fbButtonClick:(id)sender {
if (_fbButton.isLoggedIn) {
[self logout];
} else {
[self login];
}
}
And if we have not logged in yet, we call the method:
/**
* Show the authorization dialog.
*/
- (void)login {
[_facebook authorize:_permissions delegate:self];
}
where _permissions is setting permissions for various actions on facebook. In our example, we ask for permissions when initializing our controller.
- (id)initWithNibName:(NSString *)nibNameOrNil bundle:(NSBundle *)nibBundleOrNil {

...
_permissions = [[NSArray arrayWithObjects:
@"read_stream", @"offline_access",nil] retain];
}

...
}
according to the documentation here - http://developers.facebook.com/docs/authentication/permissions/ , read_stream is the right to read the tape, and offline_access is the ability of your application to remain attached for much longer. Without this right, access tokens will burn quickly enough. We will return to this topic later. By the way, it was the confirmation of these rights that was requested from us when we pressed the Allow button above.
The second important point here is that we have identified ourselves, our class, (self) as a delegate and will receive messages from the facebook object as they become available.
Another very important point relates to how we return to our application after authorization. Remember, we entered some parameters above into the Resources / DemoApp-Info.plist file. And if we look at the DemoAppAppDelegate.m file, we will see a small method there, which is responsible for returning to our application.
- (BOOL)application:(UIApplication *)application handleOpenURL:(NSURL *)url {
return [[controller facebook] handleOpenURL:url];
}
Thus, to summarize. If you make an application from scratch, then for the SDK to work successfully you should
1. Specify the app ID in the code
2. Specify the app ID in the parameters file of your application.
3. In * AppDelegate.m of your application implement the method
- (BOOL)application:(UIApplication *)application handleOpenURL:(NSURL *)url {
return [[controller facebook] handleOpenURL:url];
}
Without the last two items, you will not be returned to your application after the login window.
Depending on what you returned to the application with, one of the three methods that we have registered as a delegate is called.
/**
* , .
*/
- (void)fbDidLogin {
[self.label setText:@"logged in"];
_getUserInfoButton.hidden = NO;
_getPublicInfoButton.hidden = NO;
_publishButton.hidden = NO;
_uploadPhotoButton.hidden = NO;
_fbButton.isLoggedIn = YES;
[_fbButton updateImage];
}

/**
* , .
*/
-(void)fbDidNotLogin:(BOOL)cancelled {
NSLog(@"did not login");
}

/**
* , logout .
*/
- (void)fbDidLogout {
[self.label setText:@"Please log in"];
_getUserInfoButton.hidden = YES;
_getPublicInfoButton.hidden = YES;
_publishButton.hidden = YES;
_uploadPhotoButton.hidden = YES;
_fbButton.isLoggedIn = NO;
[_fbButton updateImage];
}
Since we successfully logged in, all our other buttons appeared on the screen. You can study for yourself what they do; we will return to them in more detail later. For example, the “Call Graph API” button will show you your first and last name, and the “Call REST API” button will show you the first and last name of a person in id = 4, namely Mike Zuckerberg. Attempts to find out who is hiding under id = 1 were unsuccessful and the application crashed. So, anyone can explore this question on their own. And while I was writing the last paragraph I had to press the Login button again at least several times. What can be done so that once logged in to the application, you do not need to log in to facebook again. Now this will do. All we need to do is save the values of two variables in NSUserDefaults. viewDidLoad will look like this here:
- (void)viewDidLoad {
_facebook = [[Facebook alloc] initWithAppId:kAppId];

_facebook.accessToken = [[NSUserDefaults standardUserDefaults] stringForKey:@"AccessToken"];
_facebook.expirationDate = (NSDate *) [[NSUserDefaults standardUserDefaults] objectForKey:@"ExpirationDate"];

if ([_facebook isSessionValid] == NO) {
[self.label setText:@"Please log in"];
_getUserInfoButton.hidden = YES;
_getPublicInfoButton.hidden = YES;
_publishButton.hidden = YES;
_uploadPhotoButton.hidden = YES;
_fbButton.isLoggedIn = NO;
[_fbButton updateImage];
} else {
[self.label setText:@"logged in"];
_getUserInfoButton.hidden = NO;
_getPublicInfoButton.hidden = NO;
_publishButton.hidden = NO;
_uploadPhotoButton.hidden = NO;
_fbButton.isLoggedIn = YES;
[_fbButton updateImage];
}
}
we check whether the session is valid (isSessionValid) with the accessToken and expirationDate parameters saved in our NSUserDefaults. If yes, then we are already logged in and can perform further actions.
we add to the fbDidLogin and fbDidLogout methods respectively
fbDidLogin - write parameters
[[NSUserDefaults standardUserDefaults] setObject:self.facebook.accessToken forKey:@"AccessToken"];
[[NSUserDefaults standardUserDefaults] setObject:self.facebook.expirationDate forKey:@"ExpirationDate"];
fbDidLogout - reset them
[[NSUserDefaults standardUserDefaults] setObject:nil forKey:@"AccessToken"];
[[NSUserDefaults standardUserDefaults] setObject:nil forKey:@"ExpirationDate"];
We run our application, log in, check our name - everything is fine. Without pressing Logout, we stop our application and start it again - we see that we are still on Facebook - we check our name - everything works. Let me remind you that it was for this that we were right in asking for the right @ "offline_access". This version of the project can be downloaded below.
And in conclusion of today's article, let's see how the query mechanism and response processing work.
Facebook is urging us to use the GRAPH API, rather than using the old REST API, which is nonetheless still supported. On this page ( http://developers.facebook.com/docs/reference/api/ ) we can see examples of using the GRAPH API and see the output of information for you. In the demo program, facebook uses this request:
- (IBAction)getUserInfo:(id)sender {
[_facebook requestWithGraphPath:@"me" andDelegate:self];
}
for example, they show what the output will be with such a request
graph.facebook.com/btaylor
{
"Id": "220439",
"Name": "Bret Taylor",
"First_name": "Bret",
"Last_name": "Taylor",
"Link": " www.facebook.com/btaylor ",
"Username": "btaylor",
"Gender": "male",
"Locale": "en_US"
}
This means that we will receive an NSDictionary in response and will be able to get our full name using the key “name”. After we sent the request and assigned the recipient of the response, we need to make the methods responsible for receiving the response. For receiving an unprocessed (raw) response is responsible
- (void)request:(FBRequest *)request didReceiveResponse:(NSURLResponse *)response {
NSLog(@"received response");
}
and the parsed answer accepts:
- (void)request:(FBRequest *)request didLoad:(id)result {
if ([result isKindOfClass:[NSArray class]]) {
result = [result objectAtIndex:0];
}
if ([result objectForKey:@"owner"]) {
[self.label setText:@"Photo upload Success"];
} else {
[self.label setText:[result objectForKey:@"name"]];
}
};
The answer (result) can be a number, string, array or dictionary. If the answer came to us at once as NSArray, then several answers came to us at once and we need to break them down into separate answers. In this case, when we asked to tell who we are (me) are, the answer comes to the NSDictionary and there is no owner key, and therefore this line is called:
[self.label setText:[result objectForKey:@"name"]];Let's complicate things. For example, I want to get in the application information about what the user likes. Change the request according to the documentation for:
- (IBAction)getUserInfo:(id)sender {
[_facebook requestWithGraphPath:@"me/likes" andDelegate:self];
}
If you look at the Facebook site for the output of this request, you will see that the answer is the NSDictionary with only one data key. It will correspond to an array of NSDictionary objects with the keys “name”, “category”, “id”, “created_time”. It is also important not to forget to add “user_likes” to the requested rights, otherwise an empty NSDictionary object will return to our response!
To accept this answer, we will rewrite our method.
- (void)request:(FBRequest *)request didLoad:(id)result {
if ([result isKindOfClass:[NSArray class]]) {
result = [result objectAtIndex:0];
}
if ([result objectForKey:@"owner"]) {
[self.label setText:@"Photo upload Success"];
} else if ([result objectForKey:@"data"]){
NSArray *likes = [result objectForKey:@"data"];
NSString *text=@"You don't like Steve";
for (NSDictionary* mylike in likes) {
NSString *mylikeName = [mylike objectForKey:@"name"];
if ([mylikeName isEqualToString:@"Steve Jobs"]) {
text=@"You like Steve";
break;
}
}
[self.label setText:text];
}
};
If we received the answer in the form of NSDictionary, and there is a value by the key “data”, then we go through this array, looking into each object and check if there are any pages among the facebook pages that the user likes, with the name Steve Jobs. I was so, so the application gave me "You like Steve".
I’ll stop on this for now, although I would like to tell you what interesting options there are for forming a message on the wall from the application. But apparently it will be next time.
The project is original , but with amendments in the properties to run in Xcode4
Project with added ability to save session
Project with a modified request
Only you will need to put your appID in them :)
ps and I also love formatting code on Habré :)
Source: https://habr.com/ru/post/116417/
All Articles