Working with GtkTreeView and GtkListStore using Glade for Beginners
In this post I want to tell you about working with very interesting widgets (objects) of the GTK + GUI Library: GtkTreeView and GtkListStore . GtkTreeView is a widget for displaying trees and lists. GtkListStore is a widget representing a list model.
I will create them with the help of the Glade editor, there is very little material on the Internet specifically for working with GTK + widgets (and especially with these) using this interface editor. I already wrote a little about working with him. Those who have never worked with him - I advise you to read this post.
There are a lot of opportunities to work with these widgets and I plan to write a few more articles on this topic (if it will of course interest the readers). This post is designed for beginners to get acquainted with the GTK + library and its capabilities. Therefore, today I will consider a fairly simple example.
Its meaning will be that we will add data to the object of the GtkListStore class (I will sometimes call it a repository) about a computer game character and display it on the screen in a visual form using GtkTreeView.
')
But adding to the GtkListStore will not only be information about the character. This storage allows you to store various data. For example, font styles, font name, colors, images, various widget settings. In this example, I will show how for each individual character to set separately the color of his writing in GtkTreeView (it is also called the tree viewing widget, although in this example we will view the structure of the list format, not the tree view).
To begin with, consider the data warehouse - the GtkListStore widget. It presents a data structure similar to a table (just like a table in a database), each row is a record, the record consists of data (atomic) of different types. Each column sets its own data type. Columns are identified by a sequence number: the first column is 0, the second column is 1, the third column is 2, and so on.
Usually, an enumeration is created for more understandable access to the storage columns:
To start, open Glade (for example, I will use version 3.6.7 - from the Ubuntu repository, although there are newer versions that support GTK + 3.0). Create a form, on the left in the object pane, look for the Window and put it on the workspace. On the left, on the property panels in the General tab, look for the Window Title and set it as: “Example of working with GtkTreeView and GtkListStore” , in the Common tab, specify Width request and Height requst: 650 and 350, respectively. Next, you will need to put on it Horizontal Panes, in two compartments which are put Scrolled Window. You should be able to do this step, as shown in the image below (clickable):

now go to the object panel, click on the Tree Model and look for the List Store - our future storage (GtkLitStore widget).

By clicking on this widget, it will automatically appear in the widget tree on the right in the Objects tab. Click on it and look at the properties. Such settings will appear, though you can scroll even lower and there will be Add and remove rows, but we don’t need it, because We will enter the data from the controls (which we will do later).

First, change the name to liststorePlayers . Secondly, in Add and Remove Columns we need to add the following columns: Name (name) - string, Health (non-health) - integer, Power (power) - integer, Selection flag (seleted) - logical and font color (colortext) - type of color.
So we add the first column name - choose the type gchararray in the Column type, and in the Column name write the name . Then the second health column - in the Column type we write gint , in the Column name health . Similarly for power type gint . Next flag selection - choose the type gboolean , and in the Column name selected . And then ... And then we are waiting for a little trouble. We need the font color of the GdkColor type (the structure used in GTK + to represent color). You look at the large number of possible choices for the type, but GdkColor is not there. Apparently this is a flaw in the Glade developers and will come to add to ourselves. If we try to put it in there, it still won't work. It is necessary to remember that Glade stores the description of the interface in an XML file, and therefore it can be corrected. So, we create another field of type gchararray , for example, in the Column type we write colortext .

Save our interface description with the name mainForm and open the resulting file. We are looking for GtkListStore there.
Change our gchararray to GdkColor
Save and open again in Glade. We look at the type of the column and see that everything is as we need it:

The configuration of the GtkListStore is now complete. Now we need to make it so that the data can be displayed in a less beautiful form. To do this, go back to the object panel and look for the Tree View there - this is the GtkTreeView widget.

We put it on the left scrolledwindow (I have it called scrolledwindow1, you can rename all objects in general, but I rename only those that will be used in the code later, in general, it is desirable to rename everything). After you have taken the Tree View in the object panel and clicking on the left scrolledwindow, you will get a message saying that you should specify the TreeView Model.

In our case, the TreeView Model is our repository - the GtkListStore, namely the liststorePlayers widget. Click ... and select liststorePlayers there.

Click OK for this dialog and for the previous one. Now we need to set up or it will be more correct to say to link the data from the storage with a specific form of displaying them on the screen. Click on treeview1 (this is what you call it) on the right panel of objects and go to the top menu where we are looking for Edit.

The edit dialog of our Tree View opens.

The General tab contains general properties for the entire Tree View as a whole. First, change Name to treeviewPlayers . We also set the Enable Grid Lines property in Horizontal and Vertical - displaying the visual separation of rows and columns. Go to the tab Hierarcy. In it, we will link data from the repository with a specific implementation of their display.

A bit of theory. Remember that the columns in the List Store and the columns in the Tree View are completely different things and there is no connection between them. Specific data is not tied to the columns of the Tree View. Tree View columns serve more as a logical-visual separation for the output data. To represent specific data from the repository, GtkCellRenderer class objects are used .
In our example, 4 different types of presentation objects will be used:
GtkCellRendererText - plain text to display the name from the repository;
GtkCellRendererProgress - the scale of execution, and if it is more simple - this is the usual ProgressBar, with the help of it we will display health and power from the storage;
GtkCellRendererSpin - the “carousel” button, with the help of it we will be able to change the power value directly in the Tree View;
GtkCellRendererToggle - the switch button in the cell, with its help we will display the record selection flag.
We return to the Glade. Click the Add button and we will have one column. In general, you can not add columns in principle. One is enough, but it will not be very nice and not very flexible in terms of output. Therefore, we do as follows. We will have 4 columns: Name, Health, Power, Seleted. But in the Power column, we will derive the Power value from the repository and in the GtkCellRendererSpin and in the GtkCellRendererProgress.
Right-click on the added line: column column and select there Add child Text item. As a result, you should get the following:

Thus, we added GtkCellRendererText - to display text content. Begin to change the properties that are located on the right. In Name we put the name cellrenderertextName . Next is the Text property. Where u is written unset click on the arrows and in the drop-down menu, select the name - gchararray . Zero means that the column with number 0 is attached from the storage (GtkListStore) with the data stored there (the character name string we specified in the GtkListStore: name of the gchararray type).

Scroll down the list of properties and look for Background color. I propose to ask it hard, i.e. for all the rows of this GtkCellRendererText will be the same background color. To do this, remove the check mark and the color selection button will appear. Click on it and choose the color that you prefer. But below is the property Foreground color. I already suggest to take it from storage. Thus, for each specific line it will be possible to have a different font color property. To do this, click on the right unset and select there colortext - GdkColor . And you should have the number 4. i. the column number from the GtkListStore where we store the color. It is also necessary to make it so that you can edit the name directly in the Tree View. To do this, scroll through the properties even lower and look for Editable there. Remove the check mark and press the button so that Yes appears. You should be able to:

I think it has become more or less clear what the essence of the attachment is. When the property has a tick, then the data is taken from the repository. By default, all properties are -1, i.e. Nothing from the GtkListStore repository column takes anything. Our task is to specify the column number of the storage where the values for the property will be taken from. If we want to set something hard ourselves, remove the check mark and set it up as we want. But then these settings will not depend on the data in the GtkListStore and will be applied to absolutely all rows of this view object.
Next, create another column. Click on our first column, it will be highlighted and click Add. One more column will be added. If we had allocated our GtkCellRendererText, then one more view object would be added to the first column. Glade is sometimes a bit uncomfortable. But that's okay.
Now add the view object GtkCellRendererProgress, where we will display the Health - the health of our character using the ProgressBar. Right-click on the new column and select the Add child Progress item. Set the Name property in the cellrendererprogressHealth , choose Health - gint in the Value, the number 1 appears - it means the data will be taken from the first column of the GtkListStore.

Set the property Background color. You can choose the same color as for GtkCellRendererText in the previous step (I did just that) and you can choose your own color. It may turn out to be a small bug, when you select a color on the button, it will be displayed, and in the line the color code will be # 000000000000. Dont be upset. The color is set normally, after you close the edit dialog of this Tree View and open it again, everything will be fine. A small Glade glitch.

Now add one more column and insert GtkCellRendererSpin and GtkCellRendererProgress into it (just like we inserted GtkCellRendererText above). For the first Add child Spin item, for the second Add child Progress item. Let's name them respectively cellrendererspinPower and cellrendererprogressPower (Name property).

Now you need to temporarily close the Tree View Editor window and create a GtkAdjustment widget called adjCellRendererSpinPower for the cellrendererspinPower . On the object panel, select Adjustment, as shown in the figure below, and it will appear in the widget tree in Objects.

In the properties of adjCellRendererSpinPower set the Maximum value: 100.00 , Page Size: 0.00 . Go back to edit mode of our GtkTreeView widget. Now you need to determine the adjCellRendererSpinPower for cellrendererspinPower. Uncheck the Adjustment, click ... and select adjCellRendererSpinPower.

Glade has another bad bug. When you open a new GladeXML file with a description of the interface that we create, this same Adjustment box is reset. Do not forget about it. Now we set other properties, let's start with Text. Choose from the dropdown list power - gint , i.e. bind from the storage column number 2 with the data with the data on the force.

Yes, we also do Yes :

It is also necessary to set, as for past objects width: 60 ; Cell background color: # c0c0e5e5e7e7 (I remind you that you may have a different color) and Horizontal Padding: 5 . Now for the cellrendererprogressPower, set the Text (the displayed text on the scale) and Value (the scale value) also in power - gint .

And of course, we install as for past objects width: 100 ; Cell background color: # c0c0e5e5e7e7 and Horizontal Padding: 5 .
It remains to add the last object in the GtkTreeView - cellrenderertoggleSelected - widget of the type Toggle (Add Toggle Item). We correlate its Toggle State property with selected gboolean , with column number 3 from the data store:

Also set the Cell background color: # c0c0e5e5e7e7 .
Lastly, it is necessary to sign the columns, i.e. set the Column Title property for all. The corresponding values are: Name , Health , Power , Selected :

This completes the GtkTreeView setup. Now the widget tree will look like this:

Next, you need to register signal handlers (events) for some GtkTreeView widgets and for it. Click on the cellrenderertextName widget and go to the Signals tab, look for the event (I’ll still call the signals as events) edited - editing the text field. Using the drop-down list or manually write the name of the handler for this event on_cellrenderertextName_edited , as shown in the figure below:

We do the same for the cellrendererspinPower widget for the edited event. Handler on_cellrendererspinPower_edited - changing the value using the carousel. For the cellrenderertoggleSelected widget, look for the toggled event - change the state of the switch and select the name of the on_cellrenderertoggleSelected_toggled handler. And now click on our own treeviewPlayers widget and look for the row_activated tab in the Signals tab. We write or choose the name of the on_treeviewPlayers_row_activated handler.
Although, in principle, you can, as you prefer, call event handlers. Most importantly, just like in Glade, specify them later in the code.
Now you need to add a small dialog box with which you can quickly add new characters and cause other manipulations. I will not describe in detail the process of creating this menu, because The purpose of the post is to tell about GtkTreeView and GtkListStore, I’ll just briefly tell you the basic steps and show you how it should end up.
First, for scrolledwindow1, we set both the Resize and Shrink properties to Yes (the Packing tab) and Width request to 370 (the Common tab). For scrolledwindow2, the Resize property is No , and Shrink is Yes , and Width request is 250 . Next, add the GtkViewport widget to scrolledwindow2, and already have a GtkVBox widget (vertical container) consisting of 8 cells. The first four will be GtkHBox widgets (horizontal container) consisting of GtkLabel (signatures) and control panels: entryName (GtkEntry), spinbuttonHealth (GtkCpinButton), spinbuttonPower (GtkSpinButton) and colorbutFontColor (Gtkkpin) (color GutkSpinButton) and colorbutFontColor (GtkCpinButton), spinbuttonPower (GtkSpinButton), and colorbutFontColor (GtkCpinButton), spinbuttonPower (GtkSpinButton), and colorbutFontColor (GtkCpinButton), spinbuttonPower (GtkSpinButton), and colorbutFontColor (GtkCpinButton) I explain: it is necessary to add 4 GtkHBox consisting of 2 two cells: one for the signature (left), the other for the control (right) listed above.
The four lower buttons are: butAdd, butDelete, butPrint, butQuit. For all widgets inside GtkVBox, I recommend setting Expand and Fill properties in No in the Packing tab (these properties are described in my previous post ). Also, spinbuttonHealth and spinbuttonPower widgets must be associated with the corresponding GtkAdjustment widgets. I called them adjHealth and adjPower. And set the appropriate settings:

Linking to spinbuttonHealth and spinbuttonPower occurs by selecting the Adjustment created by adjHealth and adjPower in their properties.
All that remains to be done in Glade is to define handlers for the buttons: butAdd, butDelete, butPrint, butQuit. Click on each widget and in the Event tab for the clicked property, select on_butAdd_clicked , on_butDelete_clicked , on_butPrint_clicked , on_butQuit_clicked .
The result should be the following:

But in general, the whole window of our training application looks like this:

Now we are going to write the code. All code will be contained in the file Example1.cpp, although you can name it as you like.
The structure for working with the repository, which was mentioned at the beginning:
Protopips of event handlers, the names should be the same as we specified in the Signals tab for widgets in the Glade editor. Because C ++ compiler is used, then we indicate that they should be linked according to the binding order in the C language.
A structure containing pointers to widgets that were created in Glade and will be obtained from GladeXML in the main function.
In main, we get widgets from the GladeXML format. Using gtk_tree_selection_set_mode, we set the ability to select multiple lines in GtkTreeView. We bind our event handlers using the gtk_builder_connect_signals function and at the same time pass pointers to widgets using the mainWindowObjects link. Thus, as you will see later using the gpointer data pointer, it will be possible to access all widgets from the handler function.
Implement a new character handler. gtk_list_store_append - adds a new line to the model (storage) and returns iter - a link to it (or else it is called an iterator pointing to the line). And the gtk_list_store_set function sets the cell values in the row that iter points to. Values are specified using the enumeration: NAME, HEALTH, etc. The sign of the end is -1.
Implementing a handler for editing a cell with the name. Using the gtk_tree_view_get_model function, we get the model (storage) associated with our GtkTreeView. Using the gtk_tree_model_get_iter_from_string function, we get a reference to the string from the path path (which is in the function signature, for this storage view this path is just the line number that was changed), and then using the gtk_list_store_set already familiar to us, we set the new value, which is in new_text. In general, the signature of this handler (as well as other handlers) is taken from the official Gtk + documentation .
Those. for each widget, you can find the event signature there (or how they write signal - the signal signature).
Implementing an event handler using the carousel button. It is almost the same as described above. Except that you need to convert a new value to an int. For simplicity, I used the old C-shnu function atoi, although it could be implemented using stringstream.
Implementing a click handler on a cell with a switch (flag) - 4th column. Using gtk_tree_model_get, we get the current state of the switch and set the opposite:! Selected
The implementation of the method of printing selected lines. Using the gtk_tree_model_get_iter_first function, we get a link to the first line and at the same time we check if the storage is empty (reader flag). Using the gtk_tree_model_get method, we obtain the cell values of interest to us for the current row, which iter "looks" at. Go to the next line using gtk_tree_model_iter_next.
An implementation of a method that double-clicks a row in a GtkTreeView. Using the gtk_tree_model_get_iter function, we get the iter from the path, and then we get the data we are interested in using gtk_tree_model_get and output them to the console.
This function is auxiliary for deleting selected lines in GtkTreeView. gtk_list_store_remove - removes the given line from the list referenced by iter. Before this, we extract the path using gtk_tree_row_reference_get_path, and then convert the path to iter using gtk_tree_model_get_iter.
Using the gtk_tree_selection_get_selected_rows function, we get a list of selected lines, then use the while loop to go through each selected line and create a reference based on the path using the gtk_tree_row_reference_new function and add this link to the references list using g_list_prepend.
Call the remove_row function for each link using g_list_foreach. And at the end, likewise, using g_list_foreach, we release our lists.
Implementing GTK + Application Close Handler
To compile, you need to create a makefile:
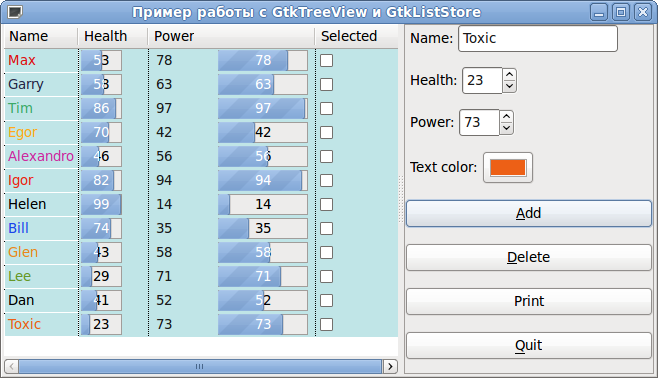
Now you can compile this example and try to “play around” with what we have done. I advise you to run from the console distribution of your Linux distribution. Try to add a few characters, choosing different colors of their name. Try to select several lines in the 4th column and click Print, then the selected ones will be printed in the console. Try changing the Power value using the carousel (double click on it, to the left of the Progress bar). Try using the pressed Ctrl or Shift keys to select a few added lines and delete them by pressing Delete.
This example can be downloaded from here .
Compilation is done with the command:
Run:
I tried to describe as many things as possible in some detail (some may even be too), but all this was done to understand this topic more quickly.
I will create them with the help of the Glade editor, there is very little material on the Internet specifically for working with GTK + widgets (and especially with these) using this interface editor. I already wrote a little about working with him. Those who have never worked with him - I advise you to read this post.
There are a lot of opportunities to work with these widgets and I plan to write a few more articles on this topic (if it will of course interest the readers). This post is designed for beginners to get acquainted with the GTK + library and its capabilities. Therefore, today I will consider a fairly simple example.
Its meaning will be that we will add data to the object of the GtkListStore class (I will sometimes call it a repository) about a computer game character and display it on the screen in a visual form using GtkTreeView.
')
But adding to the GtkListStore will not only be information about the character. This storage allows you to store various data. For example, font styles, font name, colors, images, various widget settings. In this example, I will show how for each individual character to set separately the color of his writing in GtkTreeView (it is also called the tree viewing widget, although in this example we will view the structure of the list format, not the tree view).
To begin with, consider the data warehouse - the GtkListStore widget. It presents a data structure similar to a table (just like a table in a database), each row is a record, the record consists of data (atomic) of different types. Each column sets its own data type. Columns are identified by a sequence number: the first column is 0, the second column is 1, the third column is 2, and so on.
Usually, an enumeration is created for more understandable access to the storage columns:
enum { NAME = 0, HEALTH, POWER, SELECTED, FONT_COLOR }; To start, open Glade (for example, I will use version 3.6.7 - from the Ubuntu repository, although there are newer versions that support GTK + 3.0). Create a form, on the left in the object pane, look for the Window and put it on the workspace. On the left, on the property panels in the General tab, look for the Window Title and set it as: “Example of working with GtkTreeView and GtkListStore” , in the Common tab, specify Width request and Height requst: 650 and 350, respectively. Next, you will need to put on it Horizontal Panes, in two compartments which are put Scrolled Window. You should be able to do this step, as shown in the image below (clickable):
now go to the object panel, click on the Tree Model and look for the List Store - our future storage (GtkLitStore widget).
By clicking on this widget, it will automatically appear in the widget tree on the right in the Objects tab. Click on it and look at the properties. Such settings will appear, though you can scroll even lower and there will be Add and remove rows, but we don’t need it, because We will enter the data from the controls (which we will do later).
First, change the name to liststorePlayers . Secondly, in Add and Remove Columns we need to add the following columns: Name (name) - string, Health (non-health) - integer, Power (power) - integer, Selection flag (seleted) - logical and font color (colortext) - type of color.
So we add the first column name - choose the type gchararray in the Column type, and in the Column name write the name . Then the second health column - in the Column type we write gint , in the Column name health . Similarly for power type gint . Next flag selection - choose the type gboolean , and in the Column name selected . And then ... And then we are waiting for a little trouble. We need the font color of the GdkColor type (the structure used in GTK + to represent color). You look at the large number of possible choices for the type, but GdkColor is not there. Apparently this is a flaw in the Glade developers and will come to add to ourselves. If we try to put it in there, it still won't work. It is necessary to remember that Glade stores the description of the interface in an XML file, and therefore it can be corrected. So, we create another field of type gchararray , for example, in the Column type we write colortext .
Save our interface description with the name mainForm and open the resulting file. We are looking for GtkListStore there.
<object class="GtkListStore" id="liststorePlayers"> <columns> <!-- column-name name --> <column type="gchararray"/> <!-- column-name health --> <column type="gint"/> <!-- column-name power --> <column type="gint"/> <!-- column-name selected --> <column type="gboolean"/> <!-- column-name colortext --> <column type="gchararray"/> </columns> </object> Change our gchararray to GdkColor
<object class="GtkListStore" id="liststorePlayers"> <columns> <!-- column-name name --> <column type="gchararray"/> <!-- column-name health --> <column type="gint"/> <!-- column-name power --> <column type="gint"/> <!-- column-name selected --> <column type="gboolean"/> <!-- column-name colortext --> <column type="GdkColor"/> </columns> </object> Save and open again in Glade. We look at the type of the column and see that everything is as we need it:
The configuration of the GtkListStore is now complete. Now we need to make it so that the data can be displayed in a less beautiful form. To do this, go back to the object panel and look for the Tree View there - this is the GtkTreeView widget.
We put it on the left scrolledwindow (I have it called scrolledwindow1, you can rename all objects in general, but I rename only those that will be used in the code later, in general, it is desirable to rename everything). After you have taken the Tree View in the object panel and clicking on the left scrolledwindow, you will get a message saying that you should specify the TreeView Model.
In our case, the TreeView Model is our repository - the GtkListStore, namely the liststorePlayers widget. Click ... and select liststorePlayers there.
Click OK for this dialog and for the previous one. Now we need to set up or it will be more correct to say to link the data from the storage with a specific form of displaying them on the screen. Click on treeview1 (this is what you call it) on the right panel of objects and go to the top menu where we are looking for Edit.
The edit dialog of our Tree View opens.
The General tab contains general properties for the entire Tree View as a whole. First, change Name to treeviewPlayers . We also set the Enable Grid Lines property in Horizontal and Vertical - displaying the visual separation of rows and columns. Go to the tab Hierarcy. In it, we will link data from the repository with a specific implementation of their display.
A bit of theory. Remember that the columns in the List Store and the columns in the Tree View are completely different things and there is no connection between them. Specific data is not tied to the columns of the Tree View. Tree View columns serve more as a logical-visual separation for the output data. To represent specific data from the repository, GtkCellRenderer class objects are used .
In our example, 4 different types of presentation objects will be used:
GtkCellRendererText - plain text to display the name from the repository;
GtkCellRendererProgress - the scale of execution, and if it is more simple - this is the usual ProgressBar, with the help of it we will display health and power from the storage;
GtkCellRendererSpin - the “carousel” button, with the help of it we will be able to change the power value directly in the Tree View;
GtkCellRendererToggle - the switch button in the cell, with its help we will display the record selection flag.
We return to the Glade. Click the Add button and we will have one column. In general, you can not add columns in principle. One is enough, but it will not be very nice and not very flexible in terms of output. Therefore, we do as follows. We will have 4 columns: Name, Health, Power, Seleted. But in the Power column, we will derive the Power value from the repository and in the GtkCellRendererSpin and in the GtkCellRendererProgress.
Right-click on the added line: column column and select there Add child Text item. As a result, you should get the following:
Thus, we added GtkCellRendererText - to display text content. Begin to change the properties that are located on the right. In Name we put the name cellrenderertextName . Next is the Text property. Where u is written unset click on the arrows and in the drop-down menu, select the name - gchararray . Zero means that the column with number 0 is attached from the storage (GtkListStore) with the data stored there (the character name string we specified in the GtkListStore: name of the gchararray type).
Scroll down the list of properties and look for Background color. I propose to ask it hard, i.e. for all the rows of this GtkCellRendererText will be the same background color. To do this, remove the check mark and the color selection button will appear. Click on it and choose the color that you prefer. But below is the property Foreground color. I already suggest to take it from storage. Thus, for each specific line it will be possible to have a different font color property. To do this, click on the right unset and select there colortext - GdkColor . And you should have the number 4. i. the column number from the GtkListStore where we store the color. It is also necessary to make it so that you can edit the name directly in the Tree View. To do this, scroll through the properties even lower and look for Editable there. Remove the check mark and press the button so that Yes appears. You should be able to:
I think it has become more or less clear what the essence of the attachment is. When the property has a tick, then the data is taken from the repository. By default, all properties are -1, i.e. Nothing from the GtkListStore repository column takes anything. Our task is to specify the column number of the storage where the values for the property will be taken from. If we want to set something hard ourselves, remove the check mark and set it up as we want. But then these settings will not depend on the data in the GtkListStore and will be applied to absolutely all rows of this view object.
Next, create another column. Click on our first column, it will be highlighted and click Add. One more column will be added. If we had allocated our GtkCellRendererText, then one more view object would be added to the first column. Glade is sometimes a bit uncomfortable. But that's okay.
Now add the view object GtkCellRendererProgress, where we will display the Health - the health of our character using the ProgressBar. Right-click on the new column and select the Add child Progress item. Set the Name property in the cellrendererprogressHealth , choose Health - gint in the Value, the number 1 appears - it means the data will be taken from the first column of the GtkListStore.
Set the property Background color. You can choose the same color as for GtkCellRendererText in the previous step (I did just that) and you can choose your own color. It may turn out to be a small bug, when you select a color on the button, it will be displayed, and in the line the color code will be # 000000000000. Dont be upset. The color is set normally, after you close the edit dialog of this Tree View and open it again, everything will be fine. A small Glade glitch.
Now add one more column and insert GtkCellRendererSpin and GtkCellRendererProgress into it (just like we inserted GtkCellRendererText above). For the first Add child Spin item, for the second Add child Progress item. Let's name them respectively cellrendererspinPower and cellrendererprogressPower (Name property).
Now you need to temporarily close the Tree View Editor window and create a GtkAdjustment widget called adjCellRendererSpinPower for the cellrendererspinPower . On the object panel, select Adjustment, as shown in the figure below, and it will appear in the widget tree in Objects.
In the properties of adjCellRendererSpinPower set the Maximum value: 100.00 , Page Size: 0.00 . Go back to edit mode of our GtkTreeView widget. Now you need to determine the adjCellRendererSpinPower for cellrendererspinPower. Uncheck the Adjustment, click ... and select adjCellRendererSpinPower.
Glade has another bad bug. When you open a new GladeXML file with a description of the interface that we create, this same Adjustment box is reset. Do not forget about it. Now we set other properties, let's start with Text. Choose from the dropdown list power - gint , i.e. bind from the storage column number 2 with the data with the data on the force.
Yes, we also do Yes :
It is also necessary to set, as for past objects width: 60 ; Cell background color: # c0c0e5e5e7e7 (I remind you that you may have a different color) and Horizontal Padding: 5 . Now for the cellrendererprogressPower, set the Text (the displayed text on the scale) and Value (the scale value) also in power - gint .
And of course, we install as for past objects width: 100 ; Cell background color: # c0c0e5e5e7e7 and Horizontal Padding: 5 .
It remains to add the last object in the GtkTreeView - cellrenderertoggleSelected - widget of the type Toggle (Add Toggle Item). We correlate its Toggle State property with selected gboolean , with column number 3 from the data store:
Also set the Cell background color: # c0c0e5e5e7e7 .
Lastly, it is necessary to sign the columns, i.e. set the Column Title property for all. The corresponding values are: Name , Health , Power , Selected :
This completes the GtkTreeView setup. Now the widget tree will look like this:
Next, you need to register signal handlers (events) for some GtkTreeView widgets and for it. Click on the cellrenderertextName widget and go to the Signals tab, look for the event (I’ll still call the signals as events) edited - editing the text field. Using the drop-down list or manually write the name of the handler for this event on_cellrenderertextName_edited , as shown in the figure below:
We do the same for the cellrendererspinPower widget for the edited event. Handler on_cellrendererspinPower_edited - changing the value using the carousel. For the cellrenderertoggleSelected widget, look for the toggled event - change the state of the switch and select the name of the on_cellrenderertoggleSelected_toggled handler. And now click on our own treeviewPlayers widget and look for the row_activated tab in the Signals tab. We write or choose the name of the on_treeviewPlayers_row_activated handler.
Although, in principle, you can, as you prefer, call event handlers. Most importantly, just like in Glade, specify them later in the code.
Now you need to add a small dialog box with which you can quickly add new characters and cause other manipulations. I will not describe in detail the process of creating this menu, because The purpose of the post is to tell about GtkTreeView and GtkListStore, I’ll just briefly tell you the basic steps and show you how it should end up.
First, for scrolledwindow1, we set both the Resize and Shrink properties to Yes (the Packing tab) and Width request to 370 (the Common tab). For scrolledwindow2, the Resize property is No , and Shrink is Yes , and Width request is 250 . Next, add the GtkViewport widget to scrolledwindow2, and already have a GtkVBox widget (vertical container) consisting of 8 cells. The first four will be GtkHBox widgets (horizontal container) consisting of GtkLabel (signatures) and control panels: entryName (GtkEntry), spinbuttonHealth (GtkCpinButton), spinbuttonPower (GtkSpinButton) and colorbutFontColor (Gtkkpin) (color GutkSpinButton) and colorbutFontColor (GtkCpinButton), spinbuttonPower (GtkSpinButton), and colorbutFontColor (GtkCpinButton), spinbuttonPower (GtkSpinButton), and colorbutFontColor (GtkCpinButton), spinbuttonPower (GtkSpinButton), and colorbutFontColor (GtkCpinButton) I explain: it is necessary to add 4 GtkHBox consisting of 2 two cells: one for the signature (left), the other for the control (right) listed above.
The four lower buttons are: butAdd, butDelete, butPrint, butQuit. For all widgets inside GtkVBox, I recommend setting Expand and Fill properties in No in the Packing tab (these properties are described in my previous post ). Also, spinbuttonHealth and spinbuttonPower widgets must be associated with the corresponding GtkAdjustment widgets. I called them adjHealth and adjPower. And set the appropriate settings:
Linking to spinbuttonHealth and spinbuttonPower occurs by selecting the Adjustment created by adjHealth and adjPower in their properties.
All that remains to be done in Glade is to define handlers for the buttons: butAdd, butDelete, butPrint, butQuit. Click on each widget and in the Event tab for the clicked property, select on_butAdd_clicked , on_butDelete_clicked , on_butPrint_clicked , on_butQuit_clicked .
The result should be the following:
But in general, the whole window of our training application looks like this:
Now we are going to write the code. All code will be contained in the file Example1.cpp, although you can name it as you like.
#include <stdlib.h> #include <gtk/gtk.h> #define UI_FILE "mainForm.glade" The structure for working with the repository, which was mentioned at the beginning:
enum { NAME = 0, HEALTH, POWER, SELECTED, FONT_COLOR }; Protopips of event handlers, the names should be the same as we specified in the Signals tab for widgets in the Glade editor. Because C ++ compiler is used, then we indicate that they should be linked according to the binding order in the C language.
extern "C" void on_butQuit_clicked(GtkWidget *TopWindow, gpointer data); extern "C" void on_butAdd_clicked(GtkWidget *window, gpointer data); extern "C" void on_butDelete_clicked (GtkButton *remove, gpointer data); extern "C" void on_butPrint_clicked(GtkWidget *button, gpointer data); extern "C" void on_cellrendererspinPower_edited(GtkCellRendererText *render, gchar *path, gchar *new_text, gpointer data); extern "C" void on_cellrenderertoggleSelected_toggled(GtkCellRendererToggle *render, gchar *path, gpointer data); extern "C" void on_treeviewPlayers_row_activated(GtkTreeView *treeview, GtkTreePath *path, GtkTreeViewColumn *col, gpointer data); extern "C" void on_cellrenderertextName_edited(GtkCellRendererText *renderer, gchar *path, gchar *new_text, gpointer data); A structure containing pointers to widgets that were created in Glade and will be obtained from GladeXML in the main function.
struct MainWindowObjects { GtkWindow *topWindow; GtkTreeView *treeviewPlayers; GtkListStore *liststorePlayers; GtkEntry *entryName; GtkAdjustment *adjHealth; GtkAdjustment *adjPower; GtkColorButton *colorbutFontColor; } mainWindowObjects; In main, we get widgets from the GladeXML format. Using gtk_tree_selection_set_mode, we set the ability to select multiple lines in GtkTreeView. We bind our event handlers using the gtk_builder_connect_signals function and at the same time pass pointers to widgets using the mainWindowObjects link. Thus, as you will see later using the gpointer data pointer, it will be possible to access all widgets from the handler function.
int main(int argc, char** argv) { GtkBuilder *builder; GError *error = NULL; gtk_init( &argc, &argv ); builder = gtk_builder_new(); if( ! gtk_builder_add_from_file( builder, UI_FILE, &error ) ) { g_warning( "%s\n", error->message ); g_free( error ); return( 1 ); } mainWindowObjects.topWindow = GTK_WINDOW(gtk_builder_get_object(builder, "topWindow")); mainWindowObjects.treeviewPlayers = GTK_TREE_VIEW( gtk_builder_get_object( builder, "treeviewPlayers" ) ); mainWindowObjects.liststorePlayers = GTK_LIST_STORE( gtk_builder_get_object(builder, "liststorePlayers") ); mainWindowObjects.entryName = GTK_ENTRY( gtk_builder_get_object(builder, "entryName") ); mainWindowObjects.adjHealth = GTK_ADJUSTMENT( gtk_builder_get_object(builder, "adjHealth") ); mainWindowObjects.adjPower = GTK_ADJUSTMENT( gtk_builder_get_object(builder, "adjPower") ); mainWindowObjects.colorbutFontColor = GTK_COLOR_BUTTON( gtk_builder_get_object(builder, "colorbutFontColor") ); GtkTreeSelection *selection; selection = gtk_tree_view_get_selection( GTK_TREE_VIEW(mainWindowObjects.treeviewPlayers) ); gtk_tree_selection_set_mode( selection, GTK_SELECTION_MULTIPLE ); gtk_builder_connect_signals (builder, &mainWindowObjects); g_object_unref( G_OBJECT( builder ) ); gtk_widget_show_all ( GTK_WIDGET (mainWindowObjects.topWindow) ); gtk_main (); } Implement a new character handler. gtk_list_store_append - adds a new line to the model (storage) and returns iter - a link to it (or else it is called an iterator pointing to the line). And the gtk_list_store_set function sets the cell values in the row that iter points to. Values are specified using the enumeration: NAME, HEALTH, etc. The sign of the end is -1.
void on_butAdd_clicked(GtkWidget *button, gpointer data) { MainWindowObjects* mwo = static_cast<MainWindowObjects*>( data ); GtkTreeIter iter; GdkColor color; gtk_color_button_get_color( mwo->colorbutFontColor, &color ); gtk_list_store_append(GTK_LIST_STORE( mwo->liststorePlayers ), &iter); gtk_list_store_set(GTK_LIST_STORE( mwo->liststorePlayers ), &iter, NAME, gtk_entry_get_text(mwo->entryName), HEALTH, static_cast<int>( gtk_adjustment_get_value(mwo->adjHealth) ), POWER, static_cast<int>( gtk_adjustment_get_value(mwo->adjPower) ), SELECTED, false, FONT_COLOR, &color, -1 ); } Implementing a handler for editing a cell with the name. Using the gtk_tree_view_get_model function, we get the model (storage) associated with our GtkTreeView. Using the gtk_tree_model_get_iter_from_string function, we get a reference to the string from the path path (which is in the function signature, for this storage view this path is just the line number that was changed), and then using the gtk_list_store_set already familiar to us, we set the new value, which is in new_text. In general, the signature of this handler (as well as other handlers) is taken from the official Gtk + documentation .
Those. for each widget, you can find the event signature there (or how they write signal - the signal signature).
void on_cellrenderertextName_edited(GtkCellRendererText *renderer, gchar *path, gchar *new_text, gpointer data) { MainWindowObjects* mwo = static_cast<MainWindowObjects*>( data ); if ( g_ascii_strcasecmp(new_text, "") != 0 ) { GtkTreeIter iter; GtkTreeModel *model; model = gtk_tree_view_get_model (mwo->treeviewPlayers); if (gtk_tree_model_get_iter_from_string(model, &iter, path) ) gtk_list_store_set(GTK_LIST_STORE (model), &iter, NAME, new_text, -1 ); } } Implementing an event handler using the carousel button. It is almost the same as described above. Except that you need to convert a new value to an int. For simplicity, I used the old C-shnu function atoi, although it could be implemented using stringstream.
void on_cellrendererspinPower_edited(GtkCellRendererText *renderer, gchar *path, gchar *new_text, gpointer data) { MainWindowObjects* mwo = static_cast<MainWindowObjects*>( data ); if ( g_ascii_strcasecmp(new_text, "") != 0 ) { GtkTreeIter iter; GtkTreeModel *model; model = gtk_tree_view_get_model (mwo->treeviewPlayers); if (gtk_tree_model_get_iter_from_string(model, &iter, path) ) gtk_list_store_set(GTK_LIST_STORE (model), &iter, POWER, atoi(new_text), -1 ); } } Implementing a click handler on a cell with a switch (flag) - 4th column. Using gtk_tree_model_get, we get the current state of the switch and set the opposite:! Selected
void on_cellrenderertoggleSelected_toggled(GtkCellRendererToggle *render, gchar *path, gpointer data) { MainWindowObjects* mwo = static_cast<MainWindowObjects*>( data ); GtkTreeIter iter; GtkTreeModel *model; gboolean selected; model = gtk_tree_view_get_model ( mwo->treeviewPlayers ); if (gtk_tree_model_get_iter_from_string(model, &iter, path) ) { gtk_tree_model_get( model, &iter, 3, &selected, -1 ); gtk_list_store_set( GTK_LIST_STORE (model), &iter, SELECTED, !selected, -1 ); } } The implementation of the method of printing selected lines. Using the gtk_tree_model_get_iter_first function, we get a link to the first line and at the same time we check if the storage is empty (reader flag). Using the gtk_tree_model_get method, we obtain the cell values of interest to us for the current row, which iter "looks" at. Go to the next line using gtk_tree_model_iter_next.
void on_butPrint_clicked(GtkWidget *button, gpointer data) { MainWindowObjects* mwo = static_cast<MainWindowObjects*>( data ); GtkTreeIter iter; gboolean reader = gtk_tree_model_get_iter_first(GTK_TREE_MODEL( mwo->liststorePlayers ), &iter); g_print( "Selected rows:\n" ); while ( reader ) { gboolean selected; gtk_tree_model_get (GTK_TREE_MODEL( mwo->liststorePlayers ), &iter, SELECTED, &selected, -1); if ( selected ) { gchar* name; gint health; gint power; gtk_tree_model_get (GTK_TREE_MODEL( mwo->liststorePlayers ), &iter, NAME, &name, HEALTH, &health, POWER, &power, -1); g_print( "%s %d %d\n", name, health, power ); } reader = gtk_tree_model_iter_next(GTK_TREE_MODEL( mwo->liststorePlayers ), &iter); } } An implementation of a method that double-clicks a row in a GtkTreeView. Using the gtk_tree_model_get_iter function, we get the iter from the path, and then we get the data we are interested in using gtk_tree_model_get and output them to the console.
void on_treeviewPlayers_row_activated(GtkTreeView *treeview, GtkTreePath *path, GtkTreeViewColumn *col, gpointer data) { GtkTreeModel *model; GtkTreeIter iter; model = gtk_tree_view_get_model( treeview ); if ( gtk_tree_model_get_iter(model, &iter, path) ) { gchar* name; gint health; gint power; gtk_tree_model_get(model, &iter, NAME, &name, HEALTH, &health, POWER, &power, -1); g_print( "Current row: %s %d %d\n", name, health, power); } } This function is auxiliary for deleting selected lines in GtkTreeView. gtk_list_store_remove - removes the given line from the list referenced by iter. Before this, we extract the path using gtk_tree_row_reference_get_path, and then convert the path to iter using gtk_tree_model_get_iter.
static void remove_row (GtkTreeRowReference *ref, GtkTreeModel *model) { GtkTreeIter iter; GtkTreePath *path; path = gtk_tree_row_reference_get_path (ref); gtk_tree_model_get_iter (model, &iter, path); gtk_list_store_remove (GTK_LIST_STORE (model), &iter); } Using the gtk_tree_selection_get_selected_rows function, we get a list of selected lines, then use the while loop to go through each selected line and create a reference based on the path using the gtk_tree_row_reference_new function and add this link to the references list using g_list_prepend.
Call the remove_row function for each link using g_list_foreach. And at the end, likewise, using g_list_foreach, we release our lists.
void on_butDelete_clicked (GtkButton *remove, gpointer data) { MainWindowObjects* mwo = static_cast<MainWindowObjects*>( data ); GtkTreeSelection *selection; GtkTreeRowReference *ref; GtkTreeModel *model; GList *rows, *ptr, *references = NULL; selection = gtk_tree_view_get_selection ( mwo->treeviewPlayers ); model = gtk_tree_view_get_model ( mwo->treeviewPlayers ); rows = gtk_tree_selection_get_selected_rows (selection, &model); ptr = rows; while (ptr != NULL) { ref = gtk_tree_row_reference_new (model, (GtkTreePath*) ptr->data); references = g_list_prepend (references, gtk_tree_row_reference_copy (ref)); gtk_tree_row_reference_free (ref); ptr = ptr->next; } g_list_foreach ( references, (GFunc) remove_row, model ); g_list_foreach ( references, (GFunc) gtk_tree_row_reference_free, NULL ); g_list_foreach ( rows, (GFunc) gtk_tree_path_free, NULL ); g_list_free ( references ); g_list_free ( rows ); } Implementing GTK + Application Close Handler
void on_butQuit_clicked(GtkWidget *window, gpointer data) { gtk_main_quit(); } To compile, you need to create a makefile:
CC=g++ LDLIBS=`pkg-config --libs gtk+-2.0 gmodule-2.0` CFLAGS=-Wall -g `pkg-config --cflags gtk+-2.0 gmodule-2.0` example1: example1.o $(CC) $(LDLIBS) example1.o -o example1 example1.o: example1.cpp $(CC) $(CFLAGS) -c example1.cpp clean: rm -f example1 rm -f *.o Now you can compile this example and try to “play around” with what we have done. I advise you to run from the console distribution of your Linux distribution. Try to add a few characters, choosing different colors of their name. Try to select several lines in the 4th column and click Print, then the selected ones will be printed in the console. Try changing the Power value using the carousel (double click on it, to the left of the Progress bar). Try using the pressed Ctrl or Shift keys to select a few added lines and delete them by pressing Delete.
This example can be downloaded from here .
Compilation is done with the command:
$ make Run:
$ ./example1 I tried to describe as many things as possible in some detail (some may even be too), but all this was done to understand this topic more quickly.
Source: https://habr.com/ru/post/116268/
All Articles