Writing an Android application with Cloud to Device Messaging (C2DM) support
Hello, readers Habrahabr!
In this post I want to pay attention to the C2DM service from Google and try to tell you how to implement support for this service in your Android application. Recall that C2DM is a special service that provides an API for sending messages to applications installed on Android devices. Using this service is an indispensable way if you need to send a message to a user application that is registered in the system but is not currently active.
')
Although C2DM is one of the fundamental features of the Android platform, there is little information about it in runet. Attempting to change this situation is one of the tasks of this post.
Under the cut, I'll tell you how to write simple client and server applications, show some “pitfalls”, and also give links to code examples.
Cloud to Device Messaging
But for now a bit of theory. As I wrote above, C2DM is a message delivery service from user applications to Android applications, you can read more here . Those. This is an analogue of Push Notification, in terms of Apple. The general scheme of interaction is shown in this picture found on the Internet:
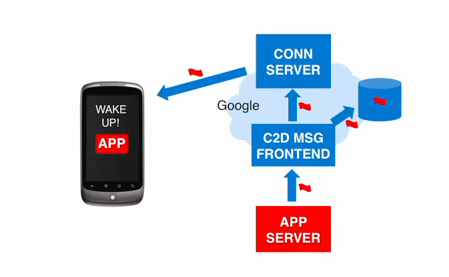
Three main parts are visible from the diagram:
- C2DM service. “Cloud” from Google, responsible for delivering messages. As well as registration / deregistration of devices and authentication.
- Client part. An Android application that accepts messages.
- Server part A client application (“3rd party server” in Google terms) that sends messages.
- The Android application registers with C2DM, thereby announcing its readiness to receive messages, and receives a Registration ID . Registration ID is a unique identifier of the device, knowing that the backend can send a message to the recipient. When registering, you need to specify the name of the Google account, but I will write about this later when I consider the client part.
- The application sends the Registration ID of the server part so that it knows to whom it is possible to send messages.
- The server part is authenticated on the Google server, using the same account as the Android application when registering with C2DM, and gets Auth Token . Details about authorization \ authentication in Google’s services are written here .
- Knowing the Registration ID and Auth Token, the server part sends a message to the Android application.
Client part
To use C2DM Android, the device must meet the following requirements:
- It must be a version of Android 2.2 or higher. On previous versions, C2DM is not supported!
- There must be any working Google account. If you are running the Android Market, then you have it.
Note: If you do not have Android 2.2, you can use the emulator, you only need to use Google APIs (API 8 or higher), not the standard SDK Platform. The standard SDK does not support Google accounts.
After you have created an application, you must register it on a special site where you need to specify the package name (package name), and, most importantly, your Google email account that will be used to forward messages. It is this mail that we will use in the client during registration and on the server during authentication. You must receive a letter with registration confirmation, after this letter the specified account can be used to work with C2DM.
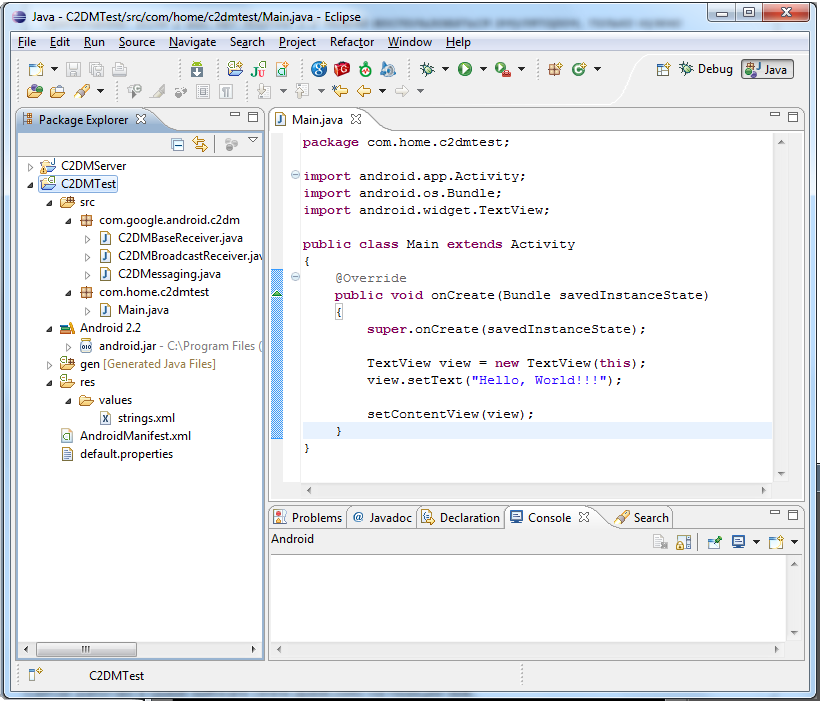
Next, we proceed to the modification of our “Hello, World!” Application. We need to implement the code responsible for registering / unregistering, and, of course, receiving messages. It’s really hard to write it yourself the first time. It is difficult to take into account all the nuances, so we will use the code, which is kindly provided by Google itself as an example . Downloading a ready-made set of classes for working with C2DM on the client side from svn storage . And we add them to the project, to the directory " src \ com \ google \ android \ c2dm ". It should turn out like this:
Now you need to implement the methods of the abstract class C2DMBaseReceiver, for this we will write the class C2DMReceiver, while only logging calls, and put it next to the Main. Content Class C2DMReceiver:
- package com.home.c2dmtest ;
- import com.google.android.c2dm.C2DMBaseReceiver ;
- import android.app.Notification ;
- import android.app.NotificationManager ;
- import android.app.PendingIntent ;
- import android.content.Context ;
- import android.content.Intent ;
- import android.util.Log ;
- public class C2DMReceiver extends C2DMBaseReceiver {
- public C2DMReceiver ( ) {
- super ( "<your mail> @ gmail.com" ) ;
- }
- @ Override
- public void onRegistered ( Context context, String registrationId ) {
- Log w ( "onRegistered" , registrationId ) ;
- }
- @ Override
- public void onUnregistered ( Context context ) {
- Log w ( "onUnregistered" , "" ) ;
- }
- @ Override
- public void onError ( Context context, String errorId ) {
- Log w ( "onError" , errorId ) ;
- }
- @ Override
- protected void onMessage ( Context context, Intent intent ) {
- Log w ( "onMessage" , "" ) ;
- }
- }
But the application is not yet ready to work with C2DM, since Required rights are not set and BroadcastReceiver is not registered. To fix this, you need to modify AndroidManifest.xml, how to do this you can read here . For my example, the file looks like this:
- <? xml version = "1.0" encoding = "utf-8" ?>
- <manifest xmlns: android = " schemas.android.com/apk/res/android"
- android: versionCode = "1"
- android: versionName = "1.0" package = "com.home.c2dmtest" >
- <application
- android: debuggable = "true"
- android: label = "@ string / app_name" >
- <activity android: name = "Main"
- android: label = "@ string / app_name"
- android: theme = "@android: style / Theme.NoTitleBar" >
- <intent-filter >
- <action android: name = "android.intent.action.MAIN" />
- <category android: name = "android.intent.category.LAUNCHER" />
- </ intent-filter >
- </ activity >
- <service android: name = ".C2DMReceiver" />
- <receiver
- android: name = "com.google.android.c2dm.C2DMBroadcastReceiver"
- android: permission = "com.google.android.c2dm.permission.SEND" >
- <intent-filter >
- <action android: name = "com.google.android.c2dm.intent.RECEIVE" />
- <category android: name = "com.home.c2dmtest" />
- </ intent-filter >
- <intent-filter >
- <action android: name = "com.google.android.c2dm.intent.REGISTRATION" />
- <category android: name = "com.home.c2dmtest" />
- </ intent-filter >
- </ receiver >
- </ application >
- <uses-sdk android: minSdkVersion = "8" />
- <permission
- android: name = "com.home.c2dmtest.permission.C2D_MESSAGE"
- android: protectionLevel = "signature" />
- <uses-permission android: name = "com.home.c2dmtest.permission.C2D_MESSAGE" />
- <uses-permission android: name = "com.google.android.c2dm.permission.RECEIVE" />
- <uses-permission android: name = "android.permission.INTERNET" />
- <uses-permission android: name = "android.permission.WAKE_LOCK" />
- </ manifest >
Note: The right android.permission.WAKE_LOCK is not needed to use C2DM, but we will need it later, and in order not to bring this file twice, I decided to add it in advance.
Now you can register a device in C2DM, for this we call the following code in OnCreate:
C2DMessaging. register ( this , "<yourmail> @ gmail.com" ) ;
If everything went fine, then after a couple of seconds, the new Regestration ID will fall into the onRegistered method of the C2DMReceiver class. If this does not happen, you need to look at the LogCat log for errors.
You can check out by calling the method:
C2DMessaging. unregister ( this ) ;
Get current Registration ID:
String id = C2DMessaging. getRegistrationId ( this ) ;
Registration ID can change at any second, i.e. Google can send its new value, and, therefore, such a situation must be able to handle. In our example, everything is already done for this, the implementation of this mechanism is in the C2DMBaseReceiver class, the handleRegistration method.
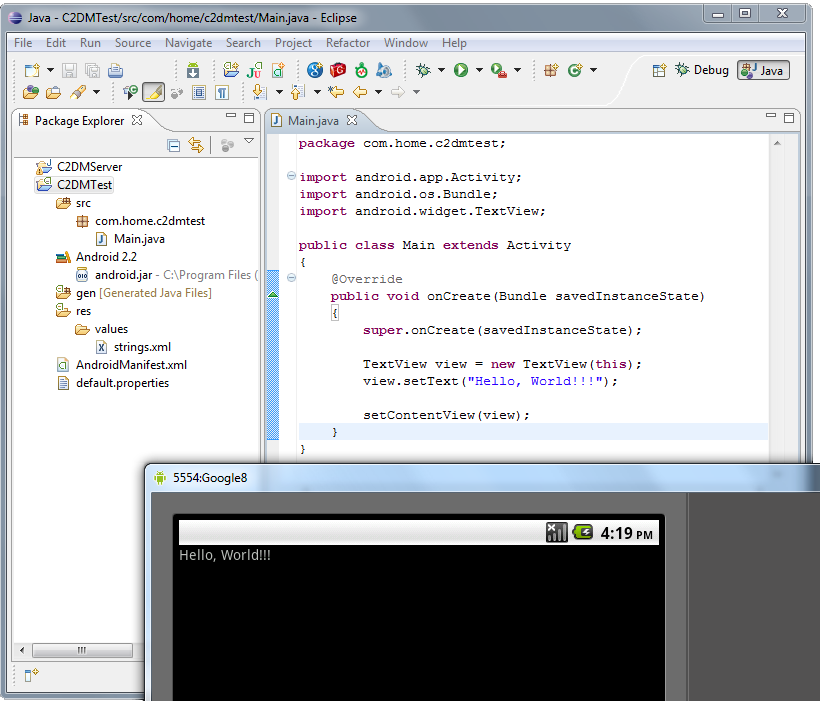
The final project looks like this:

Now we need to make our project more visual, we will expand the processing of messages. Let Notification appear when a new message arrives, and when it is selected, our application will be launched with the text specified by the server.
Ok, for this we modify the onMessage code as follows:
- @ Override
- protected void onMessage ( Context context, Intent receiveIntent )
- {
- String data = receiveIntent. getStringExtra ( "message" ) ;
- if ( data ! = null )
- {
- Log w ( "C2DMReceiver" , data ) ;
- Intent intent = new Intent ( this , Main. Class ) ;
- intent. putExtra ( "message" , data ) ;
- NotificationManager mManager = ( NotificationManager )
- getSystemService ( Context . NOTIFICATION_SERVICE ) ;
- Notification notification = new Notification ( android. R. Drawable . Ic_dialog_info ,
- "My C2DM message" , System . currentTimeMillis ( ) ) ;
- notification. setLatestEventInfo ( context, "App Name" , "C2DM notification" ,
- PendingIntent. getActivity ( this . getBaseContext ( ) , 0 ,
- intent, pendingintent. FLAG_CANCEL_CURRENT ) ) ;
- mManager. notify ( 0 , notification ) ;
- }
- }
message is the message identifier that the server sends. We will add it to the new Intent so that we can get it in Main.
Modify Main to display the transmitted message:
- @ Override
- public void onCreate ( Bundle savedInstanceState ) {
- super . onCreate ( savedInstanceState ) ;
- TextView view = new TextView ( this ) ;
- String message = getIntent ( ) . getStringExtra ( "message" ) ;
- if ( message == null )
- view. setText ( "Hello, World !!!" ) ;
- else
- view. setText ( "Your message:" + message ) ;
- setContentView ( view ) ;
- String id = C2DMessaging. getRegistrationId ( this ) ;
- if ( id == "" )
- {
- C2DMessaging. register ( this , "<yourmail> @ gmail.com" ) ;
- }
- }
In real life, we certainly need to write a Registration ID transfer mechanism to the server and other trifles, but since For this example, we’ll stop here and the Registration ID will be hard-coded on the server.
Server part
First you need to get Auth Token. This is well written in this blog (There is also a lot of other useful information). In general, there is an example, everything is in Russian, so we will not repeat it and we will assume that we received it.
So we have a Registration ID and Auth Token. Things are easy, you need to send a message. For some reason, there is very little information about this part of the Internet, although there is nothing difficult here.
We need to establish a connection with the Google server, form a request in the correct format. And that's all. A simplified example of sending a message is given in the following code:
- public boolean sendData (
- String authToken
- String registrationId,
- String collapse
- String key
- String value )
- throws IOException {
- // Set Registration ID
- StringBuilder postDataBuilder = new StringBuilder ( ) ;
- postDataBuilder. append ( "registration_id" ) .
- append ( "=" ) . append ( registrationId ) ;
- // Set collapse_key - groups messages if the collapse key is the same, and
- // a device, for example, is turned off, then only one message will be sent,
- // not all at once.
- postDataBuilder. append ( "&" ) . append ( "collapse_key" ) . append ( "=" ) .
- append ( collapse ) ;
- // Add the transmitted date, in the format <data.> <Key> = <value>
- postDataBuilder. append ( "&" ) . append ( "data." + key ) . append ( "=" ) .
- append ( URLEncoder . encode ( value, "UTF-8" ) ) ;
- byte [ ] postData = postDataBuilder. toString ( ) . getBytes ( "UTF-8" ) ;
- URL url = new URL ( " android.clients.google.com/c2dm/send" ) ;
- // Establish connection
- // Proxy proxy = new Proxy (Proxy.Type.HTTP, new InetSocketAddress ("lazerboy.local", 8080));
- HttpsURLConnection conn = ( HttpsURLConnection ) url. openConnection ( / * proxy * / ) ;
- conn. setDoOutput ( true ) ;
- conn. setHostnameVerifier ( this . new MyHostnameVerifier ( ) ) ;
- conn. setRequestMethod ( "POST" ) ;
- conn. setRequestProperty ( "Content-Type" ,
- "application / x-www-form-urlencoded; charset = UTF-8" ) ;
- conn. setRequestProperty ( "Content-Length" , Integer . toString ( postData. length ) ) ;
- conn. setRequestProperty ( "Authorization" , "GoogleLogin auth =" + authToken ) ;
- OutputStream out = conn. getOutputStream ( ) ;
- out. write ( postData ) ;
- out. close ( ) ;
- // Get the response code.
- int responseCode = conn. getResponseCode ( ) ;
- if ( responseCode == HttpServletResponse. SC_UNAUTHORIZED ||
- responseCode == HttpServletResponse. SC_FORBIDDEN ) {
- System . out . printf ( "Unauthorized - need token" ) ;
- return false ;
- }
- if ( responseCode == HttpServletResponse. SC_OK )
- {
- System . out . printf ( "Data sent to device!" ) ;
- return true ;
- }
- System . out . printf ( "Something wrong, response message:" , conn. getResponseMessage ( ) ) ;
- return false ;
- }
One very important detail is missing here: the processing of messages from the server. For example, the situation when Auth Token becomes outdated is not processed in any way. But I wanted to write an example of a working application, but not ready to use library. Moreover, everything you need can be found in the source from Google, for example, here .
If the code runs successfully, the user on his device will see our notification in the notification area, and if he clicks on it, then our application will start with the text from the server. Hooray, this is exactly what we wanted.
Conclusion
I showed how it is possible to fasten C2DM support to an Android application without a special headache. What you need to do, both on the client side and on the server side. Of course, there were "white spots", but again, the main task was to bring ideas and show code examples to make it easy for people reading this post to start developing applications with C2DM support.
useful links
Source: https://habr.com/ru/post/116106/
All Articles