Unity 3d Tank Tutorial: Chassis (Lesson 2. Tracked chassis)
Lesson 1 <<
I continue the lesson on assembling a tank at home. In the previous lesson you learned about the basics of driving a vehicle on Unity, in this lesson we will do what you could see in this demo .
')
Namely: I will talk about how to better model the tracked chassis in the 3d editor so that it can adequately move and respond to uneven terrain, also give you a finished model that you can see in the demo, then you will learn how to revive the whole thing and lead in motion with Wheel Colliders.
So before we proceed to addressing the priority issues, we must first formulate them, from the previous lesson we already know how to make the wheels turn and react to uneven terrain, but the problem is that the tank, in addition to wheels (track rollers), also has a track parts (tracks), which move at the same speed with which the track rollers rotate, especially the track along with the wheels must react to the unevenness of the landscape. How do we realize all this? Before you implement it you need to model it.
It is not strange, but these methods are inextricably linked with the methods of movement of the caterpillar, but of course everything also depends on what opportunities the engine can offer us on which we want to realize its movement. In the case of Unity 3d, I see two scenarios:
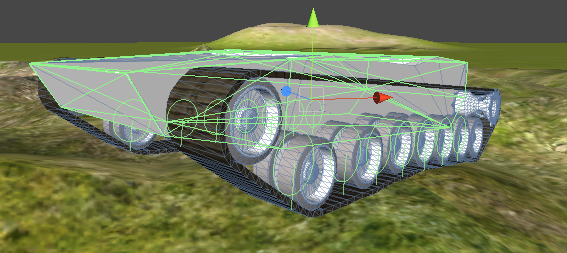
So we choose the second method, and bind the bones to the caterpillar so that it can be deformed as follows:
(3ds max)


As you can see in the screenshot, the wheels are also tied to the same bones as the caterpillar. Let's experiment, create some kind of primitive, tie it to a bone, or several, then export it to Unity (you can read about export from various 3d modeling packages here , personally I advise you to export everything to FBX format, and then copy the resulting file into the folder Assets of your project, after that you can see the name of this file in the Project tab of your project, and it is enough to drag it onto the stage for further manipulations with it). After that, select the model itself and try to move it, rotate, stretch it. It turns out? That's right, it does not work! The fact is that in Unity, any Skinned Mesh tied to the bone (bones) becomes a slave to its transformations, try doing the same operations with the bone to which it is tied and you will succeed.
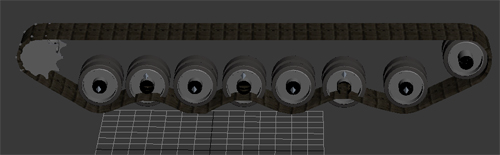
Accordingly, we do not need the wheels to be tied to the bone as they must rotate. We untie them, now it should look like this:
(3ds max)
Well, that's basically all, the preparation of the model is completed, and as I promised I give a link to my model , and the texture of the tracks . The model is in FBX format, so you can import it into your 3d editor supporting this format (as far as I know all popular editors support it), and consider in more detail how it is made and how the bones are attached, or you can immediately import into Unity and see in practice, what we actually do next.
So, as I wrote above, copy the model and texture into the Assets folder of your project, or you can simply drag them directly from your explorer to the Project tab, the main thing is that the model and texture are in the same folder so that the texture overlaps automatically if for any reason you don’t see the textures on the tracks (before you see, you naturally pull the model onto the stage), or you want to throw it in another folder, it’s okay, just choose one of the tracks (they are called Track_line_left and Track_line_right ), then in the inspector on Go to the texture setting, press the Select button and select the track texture.
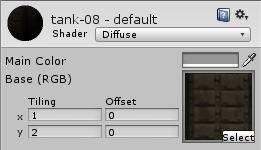
Also set the Tiling on y to 2, as in the image, in order to increase the number of tracks.
Now create a new C # script (Assets -> Create -> C Sharp Script), call it TankTrackController, open it and declare the variables we need with which we will work further:
So the main variables are declared, it remains to associate them with our model, save the script, go to the editor, drag our script to the tank object (if you did not rename it of course).
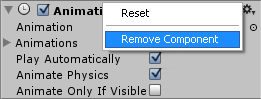
Go to the tank object itself, as you can see, in addition to the script just attached, there is an Animation object there; you can safely delete it there.
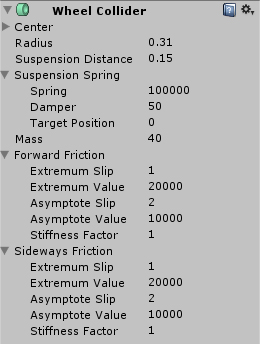
Next, create an object prefab with a WheelCollider (recall item 2 of the previous lesson), I called it tank_collider, it will have the following parameters.
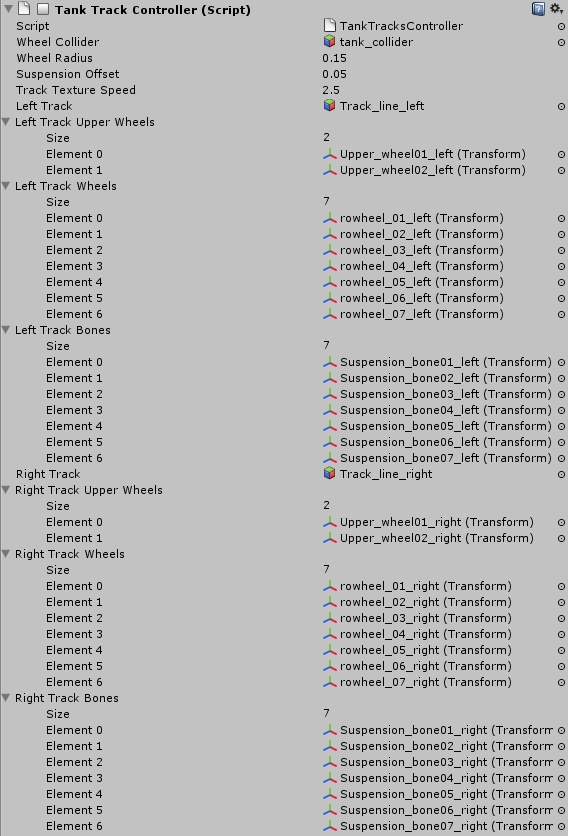
We start dragging objects into our script, first of all you can drag the newly created prefab into the Wheel Collider field inside our script. Next, drag the tracks (they are called Track_line_left and Track_line_right) to the Left Track and Right Track fields. Then the upper wheels (Upper_wheel [number] _left, Upper_wheel [number] _right), into the arrays of Left Track Upper Wheels and Right Track Upper Wheels. Well, I think you understand the rest of the wheels and bones (the wheels are called rowheel_ [number] _right and rowheel_ [number] _left, and the bones Suspension_bone [number] _left and Suspension_bone [number] _right), the main thing is that all the wheels and bones are transferred to the same In order to make it easier, I specifically numbered them, and do not touch the bones called Chain_bone [number] _left and Chain_bone [number] _right, the static part of the track is attached to them.
Here’s how all this should look like in the end:
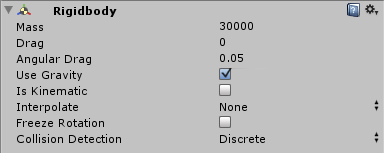
Next, select the tank object and add to it a Rigidbody with the following parameters:
Then find the hull (tank body) child object, add Mesh Collider (Component -> Physics -> Mesh Collider) to it, and tick Convex (this tick means that this Mesh Collider will calculate collisions not of all triangles contained in the tank body, but create your Mesh which will contain a maximum of 255 triangles).
So now our variables are declared and initialized, move on, and start by saving the wheel parameters in the WheelData [] leftTrackWheelData and WheelData [] rightTrackWheelData arrays. We will do this inside the Awake () function and declare the WheelData SetupWheels () helper function, which, as you can see, should return a value of the WheelData type, having performed all operations with it before. It all looks like this:
Feel free to click Play and make sure that Wheel Colliders are added to the lower wheels automatically, rather than as in the first lesson where we added each collider to each wheel manually, I think you shouldn’t talk about the advantages of this approach.
From the first lesson you should already know how to teach our wheels to rotate and react to uneven terrain, here we will use the same principle, except that the front and rear wheels of a car can rotate at different speeds, the same wheels on a separate vehicle the caterpillar rotates at the same speed, therefore we need to find a certain average wheel speed. And naturally, to this speed, we still need to link the speed of movement of the caterpillar texture. Let's more about everything:
So now you can safely click on Play, and make sure that the wheels are set in motion, but since our tank is not able to drive yet, simply move it to an uneven surface. Also, you most likely noticed that the wheels went underground, it does not matter, remember, we also have the wheelRadius variable, adjust its value without exiting the Play mode so that the wheels with the track are on the ground, as well as the value of the trackTextureSpeed variable, to synchronize the movement of the track with the movement of the wheels. I got these values as follows:

What is probably the most important feature of the movement of tracked vehicles that distinguishes it from a regular car? I think this is a turn in place. Do not believe? See it . Had an ordinary car the opportunity to turn around on the spot looking blondes leaving the parking lot would not have so often crashed into a car standing in front of them.
So in what way can a tank turn in place, or turn at all without turning steering wheels? Everything is just plain ugly, as you can see from the video above, one caterpillar moves forward, the other moves backward, so the tank turns around its axis. Almost the same turns the tank during movement, except that the caterpillar located on the side in which we want to turn does not move in the other direction, but slows down a little.
I propose to start with the simplest and, to begin with, teach our tank to turn in place. It would seem that everything is clear. And we can do this:
So, press Play, and then on the movement button to the side (A or D). And what we see, only the pitiful attempts of our tank to turn around on the spot, such a feeling that it lacks power. You can certainly increase the value of the rotateOnStandTorque variable, but the result will be pretty funny.
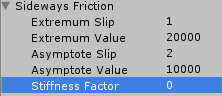
In fact, it’s not a matter of torque, it’s more than enough to turn a tank. Let's go back to the sources, that is, to our tank_collider prefab, the settings of which are inherited for all WheelColliders of the tank. Pay attention to the Sideways Friction field, in the previous lesson I mentioned this setting, I said that this is the “lateral” friction force of the wheel, and it is useful if we want to implement a drift. Now this very force of friction that acts on our colliders from the sides is incredibly large, the torque of the wheels is not able to overcome it, so our tank does not turn. Now pay attention to the variable Stiffness Factor inside Sideways Friction, we need it, in fact, this is the number by which the lateral friction force multiplies, set it to zero, press Play.
About the miracle, our tank has gone mad and now it can spin at the speed of a top, and even drive sideways, everything is correct, now there is no side friction at all. Now exit Play mode, set the value to 0.06 and click Play again. Well, finally, now our tank turns around its axis and is quite adequate. Exit Play mode and set the value of Sideways Friction back to 1. Of course, all this is good to change the value directly from the prefab, but it is better to do it from the script, because when lateral friction is not controllable, there is a chance that our tank will go into real drift. At the same time we will teach the tank to go forward and turn while moving. Modify the CalculateMotorForce () function and declare another small global variables:
, , , .
, , , 300 . at one o'clock. , . , coming soon.
Introduction
I continue the lesson on assembling a tank at home. In the previous lesson you learned about the basics of driving a vehicle on Unity, in this lesson we will do what you could see in this demo .
')
Namely: I will talk about how to better model the tracked chassis in the 3d editor so that it can adequately move and respond to uneven terrain, also give you a finished model that you can see in the demo, then you will learn how to revive the whole thing and lead in motion with Wheel Colliders.
So before we proceed to addressing the priority issues, we must first formulate them, from the previous lesson we already know how to make the wheels turn and react to uneven terrain, but the problem is that the tank, in addition to wheels (track rollers), also has a track parts (tracks), which move at the same speed with which the track rollers rotate, especially the track along with the wheels must react to the unevenness of the landscape. How do we realize all this? Before you implement it you need to model it.
1. Caterpillar simulation methods
It is not strange, but these methods are inextricably linked with the methods of movement of the caterpillar, but of course everything also depends on what opportunities the engine can offer us on which we want to realize its movement. In the case of Unity 3d, I see two scenarios:
- We model a caterpillar from a variety of individual objects as for example in this case:
(3ds max)
Set each track in motion by obtaining the position of the next one and gradually interpolate the position of the current track to the position of the next one, calculate the track deformation based on landscape irregularities using the Collider class Raycast () method, this method projects a ray of a certain length in a certain direction and returns true if it intersects with any collider.
The advantages of this method are: high detail of the caterpillar, high realism of the caterpillar movement.
Disadvantages: implementation complexity, load on computing power depending on the number of tracks because it is necessary to calculate Raycast () for each, if there are too many of them, a drop in performance is inevitable.
Honestly, I didn’t try to implement this method, because Climbing on gamedev'ovskim forums found the second. - We model a caterpillar with a continuous tape:
(3ds max)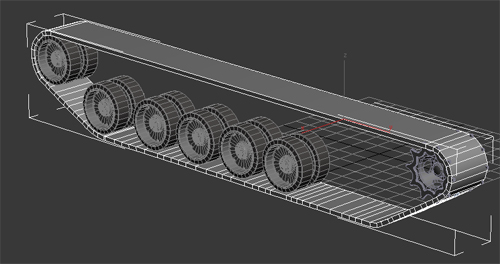
Then we impose a repeating texture of one or more tracks.
Indeed, look, everything is simpler here; the illusion of track movement can be created by moving the texture by changing its texture coordinates. And the deformation in accordance with the unevenness of the landscape can be done by tying bones in the tape where the rollers are located, because from the first lesson we already know how to calculate the position of the wheels based on the GetGroundHit () method tied to the WheelCollider wheel, then calculate the position of the bones to which the tape is tied is not difficult. Or you can use the same Raycast (for anyone as you like, personally I am quite happy with the binding to the suspension WheelCollider'a).
Advantages of this method: ease of implementation, a small load on the calculations.
Disadvantages: Not so high detail of the caterpillar compared to the first method (although there is a relative question, look at how the same was done in World of Tanks, Crysis, Battlefield: Bad Company, yes, yes, there is always used tape with a transparent texture superimposed on it, and it looks quite realistic).
So we choose the second method, and bind the bones to the caterpillar so that it can be deformed as follows:
(3ds max)
As you can see in the screenshot, the wheels are also tied to the same bones as the caterpillar. Let's experiment, create some kind of primitive, tie it to a bone, or several, then export it to Unity (you can read about export from various 3d modeling packages here , personally I advise you to export everything to FBX format, and then copy the resulting file into the folder Assets of your project, after that you can see the name of this file in the Project tab of your project, and it is enough to drag it onto the stage for further manipulations with it). After that, select the model itself and try to move it, rotate, stretch it. It turns out? That's right, it does not work! The fact is that in Unity, any Skinned Mesh tied to the bone (bones) becomes a slave to its transformations, try doing the same operations with the bone to which it is tied and you will succeed.
Accordingly, we do not need the wheels to be tied to the bone as they must rotate. We untie them, now it should look like this:
(3ds max)
Well, that's basically all, the preparation of the model is completed, and as I promised I give a link to my model , and the texture of the tracks . The model is in FBX format, so you can import it into your 3d editor supporting this format (as far as I know all popular editors support it), and consider in more detail how it is made and how the bones are attached, or you can immediately import into Unity and see in practice, what we actually do next.
2. Import the model and prepare the script
So, as I wrote above, copy the model and texture into the Assets folder of your project, or you can simply drag them directly from your explorer to the Project tab, the main thing is that the model and texture are in the same folder so that the texture overlaps automatically if for any reason you don’t see the textures on the tracks (before you see, you naturally pull the model onto the stage), or you want to throw it in another folder, it’s okay, just choose one of the tracks (they are called Track_line_left and Track_line_right ), then in the inspector on Go to the texture setting, press the Select button and select the track texture.
Also set the Tiling on y to 2, as in the image, in order to increase the number of tracks.
Now create a new C # script (Assets -> Create -> C Sharp Script), call it TankTrackController, open it and declare the variables we need with which we will work further:
using UnityEngine; using System.Collections; using System.Collections.Generic; //1 public class TankTrackController : MonoBehaviour { public GameObject wheelCollider; //2 public float wheelRadius = 0.15f; //3 public float suspensionOffset = 0.05f; //4 public float trackTextureSpeed = 2.5f; //5 public GameObject leftTrack; //6 public Transform[] leftTrackUpperWheels; //7 public Transform[] leftTrackWheels; //8 public Transform[] leftTrackBones; //9 public GameObject rightTrack; //6 public Transform[] rightTrackUpperWheels; //7 public Transform[] rightTrackWheels; //8 public Transform[] rightTrackBones; //9 public class WheelData { //10 public Transform wheelTransform; //11 public Transform boneTransform; //12 public WheelCollider col; //13 public Vector3 wheelStartPos; //14 public Vector3 boneStartPos; //15 public float rotation = 0.0f; //16 public Quaternion startWheelAngle; //17 } protected WheelData[] leftTrackWheelData; //18 protected WheelData[] rightTrackWheelData; //18 protected float leftTrackTextureOffset = 0.0f; //19 protected float rightTrackTextureOffset = 0.0f; //19 } - We allow the namespace needed to use dynamic lists, they will be useful to us later.
- We declare a variable in which the prefab of our Wheel Collider will be stored (recall item 2 of the previous lesson).
- The radius of our wheels.
- Offset wheel relative to the initial position when it does not touch the surface
- The speed of the caterpillar (in fact, the speed of displacement of texture coordinates).
- Left and right tracks.
- Left and right upper wheels to which Wheel Colliders will not be added.
- Wheels to which Wheel Colliders will be added (as you can see here I, unlike the previous lesson, did not declare arrays for Wheel Colliders, they will be added to our wheels directly from the script using the position of the wheels, so do not move the wheels before pressing on the Play button, they must be aligned relative to each other).
- Bones tied to the left and right caterpillar.
- Let's declare a class in which we will store the information we need about each wheel (except UpperWheels), namely:
- Transform wheels;
- Transform a bone tied to a caterpillar;
- WheelCollider wheels;
- The starting position of the wheel;
- The initial position of the bone;
- Angle of rotation of the wheel;
- The initial angles of rotation of the wheel.
- We declare arrays storing data about the left and right wheels, as you can see here the access modifier is used protected, so that we can not change this data outside the class.
- Finally, we declare the variables that will store the current offset of the texture coordinates on the tracks.
So the main variables are declared, it remains to associate them with our model, save the script, go to the editor, drag our script to the tank object (if you did not rename it of course).
Go to the tank object itself, as you can see, in addition to the script just attached, there is an Animation object there; you can safely delete it there.
Next, create an object prefab with a WheelCollider (recall item 2 of the previous lesson), I called it tank_collider, it will have the following parameters.
We start dragging objects into our script, first of all you can drag the newly created prefab into the Wheel Collider field inside our script. Next, drag the tracks (they are called Track_line_left and Track_line_right) to the Left Track and Right Track fields. Then the upper wheels (Upper_wheel [number] _left, Upper_wheel [number] _right), into the arrays of Left Track Upper Wheels and Right Track Upper Wheels. Well, I think you understand the rest of the wheels and bones (the wheels are called rowheel_ [number] _right and rowheel_ [number] _left, and the bones Suspension_bone [number] _left and Suspension_bone [number] _right), the main thing is that all the wheels and bones are transferred to the same In order to make it easier, I specifically numbered them, and do not touch the bones called Chain_bone [number] _left and Chain_bone [number] _right, the static part of the track is attached to them.
Here’s how all this should look like in the end:
Next, select the tank object and add to it a Rigidbody with the following parameters:
Then find the hull (tank body) child object, add Mesh Collider (Component -> Physics -> Mesh Collider) to it, and tick Convex (this tick means that this Mesh Collider will calculate collisions not of all triangles contained in the tank body, but create your Mesh which will contain a maximum of 255 triangles).
3. Install Wheel Colliders and wheel parameters
So now our variables are declared and initialized, move on, and start by saving the wheel parameters in the WheelData [] leftTrackWheelData and WheelData [] rightTrackWheelData arrays. We will do this inside the Awake () function and declare the WheelData SetupWheels () helper function, which, as you can see, should return a value of the WheelData type, having performed all operations with it before. It all looks like this:
void Awake() { leftTrackWheelData = new WheelData[leftTrackWheels.Length]; //1 rightTrackWheelData = new WheelData[rightTrackWheels.Length]; //1 for(int i=0;i<leftTrackWheels.Length;i++){ leftTrackWheelData[i] = SetupWheels(leftTrackWheels[i],leftTrackBones[i]); //2 } for(int i=0;i<rightTrackWheels.Length;i++){ rightTrackWheelData[i] = SetupWheels(rightTrackWheels[i],rightTrackBones[i]); //2 } Vector3 offset = transform.position; //3 offset.z +=0.01f; //3 transform.position = offset; //3 } WheelData SetupWheels(Transform wheel, Transform bone){ //2 WheelData result = new WheelData(); GameObject go = new GameObject("Collider_"+wheel.name); //4 go.transform.parent = transform; //5 go.transform.position = wheel.position; //6 go.transform.localRotation = Quaternion.Euler(0,wheel.localRotation.y,0); //7 WheelCollider col = (WheelCollider) go.AddComponent(typeof(WheelCollider));//8 WheelCollider colPref = wheelCollider.GetComponent<WheelCollider>();//9 col.mass = colPref.mass;//10 col.center = colPref.center;//10 col.radius = colPref.radius;//10 col.suspensionDistance = colPref.suspensionDistance;//10 col.suspensionSpring = colPref.suspensionSpring;//10 col.forwardFriction = colPref.forwardFriction;//10 col.sidewaysFriction = colPref.sidewaysFriction;//10 result.wheelTransform = wheel; //11 result.boneTransform = bone; //11 result.col = col; //11 result.wheelStartPos = wheel.transform.localPosition; //11 result.boneStartPos = bone.transform.localPosition; //11 result.startWheelAngle = wheel.transform.localRotation; //11 return result; //12 } - We declare the dimension of the arrays that will contain information about our wheels.
- Filling these arrays, for this we, as I wrote above, created the SetupWheels () function with the first argument to which we pass the Transform wheels, and the second with Transform bones.
- Strange, but when I entered Play mode, the colliders constantly collapsed underground, fortunately it is treated by simply moving the tank object forward a bit, which is what these operations do.
- Create a new empty GameObject whose name will consist of the name of the wheel with the prefix Collider_.
- We make the newly created object as a child of the object to which the script is attached (in our case, children of the tank object).
- Move the newly created object to the place where we have the wheel.
- We rotate the object locally around the Y axis at the same angle at which the current wheel is rotated.
- Add the Wheel Collider component to our empty GO.
- We get the Wheel Collider settings from our prefab.
- We assign the settings obtained from the prefab to the newly created Wheel Collider (as you can see, we had to assign each setting separately, in this case, you cannot simply write the col = colPref compiler though it skips this design, but the collider settings remain by default).
- We assign the rest of the information we need.
- Return the result.
Feel free to click Play and make sure that Wheel Colliders are added to the lower wheels automatically, rather than as in the first lesson where we added each collider to each wheel manually, I think you shouldn’t talk about the advantages of this approach.
4. “Liven up” the wheels and the track
From the first lesson you should already know how to teach our wheels to rotate and react to uneven terrain, here we will use the same principle, except that the front and rear wheels of a car can rotate at different speeds, the same wheels on a separate vehicle the caterpillar rotates at the same speed, therefore we need to find a certain average wheel speed. And naturally, to this speed, we still need to link the speed of movement of the caterpillar texture. Let's more about everything:
void FixedUpdate(){ UpdateWheels(); //1 } public void UpdateWheels(){ //1 float delta = Time.fixedDeltaTime; //2 float trackRpm = CalculateSmoothRpm(leftTrackWheelData); //3 foreach (WheelData w in leftTrackWheelData){ //4 w.wheelTransform.localPosition = CalculateWheelPosition(w.wheelTransform,w.col,w.wheelStartPos); //5 w.boneTransform.localPosition = CalculateWheelPosition(w.boneTransform,w.col,w.boneStartPos); //6 w.rotation = Mathf.Repeat(w.rotation + delta * trackRpm * 360.0f / 60.0f, 360.0f); //7 w.wheelTransform.localRotation = Quaternion.Euler(w.rotation, w.startWheelAngle.y, w.startWheelAngle.z); //8 } leftTrackTextureOffset = Mathf.Repeat(leftTrackTextureOffset + delta*trackRpm*trackTextureSpeed/60.0f,1.0f); //9 leftTrack.renderer.material.SetTextureOffset("_MainTex",new Vector2(0,-leftTrackTextureOffset)); //10 trackRpm = CalculateSmoothRpm(rightTrackWheelData); //3 foreach (WheelData w in rightTrackWheelData){ //4 w.wheelTransform.localPosition = CalculateWheelPosition(w.wheelTransform,w.col,w.wheelStartPos); //5 w.boneTransform.localPosition = CalculateWheelPosition(w.boneTransform,w.col,w.boneStartPos); //6 w.rotation = Mathf.Repeat(w.rotation + delta * trackRpm * 360.0f / 60.0f, 360.0f); //7 w.wheelTransform.localRotation = Quaternion.Euler(w.rotation, w.startWheelAngle.y, w.startWheelAngle.z); //8 } rightTrackTextureOffset = Mathf.Repeat(rightTrackTextureOffset + delta*trackRpm*trackTextureSpeed/60.0f,1.0f); ///9 rightTrack.renderer.material.SetTextureOffset("_MainTex",new Vector2(0,-rightTrackTextureOffset)); //10 for(int i=0;i<leftTrackUpperWheels.Length;i++){ //11 leftTrackUpperWheels[i].localRotation = Quaternion.Euler(leftTrackWheelData[0].rotation, leftTrackWheelData[0].startWheelAngle.y, leftTrackWheelData[0].startWheelAngle.z); //11 } for(int i=0;i<rightTrackUpperWheels.Length;i++){ //11 rightTrackUpperWheels[i].localRotation = Quaternion.Euler(rightTrackWheelData[0].rotation, rightTrackWheelData[0].startWheelAngle.y, rightTrackWheelData[0].startWheelAngle.z); //11 } } private float CalculateSmoothRpm(WheelData[] w){ //12 float rpm = 0.0f; List<int> grWheelsInd = new List<int>(); //13 for(int i = 0;i<w.Length;i++){ //14 if(w[i].col.isGrounded){ //14 grWheelsInd.Add(i); //14 } } if(grWheelsInd.Count == 0){ //15 foreach(WheelData wd in w){ //15 rpm +=wd.col.rpm; //15 } rpm /= w.Length; //15 }else{ //16 for(int i = 0;i<grWheelsInd.Count;i++){ //16 rpm +=w[grWheelsInd[i]].col.rpm; //16 } rpm /= grWheelsInd.Count; //16 } return rpm; //17 } private Vector3 CalculateWheelPosition(Transform w,WheelCollider col,Vector3 startPos){ //18 WheelHit hit; Vector3 lp = w.localPosition; if (col.GetGroundHit(out hit)) { lp.y -= Vector3.Dot(w.position - hit.point, transform.up) - wheelRadius; }else { lp.y = startPos.y - suspensionOffset; } return lp; } - We will call our UpdateWheels () function inside the FixedUpdate () function, which will calculate the position and rotation angle of the wheels.
- See lesson 1.
- The CalculateSmoothRpm () function will calculate the average rotational speed of the wheels (I’ll tell you more) that they rotate at the same speed into it, we pass the entire array to the leftTrackWheelData [], and then the array rightTrackWheelData [].
- For all elements of the arrays containing data on the left and right wheels perform the following operations:
- We calculate the local position of the wheel on the Y axis, in which the CalculateWheelPosition () function will help us (details below), into which we transfer the wheel's Transform, its WheelCollider, and its initial local position;
- The same operations, only this time to calculate the local position of the bone to which this part of the caterpillar is tied;
- We calculate the angle of rotation of the wheel (see lesson 1), only this time we use not the rpm of the collider, but the average rotational speed which we calculated earlier;
- We apply the calculated angle of rotation to the local angle of rotation of the wheel (see lesson 1).
- Calculate the caterpillar texture offset. Unfortunately, I did not find a universal formula that would allow the wheel to rotate at the same speed and move the caterpillar, so I had to introduce an additional trackTextureSpeed variable (see above), which would later have to be manually adjusted so that the wheel and caterpillar would move at a uniform speed.
- We apply the track offset to the Y coordinate (new Vector2 (0, -leftTrackTextureOffset)), the main texture ("_MainTex") of the material used by the GO leftTrack and the rightTrack.
- We calculate the rotation of the upper wheels to which WheelColliders are not attached to us, we can borrow the angle of rotation from some other wheel, all the same, they all now move at the same speed.
- Well, finally we got to the CalculateSmoothRpm () function, which takes as its first argument an array of type WheelData, which in turn has the original name w.
- We create a new dynamic list which will contain the indices of those elements of the array w, within which the WheelCollider col is currently touching the surface (terrane).
- Run through the array and find the indices of the elements in which the colliders touch the surface.
- If the number of elements in the list is zero, that is, if none of the colliders touch the ground, then we add all the rpm colliders inside the array w, then divide the resulting value by the number of elements in the array w, thus finding the average value.
- If we have one or more elements of the list, ie if one or more colliders touch the ground, then we add the speeds of only these colliders and divide by the number of elements of the list.
- We return the resulting value. (You should have a question: why do all these operations for calculating colliders that touch the ground, and why can't we just constantly find the average speed of rotation of all the wheels? The answer is homework: think (or better experiment) how then the wheels will rotate in this situations:
- The CalculateWheelPosition () function that takes the first argument of the Transform wheel (or bone), the second WheelCollider, and the third starting local position of the wheel (or bone). As I said above, this function calculates the local position of the wheel (or bone), and carries absolutely nothing new in itself, since we have analyzed this algorithm in the first lesson.
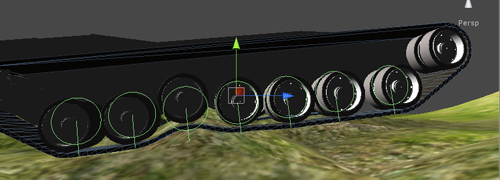
So now you can safely click on Play, and make sure that the wheels are set in motion, but since our tank is not able to drive yet, simply move it to an uneven surface. Also, you most likely noticed that the wheels went underground, it does not matter, remember, we also have the wheelRadius variable, adjust its value without exiting the Play mode so that the wheels with the track are on the ground, as well as the value of the trackTextureSpeed variable, to synchronize the movement of the track with the movement of the wheels. I got these values as follows:
5. Learning to ride
What is probably the most important feature of the movement of tracked vehicles that distinguishes it from a regular car? I think this is a turn in place. Do not believe? See it . Had an ordinary car the opportunity to turn around on the spot looking blondes leaving the parking lot would not have so often crashed into a car standing in front of them.
So in what way can a tank turn in place, or turn at all without turning steering wheels? Everything is just plain ugly, as you can see from the video above, one caterpillar moves forward, the other moves backward, so the tank turns around its axis. Almost the same turns the tank during movement, except that the caterpillar located on the side in which we want to turn does not move in the other direction, but slows down a little.
I propose to start with the simplest and, to begin with, teach our tank to turn in place. It would seem that everything is clear. And we can do this:
public float rotateOnStandTorque = 1500.0f; //1 public float rotateOnStandBrakeTorque = 500.0f; //2 public float maxBrakeTorque = 1000.0f; //3 void FixedUpdate(){ float accelerate = 0; float steer = 0; accelerate = Input.GetAxis("Vertical"); //4 steer = Input.GetAxis("Horizontal"); //4 UpdateWheels(accelerate,steer); //5 } public void UpdateWheels(float accel,float steer){ //5 float delta = Time.fixedDeltaTime; float trackRpm = CalculateSmoothRpm(leftTrackWheelData); foreach (WheelData w in leftTrackWheelData){ w.wheelTransform.localPosition = CalculateWheelPosition(w.wheelTransform,w.col,w.wheelStartPos); w.boneTransform.localPosition = CalculateWheelPosition(w.boneTransform,w.col,w.boneStartPos); w.rotation = Mathf.Repeat(w.rotation + delta * trackRpm * 360.0f / 60.0f, 360.0f); w.wheelTransform.localRotation = Quaternion.Euler(w.rotation, w.startWheelAngle.y, w.startWheelAngle.z); CalculateMotorForce(w.col,accel,steer); //6 } leftTrackTextureOffset = Mathf.Repeat(leftTrackTextureOffset + delta*trackRpm*trackTextureSpeed/60.0f,1.0f); leftTrack.renderer.material.SetTextureOffset("_MainTex",new Vector2(0,-leftTrackTextureOffset)); trackRpm = CalculateSmoothRpm(rightTrackWheelData); foreach (WheelData w in rightTrackWheelData){ w.wheelTransform.localPosition = CalculateWheelPosition(w.wheelTransform,w.col,w.wheelStartPos); w.boneTransform.localPosition = CalculateWheelPosition(w.boneTransform,w.col,w.boneStartPos); w.rotation = Mathf.Repeat(w.rotation + delta * trackRpm * 360.0f / 60.0f, 360.0f); w.wheelTransform.localRotation = Quaternion.Euler(w.rotation, w.startWheelAngle.y, w.startWheelAngle.z); CalculateMotorForce(w.col,accel,-steer); //6 } rightTrackTextureOffset = Mathf.Repeat(rightTrackTextureOffset + delta*trackRpm*trackTextureSpeed/60.0f,1.0f); rightTrack.renderer.material.SetTextureOffset("_MainTex",new Vector2(0,-rightTrackTextureOffset)); for(int i=0;i<leftTrackUpperWheels.Length;i++){ leftTrackUpperWheels[i].localRotation = Quaternion.Euler(leftTrackWheelData[0].rotation, leftTrackWheelData[0].startWheelAngle.y, leftTrackWheelData[0].startWheelAngle.z); } for(int i=0;i<rightTrackUpperWheels.Length;i++){ rightTrackUpperWheels[i].localRotation = Quaternion.Euler(rightTrackWheelData[0].rotation, rightTrackWheelData[0].startWheelAngle.y, rightTrackWheelData[0].startWheelAngle.z); } } public void CalculateMotorForce(WheelCollider col, float accel, float steer){ //6 if(accel == 0 && steer == 0){ //7 col.brakeTorque = maxBrakeTorque; //7 }else if(accel == 0.0f){ //8 col.brakeTorque = rotateOnStandBrakeTorque; //9 col.motorTorque = steer*rotateOnStandTorque; //10 } } - Torque that will be transmitted to the colliders when the tank is in place.
- Braking moment which we will pass to the colliders when the tank is in place.
- Maximum braking torque.
- See lesson 1.
- Modifying the UpdateWheels () function will make it accept values from virtual axes.
- We will use the CalculateMotorForce () function to control the torque and braking torque at the colliders; we will transfer the collider and virtual axes to this function (note for leftTrackWheelData we transfer a positive value from the horizontal axis, and for rightTrackWheelData it will allow us to move the tracks in different directions ).
- If no movement key is pressed, then we transfer the maximum braking torque to the collider (so that it does not roll off uneven places).
- If the forward key is not pressed, but the forward key is pressed then:
- We transfer the braking moment to the collider.
- We transmit the torque multiplied by the value obtained from the horizontal axis (this torque must be greater than the braking torque rotateOnStandBrakeTorque in order for the tank to move).
So, press Play, and then on the movement button to the side (A or D). And what we see, only the pitiful attempts of our tank to turn around on the spot, such a feeling that it lacks power. You can certainly increase the value of the rotateOnStandTorque variable, but the result will be pretty funny.
In fact, it’s not a matter of torque, it’s more than enough to turn a tank. Let's go back to the sources, that is, to our tank_collider prefab, the settings of which are inherited for all WheelColliders of the tank. Pay attention to the Sideways Friction field, in the previous lesson I mentioned this setting, I said that this is the “lateral” friction force of the wheel, and it is useful if we want to implement a drift. Now this very force of friction that acts on our colliders from the sides is incredibly large, the torque of the wheels is not able to overcome it, so our tank does not turn. Now pay attention to the variable Stiffness Factor inside Sideways Friction, we need it, in fact, this is the number by which the lateral friction force multiplies, set it to zero, press Play.
About the miracle, our tank has gone mad and now it can spin at the speed of a top, and even drive sideways, everything is correct, now there is no side friction at all. Now exit Play mode, set the value to 0.06 and click Play again. Well, finally, now our tank turns around its axis and is quite adequate. Exit Play mode and set the value of Sideways Friction back to 1. Of course, all this is good to change the value directly from the prefab, but it is better to do it from the script, because when lateral friction is not controllable, there is a chance that our tank will go into real drift. At the same time we will teach the tank to go forward and turn while moving. Modify the CalculateMotorForce () function and declare another small global variables:
public float forwardTorque = 500.0f; //1 public float rotateOnMoveBrakeTorque = 400.0f; //2 public float minBrakeTorque = 0.0f; //3 public float minOnStayStiffness = 0.06f; //4 public float minOnMoveStiffness = 0.05f; //5 public float rotateOnMoveMultiply = 2.0f; //6 public void CalculateMotorForce(WheelCollider col, float accel, float steer){ WheelFrictionCurve fc = col.sidewaysFriction; //7 if(accel == 0 && steer == 0){ col.brakeTorque = maxBrakeTorque; }else if(accel == 0.0f){ col.brakeTorque = rotateOnStandBrakeTorque; col.motorTorque = steer*rotateOnStandTorque; fc.stiffness = 1.0f + minOnStayStiffness - Mathf.Abs(steer); }else{ //8 col.brakeTorque = minBrakeTorque; //9 col.motorTorque = accel*forwardTorque; //10 if(steer < 0){ //11 col.brakeTorque = rotateOnMoveBrakeTorque; //12 col.motorTorque = steer*forwardTorque*rotateOnMoveMultiply;//13 fc.stiffness = 1.0f + minOnMoveStiffness - Mathf.Abs(steer); //14 } if(steer > 0){ //15 col.motorTorque = steer*forwardTorque*rotateOnMoveMultiply;//16 fc.stiffness = 1.0f + minOnMoveStiffness - Mathf.Abs(steer); //17 } } if(fc.stiffness > 1.0f)fc.stiffness = 1.0f; //18 col.sidewaysFriction = fc; //19 if(col.rpm > 0 && accel < 0){ //20 col.brakeTorque = maxBrakeTorque; //21 }else if(col.rpm < 0 && accel > 0){ //22 col.brakeTorque = maxBrakeTorque; //23 } } - (, ).
- .
- .
- .
- .
- .
- fc WheelFrictionCurve, Sideways Friction Wheel Collider'.
- , :
- ;
- ;
- ( , , ) :
- ( , );
- ( , );
- fc.
- ( , , ) :
- , .
- fc.
- , , .
- sidewaysFriction fs ( col.sidewaysFriction.stiffnes = (float), ).
- , :
- .
- :
- No comments.
, , , .
, , , 300 . at one o'clock. , . , coming soon.
Source: https://habr.com/ru/post/116088/
All Articles