How to make friends Yandex maps with Google and OSM?
I have a project that works on the basis of maps from Yandex. I chose them because there is documentation in Russian, good quality maps of our cities and a nice interface. Later, as it turned out, there are also great opportunities.
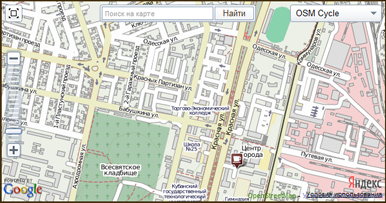
And so I noticed that some places in Yandex satellite show on a too small scale that it is not suitable for building routes.
Initially, I made two separate files with scripts, in one of which - there was the logic of working with Yandex, and in the second - with Google. Switching occurred in the profile and acted on the entire site, and all work with the maps on the site was in pseudocode (proxy).
Esosedi.ru used just such an approach with switching cards, but without rebooting. However, this option did not suit me because the markers and broken lines are used, besides, it is difficult to maintain two different files.
And so I decided to look for another option.
Option 1. Download tiles
I will not attribute myself to someone else. I found this option in the club of Yandex maps clubs.ya.ru/mapsapi/replies.xml?item_no=7125 . Having reworked all the logic for this option and, having added OSM, I was glad that everything was ready and was already thinking about something else, but then I saw with horror that the maps were displayed incorrectly. The coordinates are the same, but somewhere in the maps are not loaded, there are gray places, then above, then below. The problem was that not only the latitude and longitude are confused, but fundamentally different coordinate systems are used. When recalculated to Google coordinates, it was necessary to move the tiles vertically by a certain amount. That's just this value and was a gray area.
On the Internet, they wrote that this option is not treated. I tried to zoom the map vertically above and below, but hide it. After I already saw that not only gray stripes appear from above, but straight on the map, the line of squares can not be loaded. However, I left this option not because.
Google allows you to use your tiles only through the API, so you have to create a map anyway, but how do you map the labels of one map to another?
')
Option 2. Copy tiles
The plan was that.
A copy of the Google map is created somewhere far away, or rather, either with a negative index, or with a negative value of top or left. After that, an event handler is hung on the Yandex map, which, when the Yandex map moves, moves the Google map. The Google map has a motion handler, in which the divs with maps are copied into the Yandex map div with the class “YMaps-tile-container”, in which the Yandex tiles are located.
GEvent.addListener(gmap, "move" , function (overlay, latlng) {
var point = gmap.getCenter();
$layer = $( '#googlemap div img' ).parent().parent().parent();
$( '.GMaps-tile-container' ).html($layer.html()).width($layer.width()).height($layer.height());
$( '.GMaps-tile-container' ).css( 'left' ,$( '.YMaps-tile-container' ).css( 'left' ))
.css( 'top' ,$( '.YMaps-tile-container' ).css( 'top' ))
.css( 'width' ,$( '.YMaps-tile-container' ).css( 'width' ))
.css( 'height' ,$( '.YMaps-tile-container' ).css( 'height' ));
$( '.YMaps-tile-container' ).hide();
}, this );
GEvent.addListener(gmap, "tilesloaded" , function (overlay, latlng) {
var point = gmap.getCenter();
$layer = $( '#googlemap div img' ).parent().parent().parent();
$( '.GMaps-tile-container' ).html($layer.html()).width($layer.width()).height($layer.height());
$( '.GMaps-tile-container' ).css( 'left' ,$( '.YMaps-tile-container' ).css( 'left' ))
.css( 'top' ,$( '.YMaps-tile-container' ).css( 'top' ))
.css( 'width' ,$( '.YMaps-tile-container' ).css( 'width' ))
.css( 'height' ,$( '.YMaps-tile-container' ).css( 'height' ));

}, this );

* This source code was highlighted with Source Code Highlighter .
With a small card size, everything works quite well, but it is worth opening to the full screen, how the full paragraph begins here.
Option 3. Move the map
The next option that came to mind was to simply move a card that would be inside another card.
Google map itself is created in the diva with the class "YMaps-tile-container". A div with Yandex tiles hides, or rather does not hide, but receives transparency 0, because it is this div that processes all movements of the map.
Add an event handler to the map of Yandex. When the Yandex map moves, the Yandex map center will synchronize with the Google map.
YMaps.Events.observe(map, map.Events.Move, function (oMap, offset) {
gmap.setCenter( new GLatLng(map.getCenter().getLat(), map.getCenter().getLng()), map.getZoom());
});
YMaps.Events.observe(map, map.Events.BoundsChange, function () {
gmap.setCenter( new GLatLng(map.getCenter().getLat(), map.getCenter().getLng()), map.getZoom());
});

* This source code was highlighted with Source Code Highlighter .
We try ... And again, with a small card size, everything works well, but when deployed, noticeable inhibition and unpleasant artifacts begin.
Perhaps this is due to the fact that Yandex maps are being loaded in parallel, even though they are not visible. Create an empty card type and install it.
var none = new YMaps.TileDataSource( '' , false , false );
var tnone = function () { return new YMaps.Layer(none)};
YMaps.Layers.add( "none#layer" , tnone);
map.setType( new YMaps.MapType([ "none#layer" ], '' ,{minZoom:1, maxZoom:17}));

* This source code was highlighted with Source Code Highlighter .
Again we try and again it slows down. Experimentally, I found out that the main inhibition is due to the fact that Yandex, when moving the card, is smoothly slowing down. After a long search, I did not find how to turn it off, which means this option is not suitable.
Option 3.1. Use moveBy
Here on this page api.yandex.ru/maps/jsapi/examples/synhromaps.html is an example of how to synchronize two Yandex cards with each other. Instead of centering, there is used a shift by a certain interval (apparently this option reduces the load). Google maps has exactly the same function, but the shift values of Yandex maps are not suitable. After several experiments, I left this venture.
Option 4. Move the markers
If the option with the movement of tiles is not rolled due to the heavy load, then the option with the movement of objects should be better.
The plan is similar to option 3, with one exception: the event handler should be handled by the Google map handler. To do this, hide the Yandex layers responsible for handling events.
And here we are in for disappointment. For unknown reasons, Google maps in this embodiment only process mouse clicks, but not move and release. And how many hours I spent on the search results do not count.
After much experimentation in attempts to remove the standard Yandex Map handlers, it turned out that it was necessary to do a little differently and it would work.
First you need to transfer Google maps from the YMaps-tile-container diva to the very root, that is, to the div in which the Yandex map itself is created. Now the map is covered with a gray background. Set the background diva value with the “YMaps-layer-container” class to transparent. Now we see both the map and objects, but Google does not receive events. Set the z-index google maps to 1, while the diva “YMaps-layer-container” will put auto. We try ... Done!
And the wolves are fed and the sheep are safe!
Everything fit into two functions, the code of which can be seen below.
Here you can connect and OSM.
// .
function unbindGoogleMap()
{
$( '#googlemap' ).hide();
$( '.YMaps-map-type-layer-container' ).show();
$( '.YMaps-layer YMaps-common-object-layer' ).show();
if (mapevents[0])
mapevents[0].cleanup();
}
/ Google
function bindGoogleMap(type)
{
var selector = '#' +$(map.getContainer()).attr( 'id' );
map.setType( new YMaps.MapType([ "none#layer" ], '' ,{minZoom:1, maxZoom:17}));
map.redraw();
if ($( '#googlemap' ).length==0)
{
var $div = $( '<div>' ).attr( 'id' , 'googlemap' ).width($(selector).width()).height($(selector).height()).css({zIndex:1});
$( '#routemap' ).prepend($div);
}
$( '#googlemap' ).show();
$( '.YMaps-layer-container' ).css({background: 'transparent' ,zIndex: 'auto' });
$( '.YMaps-map-type-layer-container' ).hide();
$( '.YMaps-layer YMaps-common-object-layer' ).hide();
if (!gmap)
{
gmap = new GMap2( document .getElementById( 'googlemap' ));
gmap.enableContinuousZoom();
gmap.enableScrollWheelZoom();
}
switch (type)
{
case 'gotsat' : case 4:
gmap.setMapType(G_SATELLITE_MAP);;
break ;
case 'gothyb' : case 5:
gmap.setMapType(G_HYBRID_MAP);;
break ;
case 'gotrel' : case 6:
gmap.setMapType(G_PHYSICAL_MAP);;
break ;
default : gmap.setMapType(G_NORMAL_MAP);
}
gmap.setCenter( new GLatLng(map.getCenter().getLat(), map.getCenter().getLng()), map.getZoom());
//
GEvent.addListener(gmap, "move" , function (overlay, latlng) {
map.setCenter( new YMaps.GeoPoint(gmap.getCenter().lng(), gmap.getCenter().lat()), gmap.getZoom());
}, this );
//-
GEvent.addListener(gmap, "update" , function (overlay, latlng) {
map.setCenter( new YMaps.GeoPoint(gmap.getCenter().lng(), gmap.getCenter().lat()), gmap.getZoom());
}, this );
//
mapevents[0] = YMaps.Events.observe(map, map.Events.BoundsChange, function () {
gmap.setCenter( new GLatLng(map.getCenter().getLat(), map.getCenter().getLng()), map.getZoom());
});
}

* This source code was highlighted with Source Code Highlighter .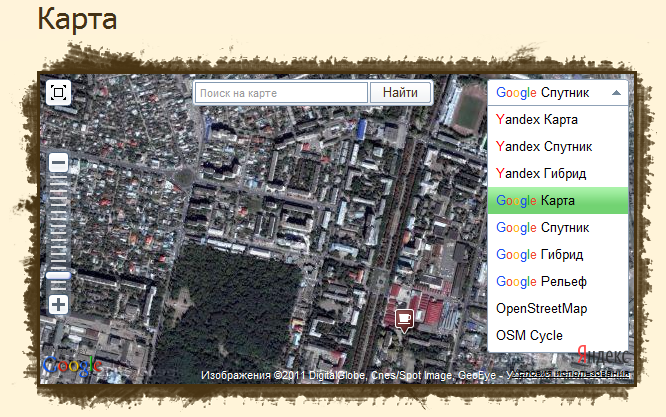
That's all. A live example can be seen on the site bikecamp.ru/map
Source: https://habr.com/ru/post/116057/
All Articles