Unity3d Tank Tutorial: Undercarriage (Lesson 1. Basics of vehicle mechanics)
Introduction
So you are no longer new to Unity, you can create a scene, arrange objects on the stage, create terrain, make prefabs, etc. ... and most importantly, work with scripts, or you have already studied the articles: Unity3D for beginners - Tutorial 1 and Unity3d script basics . All this knowledge will be useful to you because in this lesson we will move much further.
Namely: in the first part of this lesson you will learn what Wheel Collider is, how to drive a vehicle with it and create realistic car suspension behavior, in the second part of the lesson, on the basis of all this I will show how to make a tank undercarriage with appropriate physics and controllers .
')
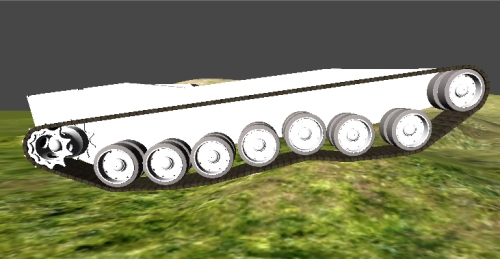
Actually, what you see on the image above (this will be the result of this lesson) you can try out "live" directly in the browser . Want to do it yourself? Then welcome under the cat
Before you start talking about the basics of modeling the mechanics of a car at Unity, I can not help but note that the official website already has lessons on this topic, for example, here . However, throughout all of this, only indications are given on which script to attach to which object and only rarely explain something useful, in the third part of the lesson they finally explain how the main script works, although in my opinion it should have been done in the very first part, and to begin To explain from the moment wheel colliders work and how they interact with a rigidbody, I finally concluded that this lesson is not designed for newbies in Unity and I want to fix it.
But if you already know what Wheel Collider is and what it is eaten with, then you can skip this lesson.
1. Create a "car"
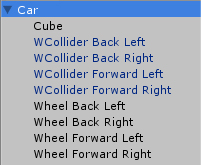
To begin, do the standard procedures, create a scene, create a terrain, or use ready-made ones, then create an empty Game Object (GO), (GameObject-> Create Empty), let's call it something original, for example Car.
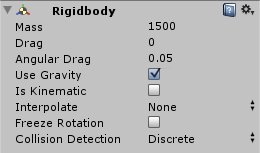
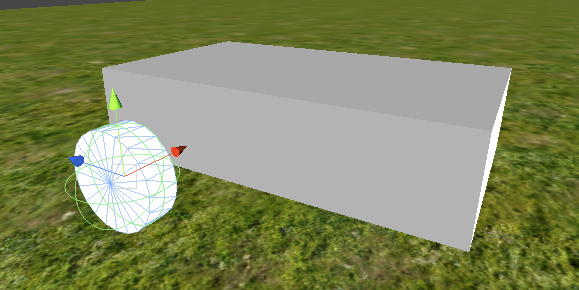
Then create a cube (GameObject-> Create Other -> Cube) apply some standard material to it to make it more visible. Imagine that this is the body of our car, and stretch it with Scale in width and length so that the front of this body looks along the Z axis (the blue axis, it is officially considered to be the front in the Unity world) then drag our Cube onto the Car object in the tab Hierarchy so that it becomes a child of Car. Let's go to the Car object itself and add Rigidbody (Component -> Physics -> Rigidbody) to it. Assign him the appropriate weight, about 1500 kg., The car body is ready.
In addition to the car body, there should be wheels, now create a cylinder (GameObject-> Create Other -> Cylinder), use the same Scale, give it a wheel appearance, then turn it on the Z axis 90 degrees (important! Only on the Z axis! ).

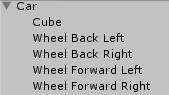
Rename our newly created cylinder to Wheel Forward Left, set the wheel to its place, that is, to the front and left of our cube (I repeat, the positive part of the Z axis is considered to be in Unity).
Drag Wheel Forward Left to Car. Assign the wheel texture in more detail to better see the rotation of the wheel. Now let's copy our wheel (with the Right button on the Wheel Forward Left and Duplicate), call the Wheel Back Left and put it in its rightful place, by analogy act with the other two wheels.

So, our supercar is almost ready! Lift it a little above the surface of the terrain and press Play, the car will fall to the ground and get a stake on the wheels, he can only dream of a soft suspension, get out of Play mode. As you can see, our wheels have a component called Capsule Collider , and the Box Collider body, I will not tell you in this lesson what collisions are and how to calculate the object's position in space based on them, I will explain it more simply: if the object has any simple colliders (Box, Capsule, Mesh, ...) then this object can interact with other objects containing Rigidbody and one or more colliders, in turn, the object containing Rigidbody will calculate its position based on collisions of all the colliders subordinate to it and their designated physical m materials.
If you do not understand anything from the above, do not bother, understanding will come with practice.
In the meantime, select each of our wheels and remove the Capsule Collider (with the Right button on it and Remove Component). Press Play, now the car is no longer on wheels, they have passed through the terrain and now only the body interacts with the surface.
2. Add Wheel Colliders
So what is this mysterious Wheel Collider ? Let's figure it out. Create an empty GameObject, name it WCollider Forward Left, now add the Wheel Collider component (Component -> Physics -> Wheel Collider) to it, it looks like a circle with a segment inside, it may be too big or too small compared to your wheel, everything depends on how much you get involved in using scale. Fortunately, he has the Radius parameter, changing this parameter to fit it to the radius of his wheel, then create a new prefab (Assets -> Create -> Prefab) call it WCollider, then drag WCollider Forward Left to the prefab. We created a prefab for convenience, since the colliders will have the same number of wheels, and in order not to change the parameters of each, we will change the parameters of the prefab, the other colliders will inherit its properties. Now we do the standard procedure, drag the WCollider Forward Left onto the Car object and place it in the center of the front left wheel, duplicate it 3 times and rename it to move it according to the other wheels.
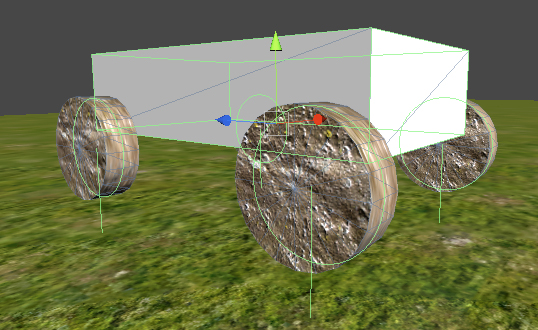
Press Play, the car will fall and get back on the wheels (by the way, if the wheels still pass through the terrain, this means that the car falls to the ground at a very high speed, and you just need to reduce the distance to the ground, or increase the Drag parameter of Rigidbody). As you can see, the result is not much different from where Capsule Colliders were on our wheels, everything is correct, because we did not set any parameters to our Wheel Colliders.
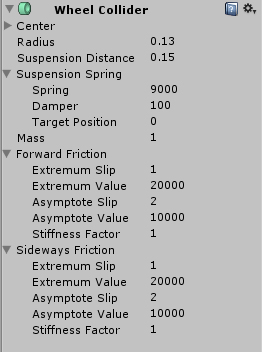
So, exit Game Mode, select our WCollider prefab, go and change the properties of the Wheel Collider component:
- Suspension Distanse - in fact, this is the length of the spring of our suspension, set 0.15
- Suspension Spring -> Spring - stiffness of the suspension, the greater the weight of our Rigidbody, the greater must be the rigidity, we put 9000
- Suspension Spring -> Damper - Suspension softener, greater value makes the spring move more slowly, set 100
- Mass - the mass of the wheel, leave 1
- Forward Friction - “front” friction force of the wheel, leave as it is
- Sideways Friction - “lateral” friction force of the wheel, useful if you want to realize a car drift, leave it as it is
(Do not look at the radius, you may have another one, the main thing is that the circle coincides with your wheel)
So, click Play now, look, our car behaves now quite differently, now it springs from the surface of the terrain, and if you put it on the slope of some kind of roller coaster, it will roll off of it, that's how Wheel Colliders work with us.
But that's not all they can do, let's find out how to drive a car with them and make our wheels spin and react to landscape irregularities. Begin to script!
3. Manage Wheel Colliders
In this tutorial, I’ll write scripts in C #, forgive me, JavaScript, I’m used to it, I think you will figure it out.
Create a new C # script (Assets -> Create -> C Sharp Script), call it CarController, open and write the following:
using UnityEngine; using System.Collections; public class CarController : MonoBehaviour { //1 public WheelCollider[] WColForward; //2 public WheelCollider[] WColBack; //3 // Use this for initialization void Start () { //4 } void FixedUpdate () { //5 } } - The main class of the script must be named exactly the same as the script file, otherwise the compiler will generate an error.
- An array of front colliders.
- Array of rear colliders.
- We will use the Start () function for initialization.
- As in the Unity3d script basics lesson, I said that for physical interaction with objects it is better to use the FixedUpdate () function than the Update () function.

Next we work with our colliders, we supplement the script:
using UnityEngine; using System.Collections; public class CarController : MonoBehaviour { public WheelCollider[] WColForward; public WheelCollider[] WColBack; public float maxSteer = 30; //1 public float maxAccel = 25; //2 public float maxBrake = 50; //3 // Use this for initialization void Start () { } void FixedUpdate () { float accel = 0; float steer = 0; accel = Input.GetAxis("Vertical"); //4 steer = Input.GetAxis("Horizontal"); //4 CarMove(accel,steer); //5 } private void CarMove(float accel,float steer){ //5 foreach(WheelCollider col in WColForward){ //6 col.steerAngle = steer*maxSteer; //6 } if(accel == 0){ //7 foreach(WheelCollider col in WColBack){ //7 col.brakeTorque = maxBrake; //7 } }else{ //8 foreach(WheelCollider col in WColBack){ //8 col.brakeTorque = 0; //8 col.motorTorque = accel*maxAccel; //8 } } } } Now you can press Play, and using the buttons W, S or the forward and backward arrows, move our “formula one” in motion, and with the buttons A, D, or the left arrows - to the right, rotate.
Let's see what this script does:
- The maximum angle of rotation of the wheels.
- Maximum torque transmitted to the wheel.
- Maximum braking torque.
- The Input class GetAxis () function waits for an event that occurs when we press the movement keys on the controller, or we move the stick of the joystick, the function takes the direction of the virtual axis (for example, “Vertical” is the W, S keys, or the forward movement of the joystick is backward) and returns a number from -1 to 1, where -1 is backward or leftward movement (S key in “Vertical” axis, D in “Horizontal”) 0 - axes are not active and 1 - forward movement, or right (W key in “ Vertical "axis, A in" Horizontal ", or the movement of the stick of the joystick to the left - right).
- Passing the results obtained from the virtual axes to the CarMove () function.
- For each Wheel Collider located in the WColForward array, we change the steerAngle variable, (wheel rotation angle) by multiplying it by the value obtained from the horizontal axis.
- If we have a vertical axis in a resting position (that is, if we do not press on the W or S keys), then we change the variable of the collider brakeTorque, which is responsible for the braking force, this is necessary so that the car does not move by inertia if we do not press the movement keys.
- In other cases, (if we press the W or S keys) reset the braking force, and then change the motorTorque variable (wheel torque) by multiplying it by the value obtained from the vertical axis, as a result of which our car begins to accelerate.
That's it, just isn't it? It remains to correct minor defects, firstly, if you try to turn around at high speed, the car will roll on its side, this is due to the fact that the rigidbody calculates the center of gravity of our car based on all the colliders attached to it, secondly, our wheels are still not spinning and do not respond to uneven terrain.
Let's do everything in order.
4. Center of gravity
It is surprisingly simple, first we need to create an empty GO, call it Center of mass, then drag it onto the Car object, and place it approximately where you think it should be, for example so that my car does not roll over when turning at high speed I had to do it like this:
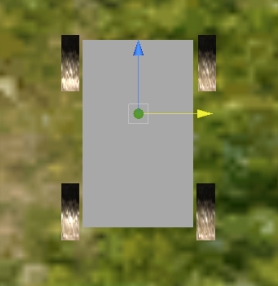

You can have it differently, it all depends on the Box Collider’s geometrical dimensions of our body, so experiment with the center of gravity, but first, complete our script:
- Declare a variable: public Transform COM.
- Drag the GO Center of mass onto the COM field in the script.
- Inside the Start () function, write the following line: rigidbody.centerOfMass = COM.localPosition
Now you can click Play and check the result.
5. “Liven up” wheels
Well, we got to the final, in my opinion the most interesting in this lesson and at the same time quite a complex topic.
In order to revive the wheel, we need to calculate the position and angle of its rotation in each fixed frame, this will again help us a wonderful WheelCollider, its method GetGroundHit () , which is able to return the WheelHit structure, which in turn contains the contact point of the collider and terrane ( variable point). Thanks to the GetGroundHit () method, we can calculate the wheel position based on the motion of the suspension spring. As for the angle of rotation, this is quite simple, in WheelCollider there is a float variable rpm , an abbreviation of rotation per minute, based on which we can determine the angle of rotation of the wheel.
Moving on to the script itself, it has grown, has grown stout, and now it looks like this:
using UnityEngine; using System.Collections; public class CarController : MonoBehaviour { public WheelCollider[] WColForward; public WheelCollider[] WColBack; public Transform[] wheelsF; //1 public Transform[] wheelsB; //1 public float wheelOffset = 0.1f; //2 public float wheelRadius = 0.13f; //2 public float maxSteer = 30; public float maxAccel = 25; public float maxBrake = 50; public Transform COM; public class WheelData{ //3 public Transform wheelTransform; //4 public WheelCollider col; //5 public Vector3 wheelStartPos; //6 public float rotation = 0.0f; //7 } protected WheelData[] wheels; //8 // Use this for initialization void Start () { rigidbody.centerOfMass = COM.localPosition; wheels = new WheelData[WColForward.Length+WColBack.Length]; //8 for (int i = 0; i<WColForward.Length; i++){ //9 wheels[i] = SetupWheels(wheelsF[i],WColForward[i]); //9 } for (int i = 0; i<WColBack.Length; i++){ //9 wheels[i+WColForward.Length] = SetupWheels(wheelsB[i],WColBack[i]); //9 } } private WheelData SetupWheels(Transform wheel, WheelCollider col){ //10 WheelData result = new WheelData(); result.wheelTransform = wheel; //10 result.col = col; //10 result.wheelStartPos = wheel.transform.localPosition; //10 return result; //10 } void FixedUpdate () { float accel = 0; float steer = 0; accel = Input.GetAxis("Vertical"); steer = Input.GetAxis("Horizontal"); CarMove(accel,steer); UpdateWheels(); //11 } private void UpdateWheels(){ //11 float delta = Time.fixedDeltaTime; //12 foreach (WheelData w in wheels){ //13 WheelHit hit; //14 Vector3 lp = w.wheelTransform.localPosition; //15 if(w.col.GetGroundHit(out hit)){ //16 lp.y -= Vector3.Dot(w.wheelTransform.position - hit.point, transform.up) - wheelRadius; //17 }else{ //18 lp.y = w.wheelStartPos.y - wheelOffset; //18 } w.wheelTransform.localPosition = lp; //19 w.rotation = Mathf.Repeat(w.rotation + delta * w.col.rpm * 360.0f / 60.0f, 360.0f); //20 w.wheelTransform.localRotation = Quaternion.Euler(w.rotation, w.col.steerAngle, 90.0f); //21 } } private void CarMove(float accel,float steer){ foreach(WheelCollider col in WColForward){ col.steerAngle = steer*maxSteer; } if(accel == 0){ foreach(WheelCollider col in WColBack){ col.brakeTorque = maxBrake; } }else{ foreach(WheelCollider col in WColBack){ col.brakeTorque = 0; col.motorTorque = accel*maxAccel; } } } } Copy it, paste it into your script, then in the hierarchy tab select our Car object, as you can see in the inspector we have new variables and arrays in the script, we need to pass the front and rear wheels to the wheelsF and wheelsB arrays, respectively (wheels and not Wheel Colliers!) How to do it click Play. If the wheels go under the terrain then change the value of the wheelRadius variable, it should roughly match the radius of your colliders.
So a miracle must happen, your wheels will now rotate and react to uneven terrain just like real ones.

If they are spinning along the wrong axis, or in the other direction, then you should read paragraph 1 where we created the car, I said there that it’s important to turn the wheels exactly Z axis 90 degrees, then I will tell you why. Let's analyze the script:
- Create arrays that will store the Transform of our wheels.
- These variables will be useful to us, below I will explain for what.
- Let's create a class that will contain the information we need about each of our wheels, namely:
- Transform wheels;
- Wheel Collider Wheels;
- The starting position of the wheel;
- Angle of rotation of the wheel.
- We declare an array of wheels with the type WheelData.
- We pass the data we need to the wheels array, for this I wrote the SetupWheels () function.
- The SetupWheels () function takes a Transform wheel and its WheelCollider, passes the data we need to the variables contained in the WheelData class and returns it.
- Let's write the UpdateWheels () function in which the position and angle of rotation of our wheels will be calculated.
- We remember the Time class fixedDeltaTime variable. We need it in order for the wheel rotation to be evenly spread over time.
- For each element of the wheels array, perform the following operations:
- Create a class variable WheelHit (I told about it above);
- We remember the local position of the wheel (the local position is the position relative to the parent coordinates, the global position is relative to the world ones);
- If WheelCollider wheels collides with the surface of the terrane (or something else);
- Then, from the local position of the wheel position Y, we subtract Dot () between the vector with the beginning at the point where the collider touches the terrain surface (hit.point) and the end at the current wheel position (w.wheelTransform.position) and between the vector directed upwards relative to the Car object (transform.up) and from all this we also subtract the variable wheelRadius so that the wheel takes the right place. (If you don’t understand a single word from the above, don’t get upset most people don’t understand it the first time, for that you need to know what the Dot product is and how it relates to the vectors listed above, or just know that the wheel position should be calculated that way );
- If WheelCollider does not touch the surface of the terrain. We take away the wheelOffset from the Y coordinate of the initial local position of the wheel, thanks to which our wheels do not fly away in an unknown direction when the car falls from a height or lies on the “back”;
- Apply the modified wheel position to its current position;
- We calculate the angle of “rotation” of the wheel using the Repeat () function of the Mathf class, this function helps us to keep the angle in the range from 0 to 360 degrees, we calculate the angle itself thanks to a not tricky formula (w.rotation + delta * w.col.rpm * 360.0f / 60.0f) where we actually add the time delta multiplied by the number of turns per minute stored in the collider and multiplied by 360/60 to the current angle of rotation.
- We apply the resulting result to the current local rotation angles, the Quaternion class Euler () function helps us in this, which returns the quaternion in the Euler angles (no matter how scary the word quaternion is, I advise you to abstract and perceive it as a structure that stores local and global angles of rotation, it means something completely different, here I will not tell you what it is, it will be so easy to understand). The first argument (ie the angle around the X axis) we pass our calculated angle of "rotation" of the wheel, the second argument (angle around the Y axis) we pass the angle of rotation of the collider, and the third argument (angle along the Z axis, now you understand why in paragraph 1 it was important turn the wheels exactly around the Z axis) betray the constant 90.0f.
Conclusion
Well, that's all I can tell you about how to build the mechanics of an ordinary car on Unity3D, after reading and realizing all of the above, you can now go to make a racing simulator.
Well, in the next part of the lesson, as I promised, I will talk about how to build the mechanics of the tank tracks, and I will also talk about modeling methods in the 3D editor and a little about exporting the model from it and importing into Unity and of course I will not force you to model what you saw in this demo , but give you a ready-made model. Thanks for attention and good luck in learning Unity3d.
>> Lesson 2
Source: https://habr.com/ru/post/115557/
All Articles