Android Development Tutorial. Part 2/?
Lars Vogel - Eclipse Evangelist.
Under the cat you will find a continuation of the translation of his article, which describes the process of creating Android applications using Eclipse. Used by Eclipse 3.6, Java 1.6 and Android 2.3 (Gingerbread).
Part 1
The operating system controls the life cycle of your application. At any time, Android can stop or destroy the process of your application, for example, due to an incoming call. Android determines the life cycle of activations using predefined methods. The most important methods are:
The android.content.Context class represents connections to the Android system. This is an interface for global information about the application environment. The context also provides the getSystemService method, which allows you to get a control object for various pieces of equipment. Since Activities and Services extend the Context class, you can directly access the context with this.
Suppose you have already installed Eclipse.
Download the Android SDK from the Android page via the Android SDK link.
')
You can unzip the downloaded zip-archive to any place of your file system, the author, for example, unpacked it in “c: \ android-sdk-windows”.
Use the Eclipse update manager to install all available plugins for the Android Development Tools (ADT) via the link dl-ssl.google.com/android/eclipse .
In Eclipse, open the Preferences dialog through Windows -> Preferences. Select Android and specify the installation path of the Android SDK.
If each time or simply you are often asked to re-select the location of the Android plugin, join the author in solving the Bug 3210 bug.
Now choose from the menu Window -> Android SDK and AVD Manager.

Select the available packages and select the latest SDK.

Click "Install selected" and agree with the licenses of all packages. After installation, restart Eclipse.
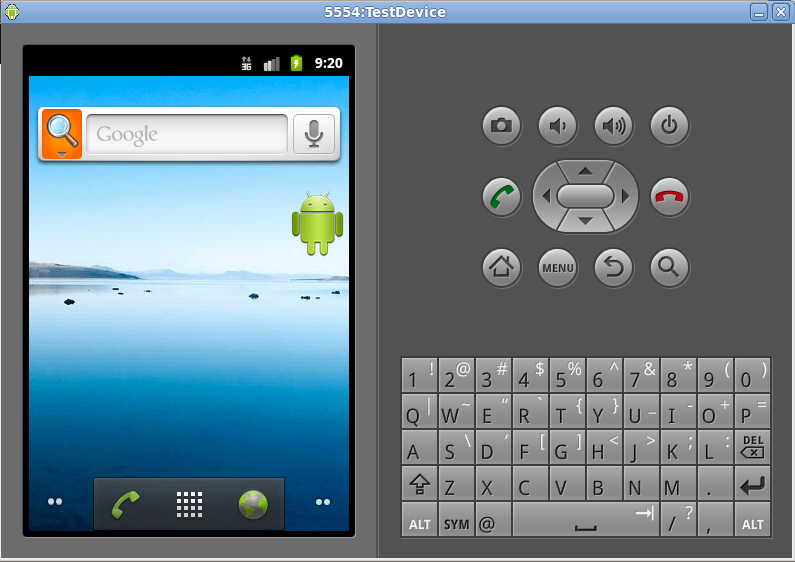
Android tools includes an emulator. This emulator behaves like a real Android device in most cases and will allow you to test your application without a physically real device. You can emulate multiple devices with different configurations. Each configuration is defined using the Android Virtual Device (AVD).
To define AVD, click the device manager button, click New, and do the following.


Click “Create AVD”. This will create a device. To check the correctness of the settings, select your device and click "Start".

After (after a long time) your device will be launched.
The next step is optional.
During the development of Android applications, it is useful to have on hand the Android source codes that are available with many defaults.
Haris Peco supports plugins that provide access to Android sources. Use the Eclipse update manager to install two plugins. Sites with updates: " adt-addons.googlecode.com/svn/trunk/source/com.android.ide.eclipse.source.update " and " adt-addons.googlecode.com/svn/trunk/binedit/com.android .ide.eclipse.binedit.update .
Things don't always work as they should. Several user reports describe the following errors:
To solve these problems, select the Project -> Clean menu.
If you have problems with your own code, you can use the LogCat viewer, described below (in the third or fourth part of the translation).
This app is also available in the Android Marketplace. Enter “vogella” in the search field to search for this example.
Select File -> New -> Other -> Android -> Android Project and create an Android project "de.vogella.android.temperature".
Stick to the following:

Click Finish. This will create the following directory structure.

In the Android platform, the structured values that the res directory contains can also store the assets directory, which is used to store any data. In Java, you can access this data through AssetsManager and the getAssets () method.
The Android SDK allows you to create well-defined objects, such as strings and user interfaces, in two ways, using a heavy editor, or directly on XML. We will try to use not only the user interface, but also XML to check the lists. You can switch between these two modes tab on the bottom of the screen. Example:

Android allows you to create resource attributes, such as strings and / or colors. These attributes can be used in defining UI using XML or Java code.
Select the file “res / values / string.xml” and click “Add”. Select "Color" and save with the name "myColor" and the value "# 3399CC".

Also add the following attributes to the string; they will later allow the application to be translated.

Switch to XML mode and check the correctness of the values you specified.
Select “res / layout / main.xml” and double-click in the Android editor. This editor allows you to set the UI by drag and drop, or directly in the XML-code. You can switch between these two tabs with the button at the bottom of the editor. To change the position and group the elements, you can use the thumbnail view.
Delete "Hello World, Hello!" By right-clicking. Drag “EditText” from the “Views” panel. Add “RadioGroup” with two RadioButtons to the layout (you can delete one RadioButton), add one “Button”. The result will be similar to the following screenshot, and the corresponding XML written below.

Switch to “main.xml” and check that the XML code looks like the one below.
If you select a UI element, you can change its properties by viewing properties. Most properties can also be changed through the right click menu. Select EditText and remove this text property. Select the field, right click on it, select Properties-> Text and delete the contents. This means that no text will be displayed in the text field.


Delete text property in EditText ()
Assign the string attribute "celsius" to your property "text" of the first switch and "fahrenheit" of the second.


From this point on, the author assumes that you can use the property menu on the UI elements. Set the “Checked” property to “true” for the first RadioButton switch. Assign “calc” to the text property of your button and assign “myClickHandler” to the “onClick” property. Set the “Input type” property to “numberSigned” and “numberDecimal” in your EditText.
Select a background (your ViewGroup / LinearLayout) and set the “Background” property to the color attribute "@ color / myColor".

Switch to the "main.xml" tab to verify that the XML code is correct.
Change your code in “Convert.java” to the following. Note that the call to “myClickHandler” will be based on the “OnClick” property of your button.
To launch an Android application, select your project, right click on it, Run-As-> Android Application. Be patient, the emulator starts up very slowly. You should get the following result.

Enter the number, select your conversion and click the button. The result should appear and get another option.
If you press the Home button, you can also select your application.


To use the Android menu provides two ways. The first is the options menu, which can be opened via the menu button. The menu of options for your actions is filled with the onCreateOptionsMenu () method of your activations. You can register a menu here through your Java code or by using menu resources in the XML that you fill through MenuInflator. You will get the MenuInflator via actions with the getMenuInflator () method.
onCreateContextMenu () is called once. If you want to work on the menu later, use the onPrepareOptionsMenu () method.
The second menu display option uses the context menu for UI (View) widgets. The context menu is activated if the user “long clicks” on the View.
The context menu for the View is registered through the registerForContextMenu (view) method. The onCreateContextMenu () method calls each time the activated context menu, as a context menu, reset after use. The Android platform can also add options to your View, for example, “EditText” provides contextual options for selecting text, and more.
This part will show how to create and determine the number of menu options, how to define settings and how to move between activations through intents. Create a project “de.vogella.android.preferences” with the activation “HelloPreferences”. Change the UI in the "/res/layout/main.xml" file to the following:
Menus can be defined via xml files. Select your project, right-click on it and select New -> Other -> Android -> "Android XML File". Select the “Menu” option, enter “menu.xml” as the file and click the “Finish” button.

Click Add and select "Item". Set the following value. This determines the entries in your menu. We will have one entry.
Change your “HelloPreferences” class to the following. The OnCreateOptionsMenu method is used to create the menu. The onOptionsItemSelected behavior is currently hard-coded to display Toasts (Toast is a notification, a message that pops up on the window surface) to trigger parameter settings. In case you want to disable or hide menu items, you can use the “onPrepareOptionsMenu” method, which invokes a previously called menu each time.
Launch your application and click “Menu” in the emulator. Your menu should appear. If you select a menu entry - then you should see a small informational message.

Setting values can also be sorted as XML resources. Create another Android XML file “preferences.xml” this time, type “Preference”.
Click Add, add a category, and two “EditTextPreferences” settings in this category: “User” and “Password”.


To support the settings, you can define Activations with PreferenceActivity extensions. This activity can load the definition of customization resources via the addPreferencesFromResource () method. Create a “Preferences” class that will load the “preference.xml”.
In order to make this class available as an activation for Android, you need to register it in your AndroidManifest.xml file. Select "AndroidManifest.xml" and the tab "Application". Add activations "Preferences".

We will update the onOptionsItemSelected () method to open the Preferences feature by selecting the menu option once. Although we now have only one option in our menu, we use switching to be ready for several new menu entries. To see the supported parameters, we also define a button and use the PreferenceManager class to get sharedPreferences.
The first button will show the currently supported settings via Toast, and the second button will return the supported username for the display, as you can change the settings via Java code.
Run your application. Press the hardware “menu” button, then select the “Preferences” menu item. You should be able to enter your user settings, then click the hardware “Back” button to return to your main activation. Saved values should be displayed in small message windows (Toast) if you press your first button. If you press the second button, the user name will be returned.

Today I stayed here. I will be glad to criticism.
Under the cat you will find a continuation of the translation of his article, which describes the process of creating Android applications using Eclipse. Used by Eclipse 3.6, Java 1.6 and Android 2.3 (Gingerbread).
Part 1
1.7. Activation and life cycle
The operating system controls the life cycle of your application. At any time, Android can stop or destroy the process of your application, for example, due to an incoming call. Android determines the life cycle of activations using predefined methods. The most important methods are:
- onSaveInstanceState () - calls if activation is stopped. Used to save data when restoring the activation state, if the activation is resumed
- onPause () - always called, if the activation has completed, can be used to release resources or save data
- onResume () - caused, if the activation is renewed, can be used to initialize fields
1.8. Context
The android.content.Context class represents connections to the Android system. This is an interface for global information about the application environment. The context also provides the getSystemService method, which allows you to get a control object for various pieces of equipment. Since Activities and Services extend the Context class, you can directly access the context with this.
2. Installation
Suppose you have already installed Eclipse.
2.1. Android SDK
Download the Android SDK from the Android page via the Android SDK link.
')
You can unzip the downloaded zip-archive to any place of your file system, the author, for example, unpacked it in “c: \ android-sdk-windows”.
2.2. Eclipse
Use the Eclipse update manager to install all available plugins for the Android Development Tools (ADT) via the link dl-ssl.google.com/android/eclipse .
2.3. Configuration
In Eclipse, open the Preferences dialog through Windows -> Preferences. Select Android and specify the installation path of the Android SDK.
If each time or simply you are often asked to re-select the location of the Android plugin, join the author in solving the Bug 3210 bug.
Now choose from the menu Window -> Android SDK and AVD Manager.
Select the available packages and select the latest SDK.
Click "Install selected" and agree with the licenses of all packages. After installation, restart Eclipse.
2.4. Device
Android tools includes an emulator. This emulator behaves like a real Android device in most cases and will allow you to test your application without a physically real device. You can emulate multiple devices with different configurations. Each configuration is defined using the Android Virtual Device (AVD).
To define AVD, click the device manager button, click New, and do the following.
Click “Create AVD”. This will create a device. To check the correctness of the settings, select your device and click "Start".
After (after a long time) your device will be launched.
2.5. Android Source Code
The next step is optional.
During the development of Android applications, it is useful to have on hand the Android source codes that are available with many defaults.
Haris Peco supports plugins that provide access to Android sources. Use the Eclipse update manager to install two plugins. Sites with updates: " adt-addons.googlecode.com/svn/trunk/source/com.android.ide.eclipse.source.update " and " adt-addons.googlecode.com/svn/trunk/binedit/com.android .ide.eclipse.binedit.update .
3. Error handling
Things don't always work as they should. Several user reports describe the following errors:
- Project ... is missing required source folder: 'gen'
- The project path could not be resolved.
- Unable to open class file R.java.
To solve these problems, select the Project -> Clean menu.
If you have problems with your own code, you can use the LogCat viewer, described below (in the third or fourth part of the translation).
4. Your first Android project
4.1. Creating a project
This app is also available in the Android Marketplace. Enter “vogella” in the search field to search for this example.
Select File -> New -> Other -> Android -> Android Project and create an Android project "de.vogella.android.temperature".
Stick to the following:
Click Finish. This will create the following directory structure.
In the Android platform, the structured values that the res directory contains can also store the assets directory, which is used to store any data. In Java, you can access this data through AssetsManager and the getAssets () method.
4.2. Two sides of things
The Android SDK allows you to create well-defined objects, such as strings and user interfaces, in two ways, using a heavy editor, or directly on XML. We will try to use not only the user interface, but also XML to check the lists. You can switch between these two modes tab on the bottom of the screen. Example:
4.3. Creating Attributes
Android allows you to create resource attributes, such as strings and / or colors. These attributes can be used in defining UI using XML or Java code.
Select the file “res / values / string.xml” and click “Add”. Select "Color" and save with the name "myColor" and the value "# 3399CC".
Also add the following attributes to the string; they will later allow the application to be translated.
Table 1. Row Attributes
| Name | Value |
|---|---|
| myClickHandler | myClickHandler |
| celsius | to Celsius |
| fahrenheit | to Fahrenheit |
| calc | Calculate |
Switch to XML mode and check the correctness of the values you specified.
<?xml version="1.0" encoding="utf-8"?> <resources> <string name="hello">Hello World, Convert!</string> <string name="app_name">Temperature Converter</string> <color name="myColor">#3399CC</color> <string name="myClickHandler">myClickHandler</string> <string name="celsius">to Celsius</string> <string name="fahrenheit">to Fahrenheit</string> <string name="calc">Calculate</string> </resources> 4.4. Adding UI Items
Select “res / layout / main.xml” and double-click in the Android editor. This editor allows you to set the UI by drag and drop, or directly in the XML-code. You can switch between these two tabs with the button at the bottom of the editor. To change the position and group the elements, you can use the thumbnail view.
Delete "Hello World, Hello!" By right-clicking. Drag “EditText” from the “Views” panel. Add “RadioGroup” with two RadioButtons to the layout (you can delete one RadioButton), add one “Button”. The result will be similar to the following screenshot, and the corresponding XML written below.
Switch to “main.xml” and check that the XML code looks like the one below.
<?xml version="1.0" encoding="utf-8"?> <LinearLayout xmlns:android="http://schemas.android.com/apk/res/android" android:orientation="vertical" android:layout_width="fill_parent" android:layout_height="fill_parent"> <EditText android:layout_height="wrap_content" android:id="@+id/editText1" android:layout_width="match_parent" android:text="EditText"></EditText> <RadioGroup android:layout_height="wrap_content" android:id="@+id/radioGroup1" android:layout_width="match_parent"> <RadioButton android:text="RadioButton" android:layout_width="wrap_content" android:id="@+id/radio0" android:layout_height="wrap_content" android:checked="true"></RadioButton> <RadioButton android:text="RadioButton" android:layout_width="wrap_content" android:id="@+id/radio1" android:layout_height="wrap_content"></RadioButton> </RadioGroup> <Button android:text="Button" android:id="@+id/button1" android:layout_width="wrap_content" android:layout_height="wrap_content"></Button> </LinearLayout> 4.5. UI properties support
If you select a UI element, you can change its properties by viewing properties. Most properties can also be changed through the right click menu. Select EditText and remove this text property. Select the field, right click on it, select Properties-> Text and delete the contents. This means that no text will be displayed in the text field.
Delete text property in EditText ()
Assign the string attribute "celsius" to your property "text" of the first switch and "fahrenheit" of the second.
From this point on, the author assumes that you can use the property menu on the UI elements. Set the “Checked” property to “true” for the first RadioButton switch. Assign “calc” to the text property of your button and assign “myClickHandler” to the “onClick” property. Set the “Input type” property to “numberSigned” and “numberDecimal” in your EditText.
Select a background (your ViewGroup / LinearLayout) and set the “Background” property to the color attribute "@ color / myColor".
Switch to the "main.xml" tab to verify that the XML code is correct.
<?xml version="1.0" encoding="utf-8"?> <LinearLayout xmlns:android="http://schemas.android.com/apk/res/android" android:orientation="vertical" android:layout_width="fill_parent" android:layout_height="fill_parent" android:background="@color/myColor"> <EditText android:layout_height="wrap_content" android:id="@+id/editText1" android:layout_width="match_parent" android:inputType="numberDecimal|numberSigned"></EditText> <RadioGroup android:layout_height="wrap_content" android:id="@+id/radioGroup1" android:layout_width="match_parent"> <RadioButton android:layout_width="wrap_content" android:id="@+id/radio0" android:layout_height="wrap_content" android:text="@string/celsius" android:checked="true"></RadioButton> <RadioButton android:layout_width="wrap_content" android:id="@+id/radio1" android:layout_height="wrap_content" android:text="@string/fahrenheit"></RadioButton> </RadioGroup> <Button android:id="@+id/button1" android:layout_width="wrap_content" android:layout_height="wrap_content" android:text="@string/calc" android:onClick="myClickHandler"></Button> </LinearLayout> 4.6. Your application code
Change your code in “Convert.java” to the following. Note that the call to “myClickHandler” will be based on the “OnClick” property of your button.
package de.vogella.android.temperature; import android.app.Activity; import android.os.Bundle; import android.view.View; import android.widget.EditText; import android.widget.RadioButton; import android.widget.Toast; public class Convert extends Activity { private EditText text; @Override public void onCreate(Bundle savedInstanceState) { super.onCreate(savedInstanceState); setContentView(R.layout.main); text = (EditText) findViewById(R.id.editText1); } // This method is called at button click because we assigned the name to the // "On Click property" of the button public void myClickHandler(View view) { switch (view.getId()) { case R.id.button1: RadioButton celsiusButton = (RadioButton) findViewById(R.id.radio0); RadioButton fahrenheitButton = (RadioButton) findViewById(R.id.radio1); if (text.getText().length() == 0) { Toast.makeText(this, "Please enter a valid number", Toast.LENGTH_LONG).show(); return; } float inputValue = Float.parseFloat(text.getText().toString()); if (celsiusButton.isChecked()) { text.setText(String .valueOf(convertFahrenheitToCelsius(inputValue))); } else { text.setText(String .valueOf(convertCelsiusToFahrenheit(inputValue))); } // Switch to the other button if (fahrenheitButton.isChecked()) { fahrenheitButton.setChecked(false); celsiusButton.setChecked(true); } else { fahrenheitButton.setChecked(true); celsiusButton.setChecked(false); } break; } } // Converts to celsius private float convertFahrenheitToCelsius(float fahrenheit) { return ((fahrenheit - 32) * 5 / 9); } // Converts to fahrenheit private float convertCelsiusToFahrenheit(float celsius) { return ((celsius * 9) / 5) + 32; } } 4.7. Launch of the project
To launch an Android application, select your project, right click on it, Run-As-> Android Application. Be patient, the emulator starts up very slowly. You should get the following result.
Enter the number, select your conversion and click the button. The result should appear and get another option.
4.8. Using the home menu
If you press the Home button, you can also select your application.
5. Menu, Settings and Intents
5.1. Menu
To use the Android menu provides two ways. The first is the options menu, which can be opened via the menu button. The menu of options for your actions is filled with the onCreateOptionsMenu () method of your activations. You can register a menu here through your Java code or by using menu resources in the XML that you fill through MenuInflator. You will get the MenuInflator via actions with the getMenuInflator () method.
onCreateContextMenu () is called once. If you want to work on the menu later, use the onPrepareOptionsMenu () method.
The second menu display option uses the context menu for UI (View) widgets. The context menu is activated if the user “long clicks” on the View.
The context menu for the View is registered through the registerForContextMenu (view) method. The onCreateContextMenu () method calls each time the activated context menu, as a context menu, reset after use. The Android platform can also add options to your View, for example, “EditText” provides contextual options for selecting text, and more.
5.2. Project
This part will show how to create and determine the number of menu options, how to define settings and how to move between activations through intents. Create a project “de.vogella.android.preferences” with the activation “HelloPreferences”. Change the UI in the "/res/layout/main.xml" file to the following:
<?xml version="1.0" encoding="utf-8"?> <LinearLayout xmlns:android="http://schemas.android.com/apk/res/android" android:orientation="vertical" android:layout_width="fill_parent" android:layout_height="fill_parent" > <Button android:id="@+id/Button01" android:layout_width="wrap_content" android:layout_height="wrap_content" android:text="Show Preferences"></Button> <Button android:id="@+id/Button02" android:layout_width="wrap_content" android:layout_height="wrap_content" android:text="Change Preferences" android:onClick="changePreferences"></Button> </LinearLayout> 5.3. Adding a menu to XML resources
Menus can be defined via xml files. Select your project, right-click on it and select New -> Other -> Android -> "Android XML File". Select the “Menu” option, enter “menu.xml” as the file and click the “Finish” button.
Click Add and select "Item". Set the following value. This determines the entries in your menu. We will have one entry.
Change your “HelloPreferences” class to the following. The OnCreateOptionsMenu method is used to create the menu. The onOptionsItemSelected behavior is currently hard-coded to display Toasts (Toast is a notification, a message that pops up on the window surface) to trigger parameter settings. In case you want to disable or hide menu items, you can use the “onPrepareOptionsMenu” method, which invokes a previously called menu each time.
package de.vogella.android.preferences; import android.app.Activity; import android.os.Bundle; import android.view.Menu; import android.view.MenuInflater; import android.view.MenuItem; import android.widget.Toast; public class HelloPreferences extends Activity { /** Called when the activity is first created. */ @Override public void onCreate(Bundle savedInstanceState) { super.onCreate(savedInstanceState); setContentView(R.layout.main); } @Override public boolean onCreateOptionsMenu(Menu menu) { MenuInflater inflater = getMenuInflater(); inflater.inflate(R.menu.menu, menu); return true; } @Override public boolean onOptionsItemSelected(MenuItem item) { Toast.makeText(this, "Just a test", Toast.LENGTH_SHORT).show(); return true; } } Launch your application and click “Menu” in the emulator. Your menu should appear. If you select a menu entry - then you should see a small informational message.
5.4. Use settings
Setting values can also be sorted as XML resources. Create another Android XML file “preferences.xml” this time, type “Preference”.
Click Add, add a category, and two “EditTextPreferences” settings in this category: “User” and “Password”.
To support the settings, you can define Activations with PreferenceActivity extensions. This activity can load the definition of customization resources via the addPreferencesFromResource () method. Create a “Preferences” class that will load the “preference.xml”.
package de.vogella.android.preferences; import android.os.Bundle; import android.preference.PreferenceActivity; public class Preferences extends PreferenceActivity { /** Called when the activity is first created. */ @Override public void onCreate(Bundle savedInstanceState) { super.onCreate(savedInstanceState); addPreferencesFromResource(R.xml.preferences); } } In order to make this class available as an activation for Android, you need to register it in your AndroidManifest.xml file. Select "AndroidManifest.xml" and the tab "Application". Add activations "Preferences".
We will update the onOptionsItemSelected () method to open the Preferences feature by selecting the menu option once. Although we now have only one option in our menu, we use switching to be ready for several new menu entries. To see the supported parameters, we also define a button and use the PreferenceManager class to get sharedPreferences.
The first button will show the currently supported settings via Toast, and the second button will return the supported username for the display, as you can change the settings via Java code.
package de.vogella.android.preferences; import android.app.Activity; import android.content.Intent; import android.content.SharedPreferences; import android.content.SharedPreferences.Editor; import android.os.Bundle; import android.preference.PreferenceManager; import android.view.Menu; import android.view.MenuInflater; import android.view.MenuItem; import android.view.View; import android.view.View.OnClickListener; import android.widget.Button; import android.widget.Toast; public class HelloPreferences extends Activity { SharedPreferences preferences; /** Called when the activity is first created. */ @Override public void onCreate(Bundle savedInstanceState) { super.onCreate(savedInstanceState); setContentView(R.layout.main); Button button = (Button) findViewById(R.id.Button01); // Initialize preferences preferences = PreferenceManager.getDefaultSharedPreferences(this); button.setOnClickListener(new OnClickListener() { public void onClick(View v) { String username = preferences.getString("username", "n/a"); String password = preferences.getString("password", "n/a"); Toast.makeText( HelloPreferences.this, "You entered user: " + username + " and password: " + password, Toast.LENGTH_LONG).show(); } }); Button buttonChangePerferences = (Button) findViewById(R.id.Button02); buttonChangePerferences.setOnClickListener(new OnClickListener() { public void onClick(View v) { Editor edit = preferences.edit(); String username = preferences.getString("username", "n/a"); // We will just revert the current user name and save again StringBuffer buffer = new StringBuffer(); for (int i = username.length() - 1; i >= 0; i--) { buffer.append(username.charAt(i)); } edit.putString("username", buffer.toString()); edit.commit(); // A toast is a view containing a quick little message for the // user. We give a little feedback Toast.makeText(HelloPreferences.this, "Reverted string sequence of user name.", Toast.LENGTH_LONG).show(); } }); } @Override public boolean onCreateOptionsMenu(Menu menu) { MenuInflater inflater = getMenuInflater(); inflater.inflate(R.menu.menu, menu); return true; } // This method is called once the menu is selected @Override public boolean onOptionsItemSelected(MenuItem item) { switch (item.getItemId()) { // We have only one menu option case R.id.preferences: // Launch Preference activity Intent i = new Intent(HelloPreferences.this, Preferences.class); startActivity(i); // Some feedback to the user Toast.makeText(HelloPreferences.this, "Here you can maintain your user credentials.", Toast.LENGTH_LONG).show(); break; } return true; } } 5.5. Launch
Run your application. Press the hardware “menu” button, then select the “Preferences” menu item. You should be able to enter your user settings, then click the hardware “Back” button to return to your main activation. Saved values should be displayed in small message windows (Toast) if you press your first button. If you press the second button, the user name will be returned.
6. Dialogs via AlertDialog
Today I stayed here. I will be glad to criticism.
Source: https://habr.com/ru/post/115122/
All Articles