Add the right Firefox for an hour
Many probably faced with the fact that your favorite browser does not know how to do something very simple, but absolutely necessary. I want to tell you how you can train FF4 in an hour on your knee. Writing extensions is a very simple and sometimes pleasant process, but, unfortunately, the documentation is not always easy to find, how-to are scattered around different corners of the MDN site, I could not find any clear recommendations either ... It all spawns (at least in my the head gave rise to the myth that this is a labor-intensive process, accessible only to the gurus. This is the myth that this article is intended to dispel. We will write an extension that will edit the typography in the input fields, asking for help from the Typographer service.

Just want to make a reservation: all of the following will work only in FF4. Colleagues from Mozilla reworked the API so that it is easier to create two extensions for both versions of the browser than to write the recommended noodles like
So.
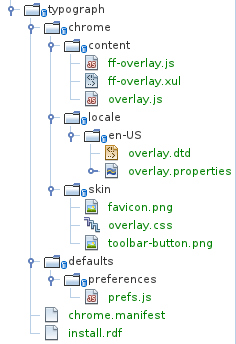
To begin with, we create the skeleton of our future expansion. We were taken care of, so just enough to ask for help . Fill in a simple mold - and download the finished skeleton. For our example, we chose the extension without the configuration dialog, with only one button on the toolbar. This is what the generator did for us:
')
I don’t know how to draw icons, so we’ll borrow it from the service that will do the main work for us (in the screenshot above, I’ve already added it to the
First, let's fix the inscription on the button and the tooltip in the
Then we substitute our icon instead of the one that rolled over to us by default:
Now it remains only to rewrite the response to pressing.
It is convenient for me to use the typographer as follows: if the focus is in the input field (
Well, let's get started. All these edits will go to the file
I dug up this magic somewhere in the depths of MDN :
Return the contents of the clipboard, or an empty string. There is nothing to comment here.
We also need to catch the input focus (I will leave this code due to its triviality behind the scenes).
And finally, the text must be sent to the printing service:
That's all. It remains to call the
And pack all this stuff into our archive:
All example code and the resulting extension can be taken on the people . XPI is an extension file, if you unzip it with a zip, the code itself will be inside.
Low start
Just want to make a reservation: all of the following will work only in FF4. Colleagues from Mozilla reworked the API so that it is easier to create two extensions for both versions of the browser than to write the recommended noodles like
appversion>=4.0 .So.
To begin with, we create the skeleton of our future expansion. We were taken care of, so just enough to ask for help . Fill in a simple mold - and download the finished skeleton. For our example, we chose the extension without the configuration dialog, with only one button on the toolbar. This is what the generator did for us:
')
I don’t know how to draw icons, so we’ll borrow it from the service that will do the main work for us (in the screenshot above, I’ve already added it to the
skin folder). So what to do next with this set of files?First, let's fix the inscription on the button and the tooltip in the
/chrome/locale/en-US/overlay.dtd file: <!ENTITY typographToolbarButton.label "Typo!"> <!ENTITY typographToolbarButton.tooltip "Proceed typography of selected text against Lebedev's tool"> Then we substitute our icon instead of the one that rolled over to us by default:
pushd chrome/skin && mv favicon.png toolbar-button.png && popd Now it remains only to rewrite the response to pressing.
Some code
It is convenient for me to use the typographer as follows: if the focus is in the input field (
textarea ) and a piece of text is highlighted there, then we type it. If the text is not selected - typography the contents of the clipboard. Well, if the focus is somewhere else - we do nothing :-). Therefore, we need to learn to work with the clipboard (this is the most non-trivial part).Well, let's get started. All these edits will go to the file
/chrome/content/overlay.js .I dug up this magic somewhere in the depths of MDN :
var getClipboard = function (flavor) { if (!flavor || flavor == "") flavor = "text/unicode"; var trans = Components.classes["@mozilla.org/widget/transferable;1"] .createInstance(Components.interfaces.nsITransferable); var clip = Components.classes["@mozilla.org/widget/clipboard;1"] .getService(Components.interfaces.nsIClipboard); if (!clip || !trans) return ''; trans.addDataFlavor(flavor); clip.getData(trans, clip.kGlobalClipboard); var str = new Object(); var strLength = new Object(); try { trans.getTransferData(flavor, str, strLength); if (str) str = str.value.QueryInterface(Components.interfaces.nsISupportsString); } catch (e) { // it's OK, skipping str = null; } return str ? str.data.substring(0, strLength.value / 2) : ''; } Return the contents of the clipboard, or an empty string. There is nothing to comment here.
We also need to catch the input focus (I will leave this code due to its triviality behind the scenes).
And finally, the text must be sent to the printing service:
typo : function () { var focused = document.commandDispatcher.focusedElement; if (!focused || focused.tagName.toLowerCase() != 'textarea') { return; } if (focused.selectionStart != focused.selectionEnd ) { text = focused.value.substring(focused.selectionStart, focused.selectionEnd); } else { text = getClipboard(); } text = text.replace (/&/g, '&'); text = text.replace (/</g, '<'); text = text.replace (/>/g, '>'); var xmlRequest = '<?xml version="1.0" encoding="UTF-8"?>' + '<soap:Envelope xmlns:xsi="http://www.w3.org/2001/XMLSchema-instance" ' + 'xmlns:xsd="http://www.w3.org/2001/XMLSchema" ' + 'xmlns:soap="http://schemas.xmlsoap.org/soap/envelope/">' + '<soap:Body>' + '<ProcessText xmlns="http://typograf.artlebedev.ru/webservices/">' + '<text>' + text + '</text>' + '<entityType>' + 3 + '</entityType>' + '<useBr>' + 0 + '</useBr>' + '<useP>' + 0 + '</useP>' + '</ProcessText>' + '</soap:Body>' + '</soap:Envelope>'; var req = new XMLHttpRequest(); req.open('POST', 'http://typograf.artlebedev.ru/webservices/typograf.asmx', true); req.onreadystatechange = function (aEvt) { if (req.readyState == 4) { if (req.status == 200) { var response = req.responseText; var re = /<ProcessTextResult>\s*((.|\n)*?)\s*<\/ProcessTextResult>/m; response = re.exec (response); response = RegExp.$1; response = response.replace (/>/g, '>'); response = response.replace (/</g, '<'); response = response.replace (/&/g, '&'); insertText(response, focused); } else { // smth went wrong — just skip it } } }; req.send(xmlRequest); } That's all. It remains to call the
typo function from the button- typo event handler: onToolbarButtonCommand: function(e) { typograph.typo(); } And pack all this stuff into our archive:
#!/bin/bash if [ -e build ]; then rm -rf build; fi mkdir -p build cp -r install.rdf chrome.manifest chrome defaults build pushd build/chrome >/dev/null && zip -r typograph.jar content/* skin/* locale/* && popd >/dev/null || echo 'Unable to produce jar :-(\n' pushd build && zip -r typograph-4.0.xpi install.rdf chrome.manifest chrome/* defaults/* && popd >/dev/null || echo 'Unable to produce .xpi :-(\n' if [ -e dist ]; then rm -rf dist; fi mkdir -p dist cp build/typograph-4.0.xpi dist/ All example code and the resulting extension can be taken on the people . XPI is an extension file, if you unzip it with a zip, the code itself will be inside.
Source: https://habr.com/ru/post/114754/
All Articles