Introduction to Cappuccino
The Cappuccino framework is a unique technology that allows you to create desktop-quality web applications. It abstracts the DOM and provides a Cocoa-like API instead. Instead of messing with CSS and cross-browser problems, you use interfaces specifically designed for application development, rather than static pages, interfaces taken from Mac OS X and iOS platforms.
I noticed that there are almost no educational materials about Cappuccino in Russian, and decided to fill the gap. This essay is designed so that after reading it, you can immediately start developing your first Cappuccino application. I became acquainted with the framework when I was looking for a tool to implement an online development environment for my Akshell project. I needed to make a full-featured IDE running in a browser window, and Cappuccino did an excellent job with the task.
In 2008, Francisco Tolmaski, Tom Robinson and Ross Boucher (Francisco and Ross - former Apple employees) created 280 North and released 280 Slides , a web-based application for preparing presentations. It still impresses with its look and feel, and then it was just something unreal. And 280 Slides was not an independent product, it was just a demonstration of the capabilities of the new web framework, Cappuccino.
On September 4th of the same year, Cappuccino was published under the LGPL license and immediately became a hit on GitHub. There is a community of programmers around the framework who use it in their products. Since then, this community has only grown and is becoming increasingly involved in the development of Cappuccino.
')
In 2009, 280 North announced a new product, Atlas , and it also turned out to be a breakthrough technology. Atlas is an analogue of the Interface Builder for web applications, in it you can draw interfaces with the mouse by dragging the necessary components from the library. A couple of minutes of work gives a more impressive result than the day of torment with CSS. Unlike Cappuccino, Atlas is a closed paid program, you need to pay $ 20 to download the beta version. This essay is about Cappuccino, so I will not describe Atlas in more detail. I can only say that it really saves a lot of time when creating interfaces, allows you to focus on usability, and not on dealing with different versions of browsers.
Cappuccino and Atlas were actively developing when, in the summer of 2010, Motorola bought 280 North with all its assets, according to rumors, spent $ 20 million on this. The official purpose of the purchase is the development of technology development on the Android platform. Many evil tongues began to talk about the death of Cappuccino, but half a year has passed since then, the framework has been actively developed, and on February 23, the release of version 0.9 took place.
So, Cappuccino is one of the most advanced technologies for creating web applications, its development is provided by a large corporation. It will be useful for every web programmer to learn or at least familiarize yourself with the framework, and we’ll get started.
The main feature of Cappuccino is the Objective-J language created specifically for it. It is the same add-on over JavaScript, as Objective-C is above C. For me, as for many, at first it was completely unclear why I should make an object-oriented add-on above a language that is itself object-oriented. However, this makes a lot of sense.
First, thanks to Objective-J, Cappuccino repeats the Cocoa API. This is not a fantasy on the topic or even creative processing, it is just a repetition, right up to function signatures. Due to this, programmers working on Mac OS X and iOS can safely switch to web development. The convenience of all APIs has been tested by long-term use on the desktop, starting with NeXTSTEP. Finally, when using the framework, you can successfully use the Cocoa documentation , which is far superior to the Doxygen quality and sophistication of the Cappuccino documentation .
Secondly, the lack of flexibility is sometimes a plus. Most programmers will consider that I have now expressed a great heresy, so I will immediately begin to justify myself. Designers know that introducing meshes and other artificial constraints can improve design. Objective-J Cappuccino interfaces at first glance seem cumbersome and antediluvian compared to what could be done in JavaScript. Instead of the Target-Action paradigm, it would often be possible to use closures, instead of explicit getters and setters,
Having worked with Cappuccino, I understood the advantages of this approach, and they are direct consequences of the shortcomings. A more rigid object model allows you to more clearly structure the code, not to drown in the porridge nested in each other functions. Long meaningful names allow you to cope with class hierarchies of Cocoa, in which one class usually has many dozens of methods. Ubiquitous getters and setters make it possible to implement Key-Value Coding, Key-Value Observing and Key-Value Binding, techniques that turn the idea of creating complex user interfaces (unfortunately, there is not enough room in this sketch to describe them).
I started using Cappuccino because I was attracted by the appearance of applications created with it. Now I understand that the real power lies in its API, which at first seemed terrible to me. Therefore, I urge you to become aware of the framework's philosophy before making a final judgment about it.
Let's get to the Objective-J review. The main thing that he brings to JavaScript is the classes. They are defined using the
Between
Interaction between Objective-J objects occurs via message transfer , the first time this technique appeared in the Smalltalk language. Syntactically, it looks like this:
For example, a call to the getters and setters of an object of class
Methods are declared after member variables, before the
Creating an instance of a class in Objective-J occurs in two stages: first, the
The names of constructors in Objective-J are made to begin with the word
For the sake of unity of style, Objective-J defines three variables, taken from Objective-C, that are
Like many people reading this essay, I never used Objective-C, so for me it was completely unclear why the class is defined by the
It's time to install Cappuccino. If you are using Windows, you first have to install Cygwin (unpleasant circumstance). All the rest, and those who decided to take the previous step, simply download the Cappuccino Starter Package and run the bootstrap.sh script.
After installation, the capp utility should appear in the system. As an example, we will create (surprise!) Twitter search application. Generate it:
In the folder that appears there are a lot of files, we are interested in index-debug.html and AppController.j (* .j is the standard extension of files with Objective-J code).
Open index-debug.html. Google Chrome's strict security policy does not allow Cappuccino to download the files it needs when working with the file: // protocol, you need to raise the web server, and in all other browsers we will see the Hello World! Cappuccino compiles Objective-J code in JavaScript on the fly, right in the browser, so when designing you can simply refresh the page and not worry about rebuilding. The “combat” version of the application can be compiled in advance to speed up the download.
Let's start the development. The AppController class is defined in the
Before defining the class, we import
The
The
To initialize the application, we will create a window and a text field:
The JavaScript function
I used to be an ardent supporter of limiting the length of a string to 80 characters. Applying this rule in Cappuccino turns the code into an unreadable mess, so most developers do not limit themselves to working with both Objective-J and Objective-C. The only exception is the Google Guidelines , but it’s also Google.
Now we will make the text field editable and add a frame to it:
Install Target and Action, i.e. the object and method that should be invoked when pressing the Enter button in the field:
Add a field to the window and focus it:
Finally, we show the window:
With the application initialization done, now we define its reaction to pressing Enter, i.e.
We retrieve the value of the text field and, if it is not empty, create an instance of
Create a file SearchWindowController.j and inherit our class from
Define a constructor that creates a window and makes a request to twitter:
And finally, let's write a response handler from Twitter:
It uses the
You probably noticed in the code several calls to the
It remains to deal with the class
The
Now open index-debug.html again and look for a few words. The result should be something like this:
You can view the complete code of the sample and test it.
Of course, in this essay it was impossible to describe even a tenth of the Cappuccino functional. However, I am sure that now you are ready to start developing your applications, and I urge you to do so. To deepen knowledge, use the documentation Cappuccino , also highly recommend a set of screencasts on the topic. I hope that the titanic work of Francisco, Tom and Ross, as well as my humble essay will help some of you to create a new interesting web application.
I noticed that there are almost no educational materials about Cappuccino in Russian, and decided to fill the gap. This essay is designed so that after reading it, you can immediately start developing your first Cappuccino application. I became acquainted with the framework when I was looking for a tool to implement an online development environment for my Akshell project. I needed to make a full-featured IDE running in a browser window, and Cappuccino did an excellent job with the task.
Story
In 2008, Francisco Tolmaski, Tom Robinson and Ross Boucher (Francisco and Ross - former Apple employees) created 280 North and released 280 Slides , a web-based application for preparing presentations. It still impresses with its look and feel, and then it was just something unreal. And 280 Slides was not an independent product, it was just a demonstration of the capabilities of the new web framework, Cappuccino.
On September 4th of the same year, Cappuccino was published under the LGPL license and immediately became a hit on GitHub. There is a community of programmers around the framework who use it in their products. Since then, this community has only grown and is becoming increasingly involved in the development of Cappuccino.
')
In 2009, 280 North announced a new product, Atlas , and it also turned out to be a breakthrough technology. Atlas is an analogue of the Interface Builder for web applications, in it you can draw interfaces with the mouse by dragging the necessary components from the library. A couple of minutes of work gives a more impressive result than the day of torment with CSS. Unlike Cappuccino, Atlas is a closed paid program, you need to pay $ 20 to download the beta version. This essay is about Cappuccino, so I will not describe Atlas in more detail. I can only say that it really saves a lot of time when creating interfaces, allows you to focus on usability, and not on dealing with different versions of browsers.
Cappuccino and Atlas were actively developing when, in the summer of 2010, Motorola bought 280 North with all its assets, according to rumors, spent $ 20 million on this. The official purpose of the purchase is the development of technology development on the Android platform. Many evil tongues began to talk about the death of Cappuccino, but half a year has passed since then, the framework has been actively developed, and on February 23, the release of version 0.9 took place.
So, Cappuccino is one of the most advanced technologies for creating web applications, its development is provided by a large corporation. It will be useful for every web programmer to learn or at least familiarize yourself with the framework, and we’ll get started.
Theory
The main feature of Cappuccino is the Objective-J language created specifically for it. It is the same add-on over JavaScript, as Objective-C is above C. For me, as for many, at first it was completely unclear why I should make an object-oriented add-on above a language that is itself object-oriented. However, this makes a lot of sense.
First, thanks to Objective-J, Cappuccino repeats the Cocoa API. This is not a fantasy on the topic or even creative processing, it is just a repetition, right up to function signatures. Due to this, programmers working on Mac OS X and iOS can safely switch to web development. The convenience of all APIs has been tested by long-term use on the desktop, starting with NeXTSTEP. Finally, when using the framework, you can successfully use the Cocoa documentation , which is far superior to the Doxygen quality and sophistication of the Cappuccino documentation .
Secondly, the lack of flexibility is sometimes a plus. Most programmers will consider that I have now expressed a great heresy, so I will immediately begin to justify myself. Designers know that introducing meshes and other artificial constraints can improve design. Objective-J Cappuccino interfaces at first glance seem cumbersome and antediluvian compared to what could be done in JavaScript. Instead of the Target-Action paradigm, it would often be possible to use closures, instead of explicit getters and setters,
__defineGetter__ and __defineSetter__ , instead of square brackets, usual points, after all. And the worst thing is that Objective-J methods are not first-class objects !Having worked with Cappuccino, I understood the advantages of this approach, and they are direct consequences of the shortcomings. A more rigid object model allows you to more clearly structure the code, not to drown in the porridge nested in each other functions. Long meaningful names allow you to cope with class hierarchies of Cocoa, in which one class usually has many dozens of methods. Ubiquitous getters and setters make it possible to implement Key-Value Coding, Key-Value Observing and Key-Value Binding, techniques that turn the idea of creating complex user interfaces (unfortunately, there is not enough room in this sketch to describe them).
I started using Cappuccino because I was attracted by the appearance of applications created with it. Now I understand that the real power lies in its API, which at first seemed terrible to me. Therefore, I urge you to become aware of the framework's philosophy before making a final judgment about it.
Let's get to the Objective-J review. The main thing that he brings to JavaScript is the classes. They are defined using the
@implementation : @implementation Person: CPObject
{
CPString name @accessors;
}
(id) initWithName: (CPString) aName
{
if (self = [super init])
name = aName;
return self;
}
(Person) personWithName: (CPString) aName
{
return [[Person alloc] initWithName: aName];
}
@end Between
@implementation and @end is a class description. The Person class is inherited from CPObject , the top of the Cappuccino class hierarchy. Then in curly braces are declared the member variables of the class. name is a string member variable for which a getter and a setter are automatically generated (by specifying @accessors ). Objective-J accessors have a nonstandard naming rule setName: name and setName: . This format is worth adhering to, because it relies on the internal mechanisms of Cappuccino.Interaction between Objective-J objects occurs via message transfer , the first time this technique appeared in the Smalltalk language. Syntactically, it looks like this:
  [message object]
 [object message with parameter: value]
 [object messageSParameter1: value1 parameter2: value2]
 ...
For example, a call to the getters and setters of an object of class
Person looks like this:var name = [aPerson name]; [aPerson setName: "Vasya"];
Methods are declared after member variables, before the
@end keyword. Class methods begin with a plus, class instance methods begin with a minus.Creating an instance of a class in Objective-J occurs in two stages: first, the
alloc method of this class creates an uninitialized object, and then the constructor (init-method) initializes it. Often define class methods that simplify this process, personWithName: is an example of such a method.The names of constructors in Objective-J are made to begin with the word
init . Each constructor must first take care of calling the constructor of the superclass, then initialize and return self . The design error is signaled by returning the nil value (yes, during the creation of Objective-C, exceptions were not yet in vogue, so Cocoa and, as a result, Cappuccino do without them).For the sake of unity of style, Objective-J defines three variables, taken from Objective-C, that are
nil , YES and NO . They are identical to null , true and false , respectively. Cappuccino Coding Style Guidelines recommend using them.Like many people reading this essay, I never used Objective-C, so for me it was completely unclear why the class is defined by the
@implementation , and not, for example, @class . Especially for the same curious: Objective-C, as a superstructure over C, uses declaration files (* .h from headers) and definition files (* .m from messages), so classes must be declared ( @interface ) and defined ( @implementation ) . In Objective-J, ads are not needed, so only @implementation .Practice
It's time to install Cappuccino. If you are using Windows, you first have to install Cygwin (unpleasant circumstance). All the rest, and those who decided to take the previous step, simply download the Cappuccino Starter Package and run the bootstrap.sh script.
After installation, the capp utility should appear in the system. As an example, we will create (surprise!) Twitter search application. Generate it:
capp gen "Twitter Search"
In the folder that appears there are a lot of files, we are interested in index-debug.html and AppController.j (* .j is the standard extension of files with Objective-J code).
Open index-debug.html. Google Chrome's strict security policy does not allow Cappuccino to download the files it needs when working with the file: // protocol, you need to raise the web server, and in all other browsers we will see the Hello World! Cappuccino compiles Objective-J code in JavaScript on the fly, right in the browser, so when designing you can simply refresh the page and not worry about rebuilding. The “combat” version of the application can be compiled in advance to speed up the download.
Let's start the development. The AppController class is defined in the
AppController file, in Objective-J it is customary to place the code of each class in the same file. Cappuccino creates one instance of AppController at startup, it must initialize the application and manage its further work.Before defining the class, we import
Foundation and AppKit , the two main parts of Cappuccino. Foundation contains classes for business logic, and AppKit is a library of user interface classes.@import <Foundation / Foundation.j> @import <AppKit / AppKit.j>
The
@import keyword @import specified file. As in C, when you specify the path in angle brackets, the file will be searched for in system folders, when using double quotes, in the current folder.The
applicationDidFinishLaunching: method is called on all objects immediately after starting the application. The meaningful names of the Cappuccino methods make the code understandable even for those who are not familiar with the framework, so I will give explanations only in non-obvious cases. Cappuccino is unlikely to save you keystrokes, so let at least save them to me.To initialize the application, we will create a window and a text field:
  var window = [[CPWindow alloc] initWithContentRect: CGRectMake (100, 100, 250, 70)
                                          styleMask: CPTitledWindowMask],
     contentView = [window contentView],
     textField = [[CPTextField alloc] initWithFrame: CGRectMake (25, 20, 200, 30)];
The JavaScript function
CGRectMake(x, y, width, height) describes the rectangle in which the control will be located. The contentView method returns a view of the inner window area.I used to be an ardent supporter of limiting the length of a string to 80 characters. Applying this rule in Cappuccino turns the code into an unreadable mess, so most developers do not limit themselves to working with both Objective-J and Objective-C. The only exception is the Google Guidelines , but it’s also Google.
Now we will make the text field editable and add a frame to it:
  [textField setEditable: YES];
 [textField setBezeled: YES];
Install Target and Action, i.e. the object and method that should be invoked when pressing the Enter button in the field:
  [textField setTarget: self];
 [textField setAction: @selector (didSubmitTextField :)];
@selector used to turn a method into a passed value.Add a field to the window and focus it:
  [contentView addSubview: textField];
 [window makeFirstResponder: textField];
Finally, we show the window:
  [window center];
 [window setTitle: "Twitter Search"];
 [window orderFront: self];
With the application initialization done, now we define its reaction to pressing Enter, i.e.
didSubmitTextField: method didSubmitTextField: - (void) didSubmitTextField: (CPTextField) textField
{
var searchString = [textField stringValue];
if (! searchString)
return;
[[[SearchWindowController alloc] initWithSearchString: searchString] showWindow: nil];
[textField setStringValue: ""];
[[textField window] makeKeyAndOrderFront: nil];
} We retrieve the value of the text field and, if it is not empty, create an instance of
SearchWindowController , display its window, empty the text field and push its window forward. Things are easy - to develop a class SearchWindowController .Create a file SearchWindowController.j and inherit our class from
CPWindowController : @implementation SearchWindowController: CPWindowController
{
}
@end Define a constructor that creates a window and makes a request to twitter:
  - (id) initWithSearchString: (CPString) searchString
 {
     if (self = [super init]) {
         var window = [[CPWindow alloc] initWithContentRect: CGRectMake (10, 30, 300, 400)
                                                  styleMask: CPTitledWindowMask |  CPClosableWindowMask |  CPResizableWindowMask];
         [window setTitle: searchString];
         [self setWindow: window];
         var request = [CPURLRequest requestWithURL: "http://search.twitter.com/search.json?q=" + encodeURIComponent (searchString)];
         [CPJSONPConnection sendRequest: request callback: "callback" delegate: self];
     }
     return self;
 }
And finally, let's write a response handler from Twitter:
  - (void) connection: (CPJSONPConnection) connection didReceiveData: (Object) data
 {
     var contentView = [[self window] contentView];

     if (data.results.length) {
         var bounds = [contentView bounds],
             collectionView = [[CPCollectionView alloc] initWithFrame: bounds];
         [collectionView setAutoresizingMask: CPViewWidthSizable];
         [collectionView setMaxNumberOfColumns: 1];
         [collectionView setMinItemSize: CGSizeMake (200, 100)];
         [collectionView setMaxItemSize: CGSizeMake (10000, 100)];

         var itemPrototype = [[CPCollectionViewItem alloc] init];
         [itemPrototype setView: [TweetView new]];
         [collectionView setItemPrototype: itemPrototype];
         [collectionView setContent: data.results];

         var scrollView = [[CPScrollView alloc] initWithFrame: bounds];
         [scrollView setAutoresizingMask: CPViewWidthSizable |  CPViewHeightSizable]
         [scrollView setDocumentView: collectionView];
         [contentView addSubview: scrollView];
     } else {
         var label = [CPTextField labelWithTitle: "No tweets"],
             boundsSize = [contentView boundsSize];
         [label setCenter: CGPointMake (boundsSize.width / 2, boundsSize.height / 2)];
         [label setAutoresizingMask: CPViewMinXMargin |  CPViewMaxXMargin |  CPViewMinYMargin |  CPViewMaxYMargin];
         [contentView addSubview: label];
     }
 }
It uses the
CPCollectionView , CPCollectionViewItem and CPScrollView library classes to display tweets. But the TweetView class TweetView have to be defined independently.You probably noticed in the code several calls to the
setAutoresizingMask: method. This method will make you forever curse CSS positioning, unless, of course, you have not done so yet. Positioning controls in Cappuccino is so simple and elegant that even a child can handle it.It remains to deal with the class
TweetView : @implementation TweetView: CPView
{
CPImageView imageView;
CPTextField userLabel;
CPTextField tweetLabel;
}
- (void) setRepresentedObject: (id) tweet
{
if (! imageView) {
imageView = [[CPImageView alloc] initWithFrame: CGRectMake (10, 5, 48, 48)];
[self addSubview: imageView];
userLabel = [[CPTextField alloc] initWithFrame: CGRectMake (65, 0, -60, 18)];
[userLabel setAutoresizingMask: CPViewWidthSizable];
[userLabel setFont: [CPFont boldSystemFontOfSize: 12]];
[self addSubview: userLabel];
tweetLabel = [[CPTextField alloc] initWithFrame: CGRectMake (65, 18, -60, 100)];
[tweetLabel setAutoresizingMask: CPViewWidthSizable];
[tweetLabel setLineBreakMode: CPLineBreakByWordWrapping];
[self addSubview: tweetLabel];
}
[imageView setImage: [[CPImage alloc] initWithContentsOfFile: tweet.profile_image_url size: CGSizeMake (48, 48)]];
[userLabel setStringValue: tweet.from_user];
[tweetLabel setStringValue: tweet.text];
}
@end The
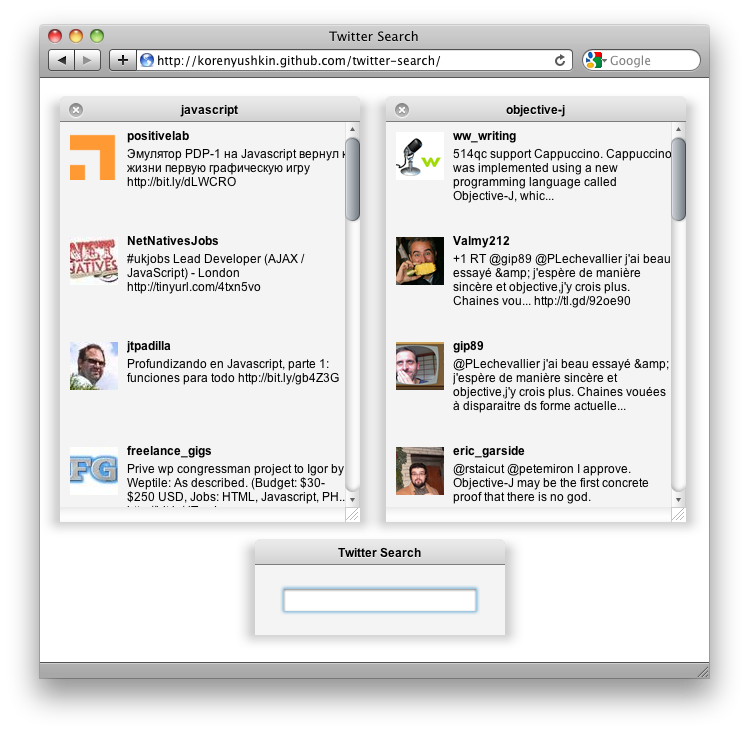
setRepresentedObject: method setRepresentedObject: creates an avatar image and two tags, with a username and a tweet.Now open index-debug.html again and look for a few words. The result should be something like this:
You can view the complete code of the sample and test it.
What's next?
Of course, in this essay it was impossible to describe even a tenth of the Cappuccino functional. However, I am sure that now you are ready to start developing your applications, and I urge you to do so. To deepen knowledge, use the documentation Cappuccino , also highly recommend a set of screencasts on the topic. I hope that the titanic work of Francisco, Tom and Ross, as well as my humble essay will help some of you to create a new interesting web application.
Source: https://habr.com/ru/post/114749/
All Articles