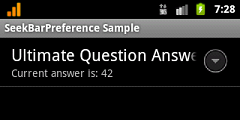
SeekBar in the application settings

For creating custom settings screens, Android provides a very handy set of widgets, such as CheckBoxPreference, EditTextPreference, ListPreference. If existing widgets for some reason do not meet the requirements, you can create your own on the basis of existing ones.
It is quite common that a certain integer setting has reasonable limits: brightness, volume, etc. In this case, it makes sense to create your own widget in order to reuse it in the application.
Training
We take the DialogPreference class as a basis - the base class for widgets that show a two-line element in the settings screen and open a dialog when pressed.
')
Let's call this class SeekBarPreference. The parameters for it will be the minimum value, the maximum value and the current default value, and it will take the real current value from the associated application settings using the specified key.
Then the file /res/xml/preferences.xml with the markup of the settings may look like this:
<?xml version="1.0" encoding="utf-8"?> <PreferenceScreen xmlns:android="http://schemas.android.com/apk/res/android" xmlns:example="http://schemas.android.com/apk/res/com.mnm.seekbarpreference"> <com.mnm.seekbarpreference.SeekBarPreference android:key="seekBarPreference" android:title="@string/dialog_title" android:dialogTitle="@string/dialog_title" android:summary="@string/summary" android:persistent="true" android:defaultValue="20" example:minValue="10" example:maxValue="50" /> </PreferenceScreen> To set the default value, you can use an existing tag, but for the minimum and maximum you will have to create your own. To do this, add a description of the attributes to the file /res/values/attrs.xml .
<?xml version="1.0" encoding="utf-8"?> <resources> <declare-styleable name="com.mnm.seekbarpreference.SeekBarPreference"> <attr name="minValue" format="integer" /> <attr name="maxValue" format="integer" /> </declare-styleable> </resources> The name attribute of the <declare-styleable> tag must contain the qualified class name of our widget.
The same name, only in a more complete format ( schemas.android.com/apk/res/qualified_class_name ) must be indicated in the markup of the settings file as an additional namespace (see above).
The last step in working with xml is to create a dialog markup, which will be called when the widget is clicked. The markup code is nothing unusual, so it can be omitted without consequences. It contains a TextView for the minimum value, maximum value, current value, and, in fact, the SeekBar.
Now you can continue with the implementation of the class SeekBarPreference.
Implementation
First you need to read the specified values from the attributes in the constructor:
mMinValue = attrs.getAttributeIntValue(PREFERENCE_NS, ATTR_MIN_VALUE, DEFAULT_MIN_VALUE); mMaxValue = attrs.getAttributeIntValue(PREFERENCE_NS, ATTR_MAX_VALUE, DEFAULT_MAX_VALUE); mDefaultValue = attrs.getAttributeIntValue(ANDROID_NS, ATTR_DEFAULT_VALUE, DEFAULT_CURRENT_VALUE); where constants are the names of the namespaces, attributes, and default values for minimum, maximum, and default values (in case they are not specified in the markup):
private static final String PREFERENCE_NS = "http://schemas.android.com/apk/res/com.mnm.seekbarpreference"; private static final String ANDROID_NS = "http://schemas.android.com/apk/res/android"; private static final String ATTR_DEFAULT_VALUE = "defaultValue"; private static final String ATTR_MIN_VALUE = "minValue"; private static final String ATTR_MAX_VALUE = "maxValue"; To initialize the dialog, we implement the onCreateDialogView method:
@Override protected View onCreateDialogView() { // mCurrentValue = getPersistedInt(mDefaultValue); // LayoutInflater inflater = (LayoutInflater) getContext().getSystemService(Context.LAYOUT_INFLATER_SERVICE); View view = inflater.inflate(R.layout.dialog_slider, null); // ((TextView) view.findViewById(R.id.min_value)).setText(Integer.toString(mMinValue)); ((TextView) view.findViewById(R.id.max_value)).setText(Integer.toString(mMaxValue)); // SeekBar mSeekBar = (SeekBar) view.findViewById(R.id.seek_bar); mSeekBar.setMax(mMaxValue - mMinValue); mSeekBar.setProgress(mCurrentValue - mMinValue); mSeekBar.setOnSeekBarChangeListener(this); // mValueText = (TextView) view.findViewById(R.id.current_value); mValueText.setText(Integer.toString(mCurrentValue)); return view; } The value is read by the key specified in the preferences.xml for the widget. When setting up a SeekBar, you need to take into account that for it the minimum value is always 0, so you have to subtract if the minimum is non-zero. By the way, this code is valid only for non-negative numbers, as well as when the maximum is greater than the minimum.
After that, you can already launch the application and move the slider, but the text of the current value will not change, since it is necessary to process the changes.
To do this, we implement the OnSeekBarChangeListener interface from SeekBarPreference. In the code above, the link is passed to this interface in
mSeekBar.setOnSeekBarChangeListener(this) . It is necessary to implement only one method from three possible: public void onProgressChanged(SeekBar seek, int value, boolean fromTouch) { mCurrentValue = value + mMinValue; mValueText.setText(Integer.toString(mCurrentValue)); } And again, due to the fact that the minimum SeekBar value is equal to zero, it is necessary to apply addition.
The next step is to save the resulting value. When applying or
onDialogClosed changes, the onDialogClosed method is onDialogClosed , which you need to override: @Override protected void onDialogClosed(boolean positiveResult) { super.onDialogClosed(positiveResult); if (!positiveResult) { return; } if (shouldPersist()) { persistInt(mCurrentValue); } notifyChanged(); } If positive, the current value is saved. The check
shouldPersist() analyzes whether it should be done. This checks the android:persistent flag specified in preferences.xml .The last line is needed for a little trick. The fact is that by default the second line of the widget ( summary ) is not dynamic, so if you want to display the current value in it, you need to add the following lines:
@Override public CharSequence getSummary() { String summary = super.getSummary().toString(); int value = getPersistedInt(mDefaultValue); return String.format(summary, value); } Here, when requesting summary , the original line plays the role of a pattern into which the current value is inserted. This works great when opening the settings screen. But to make this code work after changing the value, you need to call
notifyChanged() .Result
The resulting widget is suitable for applying to a wide range of settings and elegantly complements existing widgets. The dynamic line summary approach can be used in other types of settings.
Links
Archive with draft project
Description of SeekBar (en)
DialogPreference Description (en)
Source: https://habr.com/ru/post/114733/
All Articles