Integrating Twitter into your Android app.
Integrating Twitter into your Android app.
Starting to write my small toy for google phone, I wanted to send records to twitter. As it turned out on the Internet there are many articles about connecting to your account on Twitter, but there are very few working examples. A little effort and I found the code I needed, which turned out to be quite efficient. Well, let's get down to integration.
Recently, Twitter has been using the OAuth protocol for authentication. And so we need to log in using this protocol. And actually, send a message straight to our microblog. For this, I decided to use the following libraries:
signpost library for direct use of the OAuth mechanism, Twitter4J library for sending tweets.
We start
And so we need a working Twitter account (if you don’t have one, register here ). Next, we need to register our test application to interact with Twitter. And so we go here
Now we fill in the necessary fields, all that matters is the following: Application Type - Browser, Default Access type - Read & Write. The rest is filled in an arbitrary way, but remembering the format of the input data (we do not try to type in the URL & callback URL something like & * ^ & JKLLKL :, enter everything as it should).
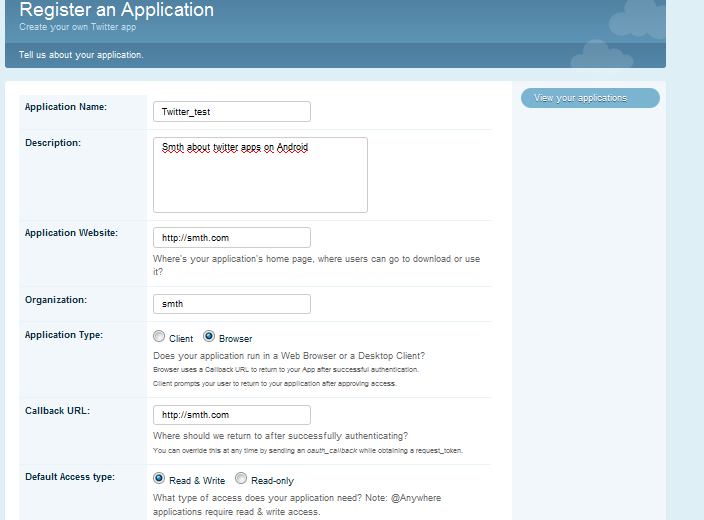
As soon as they have filled in all the fields, entered a captcha - we will see the following text.
')
Consumer key
************************ (character set)
Consumer secret
************************ (character set)
Request token URL
api.twitter.com/oauth/request_token
Access token URL
api.twitter.com/oauth/access_token
Authorize URL
api.twitter.com/oauth/authorize
Registered OAuth Callback URL
smth.com
Yes, we will not use this callback in our application, there we will act a little differently and define our own callback.
We start writing the application
And so we will need the following libraries:
- signpost-commonshttp4-1.2.1.1.jar
- signpost-core-1.2.1.1.jar
- httpclient-4.0.1.jar
- twitter4j-core-2.1.11
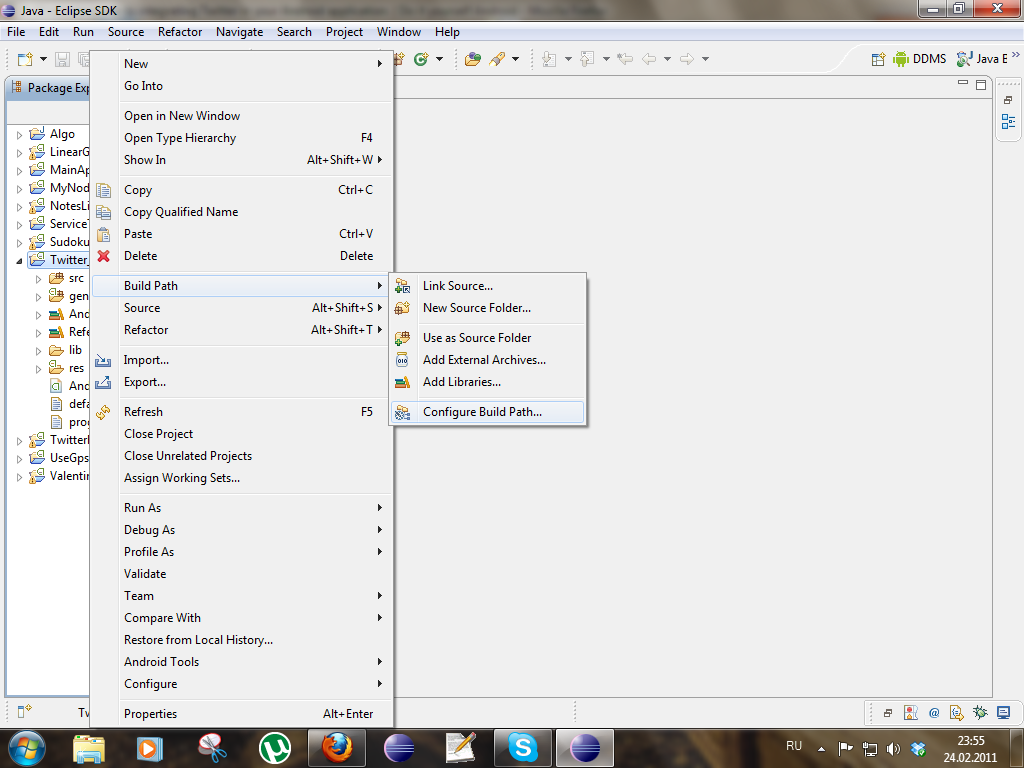
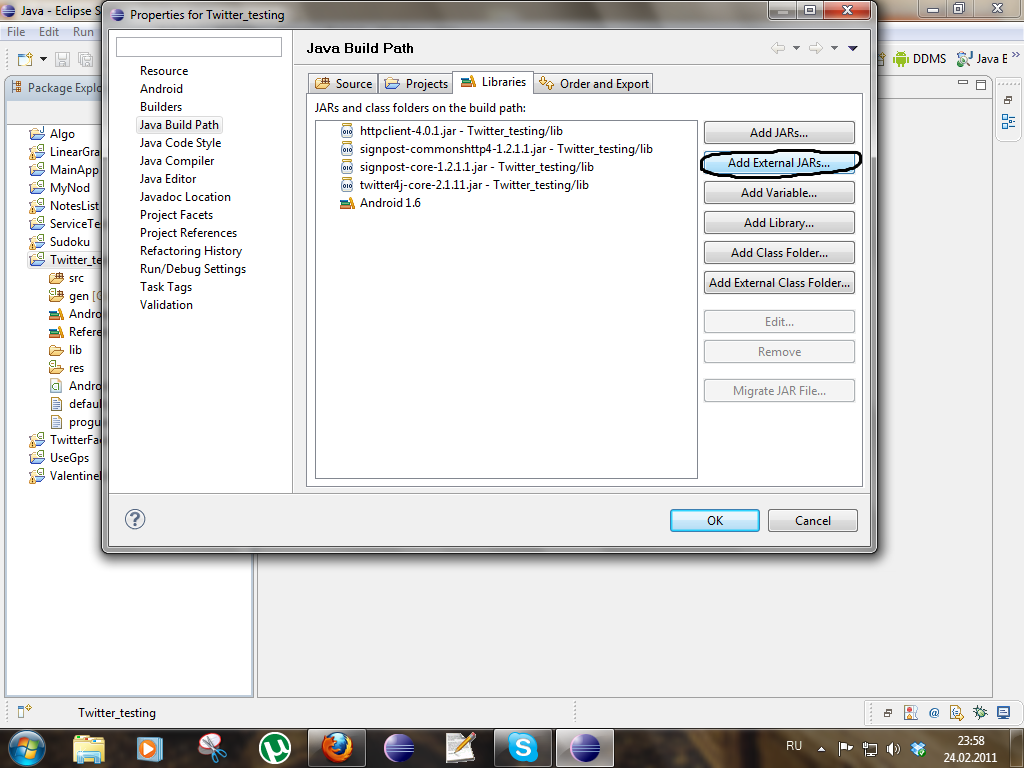
And so now we have acc. libraries.
As a result, we outline a small plan of how our application will look like. For simplicity, the example will be only 1 Activity.
- status bar that displays whether we are connected to twitter or not
- the Tweet button, which actually posts our test message, and if we are not logged in, it opens the browser in which we log in
- just come out of Twitter, clearing the previous settings (what if some other application uses the account)
Constant file
In this file, we define the necessary constants for the connection.
public class Constants { public static final String CONSUMER_KEY = "< CONSUMER KEY >"; public static final String CONSUMER_SECRET= "< CONSUMER SECRET >"; public static final String REQUEST_URL = "http://api.twitter.com/oauth/request_token"; public static final String ACCESS_URL = "http://api.twitter.com/oauth/access_token"; public static final String AUTHORIZE_URL = "http://api.twitter.com/oauth/authorize"; final public static String CALLBACK_SCHEME = "x-latify-oauth-twitter"; final public static String CALLBACK_URL = CALLBACK_SCHEME + "://callback"; } I will give the scheme by which the interaction between Twitter and the application.
CONSUMER_KEY - a unique key for our application, we get as soon as we register our application (something like a login)
CONSUMER_SECRET - the secret key for our application (something like a password for "login")
REQUEST_URL - needed to get request token. Part of OAuth. We receive immediately after registration.
AUTHORIZE_URL - URL required to access Twitter. Part of OAuth. We receive immediately after registration.
ACCESS_URL - to get access token. Part of OAuth. We receive immediately after registration.
CALLBACK SCHEME is the unique identifier that we use as a callback to get access token. In general, the choice of the scheme is not limited. For examples, we’ll use x-sample-oauth-twitter here.
CALLBACK_URL - actually our callback with which we received the answer, to which the authorization was successful, we can send the requests we need using the access token.
Tweet button
tweet.setOnClickListener(new View.OnClickListener() { public void onClick(View v) { if (TwitterUtils.isAuthenticated(prefs)) { sendTweet(); } else { Intent i = new Intent(getApplicationContext(), PrepareRequestTokenActivity.class); i.putExtra("tweet_msg",getTweetMsg()); startActivity(i); } } }); Everything is simple here, our button just checks if the user is logged in, if everything is ok, then we send our message, if not, then we are prompted to log in to the browser. For this we use PrepareRequestTokenActivity. Login process a little later.
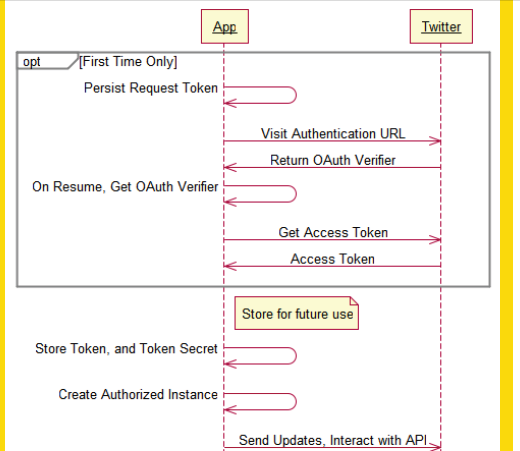
Authentification
Consider the situation first, we are with you (user) has not yet passed the process of authentication. Before we can send our messages, we redirect in the browser to the login page of the twitter account. This is implemented using PrepareRequestTokenActivity.
Consider what classes we need for this.
PrepareRequestTokenActivity — Installs the OAuth user and provider (Signpost library) and the old asynchronous OAuthRequestTokenTask. It also contains a callback when we have already been authenticated for access token.
OAuthRequestTokenTask - is responsible for receiving the request token, and calling the browser, in which we actually go through authentication.
RetrieveAccessTokenTask is an internal PrepareRequestTokenActivity class. Called by the NewIntent method on the PrepareRequestTokenActivity. Stores our received tokens after authorization.
PrepareRequestTokenActivity and call the asynchronous OAuthRequestTokenTask
@Override public void onCreate(Bundle savedInstanceState) { super.onCreate(savedInstanceState); try { this.consumer = new CommonsHttpOAuthConsumer(Constants.CONSUMER_KEY, Constants.CONSUMER_SECRET); this.provider = new CommonsHttpOAuthProvider(Constants.REQUEST_URL,Constants.ACCESS_URL,Constants.AUTHORIZE_URL); } catch (Exception e) { Log.e(TAG, "Error creating consumer / provider",e); } Log.i(TAG, "Starting task to retrieve request token."); new OAuthRequestTokenTask(this,consumer,provider).execute(); } Here we get our callback URL to return control to the application (x-oauthflow-twitter: // callback).
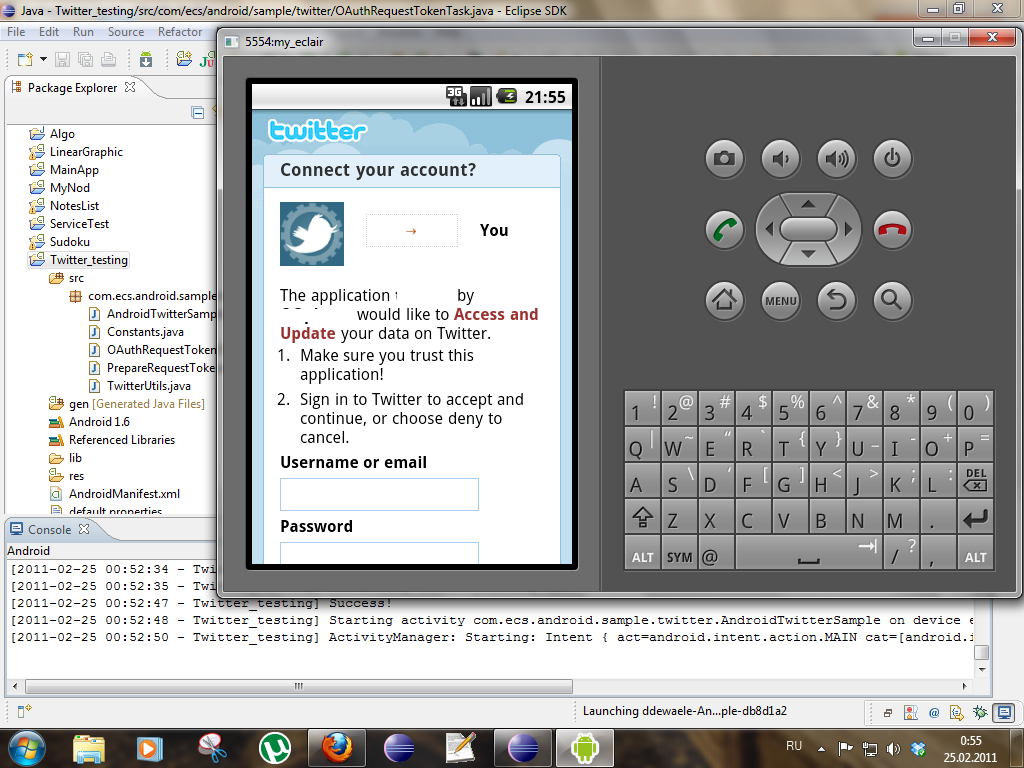
@Override protected Void doInBackground(Void... params) { try { Log.i(TAG, "Retrieving request token from Google servers"); final String url = provider.retrieveRequestToken(consumer, Constants.OAUTH_CALLBACK_URL); Log.i(TAG, "Popping a browser with the authorize URL : " + url); Intent intent = new Intent(Intent.ACTION_VIEW, Uri.parse(url)).setFlags(Intent.FLAG_ACTIVITY_SINGLE_TOP | Intent.FLAG_ACTIVITY_NO_HISTORY | Intent.FLAG_FROM_BACKGROUND); context.startActivity(intent); } catch (Exception e) { Log.e(TAG, "Error during OAUth retrieve request token", e); } return null; } Login page
And so we are on the login page.
In order for the browser to start, you must register our Activity (PrepareRequestTokenActivity) in the manifest file (AndroidManifest.xml)
<activity android:name=".PrepareRequestTokenActivity" android:launchMode="singleTask">>
<intent-filter>
<action android:name="android.intent.action.VIEW" />
<category android:name="android.intent.category.DEFAULT" />
<category android:name="android.intent.category.BROWSABLE" />
<data android:scheme="x-oauthflow-twitter" android:host="callback" />
</intent-filter>
We continue to work. Now we need to get access token to access our microblog, we produce it via RetrieveAccessTokenTask. Called by the onNewIntent method already mentioned above.
@Override public void onNewIntent(Intent intent) { super.onNewIntent(intent); SharedPreferences prefs = PreferenceManager.getDefaultSharedPreferences(this); final Uri uri = intent.getData(); if (uri != null && uri.getScheme().equals(Constants.OAUTH_CALLBACK_SCHEME)) { Log.i(TAG, "Callback received : " + uri); Log.i(TAG, "Retrieving Access Token"); new RetrieveAccessTokenTask(this,consumer,provider,prefs).execute(uri); finish(); } } Now that everything is in place, we must consider that we need to save our session, i.e. even if we restarted the application, we do not need to re-authorize, for this we will write a function that stores all our values in the background.
@Override protected Void doInBackground(Uri...params) { final Uri uri = params[0]; final String oauth_verifier = uri.getQueryParameter(OAuth.OAUTH_VERIFIER); try { provider.retrieveAccessToken(consumer, oauth_verifier); final Editor edit = prefs.edit(); edit.putString(OAuth.OAUTH_TOKEN, consumer.getToken()); edit.putString(OAuth.OAUTH_TOKEN_SECRET, consumer.getTokenSecret()); edit.commit(); String token = prefs.getString(OAuth.OAUTH_TOKEN, ""); String secret = prefs.getString(OAuth.OAUTH_TOKEN_SECRET, ""); consumer.setTokenWithSecret(token, secret); context.startActivity(new Intent(context,AndroidTwitterSample.class)); executeAfterAccessTokenRetrieval(); Log.i(TAG, "OAuth - Access Token Retrieved"); } catch (Exception e) { Log.e(TAG, "OAuth - Access Token Retrieval Error", e); } return null; } The executeAfterAccessTokenRetrieval method immediately retrieves our message and carries it through the authentication procedure using OAuth.
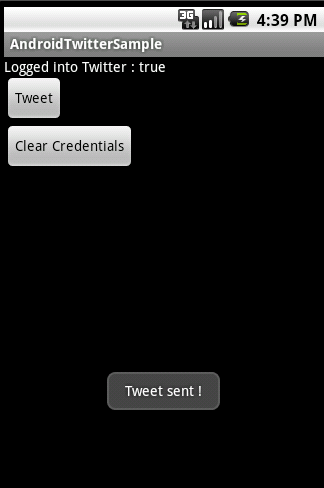
private void executeAfterAccessTokenRetrieval() { String msg = getIntent().getExtras().getString("tweet_msg"); try { TwitterUtils.sendTweet(prefs, msg); } catch (Exception e) { Log.e(TAG, "OAuth - Error sending to Twitter", e); } } Well, do not forget to inform the user about the successful implementation of our task. write a simple toast for this.
private final Handler mTwitterHandler = new Handler(); final Runnable mUpdateTwitterNotification = new Runnable() { public void run() { Toast.makeText(getBaseContext(), "Tweet sent !", Toast.LENGTH_LONG).show(); } }; The message itself is sent using the methods of the Twitter4J library.
public static void sendTweet(SharedPreferences prefs,String msg) throws Exception { String token = prefs.getString(OAuth.OAUTH_TOKEN, ""); String secret = prefs.getString(OAuth.OAUTH_TOKEN_SECRET, ""); AccessToken a = new AccessToken(token,secret); Twitter twitter = new TwitterFactory().getInstance(); twitter.setOAuthConsumer(Constants.CONSUMER_KEY, Constants.CONSUMER_SECRET); twitter.setOAuthAccessToken(a); twitter.updateStatus(msg); } Here's what I got in the end:

Translation of the tutorial:
blog.doityourselfandroid.com/2011/02/13/guide-to-integrating-twitter-android-application
with further performance checks.
Used by:
As well as the source code of the author of an English-language article, I hope they will help you to fully understand the described process - github link
Source: https://habr.com/ru/post/114544/
All Articles