SSD and HDD in the body of one MacBook Pro
Greetings, dear habrazhiteli.
My experience that I want to share with you should be useful for all laptop users, although my particular example is the MacBook Pro.
After buying this unit, with a serial number in the line: 6.1, I was expecting unprecedented speeds, but, alas, a treacherous merry-go-round overload, at the place of the cursor> it appeared quite often, forced itself to wait, tormented by the question “how is that ?!”, while the boot speed of the totally equipped operating system was about 2+ minutes, with the loading of 5 applications (of varying severity) on autorun.
')
Such indicators + periodic suspensions turned out to be an annoying and insulting conclusion, because under the hood i7 / 4Gb DDR3 / 5 Series Chipset processor with a possible data transfer rate of 3 gigabytes.
Then I decided to deal with the annoying hitch in the speed of work and solve the problem by upgrading the available insides of the laptop; in spite of the fact that the laptop itself has already risen to a solid penny, I could not put up with such a style of work.
Googling and studying the issue led me to the only right decision:
1. Replacing the HDD, with a spindle speed of 5400> with a mainstream solid-state drive from Intel or a hybrid version from Seagate.
2. Increasing RAM from 4 to 8 Gb
Not surprisingly, both items perfectly complement each other!
And everything here may seem logical: make money, but click on ebay.
But there was a problem that got a stumbling block in my head - the amount of disk space.
I could not afford SSDrive on 512Gb (from $ 1200), and 80-120 Gb was not enough to store all the data that I used to have with me. Momentus XT, being a good solution, in my opinion belongs to the category of “neither fish nor fowl”, so he also did not fit into my solution to the problem (despite the fact that I quickly refused it in the body of the post, it seemed I have a great option for a long time, so I decided to mention it).
One fine evening, somewhere on the Apple site, I came across the phrase: Use this space for Superdrive or second HDD and then I realized: I need to put two hard drives in one body! The solution was found, the means turned out to be such a thing-thing:
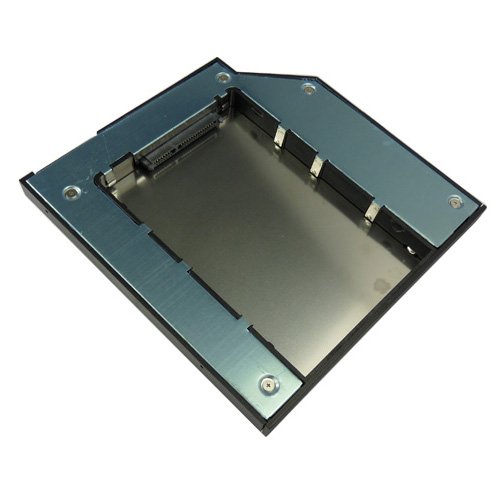
This plug, or rather the SATA adapter, which is put in place of the Superdrive CD-rom.
For me personally, the constant presence of CD-rom didn’t have any fundamental importance, moreover, those who have been using Apple’s laptops for a long time will understand my joy from the realization that I don’t have to listen to the sound of its disgusting sound when it reboots — now Throw in a bag from a notebuk, if there is a possibility that it can come in handy.
So, everything was finally decided and I ordered the following number of devices:
1. Sata adapter inside laptop - $ 30
2. Box for storing Superdrive outside - $ 17
3. RAM - from $ 150 (branded more expensive)
4. SSD Intel X25-M 80GB - $ 210 (the cost is about the same, both on ebay and in Formoze, for example)
Just today, I received a notice from the Russian Post and must pay tribute to the postal staff, despite the fact that they are scolded as soon as they can: 3 parcels from 4 were delivered within 12 days from Hong Kong; I was expecting one, on notice, but the employee delivered me two more small packages, saying that they also came today, but did not have time to send you notices, with high spirits and three bags I returned home to take up disassembly / assembly:
Superdrive is fixed with 3 screws and one cable, we extract the Superdrive:
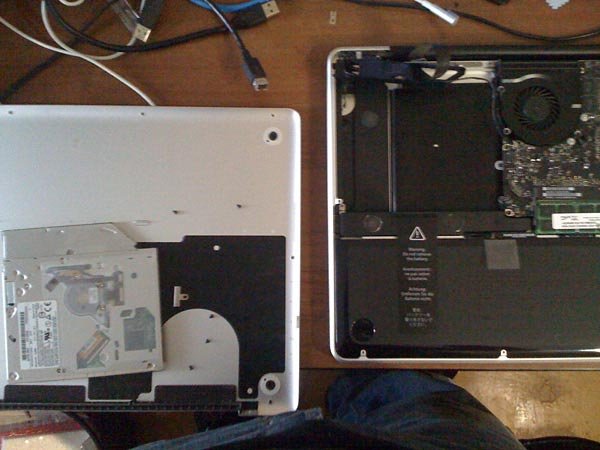
under it we observe a piece of battery on the right and a speaker on the left.
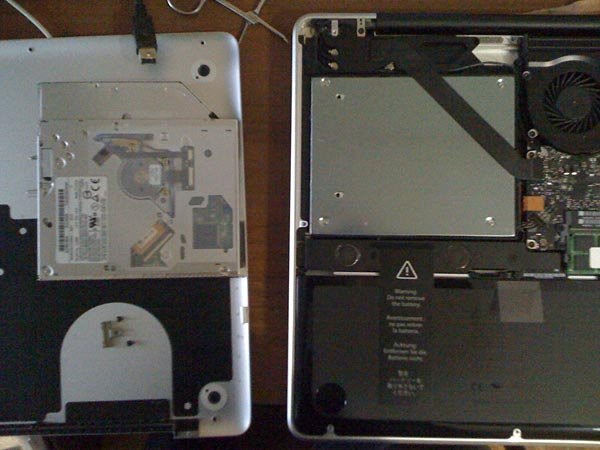
Install SSDrive in the box:

Mount box:
If you decide to repeat this simple operation with your MBPro, I advise you to watch the video instruction from OWC , it helped me a lot.
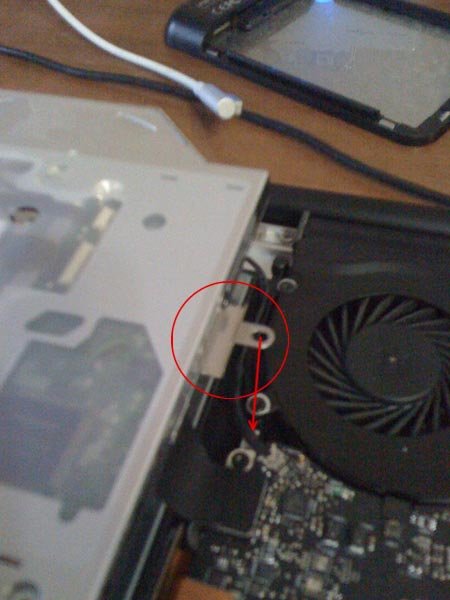
In the best traditions of the genre: I have extra details left! :)
In this case, this is normal, as the metal part, which must be mounted somewhere in the region of the plumes with one bolt to the frame and two bolts to the box itself does not carry constructive importance, since she, in my opinion, performs the function of the stabilizer for the Superdrive, in which there are moving parts.
In SSDrive, they are absent on the box, in the place where this piece of iron should be mounted - the holes are not suitable for bolts, they are but very small in diameter. I attach a photo of the object, properly attached to the Superdriv'y roughly above the place where it should be attached to MBP:
After closing the lid and pressing the button, the moment of truth comes pretty quickly.
Since I took care of buying an SSD in advance and had already tried the system again through the USB interface in the external box, the only thing I was so eager to see was the little line:
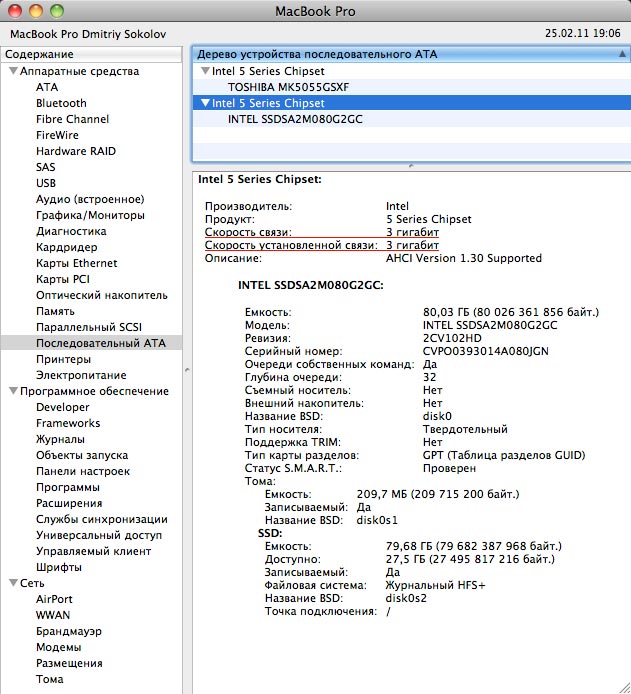
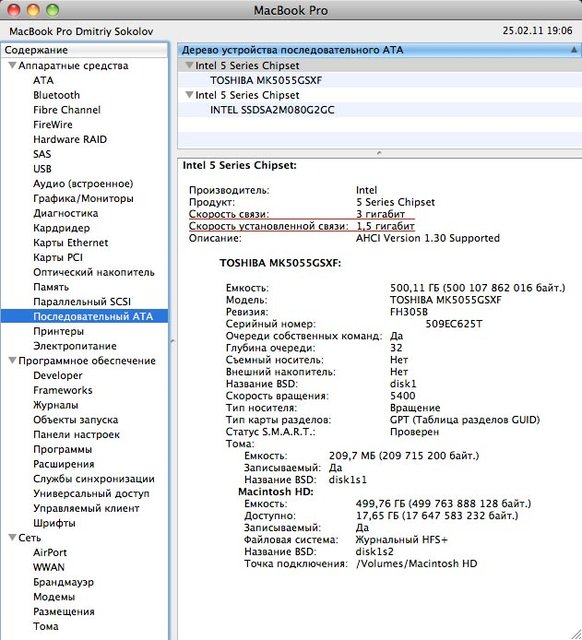
In comparison with normal HDD:
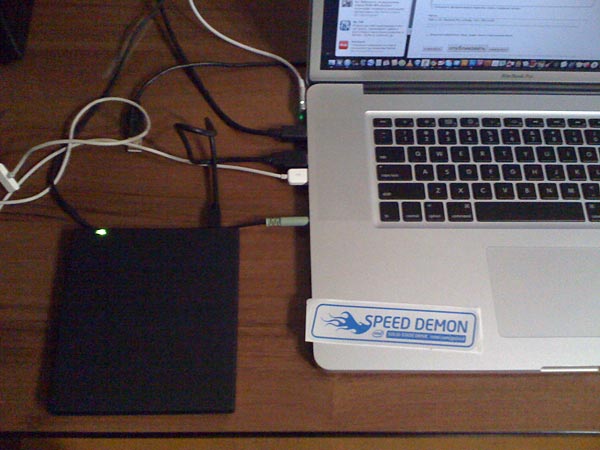
Photos of a happy family of pieces of iron:
At the end I want to attach a video showing the speed of the reload:
Some numbers and the Carina Nebula nebula:
I want to apologize for the poor quality of photos and videos, alas, only an old iPhone was at hand from the recording devices.
Thanks for attention!
Update: A few measurements of the battery when the updated configuration:
For continuous web surfing:
≈ 3 hours [+ - 20 minutes]
brightness: 40-70%
To take notes in the easiest mode: managed to stretch for 5 hours.
brightness: 20-50% (Textedit + Chrome)
With increased load, ≈10 programs including heavy applications from Adobe, with a continuous process: ≈ 2 hours and 25 minutes (brightness 80-100%)
Photoshop launch: 4 sec.
Illustrator: 5 sec
On the whole, I am satisfied with the work of the Blaster, finally I achieved that the computer would work with my speed or faster and now I do not have to wait for it.
Update 2:
Wrote a post about TRIM activation. Strongly recommended to anyone who has set himself an SSD drive in this or any other way under MacOS Lion or Mac OS 10.6.8 (since this version support TRIM has been added)
My experience that I want to share with you should be useful for all laptop users, although my particular example is the MacBook Pro.
After buying this unit, with a serial number in the line: 6.1, I was expecting unprecedented speeds, but, alas, a treacherous merry-go-round overload, at the place of the cursor>
it appeared quite often, forced itself to wait, tormented by the question “how is that ?!”, while the boot speed of the totally equipped operating system was about 2+ minutes, with the loading of 5 applications (of varying severity) on autorun.')
Such indicators + periodic suspensions turned out to be an annoying and insulting conclusion, because under the hood i7 / 4Gb DDR3 / 5 Series Chipset processor with a possible data transfer rate of 3 gigabytes.
Then I decided to deal with the annoying hitch in the speed of work and solve the problem by upgrading the available insides of the laptop; in spite of the fact that the laptop itself has already risen to a solid penny, I could not put up with such a style of work.
Googling and studying the issue led me to the only right decision:
1. Replacing the HDD, with a spindle speed of 5400> with a mainstream solid-state drive from Intel or a hybrid version from Seagate.
2. Increasing RAM from 4 to 8 Gb
Not surprisingly, both items perfectly complement each other!
And everything here may seem logical: make money, but click on ebay.
But there was a problem that got a stumbling block in my head - the amount of disk space.
I could not afford SSDrive on 512Gb (from $ 1200), and 80-120 Gb was not enough to store all the data that I used to have with me. Momentus XT, being a good solution, in my opinion belongs to the category of “neither fish nor fowl”, so he also did not fit into my solution to the problem (despite the fact that I quickly refused it in the body of the post, it seemed I have a great option for a long time, so I decided to mention it).
One fine evening, somewhere on the Apple site, I came across the phrase: Use this space for Superdrive or second HDD and then I realized: I need to put two hard drives in one body! The solution was found, the means turned out to be such a thing-thing:
This plug, or rather the SATA adapter, which is put in place of the Superdrive CD-rom.
For me personally, the constant presence of CD-rom didn’t have any fundamental importance, moreover, those who have been using Apple’s laptops for a long time will understand my joy from the realization that I don’t have to listen to the sound of its disgusting sound when it reboots — now Throw in a bag from a notebuk, if there is a possibility that it can come in handy.
So, everything was finally decided and I ordered the following number of devices:
1. Sata adapter inside laptop - $ 30
2. Box for storing Superdrive outside - $ 17
3. RAM - from $ 150 (branded more expensive)
4. SSD Intel X25-M 80GB - $ 210 (the cost is about the same, both on ebay and in Formoze, for example)
Just today, I received a notice from the Russian Post and must pay tribute to the postal staff, despite the fact that they are scolded as soon as they can: 3 parcels from 4 were delivered within 12 days from Hong Kong; I was expecting one, on notice, but the employee delivered me two more small packages, saying that they also came today, but did not have time to send you notices, with high spirits and three bags I returned home to take up disassembly / assembly:
Superdrive is fixed with 3 screws and one cable, we extract the Superdrive:
under it we observe a piece of battery on the right and a speaker on the left.
Install SSDrive in the box:
Mount box:
If you decide to repeat this simple operation with your MBPro, I advise you to watch the video instruction from OWC , it helped me a lot.
In the best traditions of the genre: I have extra details left! :)
In this case, this is normal, as the metal part, which must be mounted somewhere in the region of the plumes with one bolt to the frame and two bolts to the box itself does not carry constructive importance, since she, in my opinion, performs the function of the stabilizer for the Superdrive, in which there are moving parts.
In SSDrive, they are absent on the box, in the place where this piece of iron should be mounted - the holes are not suitable for bolts, they are but very small in diameter. I attach a photo of the object, properly attached to the Superdriv'y roughly above the place where it should be attached to MBP:
After closing the lid and pressing the button, the moment of truth comes pretty quickly.
Since I took care of buying an SSD in advance and had already tried the system again through the USB interface in the external box, the only thing I was so eager to see was the little line:
In comparison with normal HDD:
Photos of a happy family of pieces of iron:
At the end I want to attach a video showing the speed of the reload:
Some numbers and the Carina Nebula nebula:
I want to apologize for the poor quality of photos and videos, alas, only an old iPhone was at hand from the recording devices.
Thanks for attention!
Update: A few measurements of the battery when the updated configuration:
For continuous web surfing:
≈ 3 hours [+ - 20 minutes]
brightness: 40-70%
To take notes in the easiest mode: managed to stretch for 5 hours.
brightness: 20-50% (Textedit + Chrome)
With increased load, ≈10 programs including heavy applications from Adobe, with a continuous process: ≈ 2 hours and 25 minutes (brightness 80-100%)
Photoshop launch: 4 sec.
Illustrator: 5 sec
On the whole, I am satisfied with the work of the Blaster, finally I achieved that the computer would work with my speed or faster and now I do not have to wait for it.
Update 2:
Wrote a post about TRIM activation. Strongly recommended to anyone who has set himself an SSD drive in this or any other way under MacOS Lion or Mac OS 10.6.8 (since this version support TRIM has been added)
Source: https://habr.com/ru/post/114469/
All Articles