Unity3d script basics
Foreword
This article will focus on newcomers to Unity scripting, but not to newbies in the syntax of JavaScript or any other such programming language. Here it is necessary to clarify a little that JavaScript which uses Unity is slightly different from the original in favor of improved OOP support and is called respectively Unity JavaScript. In it, for example, there appeared classes and their inheritance, which no-one Unity developers who are familiar with the object-oriented features of the original JavaScript do not know, so they reject it using C # or Boo.
Acknowledgments
First of all I want to say a huge thank you to the author who wrote the article Unity - a free cross-platform 3D engine (and browser too) , and Unity3D tutorial for beginners - Tutorial 1 , the articles are very good, but I don’t have to continue for quite a while. help the author of these articles to educate habraludey on Unity and I think he will not mind if I write an upgrade of his lesson.
Summary
I thought for a long time where to start and finally decided to start from the beginning. That is, where does most games start? No, it’s not right from the screensavers and logos of the producer’s studio, but from the main menu! In this lesson I will talk in detail about the main elements of the game GUI, how to load scenes from the script, and how to make different scripts interact with each other. In this tutorial, we will create the main menu for the “shooter” created in the tutorial: Unity3D for beginners - Tutorial 1 , I will also tell you that it’s done the script in that tutorial, we will change it a bit and learn how to customize it during the game, directly from our game menu .
')
1. Labels and GUIStyle
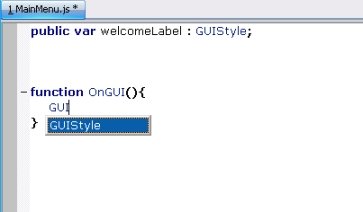
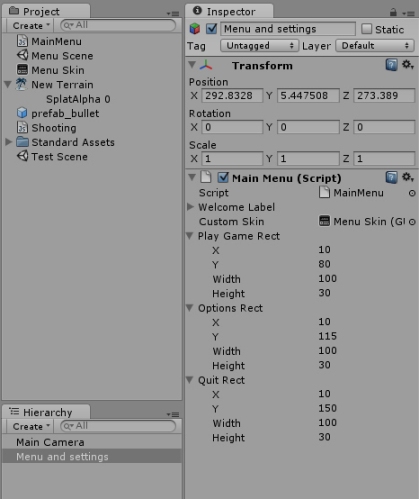
So let's go, we open our project that we created thanks to the lesson . Create a new scene (File -> New scene), then create an empty object inside the scene (GameObject -> Create Empty) and name it for example Menu and settings. Now we will create an empty JavaScript file (Assets -> Create -> JavaScript), drag it to our Menu and settings object and click on the script itself two times, the script editing dialog box will open.
We see that the script file is not completely empty, it contains the Update function, I’ll tell you about it later, delete it for now and write the following:
public var welcomeLabel : GUIStyle; //1 function OnGUI(){ //2 GUI.Label(new Rect(Screen.width / 2, 0, 50, 20),"Welcome",welcomeLabel); //3 }
Save the changes and click Play.
We see from above, not quite in the center, the almost imperceptible word Welcom, written in black font:

But what is it? There should be the word Welcome!
In fact, the last letter was lost because we declared the width of the square in which the text was written insufficient to fit the whole word.
But let's talk about everything in order, turn off Play mode.
If it is not clear to whom, the points below will correspond to the comments in our code:
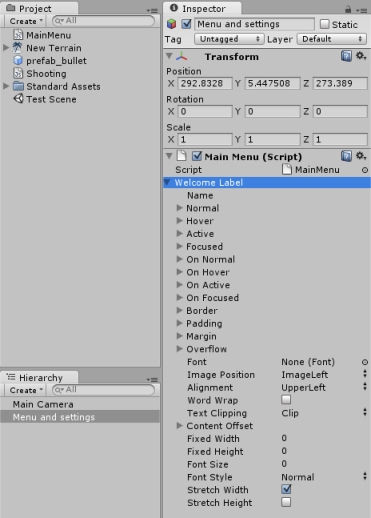
- Variable welcomeLabel with GUIStyle type. Go to the Hierarchy tab and select our GameObject (GO) - Menu and settings, we see that a new Welcome Label field has appeared in our script. Deploy it, as you can see there are many child fields in it, I think those who worked with JavaScript and CSS on the web have probably guessed what these properties are for.
- The OnGUI () function, it is called in each frame to render and handle GUI events, all that is related to the GUI must be called in this function.
- F. Label () class GUI . The first argument to this function we pass to the structure is a Rect , essentially it is a square which is given by the x and y coordinates of the upper left corner, width and height, here we see the x coordinate = Screen.width / 2, ie the screen width divided by 2, is necessary in order to center the text, the second argument is the text string “Welcome”, and the third argument is the style with which we will set different parameters to our Label using the Welcome Label field.
Now expand the Welcome Label field and set the following parameters:
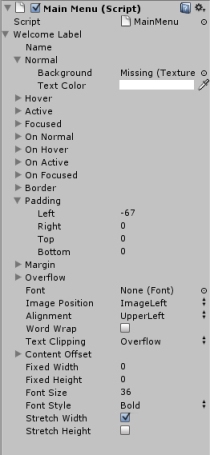
Click on Play and enjoy the result:

I will not describe what the setting is responsible for, because the lesson is already quite long, try to play with them, change the color and size of the font, impose a texture, everything is quite simple and intuitive.
Lyrical retreat Begin
In general, as a script editor, you can use any development environment that you like, all scripts are created in the Assets folder of your project. For example, you can use the free MonoDevelop development environment, although it is intended mainly for coding C # and other .NET languages, for JS also comes down. It is also included in the Unity distribution kit (to install it, you need to tick the box before starting the installation of Unity), and to open the scripts constantly through this program you need to go to Edit -> Prefences ... and specify the path to our editor in the External Script Editor field also all the scripts you have created with the project file just click Assets -> Sync MonoDevelop Project (you do not need to click the button every time after creating the next script just press once, further scripts will be included in the project file automatically). I will not describe all the advantages of this editor, let screenshots do it for me.
Standard Editor:
MonoDevelop:

Lyrical Retreat End
2. Buttons and GUISkin
Moving on, and modify our script:
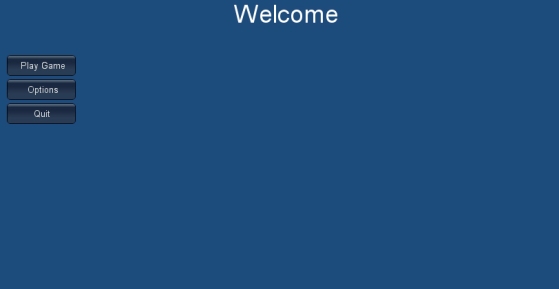
public var welcomeLabel : GUIStyle; public var customSkin : GUISkin; //1 public var playGameRect : Rect; //2 public var optionsRect : Rect; //2 public var quitRect : Rect; //2 function OnGUI(){ GUI.Label(new Rect(Screen.width / 2, 0, 50, 20),"Welcome",welcomeLabel); GUI.skin = customSkin; //3 GUI.Button(playGameRect,"Play Game"); //4 GUI.Button(optionsRect,"Options"); //4 GUI.Button(quitRect,"Quit"); //4 }
Now create a new GUISkin, Assets -> Create -> GUI Skin, call it Menu Skin, now go to our Menu and settings object and drag the newly created Menu Skin onto the new Custom Skin field, also set the following settings in the other fields (Play Game Rect, Options Rect, Quit Rect):
Click Play, the result should be the following:
Let's go to our Menu Skin in the Project tab and slightly increase the font size of our buttons, that is, expand the Buttons field and set the Font Size to 16, all this can be done without exiting Game mode and when leaving it, the changes will be saved, as we change the properties of the prefab .
Now let's analyze our script:
- GUISkin is essentially a universal set of standard GUI settings that allow you to change them very flexibly.
- We already know about Rect, only now we declare variables with the public access modifier outside the function in order to be able to customize them (variables) from the editor.
- Assigning the GUISkin settings to the GUI skin variable of the GUI class, from this point on, all further class functions will use this skin if we at some point want to stop using the skin in the script and reset the default settings to just write GUI.skin = null.
- The Button () function is essentially the same as the Label function, except that it returns a bool value (true, when we click on the button, false is natural in all other cases).
3. Options menu and Sliders
Modify the script further, use the return value of the Button () function:
public var welcomeLabel : GUIStyle; public var customSkin : GUISkin; public var playGameRect : Rect; public var optionsRect : Rect; public var quitRect : Rect; private var optionsMode = false; //1 public var _bulletImpulse : float = 300; //2 public var _shootDelay : float = 1; //2 function OnGUI(){ if(!optionsMode){ //1 GUI.Label(new Rect(Screen.width / 2, 0, 50, 20), "Welcome", welcomeLabel); GUI.skin = customSkin; GUI.Button(playGameRect,"Play Game"); if(GUI.Button(optionsRect,"Options")){ optionsMode = true; //1 } GUI.Button(quitRect,"Quit"); }else{ GUI.Label(new Rect(Screen.width / 2, 0, 50, 20), "Options", welcomeLabel); GUI.skin = customSkin; //5 GUI.Label(new Rect(270, 75, 50, 20),"Bullet Impulse"); _bulletImpulse = GUI.HorizontalSlider(new Rect(50, 100, 500, 20), _bulletImpulse,10,700);//3 GUI.Label(new Rect(560, 95, 50, 20), _bulletImpulse.ToString());//4 GUI.Label(new Rect(270, 125, 50, 20),"Shoot Delay"); _shootDelay = GUI.HorizontalSlider(new Rect(50, 150, 500, 20), _shootDelay, 0.1, 3);//3 GUI.Label(new Rect(560, 145, 50, 20), _shootDelay.ToString());//4 if(GUI.Button(new Rect(20, 190, 100, 30),"<< Back")){ optionsMode = false; //1 } } }
- Usually we are used to having only one on the screen when opening any submenu, but the main menu disappeared, and this variable will keep track of this.
- Actually this is our game options, we will return to them later.
- The HorizontalSlider () function “draws” (Here is a surprise!) I leave the horizontal slider, the first accepted argument (Rect), no comments, the second argument is the current value responsible for the slider position on the slider, the third argument is the left value of the range of values, and the last is the right one value, the function returns a float value (when moving the slider slider) located between the left and right value.
- Pay attention to the last argument in the Label () function - this is the float value converted to string by the ToString () function, this is important because The Unity script compiler cannot convert a number to a string itself, and will generate an error.
- GUI.skin is reset when moving to another menu, to prevent this from happening, you need to assign our customSkin before drawing a new menu.
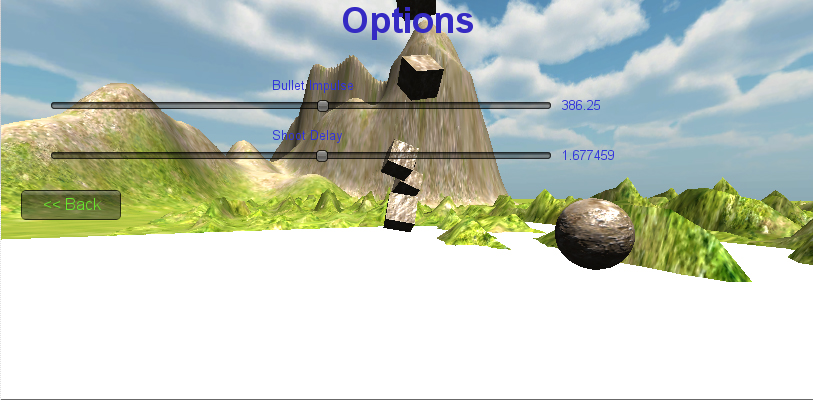
Well, let's see what we did, click on Play and on our Options button:
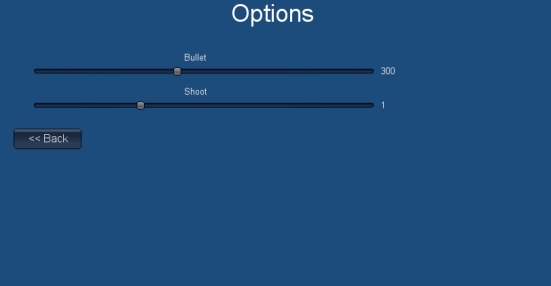
But what is again? What kind of Bullet and Shoot? There must be Bullet Impulse and Shoot Delay! Again, the width of these *** squares was not enough and do we really need to climb into the script again and change the width there?
Not! Do not! We also have our wonderful GUISkin called Menu Skin. Without leaving Play mode, we go into it, expand the Label field, select the Overflow value in the Text Clipping option and remove the check mark in front of Word Wrap, voila, everything fell into place and exit Game mode.
4. Play Game and Quit
Add interactivity to our other buttons:
public var welcomeLabel : GUIStyle; public var customSkin : GUISkin; public var playGameRect : Rect; public var optionsRect : Rect; public var quitRect : Rect; private var optionsMode = false; public var _bulletImpulse : float = 300; public var _shootDelay : float = 1; function OnGUI(){ if(!optionsMode){ GUI.Label(new Rect(Screen.width / 2, 0, 50, 20),"Welcome",welcomeLabel); GUI.skin = customSkin; if(GUI.Button(playGameRect,"Play Game")){ Application.LoadLevel("Test Scene"); //1 } if(GUI.Button(optionsRect,"Options")){ optionsMode = true; } if(GUI.Button(quitRect,"Quit")){ Application.Quit(); //2 } }else{ GUI.Label(new Rect(Screen.width / 2, 0, 50, 20), "Options",welcomeLabel); GUI.skin = customSkin; GUI.Label(new Rect(270, 75, 50, 20),"Bullet Impulse"); _bulletImpulse = GUI.HorizontalSlider(new Rect(50, 100, 500, 20),_bulletImpulse,10,700); GUI.Label(new Rect(560, 95, 50, 20),_bulletImpulse.ToString()); GUI.Label(new Rect(270, 125, 50, 20),"Shoot Delay"); _shootDelay = GUI.HorizontalSlider(new Rect(50, 150, 500, 20),_shootDelay,0.1,3); GUI.Label(new Rect(560, 145, 50, 20),_shootDelay.ToString()); if(GUI.Button(new Rect(20, 190, 100, 30),"<< Back")){ optionsMode = false; } } }
If you enter Play mode and try to click on these buttons, then most likely an error will appear when clicking on the Play Game in the console (Window -> Console), and nothing will happen when you click on Quit, let's see why:
- The LoadLevel () class of the Application class loads a scene called “Test Scene” (as I called the scene from the Unity3D beginner’s tutorial Tutorial 1 ), you can also transfer the scene number to this function. You should have a question: where to get this number? It's simple, save your scene if you haven't done it yet, File -> Save Scene As ... and name it Menu Scene, then go to File -> Build Settings ... and drag the Menu Scene into the window that appears, then Test Scene.
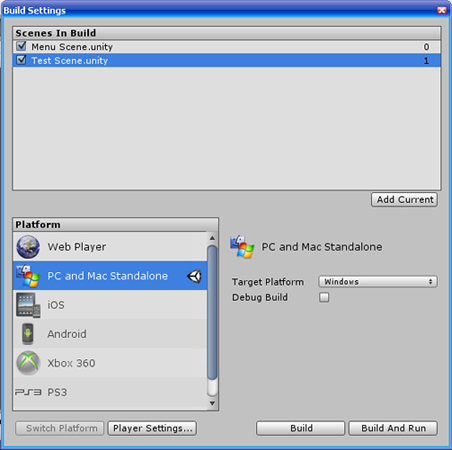
On the right side of the scene name, we see its sequence number (by default, the scene with the number 0 is always loaded first). Who has not yet figured out our Test Scene did not want to boot because it was not registered in the Build Settings, but now everything will be OK. Close the Build Settings window, enter Play mode and click on the Play Game button. Hooray! Our scene is loading! - But the Quit button is still not working. Do not worry, it will not work if the project is launched in the editor or in the web player. In order for the button to work it is necessary that our project become an independent application, for this you need to “build” it and launch it. To do this, go to the Build Settings and click on the Build And Run button, specify the folder where the finished application will be stored, save, select the settings, start, see our main menu, and click Quit, about the miracle the application closes.
5. DontDestroyOnLoad and other bad words
First, let's analyze the script from the Unity3D lesson for beginners - Tutorial 1 and find out what settings it uses and for what it uses them:
public var bulletImpulse = 300; //1 public var shootSpeed; //2 public var bullet : GameObject; //3 public var lastShotTime : float; //4 function Start() { //5 lastShotTime = 0; } function Update () { //6 if (Input.GetKey(KeyCode.Mouse0)) { //7 if (Time.time>(lastShotTime + shootSpeed)){//8 var bull_clone : GameObject; //9 bull_clone = Instantiate(bullet, transform.position, transform.rotation);//10 Physics.IgnoreCollision(bull_clone.collider, collider);//11 bull_clone.rigidbody.AddForce(transform.forward*bulletImpulse, ForceMode.Impulse);//12 lastShotTime = Time.time;//13 } } }
- the momentum that
gives a kick in the assis transmitted to our bullet - shootSpeed, not a very good name for this parameter. this is essentially a delay between shots, in the MainMenu script an option which later we have to get instead of this one I called _shootDelay
- the bullet itself can be either a prefab or an object inside the scene
- last shot time
- The Start () function is called one time before the FIRST Update method.
- The f-I Update () is called every frame (in general, in the official documentation, all functions interacting with physics are recommended to be written in the FixedUpdate () function in order to avoid various physics bugs, but for our project this is not critical since it is very small).
- If the left mouse button is pressed.
- And if the current time is more than the time of the last shot + delay between shots.
- Declare a variable with type GameObject .
- The fI Instantiate () clones an object and returns it with a given position and angle of rotation in world space. Actually the first argument is the bullet, this is the object to be copied, that is our bullet, the second argument is the class transform of the game object to which the script is attached (in our case, the Player object), the Transform class itself stores information about the physical location of the game object, from it we get the two variables we need, this position - storing the position in world space, and rotation - storing the angle of rotation.
- Appeal to the Physics object and call the IgnoreCollision function which causes it to ignore all collisions (collisions) between the object collider (Player) to which the script is attached, and the colliders of our bullet clones, all this means that between these two objects there will no longer be any physical interactions, and our Player will simply walk through the balls - clones.
- refer to the object rigidbody of our bullet, which controls the position of the object through a physical simulation, and call the AddForce () function which will add a certain physical effect (in our case, impulse) to our object, the first parameter is the vector, in our case, directed forward relative to the transformation of our Player 'a and multiplied by the impulse force, the second parameter is the force mode .
- save the current time, now is the time of the last shot
So, we recycle this information flow and find out that we need only two variables (bulletImpulse and shootSpeed) and, as many have already guessed, we need to get them from GameObject Menu and settings, or rather from the script that is attached to it.
But what a bad luck. In order to get the data we need from the Menu and settings object script, it must be in the same scene with our Player object, and as many may have noticed, when you click our Play Game button, all objects from the Menu Scene scene are destroyed and in the Hierarchy tab we have Objects from the second scene (Test Scene) appear.
The DontDestroyOnLoad () function will help us defeat this ailment. It is enough to call it once in the Awake () function which is called when the script is initialized, this is a kind of constructor for it.
Add the following function to the MainMenu script:
function Awake(){ DontDestroyOnLoad(this); }
Enter Play mode and click on Play Game. Cool! The menu has not disappeared and is now superimposed on top of everything, it means that the Menu and settings object has not been destroyed, and it also means its presence in the Hierarchy tab.
But the menu is now constantly visible! Do not order and with this we must fight, and therefore modify the script (this is the last time):
public var welcomeLabel : GUIStyle; public var customSkin : GUISkin; public var playGameRect : Rect; public var optionsRect : Rect; public var quitRect : Rect; private var optionsMode = false; private var menuMode = true; //1 private var gameMode = false; //1 public var _bulletImpulse : float = 300; public var _shootDelay : float = 1; function Awake(){ DontDestroyOnLoad(this); } function OnGUI(){ if (Input.GetKey(KeyCode.Escape)){ //2 menuMode = true; //1 optionsMode = false; Time.timeScale = 0; //3 if(gameMode){ //1 var ml = GameObject.Find("Player").GetComponent(MouseLook); //4 ml.enabled = false; //4 } } if(menuMode){ if(!optionsMode){ GUI.Label(new Rect(Screen.width / 2, 0, 50, 20), "Welcome",welcomeLabel); GUI.skin = customSkin; if(!gameMode){ //1 if(GUI.Button(playGameRect, "Play Game")){ menuMode = false; //1 gameMode = true; //1 Time.timeScale = 1; //3 Application.LoadLevel("Test Scene"); } }else{ if(GUI.Button(playGameRect,"Resume")){ var _ml = GameObject.Find("Player").GetComponent(MouseLook);//4 _ml.enabled = true; //4 Time.timeScale = 1; //3 menuMode = false; //1 } } if(GUI.Button(optionsRect,"Options")){ optionsMode = true; } if(GUI.Button(quitRect,"Quit")){ Application.Quit(); } }else{ GUI.Label(new Rect(Screen.width / 2, 0, 50, 20),"Options",welcomeLabel); GUI.skin = customSkin; GUI.Label(new Rect(270, 75, 50, 20), "Bullet Impulse"); _bulletImpulse = GUI.HorizontalSlider(new Rect(50, 100, 500, 20), _bulletImpulse,10,700); GUI.Label(new Rect(560, 95, 50, 20), _bulletImpulse.ToString()); GUI.Label(new Rect(270, 125, 50, 20), "Shoot Delay"); _shootDelay = GUI.HorizontalSlider(new Rect(50, 150, 500, 20), _shootDelay,0.1,3); GUI.Label(new Rect(560, 145, 50, 20), _shootDelay.ToString()); if(GUI.Button(new Rect(20, 190, 100, 30), "<< Back")){ optionsMode = false; } } } }
- In order for the menu to be more flexible, it must know what state it is in now.
- Add to the script the ability to call the menu by pressing the Escape key.
- When we call the menu during a game, it should pause, the easiest way to do this is to reset the timeScale variable of the Time class, in essence, this variable is responsible for the speed of the game process, where the value 1 is normal speed, the values are less than 1 - slo- mo, above 1 - fast speed, and 0 - pause
- Well, actually we got to the interaction between the scripts, this construction performs the following actions: The FindOA class ( GameObject class ) searches for the GO by name and returns it, followed by the GetComponent () function that finds the class in our returning GO (MouseLook class ) and returns it, then we assign the bool value to the enabled variable inside this class, which allows you to enable or disable the MouseLook script (true and false, respectively). We need all these operations so that when we go to the main menu, our Player cannot turn his head (putting the game into pause mode does not help, you can check out by commenting these lines).
6. Get the settings
Well, finally, we reached the finish line, all we have to do is get the settings from the Menu and settings object. Modifying the script from the Unity3D tutorial for beginners - Tutorial 1 :
//public var bulletImpulse = 300; //1 //public var shootSpeed : float = 1; //1 public var bullet : GameObject; public var lastShotTime : float; function Start() { lastShotTime = 0; } function FixedUpdate () { if (Input.GetKey(KeyCode.Mouse0)) { var go : GameObject = GameObject.Find("Menu and settings");//2 var shootSpeed : float = go.GetComponent(MainMenu)._shootDelay;//3 if (Time.time>(lastShotTime + shootSpeed)) { var bulletImpulse : float = go.GetComponent(MainMenu)._bulletImpulse; //3 var bull_clone : GameObject; bull_clone = Instantiate(bullet,transform.position,transform.rotation); Physics.IgnoreCollision(bull_clone.collider, collider); bull_clone.rigidbody.AddForce(transform.forward*bulletImpulse, ForceMode.Impulse); lastShotTime = Time.time; } } }
- Here we will not need these variables anymore, so we will get their values from another script, I commented them out to make it clearer.
- Get the object Menu and settings.
- We receive the MainMenu component, and its variables.
Everything, can start and check. The most obvious madness begins when the option of Shoot Delay is reduced to a minimum, the balls should fly out of your Player with a high frequency, like machine-gun bullets. Well generally, I think now you will understand, after all now you own force, force of scripts of Unity.
Conclusion
If, after reading the article, you thought that the scripts in Unity are mainly needed only to render the main menu or roll the balls around the landscape, then you are deeply mistaken, this is just a drop in the ocean. They can do much more. For example, you can program artificial intelligence, control skeletal animation, detonate a nuclear bomb, after all, it all depends on your knowledge and ability to use what the engine gives you. Well, I think this article will be useful for people starting to master the jungle of scripting in Unity, and will give them an incentive to move forward.
Source: https://habr.com/ru/post/113859/
All Articles