Progress Indicator with HTML5 Canvas
Hi, Habr!
More and more articles appear about Canvas, and this is good news. The basics , hopefully, have already been studied, and I would like to share an example of the possible practical use of canvas, namely, to create an animated progress indicator.
For impatient experiment results you can see here: http://pastehtml.com/view/1d7z824.html , as well as a screenshot of the final result:
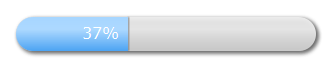
The progress bar turned out pretty simple, but at the same time in the style of web 2.0 - rounded (of course!), With elements of depth and volume: that is, shadows and gradients.
')
For details, I ask under the cat.
Let's start with drawing the substrate, which will be filled with progress. We will make roundings at the ends of the rectangle using the arc () function, so in this case the rectangle will always be rounded at the ends by semi-circles, to create an arbitrary rounding (as when using border-radius), it’s enough to use 2 Bezier curves and segment between them (degenerating to a point with a semicircle, as in our case). So, the function of creating a filled outline of the substrate will look like this:
Add a background shadow and volume. The volume will be created using a linear gradient with three stops, the shadows using the standard context properties:
Here two layers are used - the bottom one in solid gray and the top white with transparency gradients. In my opinion, this allows you to get a clearer border of the substrate and looks more realistic, in any case, you can always experiment with all the color settings.
If everything was done correctly, you should get something like the following:
We now turn to the creation of progress-making progress.
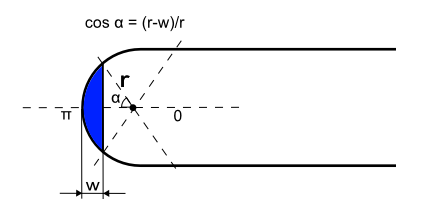
Progress is the same rectangle with rounded edges, only in a different color. However, it has a feature that distinguishes it from the substrate and which must be taken into account when drawing - when the width of the progress is less than the radius of rounding and when the width is more than the length of the substrate minus the radius. In these cases, it is necessary to additionally calculate the angles of drawing the rounding and the position of the chord of the circle , all calculations are made on the basis of the school geometry course, for clarity, they are shown in the figure below:
Plus, add a shadow from the right edge of the progress to give it a volume effect.
As a result, we get the following progress rendering code:
Here, unlike the previous function, we do not save and restore the context as in the case of the substrate, because we are going to set global progress attributes for progress.
It remains to add a text describing the progress in percent. The text will be located directly at the right border of the progress if the length of the text is less than the length of the progress, or at the left margin of the progress otherwise. To measure the test length, we use the measureText () function:
Now it remains to connect all the parts together and set the animation, which fills the progress from 0 to 100%. For animation, we use the functions setInterval () and clearInterval () :
That's all, it remains to place the javascript code in the <script> tag , and add it to the <body> of the document:
Once again the link to the result: http://pastehtml.com/view/1d7z824.html
In conclusion, I prepared a different substrate style using inset shadow, in which case the substrate would appear pressed inward. The original idea is taken from here: http://weblog.bocoup.com/can-i-draw-an-inset-shadow-with-the-html5-canvas-api
The fact is that in canvas there are no means for creating inset shadow as easily as in css, and the essence of the above method is to use a technique called “Opposite winding”, which also applies to canvas.
To achieve the desired effect, first draw a sufficiently large outer rectangle with a counterclockwise direction, and then an inside figure with a clockwise direction. If everything is done correctly, we will end up with an inset shadow for the inner shape.
To get the inset shadow effect, create a new roundInsetRect () function and modify the progressLayerRect () function as follows:
How it looks you can see here: http://pastehtml.com/view/1d80e6t.html
I will hear comments / additions on the implementation, I hope it will be useful.
More and more articles appear about Canvas, and this is good news. The basics , hopefully, have already been studied, and I would like to share an example of the possible practical use of canvas, namely, to create an animated progress indicator.
For impatient experiment results you can see here: http://pastehtml.com/view/1d7z824.html , as well as a screenshot of the final result:
The progress bar turned out pretty simple, but at the same time in the style of web 2.0 - rounded (of course!), With elements of depth and volume: that is, shadows and gradients.
')
For details, I ask under the cat.
Substrate
Let's start with drawing the substrate, which will be filled with progress. We will make roundings at the ends of the rectangle using the arc () function, so in this case the rectangle will always be rounded at the ends by semi-circles, to create an arbitrary rounding (as when using border-radius), it’s enough to use 2 Bezier curves and segment between them (degenerating to a point with a semicircle, as in our case). So, the function of creating a filled outline of the substrate will look like this:
function roundRect(ctx, x, y, width, height, radius) { ctx.beginPath(); ctx.moveTo(x + radius, y); ctx.lineTo(x + width - radius, y); ctx.arc(x+width-radius, y+radius, radius, -Math.PI/2, Math.PI/2, false); ctx.lineTo(x + radius, y + height); ctx.arc(x+radius, y+radius, radius, Math.PI/2, 3*Math.PI/2, false); ctx.closePath(); ctx.fill(); } Add a background shadow and volume. The volume will be created using a linear gradient with three stops, the shadows using the standard context properties:
function progressLayerRect(ctx, x, y, width, height, radius) { ctx.save(); // ctx.shadowOffsetX = 2; ctx.shadowOffsetY = 2; ctx.shadowBlur = 5; ctx.shadowColor = '#666'; // ctx.fillStyle = 'rgba(189,189,189,1)'; roundRect(ctx, x, y, width, height, radius); // // ctx.shadowColor = 'rgba(0,0,0,0)'; var lingrad = ctx.createLinearGradient(0,y+height,0,0); lingrad.addColorStop(0, 'rgba(255,255,255, 0.1)'); lingrad.addColorStop(0.4, 'rgba(255,255,255, 0.7)'); lingrad.addColorStop(1, 'rgba(255,255,255,0.4)'); ctx.fillStyle = lingrad; roundRect(ctx, x, y, width, height, radius); ctx.restore(); } Here two layers are used - the bottom one in solid gray and the top white with transparency gradients. In my opinion, this allows you to get a clearer border of the substrate and looks more realistic, in any case, you can always experiment with all the color settings.
If everything was done correctly, you should get something like the following:
Progress indicator
We now turn to the creation of progress-making progress.
Progress is the same rectangle with rounded edges, only in a different color. However, it has a feature that distinguishes it from the substrate and which must be taken into account when drawing - when the width of the progress is less than the radius of rounding and when the width is more than the length of the substrate minus the radius. In these cases, it is necessary to additionally calculate the angles of drawing the rounding and the position of the chord of the circle , all calculations are made on the basis of the school geometry course, for clarity, they are shown in the figure below:
Plus, add a shadow from the right edge of the progress to give it a volume effect.
As a result, we get the following progress rendering code:
function progressBarRect(ctx, x, y, width, height, radius, max) { // var offset = 0; ctx.beginPath(); if (width<radius) { offset = radius - Math.sqrt(Math.pow(radius,2)-Math.pow((radius-width),2)); // var left_angle = Math.acos((radius - width) / radius); ctx.moveTo(x + width, y+offset); ctx.lineTo(x + width, y+height-offset); ctx.arc(x + radius, y + radius, radius, Math.PI - left_angle, Math.PI + left_angle, false); } else if (width+radius>max) { offset = radius - Math.sqrt(Math.pow(radius,2)-Math.pow((radius - (max-width)),2)); // var right_angle = Math.acos((radius - (max-width)) / radius); ctx.moveTo(x + radius, y); ctx.lineTo(x + width, y); ctx.arc(x+max-radius, y + radius, radius, -Math.PI/2, -right_angle, false); ctx.lineTo(x + width, y+height-offset); ctx.arc(x+max-radius, y + radius, radius, right_angle, Math.PI/2, false); ctx.lineTo(x + radius, y + height); ctx.arc(x+radius, y+radius, radius, Math.PI/2, 3*Math.PI/2, false); } else { ctx.moveTo(x + radius, y); ctx.lineTo(x + width, y); ctx.lineTo(x + width, y + height); ctx.lineTo(x + radius, y + height); ctx.arc(x+radius, y+radius, radius, Math.PI/2, 3*Math.PI/2, false); } ctx.closePath(); ctx.fill(); // if (width<max-1) { ctx.save(); ctx.shadowOffsetX = 1; ctx.shadowBlur = 1; ctx.shadowColor = '#666'; if (width+radius>max) offset = offset+1; ctx.fillRect(x+width,y+offset,1,total_height-offset*2); ctx.restore(); } } Here, unlike the previous function, we do not save and restore the context as in the case of the substrate, because we are going to set global progress attributes for progress.
Progress text
It remains to add a text describing the progress in percent. The text will be located directly at the right border of the progress if the length of the text is less than the length of the progress, or at the left margin of the progress otherwise. To measure the test length, we use the measureText () function:
function progressText(ctx, x, y, width, height, radius, max) { ctx.save(); ctx.fillStyle = 'white'; var text = Math.floor(width/max*100)+"%"; var text_width = ctx.measureText(text).width; var text_x = x+width-text_width-radius/2; if (width<=radius+text_width) { text_x = x+radius/2; } ctx.fillText(text, text_x, y+22); ctx.restore(); } Full progress indicator
Now it remains to connect all the parts together and set the animation, which fills the progress from 0 to 100%. For animation, we use the functions setInterval () and clearInterval () :
// var i = 0; var res = 0; var context = null; var total_width = 300; var total_height = 34; var initial_x = 20; var initial_y = 20; var radius = total_height/2; window.onload = function() { // canvas var elem = document.getElementById('myCanvas'); // canvas if (!elem || !elem.getContext) { return; } context = elem.getContext('2d'); if (!context) { return; } // context.font = "16px Verdana"; // var progress_lingrad = context.createLinearGradient(0,initial_y+total_height,0,0); progress_lingrad.addColorStop(0, '#4DA4F3'); progress_lingrad.addColorStop(0.4, '#ADD9FF'); progress_lingrad.addColorStop(1, '#9ED1FF'); context.fillStyle = progress_lingrad; // res = setInterval(draw, 50); } function draw() { // 1 i+=1; // context.clearRect(initial_x-5,initial_y-5,total_width+15,total_height+15); progressLayerRect(context, initial_x, initial_y, total_width, total_height, radius); progressBarRect(context, initial_x, initial_y, i, total_height, radius, total_width); progressText(context, initial_x, initial_y, i, total_height, radius, total_width ); // 100% if (i>=total_width) { clearInterval(res); } } That's all, it remains to place the javascript code in the <script> tag , and add it to the <body> of the document:
<canvas id="myCanvas" width="500" height="150">Your browser does not have support for canvas.</canvas> Once again the link to the result: http://pastehtml.com/view/1d7z824.html
Inset shadow
In conclusion, I prepared a different substrate style using inset shadow, in which case the substrate would appear pressed inward. The original idea is taken from here: http://weblog.bocoup.com/can-i-draw-an-inset-shadow-with-the-html5-canvas-api
The fact is that in canvas there are no means for creating inset shadow as easily as in css, and the essence of the above method is to use a technique called “Opposite winding”, which also applies to canvas.
To achieve the desired effect, first draw a sufficiently large outer rectangle with a counterclockwise direction, and then an inside figure with a clockwise direction. If everything is done correctly, we will end up with an inset shadow for the inner shape.
To get the inset shadow effect, create a new roundInsetRect () function and modify the progressLayerRect () function as follows:
function roundInsetRect(ctx, x, y, width, height, radius) { ctx.beginPath(); // ctx.moveTo(1000, 1000); ctx.lineTo(1000, -1000); ctx.lineTo(-1000, -1000); ctx.lineTo(-1000, 1000); ctx.lineTo(1000, 1000); ctx.moveTo(x + radius, y); ctx.lineTo(x + width - radius, y); ctx.arc(x+width-radius, y+radius, radius, -Math.PI/2, Math.PI/2, false); ctx.lineTo(x + radius, y + height); ctx.arc(x+radius, y+radius, radius, Math.PI/2, 3*Math.PI/2, false); ctx.closePath(); ctx.fill(); } function progressLayerRect(ctx, x, y, width, height, radius) { ctx.save(); // ctx.shadowOffsetX = 2; ctx.shadowOffsetY = 2; ctx.shadowBlur = 5; ctx.shadowColor = '#666'; // ctx.fillStyle = 'rgba(189,189,189,1)'; roundRect(ctx, x, y, width, height, radius); ctx.fillStyle = 'white'; roundInsetRect(ctx, x, y, width, height, radius); ctx.restore(); } How it looks you can see here: http://pastehtml.com/view/1d80e6t.html
I will hear comments / additions on the implementation, I hope it will be useful.
Source: https://habr.com/ru/post/113782/
All Articles