Testing Android Applications
Introduction

I am sure that modern programmers do not need to be persuaded to use unit tests. And if, when developing applications for android, modules that are not related to it, we can test using JUnit, familiar to everyone (truth is not always without crutches ), then how to test the user interface and the classes using it? The tools of the android.test framework will help us in this.
In this article we will write a small android application and test it. To work, we will need the installed jdk, android sdk, Eclipse and ADT plugin.
Part one. SpeedConverter.
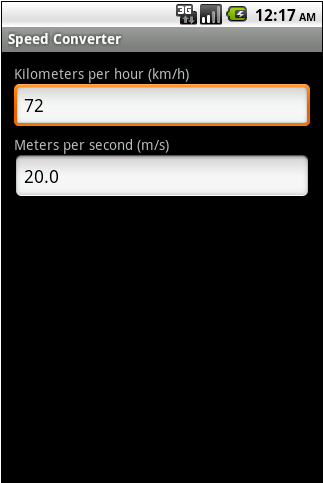
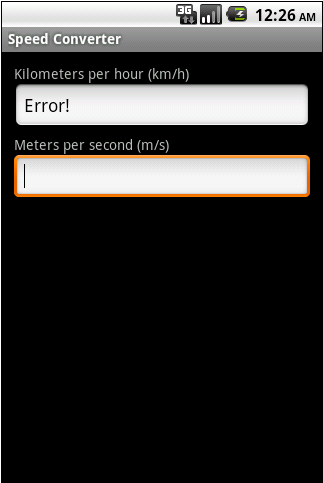
Our primitive application will translate “kilometers per hour” into “meters per second” and vice versa, as well as issue an Error! Message if the required value cannot be calculated. The user will enter speed data in any EditText and in another get the result. We will not dwell on it in more detail.
')
XML layout forms:
<? xml version = "1.0" encoding = "utf-8" ? >
< LinearLayout xmlns: android = " schemas.android.com/apk/res/android "
android: orientation = "vertical"
android: layout_width = "fill_parent"
android: layout_height = "fill_parent"
android: padding = "12dp" >
< Textview
android: id = "@ + id / textKmPerHour"
android: text = "@ string / kmh"
android: layout_width = "wrap_content"
android: layout_height = "wrap_content" />
< Edittext
android: id = "@ + id / editKmPerHour"
android: layout_height = "wrap_content"
android: layout_width = "match_parent"
android: inputType = "numberDecimal"
android: numeric = "decimal" />
< Textview
android: id = "@ + id / textMetersPerSec"
android: text = "@ string / ms"
android: layout_width = "wrap_content"
android: layout_height = "wrap_content"
android: paddingTop = "4dp" />
< Edittext
android: id = "@ + id / editMetersPerSec"
android: layout_height = "wrap_content"
android: layout_width = "match_parent"
android: inputType = "numberDecimal"
android: numeric = "decimal" />
</ LinearLayout >
* This source code was highlighted with Source Code Highlighter .
Next, set the listener for Kilometers per hour EditText and when the event occurs, we calculate the speed. The nuance that onKey () does not occur with the active software keyboard, we will take into account later in the tests. The second EditText works by analogy.
// setup listener for Kilometers per hour EditText
editKmPerHour.setOnKeyListener ( new OnKeyListener () {
public boolean onKey (View v, int keyCode, KeyEvent event ) {
if ( event .getAction () == KeyEvent.ACTION_UP) {
try {
double kmPerHour = Double.parseDouble (editKmPerHour
.getText (). toString ());
double meterPerSec = kmPerHour * 0.2777777777777778;
editMeterPerSec.setText ( new Double (meterPerSec)
.toString ());
} catch (NumberFormatException e) {
editMeterPerSec.setText (R. string .errorMsg);
Log.d (LOG, "e:" + e);
}
return true ;
}
return false ;
}
});
* This source code was highlighted with Source Code Highlighter .
We now turn to testing.
Part two. SpeedConverterTest.
Android Test Project
In the first part, we created the SpeedConverter application. Now for him we need to create a new test application. Go to the menu eclipse'a: File -> New -> Projects ... in the window that appears, select Android -> Android Test Project , click Next and see this window:
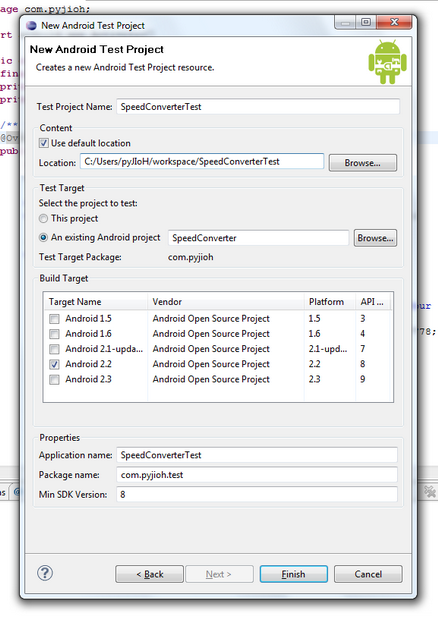
Set the following values:
- Test Project Name: SpeedConverterTest
- Test Target: install “An existing Android project” and select our project SpeedConverter
- Application name and Package name will be substituted automatically
Creating a Test Case Class
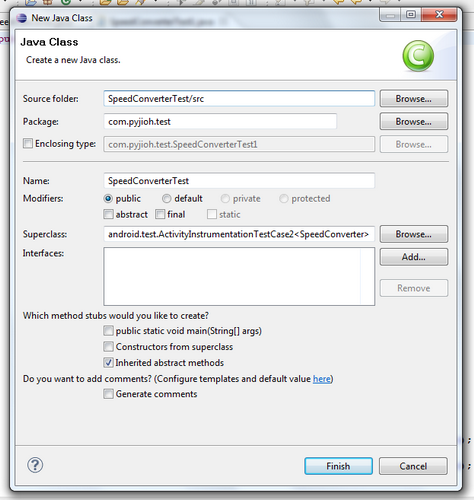
In the src / directory of our project we will create a new class New> Class . Let's call it SpeedConverterTest and specify as android.test.ActivityInstrumentationTestCase2 as a SuperClass. Our dialogue will look like this:
Now a little more about ActivityInstrumentationTestCase2. This class is designed to test activities in the android application. It can create an activity (using InstrumentationTestCase.launchActivity ()), run tests in the UI thread and allows us to send various mock Intents to our activity. In the parameter we will need to send to SpeedConverter.
Add a test case constructor that will be used by the testing framework. As parameters, we will show which android application will be tested.
public SpeedConverterTest () {
super ( "com.pyjioh" , SpeedConverter. class );
}
Further, the setUp () method familiar from JUnit, which is called before running the tests, will initialize the variables in it.
@Override
protected void setUp () throws Exception {
// TODO Auto-generated method stub
super.setUp ();
activity = getActivity ();
editKmPerHour = (EditText) activity
.findViewById (com.pyjioh.R.id.editKmPerHour);
editMeterPerSec = (EditText) activity
.findViewById (com.pyjioh.R.id.editMetersPerSec);
}
We are starting to add tests, they will be simple in order to show how to interact with the UI, the first one will check whether our SpeedConverter activity was created and started, and whether we have access to our controls.
public void testControlsCreated () {
assertNotNull (activity);
assertNotNull (editKmPerHour);
assertNotNull (editMeterPerSec);
}
Using the assertOnScreen () method from ViewAsserts, we check if our controls are visible.
public void testControlsVisible () {
ViewAsserts.assertOnScreen (editKmPerHour.getRootView (), editMeterPerSec);
ViewAsserts.assertOnScreen (editMeterPerSec.getRootView (), editKmPerHour);
}
Whether the application starts with empty EditText'mi.
public void testStartingEmpty () {
assertEquals ( "editKmPerHour is not empty" , "" , editKmPerHour.getText ()
.toString ());
assertEquals ( "editMeterPerSec is not empty" , "" , editMeterPerSec
.getText (). toString ());
}
Now add a test that verifies the correctness of the translation of km / s in m / s. In it, we use TouchUtils.tapView (..) which simulates a touch on the control we need, and KeyEvent.KEYCODE_BACK removes the software keyboard. The void testConvertMsToKmh () method looks similar.
public void testConvertKmhToMs () {
TouchUtils.tapView ( this , editKmPerHour);
sendKeys (KeyEvent.KEYCODE_BACK, KeyEvent.KEYCODE_1, KeyEvent.KEYCODE_0,
KeyEvent.KEYCODE_0);
double meterPerSec;
try {
meterPerSec = Double.parseDouble (editMeterPerSec.getText ()
.toString ());
} catch (Exception e) {
meterPerSec = -1;
}
assertTrue ( "100 km / h is not 27.778 m / s" , meterPerSec> 27.7
&& meterPerSec <27.8);
}
The last test checks if we get an error message.
public void testGetError () {
TouchUtils.tapView ( this , editKmPerHour);
sendKeys (KeyEvent.KEYCODE_1, KeyEvent.KEYCODE_DEL);
assertEquals ( "Must be Error!" ,
activity.getString (com.pyjioh.R. string .errorMsg),
editMeterPerSec.getText (). toString ());
}
Run our test application: Run As> Android JUnit Test . The video below shows how it will look.
Thus, we tested the functionality of our frivolous application.
What else?
Yes, actually, everything else. The possibilities of the android.test framework are much wider. For example, the ActivityUnitTestCase class, unlike ActivityInstrumentationTestCase2, allows you to test an activity in isolation, using the mock Context or Application. On the official website developer.android.com you can get acquainted with all the testing tools.
The source text of SpeedConverter and SpeedConverterTest lies on code.google.com
Source: https://habr.com/ru/post/113584/
All Articles