Setting up a Transmission client torrent on Tomato firmware
Intro
Greetings to all. I want to share with you my experience of setting up the Transmission client on the popular open source firmware for Tomato routers. Recently, the article Netgear WNR3500L was published on Habré : We turn the router into a NAS , where DD-WRT firmware was taken as a basis. But personally, I didn’t like DD-WRT very much, and the torrent rocking functionality with NAS was very necessary. Therefore, I propose to get acquainted with an alternative method.
Installing the Tomato firmware on the router.
I don’t want to describe the process of installing the firmware in great detail and I assume that you can do it. In general terms, the sequence of actions is as follows: from the site www.dd-wrt.com we download the mini firmware and install it. For my NetGear WNR3500L, this is the d-wrt.v24-14896_NEWD-2_K2.6_mini-WNR3500L.chk file ( unfortunately the router’s default firmware cannot immediately open the tomato file with the trx extension. Therefore, we pre-use DD-WRT) The next step is to install directly Tomato. We download the required distribution kit from tomatousb.org/download (in my case it was tomato-K26USB-1.28.9054MIPSR2-beta-Ext.trx ) and install it again. Be sure not to forget to reset the router. By default, admin \ admin is set to the admin address at 192.168.1.1 .
')
Hard Drive Preparation
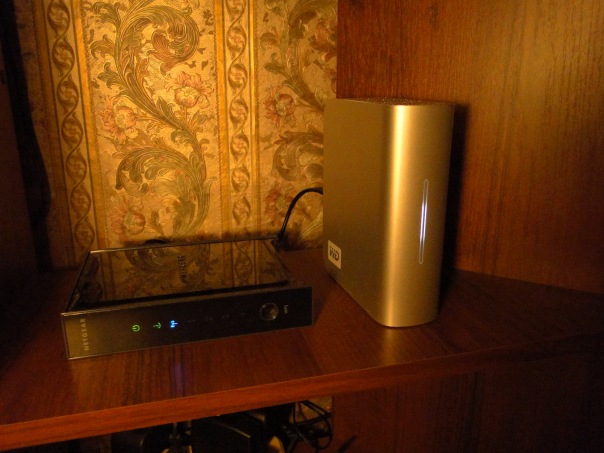
Now we need to format the hard disk into the ext3 file system in one partition . I did this using Acronis Disk Director. When formatting, you will need to specify the HDD label - I introduced the name Elements in honor of my WD Elements Portable hard drive. The name of the hard will be needed in the future and will help not to get confused.
Hard drive connection
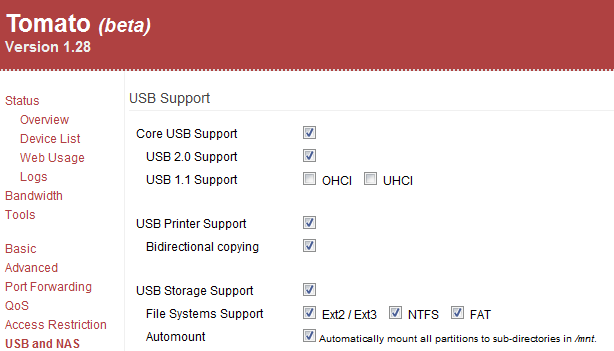
Before connecting the hard drive to the usb port of the router, go to the admin area and follow the USB and NAS section -> USB Support and set the checkboxes as in the screenshot.
Transmission Installation
With the help of Putty we connect via telnet to the router. By default, port 23 is open at 192.168.1.1. The root username, password is your admin password. Further, the most interesting.
Create the necessary directories:
mkdir / mnt / Elements # where Elements is a USB HDD label (ext3)
mkdir / mnt / Elements / opt
mkdir -p / mnt / Elements / data / torrents
mkdir / mnt / Elements / opt
mount -o bind / mnt / Elements / opt / opt
mount -o bind / mnt / Elements / / mnt
Downloading Optware:
wget www.3iii.dk/linux/optware/optware-install-ddwrt.sh -O /tmp/optware-install.sh
sh /tmp/optware-install.sh
We put Transmission and config:
/ opt / bin / ipkg-opt -verbose_wget install transmission
/ opt / bin / transmission-daemon -g /mnt/Elements/data/torrents/.config/transmission-daemon
killall transmission-daemon
wget www.3iii.dk/linux/optware/settings.json -O /mnt/Elements/data/torrents/.config/transmission-daemon/settings.json
/ opt / bin / transmission-daemon -g /mnt/Elements/data/torrents/.config/transmission-daemon
Now Transmission works and you can go to its web interface at http://192.168.1.1:9091
We fix the result
We currently have a working client. But when the router is restarted, our entire economy will not start by itself. Therefore, again we go to the USB section and NAS -> USB SUPPORT and write the following script to the After Mounting block. After this operation, the Transmission will rise itself after loading the router.
mount / mnt / Elements / opt / opt
/ opt / bin / transmission-daemon -g /mnt/Elements/data/torrents/.config/transmission-daemon

Correct shutdown
In the Administration -> Scripts section, in the Shutdown block we add the following script to exit correctly (shut down the transmission service and unmount the disk) if the router is turned off.
killall transmission-daemon
sleep 5 && unmount / dev / sda1

Raise the ball
To make all downloaded content conveniently available, run Samba. This is done very simply in the section USB and NAS -> File Sharing . Here you need to set Enable File Sharing to Yes and add the folder that you want to make available.
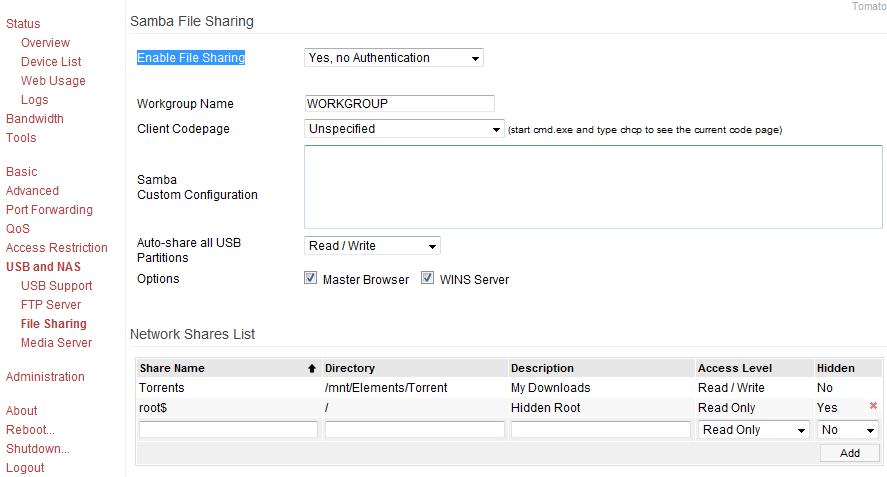
Now the folder can be attached to a network drive.
Access from the outside. Dyndns
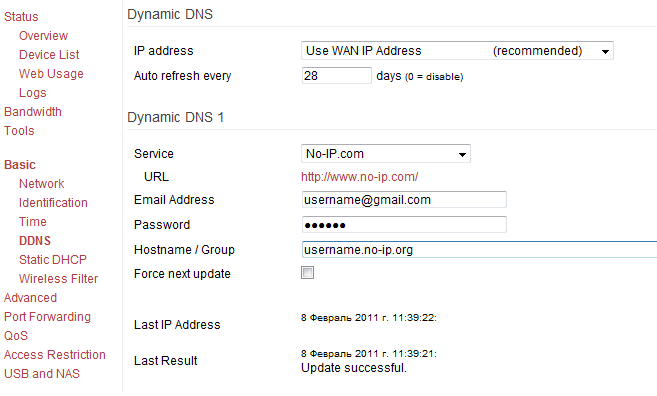
It is very good to have access to the router from the external network. Thus, it is possible, for example, from work to put something on download and on arrival home you already have what you need. Most providers do not provide a static ip address or want money for this service. This is where DynDNS services come to the rescue. I opted for no-ip. We go to www.no-ip.com , register and get the address of the form username.no-ip.org and password. Go to the admin menu of the Basic menu router - DDNS and configure as in the screenshot.
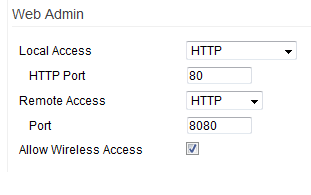
Access from outside to the admin panel of the router
Go to the menu Administration - Admin Access , where we set the settings as in the screenshot. Now at username.no-ip.org:8080 you can get to the router.
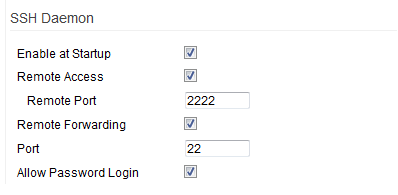
Access from outside via SSH
To make it possible to connect to the router via the Internet via Putty, we enable SSH Daemon in the same menu ( Administration - Admin Access ) with the following settings.
Next, we forward the ports in the Port Forwarding - Basic menu.

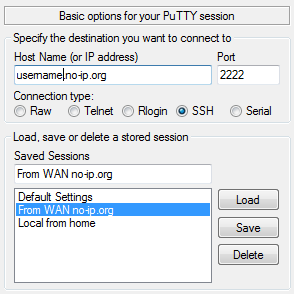
Thanks to this, if necessary, we connect via SSH
Access from outside to the Transmission web interface
Through the interface of the router I could not do the forwarding of the port for the torrent client. This problem was solved by the command in the terminal:
iptables -I INPUT -p tcp --dport 9091 -j ACCEPT
Since after rebooting the router this “forwarding” disappears, I put it in the “Startup” section of the Administration - Scripts WAN UP block

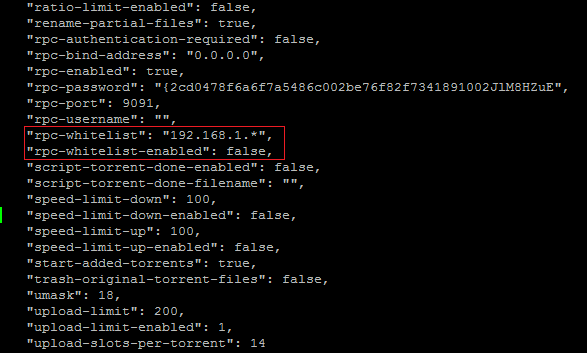
After all the manipulations when entering username.no-ip.org:9091, the web interface should be Transmission. But in the configuration file settings.json located in /mnt/Elements/data/torrents/.config/transmission-daemon/settings.json there is a setting that does not allow "foreign" ip. Solution: either we add our ip to rpc-whitelist or we cut off whitelist altogether, setting it to false. I chose the second method.
Profit!
Again, try to go to username.no-ip.org:9091 - voila! Works. From this point on, you can control the entire “system” from any place where there is an internet connection.

Goodies & Thanks!
1) For checking open ports on a router it is convenient to use the service www.yougetsignal.com/tools/open-ports
2) For SSH, you can connect using FAR with the WinSCP plugin installed
3) In order not to climb into Transmission through a browser, you can use the Transmission Remote GUI
4) There is also a Transmission Remote for Android. Easily searched on the Android Market. Tested with a slow GPRS connection - it works. True application functionality is not very large.

5) I want to thank the user with the nickname ArtemR from the forum forumgege.ru, Vladimir Kuznetsov and Andrey Rogozhkin for help in setting up.
6) Materials from here are used www.xtremecoders.org/forums/f76/guide-how-install-setup-transmission-tomato-56
Source: https://habr.com/ru/post/113462/
All Articles