We build Code Coverage collection in CruiseControl.NET
Introduction
Recently, the practice of developing software for test-driven development has been actively promoted. Undoubtedly, it is very useful, but not always and not everyone uses it. Therefore, a part of the code is covered by unit tests, and a part remains uncovered. Tracing each project manually, whether tests are normally written there or not, is an almost impossible task.
Recently, I wondered how you can automate the process of collecting metrics, which shows the percentage of code coverage of tests. It was decided to embed her collection in CruiseControl.NET. Naturally, 100% coverage does not guarantee the absence of bugs, but at least shows the attitude of developers to writing tests.
In this article, I will not dwell on the moments regarding the setting of CruiseControl for building projects and running unit tests. The steps that will allow you to collect the necessary information about code coverage and display it on the test page will be described. For writing unit tests, our company uses the Microsoft framework - MSTest. The results of working with this framework will be described in the article. It is worth noting that a prerequisite for embedding code coverage is CruiseControl’s initial setup for running tests.
')
As far as I know, CruiseControl has built-in capabilities for displaying data collected with NCover. But due to the fact that we do not have the opportunity to buy this library, we use the methods that exist.
Everything described below applies to projects written in Visual Studio 2010. Differences with the 2008 version, although small, are there.
Creating a data.coverage file on the build server
Visual Studio allows you to customize the execution of tests in such a way that after passing all the tests a file is created in which information about covered code sections will be stored. This file will be called data.coverage (it is stored in the In folder with the results of passing tests).
This setting is stored in your project’s .testrunconfig file. Through the UI it can be set as follows:
- Open your .testrunconfig file
- Select Data and Diagnostics
- Check the box next to Code Coverage and click Configure.
- Select the library for which you want to collect coverage.
- Disable the Instrument assemblies in place checkbox.
After saving the file inside it will be the following text:
<?xml version="1.0" encoding="UTF-8"?> <TestSettings name="Local Test Run" id="de0d45b4-4fed-4acb-a663-2cfdf0ce4fd7" xmlns="http://microsoft.com/schemas/VisualStudio/TeamTest/2010"> <Description>This is a default test run configuration for a local test run.</Description> <Deployment enabled="false" /> <Execution> <Timeouts testTimeout="300000" /> <TestTypeSpecific> <UnitTestRunConfig testTypeId="13cdc9d9-ddb5-4fa4-a97d-d965ccfc6d4b"> <AssemblyResolution> <TestDirectory useLoadContext="true" /> </AssemblyResolution> </UnitTestRunConfig> </TestTypeSpecific> <AgentRule name="LocalMachineDefaultRole"> <DataCollectors> <DataCollector uri="datacollector://Microsoft/CodeCoverage/1.0" assemblyQualifiedName="Microsoft.VisualStudio.TestTools.CodeCoverage.CoveragePlugIn, Microsoft.VisualStudio.QualityTools.Plugins.CodeCoverage, PublicKeyToken=b03f5f7f11d50a3a" friendlyName="Code Coverage"> <Configuration> <CodeCoverage xmlns=""> <Regular> <CodeCoverageItem binaryFile="YourProject\bin\Debug\YourProject.dll" pdbFile="YourProject\bin\Debug\YourProject.pdb" /> </Regular> </CodeCoverage> </Configuration> </DataCollector> </DataCollectors> </AgentRule> </Execution> </TestSettings> The DataCollectors section tells MSTest that it is necessary to build Code Coverage.
Now we know what should be specified in the config file, and we have 3 options for using it on the build server:
- use ready-made config file from your project;
- store in the project a separate config for the build server;
- create config file on the fly.
The first case does not suit us, because This file is stored in the version control system, so any developer can turn off the setting for collecting Code Coverage and put this file back. Or vice versa, if we, for example, do not want in some cases to collect this metric. For these reasons, the setting about whether or not to collect the metric should be included in CruiseControl. The second option also does not completely prevent the problem described above. For the above reasons, we in our company stopped at the third option. I will not describe how to create an XML file, everything is quite simple there.
When the config is ready, you can run the tests. To do this, the following code should be added to the CruiseControl file in the task section:
<exec> <executable>C:\Program Files (x86)\Microsoft Visual Studio 10.0\Common7\IDE\MSTest.exe</executable> <buildArgs>"/testcontainer:PathToWorkingDirectory\Source\bin\Release\YourTestProject.dll" "/runconfig:PathToYourConfig\localtestrun.testrunconfig" "/resultsfile:PathToWorkingDirectory\TestResults.xml"</buildArgs> <description>Executing MSTest</description> </exec> If you start CruiseControl now, the data.coverage file will be created in the PathToWorkingDirectory \ [USERNAME] _ [MACHINE-NAME] [DATE AND TIME] \ In \ [MACHINE-NAME] folder. Because there is time in the folder name, it will not be very convenient to use it in the future. Therefore, the following section must be added to .testrunconfig (inside <TestSettings>):
<NamingScheme baseName="FolderName" appendTimeStamp="false" useDefault="false" /> Now the data.coverage file can be found in the PathToWorkingDirectory \ FolderName \ In \ [MACHINE-NAME] folder.
After the done actions, the data.coverage file will be located in the test results folder for this project on the CruiseControl machine. The problem is that this file is binary, so we need to convert it to xml.
Convert data.coverage to XML
To convert this file, you need to write a console application that will be executed after passing all the tests. Everything is simple enough, the code that performs the conversion is presented below:
using (CoverageInfo info = CoverageInfo.CreateFromFile(PathToDataCoverageFile)) { CoverageDS data = info.BuildDataSet(); string outputXml = data.GetXml(); File.WriteAllText(PathToOutputXmlCoverageFile,outputXml)); } In the output XML there will be a lot of information that we do not need, so you can apply the XSL transformation and leave only those sections that we need. Also, the names of the methods will have the full name including the namespace, which is somewhat inconvenient when displaying detailed information about the coverage, and this is solved by simply modifying the resulting XML file.
The launch of our console application is carried out thanks to an additional section in the build server config:
<exec> <executable>PathToConverter\Coverage2XmlConverter.exe</executable > <buildArgs>"PathToDataCoverage\data.coverage" "PathToOutputXml\coverage.xml"</buildArgs> <description>Calculation code coverage data</description> </exec> Adding data to the build results
Now we have almost everything ready. Just add the resulting XML file to the build results. This is done quite simply, you need to add the following section to the CruiseControl configuration file inside the Publishers section:
<merge> <files> <file>PathToResults\TestResult.xml</file> <file>PathToCoverage\coverage.xml</file> </files> </merge> The TestResult.xml file should already have been in your config if you have set up work with tests.
Displaying data on the build page
It remains to write the XSLT file to display the collected data on the build page. On builds where coverage is less than 20%, Code Coverage will be red, in the case of 20% -50%, the indicator will be yellow and in the case of> 50% it will be green. These values can easily be changed in XSLT, and use those that suit you best.
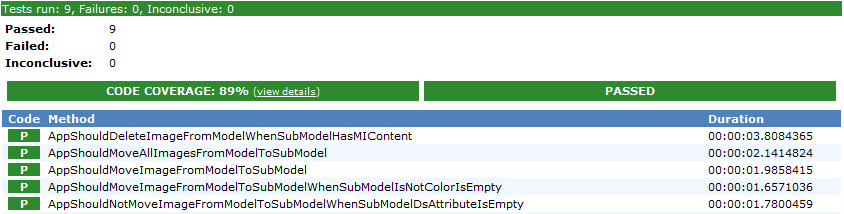
We show the total coverage value on the build page, this is how it looks now:

For this, we had to slightly modify the MSTestReport2008.xsl from the standard set of CruiseControl.NET.
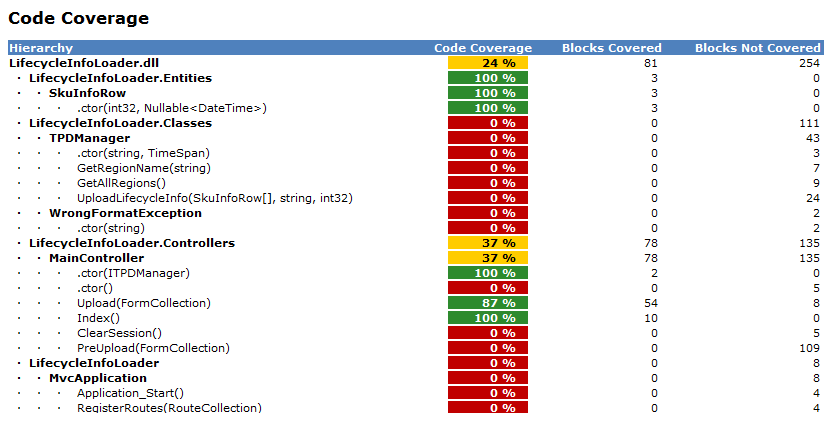
And this is how the Code Coverage metrics look like:
I will not occupy space in the article with XSLT text, so I uploaded 2 XSLT files to GitHub , along with an application for converting the data.coverage file to XML.
Thank you very much, I will be just comments and additions.
Source: https://habr.com/ru/post/113263/
All Articles