Rapid creation of a prototype web application in ASP.NET MVC 3 using MvcScaffolding
In this article, I would like to consider the possibility of quickly creating a functional prototype of a web application based on ASP.NET MVC 3. Having come into contact with “Ruby on Rails”, I became interested in the possibility of Scaffolding, i.e. a quick way to generate the main framework of the application. This allows the developer to concentrate on creating a business model and get a functional prototype without spending his time on implementation details, which is very important at the beginning of any project. Is there anything like this in ASP.NET MVC? And how functional, fast, convenient and practical.
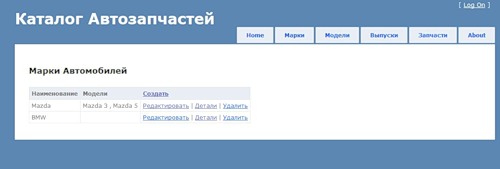
I would like to consider this with a specific example, and as such I propose to create a simple web catalog of products. In my case, it will be the auto parts catalog.
As tools, I will use the following development tools and libraries.
First of all, you need to configure our environment. Locate the NuGet extension in the Visual Studio Extension Manager and install it. Or download and install from the official site .
Create a new ASP.NET MVC 3 project.
Next you need to install MvcScaffolding using the command line manager of the package manager. Open NuGet console: View menu → “Other Windows” → Package Manager Console.
As we will see later, this command line is the main tool for working with MvcScaffolding, and is similar to the command run in Rails.
To install a package, just run the command:
')
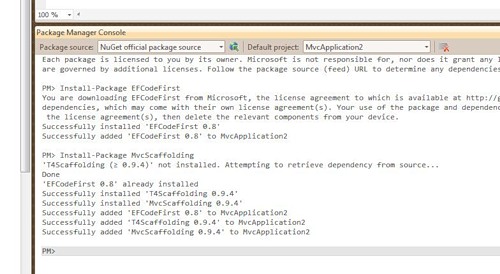
As you can see, this command will install the MvcScaffolding package in your project, as well as the EFCodeFirst package, which is dependent (in my case, I installed EFCodeFirst before).
The application that I am going to develop in this example is a simple auto parts catalog and can be part of a store or an accounting system.
To begin with, we need to model the subject area.
So, what we have is:
Create the main classes of business entities.
As you can see, we have a one-to-many relationship between the Model, the Brand and the Release, as well as a many-to-many relationship between the Parts and the Release. I was wondering how MvcScaffolding will handle this relationship and what code will be created as a result. Looking ahead, you need to note the following rules that must be followed when describing business model classes:
In our case, in the “Model” we included the MakeId field - the foreign key from the “Mark”, as well as the virtual field Make. This implements a one-to-many relationship. To implement the many-to-many relationship, we added the corresponding property list to the classes Part and Release.
For the CodeFirst paradigm, this class description is enough: we don’t need to worry about storage and generation, everything will be done automatically when the application starts. After finishing work with the model, it is necessary to assemble the project.
To work with MvcScaffolding, you need to open the command stack of the package manager, which I described above.
This step is optional, but let's start by customizing our templates and running the following commands:
As a result, a new folder with templates will appear in our project.
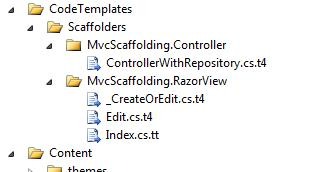
Now you can edit these templates so that the generated code matches our views and markup.
Next, create our first controller:
Here:
As a result, we create the following files and classes.
I will not give here the generated code, those who are interested can download the project source at the link at the end of the article.
Now let's create a second controller in the same way:
Let's open the created _CreateOrEdit.cshtml view and look at the generated code:
And also in the controller code:
One-to-many MvcScaffolding handled the situation very well: a drop-down list was created in the Model view, which was populated with the values from the Mark.
Continue to create our controllers:
Appropriate controllers, views, and repositories have been created. Almost everything is also good with the one-to-many relationship (you can only replace the Name property with FullName in the parameters for creating a drop-down list for better display), however, for the many-to-many relationship, MvcScaffolding did not create anything, that we need to either add it manually or change the generation template (this is a separate topic, I will try to write and give an example of implementation in another article and inform the author of MvcScaffolding, maybe he will include it in the next release).
Now we just need to create repositories for reference books and other classes that do not have controllers.
It is time for the first launch.
Before this, it is necessary to write the database connection string to the configuration. If it is SQL Express, then no physical file is allowed.
It is important that the name of the connection string matches the name of the context class.
In addition, I would like to have test data and reference books. To do this, add a class inherited from the DropCreateDatabaseAlways class, which will initialize our database each time.
And in Global.asax at the start of the application, add:
Having corrected a little received code, we received functionally working application.
As a result, I spent only a couple of hours on the creation of a functional prototype, with all the modifications.
Opportunities that I clearly lacked when working:
Although all this is not critical and can be implemented through customization and metaprogramming in templates.
So far, EFCodeFirst and MvcScaffolding are in beta stage, but they are fully functional and are powerful enough to quickly launch and develop web applications.
In the near future, these funds will have more advanced functionality and will become part of the official ASP.NET MVC release.
Blog author MvcScaffolding
Sample source code
I would like to consider this with a specific example, and as such I propose to create a simple web catalog of products. In my case, it will be the auto parts catalog.
As tools, I will use the following development tools and libraries.
- MS Visual Studio 2010
- ASP.NET MVC 3 - official release
- NuGet - Package Manager for Visual Studio
- MvcScaffolding - template-based MVC code generator
- EFCodeFirst - new feature Entity Framework CPT5
Installation and Setup
First of all, you need to configure our environment. Locate the NuGet extension in the Visual Studio Extension Manager and install it. Or download and install from the official site .
Create a new ASP.NET MVC 3 project.
Next you need to install MvcScaffolding using the command line manager of the package manager. Open NuGet console: View menu → “Other Windows” → Package Manager Console.
As we will see later, this command line is the main tool for working with MvcScaffolding, and is similar to the command run in Rails.
To install a package, just run the command:
Install-Package MvcScaffolding
')
As you can see, this command will install the MvcScaffolding package in your project, as well as the EFCodeFirst package, which is dependent (in my case, I installed EFCodeFirst before).
Data Model and Application Domain
The application that I am going to develop in this example is a simple auto parts catalog and can be part of a store or an accounting system.
To begin with, we need to model the subject area.
So, what we have is:
- Car brand
- Model
- Year of issue
- Replacement part
Create the main classes of business entities.
public class Make
{
public int Id { get ; set ; }
public string Name { get ; set ; }
public List <Model> Models { get ; set ; }
}

public class Model
{
public int Id { get ; set ; }
public string Name { get ; set ; }
public int MakeId { get ; set ; }
[NotMapped]
public string FullName
{
get { return string .Format( "{0} {1}" , Make.Name, Name); }
}
virtual public Make Make { get ; set ; }
public List <Release> Years { get ; set ; }
}

public class Release
{
public int Id { get ; set ; }
public int ModelId { get ; set ; }
public int YearId { get ; set ; }
[NotMapped]
public string FullName
{
get { return string .Format( "{0} ({1})" , Model.FullName, Year.Value); }
}
virtual public Model Model { get ; set ; }
virtual public Year Year { get ; set ; }
public List <Part> Parts { get ; set ; }
}

public class Part
{
public int Id { get ; set ; }
public string Name { get ; set ; }
public string Description { get ; set ; }
public decimal Price { get ; set ; }
public int Quantity { get ; set ; }
public int GroupId { get ; set ; }
virtual public Group Group { get ; set ; }
public List <Release> Releases { get ; set ; }
}

* This source code was highlighted with Source Code Highlighter .
As you can see, we have a one-to-many relationship between the Model, the Brand and the Release, as well as a many-to-many relationship between the Parts and the Release. I was wondering how MvcScaffolding will handle this relationship and what code will be created as a result. Looking ahead, you need to note the following rules that must be followed when describing business model classes:
- Specify primary key. This can be Id, {RealName} Id or [Key] attribute
- Specify the foreign key {Name of Identity} Id
- No support for complex primary keys. But maybe this is for the better, because with them there are many other problems.
In our case, in the “Model” we included the MakeId field - the foreign key from the “Mark”, as well as the virtual field Make. This implements a one-to-many relationship. To implement the many-to-many relationship, we added the corresponding property list to the classes Part and Release.
For the CodeFirst paradigm, this class description is enough: we don’t need to worry about storage and generation, everything will be done automatically when the application starts. After finishing work with the model, it is necessary to assemble the project.
Setting up the template and creating controllers
To work with MvcScaffolding, you need to open the command stack of the package manager, which I described above.
This step is optional, but let's start by customizing our templates and running the following commands:
Scaffold CustomTemplate MvcScaffolding.RazorView _CreateOrEdit
Scaffold CustomTemplate MvcScaffolding.RazorView Edit
Scaffold CustomTemplate MvcScaffolding.RazorView Index
Scaffold CustomTemplate MvcScaffolding.Controller ControllerWithRepository
As a result, a new folder with templates will appear in our project.
Now you can edit these templates so that the generated code matches our views and markup.
Next, create our first controller:
Scaffold Controller Make -Verbose -ControllerName Make -DbContextType ApartsContext -Repository
Here:
- Scaffold Controller - controller creation command
- Make - model class name
- -ControllerName Make — specify the name of the controller, not necessarily, but by default, generate a plural form on behalf of the model
- -DbContextType ApartsContext - context class
- -Repository - indicates that you need to use data access through the repository
As a result, we create the following files and classes.
- MakeController controller, which contains methods for creating, deleting, modifying, and displaying as a list for the essence of Make
- The ApartsContext context (if it was not created), which provides a connection to the repository
- MakeRepository repository - implementation of basic rules rules
- View files _CreateOrEdit.cshtml, Create.cshtml Delete.cshtml Details.cshtml Edit.cshtml Index.cshtml
I will not give here the generated code, those who are interested can download the project source at the link at the end of the article.
Now let's create a second controller in the same way:
Scaffold Controller Model -Verbose -ControllerName Model -DbContextType ApartsContext -Repository
Let's open the created _CreateOrEdit.cshtml view and look at the generated code:
...
@Html.DropDownListFor(model => model.MakeId, (( IEnumerable <ApartCatalogMvc.Models.Make>)ViewBag.PossibleMakes).Select(option => new SelectListItem {
Text = (option == null ? "None" : option.Name),
Value = option.Id.ToString(),
Selected = (Model != null ) && (option.Id == Model.MakeId)
}), "Choose..." )
...

* This source code was highlighted with Source Code Highlighter .
And also in the controller code:
...
public ActionResult Edit( int id)
{
ViewBag.PossibleMakes = makeRepository.GetAllMakes();
...

* This source code was highlighted with Source Code Highlighter .
One-to-many MvcScaffolding handled the situation very well: a drop-down list was created in the Model view, which was populated with the values from the Mark.
Continue to create our controllers:
Scaffold Controller Release -Verbose -ControllerName Releases -DbContextType ApartsContext -Repository
Scaffold Controller Part -Verbose -ControllerName Part -DbContextType ApartsContext -Repository
Appropriate controllers, views, and repositories have been created. Almost everything is also good with the one-to-many relationship (you can only replace the Name property with FullName in the parameters for creating a drop-down list for better display), however, for the many-to-many relationship, MvcScaffolding did not create anything, that we need to either add it manually or change the generation template (this is a separate topic, I will try to write and give an example of implementation in another article and inform the author of MvcScaffolding, maybe he will include it in the next release).
Now we just need to create repositories for reference books and other classes that do not have controllers.
Scaffold Repository Year -DbContextType ApartsContext -Verbose
Scaffold Repository Group -DbContextType ApartsContext -Verbose
It is time for the first launch.
Before this, it is necessary to write the database connection string to the configuration. If it is SQL Express, then no physical file is allowed.
< add name ="ApartsContext"
connectionString ="Data Source=.\SQLEXPRESS;AttachDbFilename=|DataDirectory|\ApartsDB.mdf;Integrated Security=True;User Instance=True;Initial Catalog=ApartsDB"
providerName ="System.Data.SqlClient" />

* This source code was highlighted with Source Code Highlighter .
It is important that the name of the connection string matches the name of the context class.
In addition, I would like to have test data and reference books. To do this, add a class inherited from the DropCreateDatabaseAlways class, which will initialize our database each time.
public class ApartsInitializer : DropCreateDatabaseAlways<ApartsContext>
{
protected override void Seed(ApartsContext context)
{
var makes = new List <Make>
{
new Make { Name = "BMW" },
new Make { Name = "Mazda" }
};
makes.ForEach(m => context.Makes.Add(m));
...

* This source code was highlighted with Source Code Highlighter .
And in Global.asax at the start of the application, add:
...
DbDatabase.SetInitializer<ApartsContext>( new ApartsInitializer());
...

* This source code was highlighted with Source Code Highlighter .
Having corrected a little received code, we received functionally working application.
Conclusion
As a result, I spent only a couple of hours on the creation of a functional prototype, with all the modifications.
Opportunities that I clearly lacked when working:
- Paging and filtering in lists
- Multi-to-many relationship support
- Binding for various data types, for example for DataTme
Although all this is not critical and can be implemented through customization and metaprogramming in templates.
So far, EFCodeFirst and MvcScaffolding are in beta stage, but they are fully functional and are powerful enough to quickly launch and develop web applications.
In the near future, these funds will have more advanced functionality and will become part of the official ASP.NET MVC release.
Additional materials
Blog author MvcScaffolding
Sample source code
Source: https://habr.com/ru/post/113214/
All Articles