Raytracer javascript
Do you know what is raytracer? This is a program that draws a three-dimensional scene on the screen as you would see it. Of course, not quite so, but some raytracers can draw very realistic images, for example, as in Avatar .
The idea of a raytracer is very simple and in this article I will tell you how this algorithm works and even write it in JavaScript. Pictures and an example are attached.
')
How to draw three-dimensional scenes?
Today, as far as I know, there are two methods for designing three-dimensional scenes on a flat screen. The first method is based on matrix transformations. His idea is also simple, it works quickly, but what he draws is not like a photo and is suitable only for games. The second method is raytracing. It is simply arranged, it makes it easy to depict shadows, reflections, refraction and other lighting effects, but it works very slowly and therefore is not suitable for games. In addition, the raytracing algorithm is easily parallelized: how many processors there are, exactly as many times there will be acceleration.
The idea of the algorithm
Imagine that the monitor behind which you are sitting is this window, and outside the window is some sort of scene. The color of each pixel on the monitor is the color of the beam that comes out of the eye, passes through that pixel and collides with the scene. To find out the color of each pixel, you need to launch a ray through each pixel and find out where this ray collides with the scene. Hence the name of the algorithm: ray-tracing - ray tracing.
It turns out that it is enough to write a function that, by the coordinates of the ray - two points in space - calculates the color of the surface where that ray falls. What situations need to be considered? There are at least three:
- Normal surface. When a beam collides with such, it can be said that the color of the beam is the color of this surface. This is the easiest case.
- Reflection. The beam can get into the mirror and reflect at the same angle. To handle this situation, you must be able to reflect the beam.
- Refraction. The beam can pass through the edge of two media, for example, from air to water. When moving from one medium to another, the beam is refracted. This phenomenon is called refraction.
Each of these situations is easily handled, so writing a reystrayser is not difficult.
Scene
On the stage there are two types of objects: objects that need to be drawn on the screen and light sources. For simplicity, there will be only spheres, cubes (parallelepipeds) and point sources of light that shine evenly in all directions around them. Any subject should be able to do three things or, in other words, have three methods:
- norm (p) finds the normal to the surface of the object at point p. The normal is outward and has a length of 1.
- color (p) says what color is on the surface of the object at point p.
- trace (ray) goes along the ray of ray and stops where the ray crosses the surface of the object. This method returns the intersection coordinates and the distance from the beginning of the ray to the intersection point.
These are the methods of the sphere:
sphere.norm = function(at) { return vec.mul(1 / this.r, vec.sub(at, this.q)) } sphere.trace = function(ray) { var a = ray.from var aq = vec.sub(a, this.q) var ba = ray.dir var aqba = vec.dot(aq, ba) if (aqba > 0) return var aq2 = vec.dot(aq, aq) var qd = aq2 - this.r * this.r var D = aqba * aqba - qd if (D < 0) return var t = qd > 0 ? -aqba - Math.sqrt(D) : -aqba + Math.sqrt(D) var sqrdist = t * t var at = vec.add(a, vec.mul(t, ba)) return {at:at, sqrdist:sqrdist} } sphere.color = function(p) { return [1, 0, 0] // red color } The meaning of the individual notation, like this.q, is not important now: you can easily write your function sphere.trace. The only important thing is that writing these three methods is quite simple. Similarly described cube.
Raytracer
We now turn to the raytracer code. It has several basic functions:
- trace (ray) goes along the ray of ray and stops where the ray crosses an object. In other words, this function finds the nearest intersection of the beam with the object. trace returns the intersection coordinates and the distance to it, as well as a link to the item with whom they crossed. I wrote the eu function like this:
rt.trace = function(ray) { var p for (var i in rt.objects) { var obj = rt.objects[i] var ep = obj.trace(ray) if (ep && (!p || ep.sqrdist < p.sqrdist)) { p = ep p.owner = obj } } return p } - inshadow (p, lightpos) checks whether the point p is in the shade from the light source at the point lightpos. In other words, this function checks if the lightpos shines on p. Here is its code:
rt.inshadow = function(p, lightpos) { var q = rt.trace(rt.ray(lightpos, p)) return !q || vec.sqrdist(q.at, p) > math.eps }
In the first step, the function releases a ray from lightpos to point p and looks where this ray crosses objects. In the second step, the function checks whether the intersection point coincides with the point p. If it does not match, then the ray of light did not get to p. - color (ray) releases a ray of ray and looks at where it encounters objects. At the collision point, it recognizes the color of the surface and returns it. Here is its code:
rt.color = function( r ) { var hit = rt.trace( r ) if (!hit) return rt.bgcolor hit.norm = hit.owner.norm(hit.at) var surfcol = rt.diffuse(r, hit) || [0, 0, 0] var reflcol = rt.reflection(r, hit) || [0, 0, 0] var refrcol = rt.refraction(r, hit) || [0, 0, 0] var m = hit.owner.mat // material return vec.sum ( vec.mul(m.reflection, reflcol), vec.mul(m.transparency, refrcol), vec.mul(m.surface, surfcol) ) }
First, the function finds the point of collision of the beam with the nearest object and calculates the normal to the surface at this point (if no such point was found, then the beam passed by all the objects and you can return the background color, say black). At the collision point, the color is summed up in three parts:- diffuse - the color of the surface itself, taking into account the angles at which this point is illuminated by light sources and the angle at which the ray r fell on it.
- reflection - the color of the reflected beam.
- refraction - color of the refracted ray.
These three parts are summed up with weighting factors: the color of the surface of the surfcol has a weight of m.surface, the color of the reflected beam reflcol is m.reflection, the color of the refracted ray is m.transparency. The sum of the weight coefficients is equal to 1. For example, if the transparency is m.transparency = 0, then there is no point in considering refraction.
It remains to consider ways to calculate the color at a point. There are different approaches to the implementation of the functions diffuse, reflection and refraction. I will review a few of them.
Lambert model
This is a model for calculating the color of the surface, depending on how the source of color shines on it. According to this model, the illumination of a point is equal to the product of the power of the light source and the cosine of the angle at which it shines by the point. Let's write the diffuse function using the Lambert model:
rt.diffuse = function(r, hit) { var obj = hit.owner var m = obj.mat var sumlight = 0 for (var j in rt.lights) { var light = rt.lights[j] if (rt.inshadow(hit.at, light.at)) continue var dir = vec.norm(vec.sub(hit.at, light.at)) var cos = -vec.dot(dir, hit.norm) sumlight += light.power * cos } return vec.mul(sumlight, obj.color) } The function iterates over all light sources and checks if the hit point is in the shadow. If it is in the illuminated area, then the vector dir is calculated - the direction from the light source to the hit point. The function then finds the cosine of the angle between the normal hit.norm to the surface at hit and the direction dir. This cosine is equal to the scalar product dir • hit.norm. Finally, the function finds the illumination according to Lambert: light.power • cos.
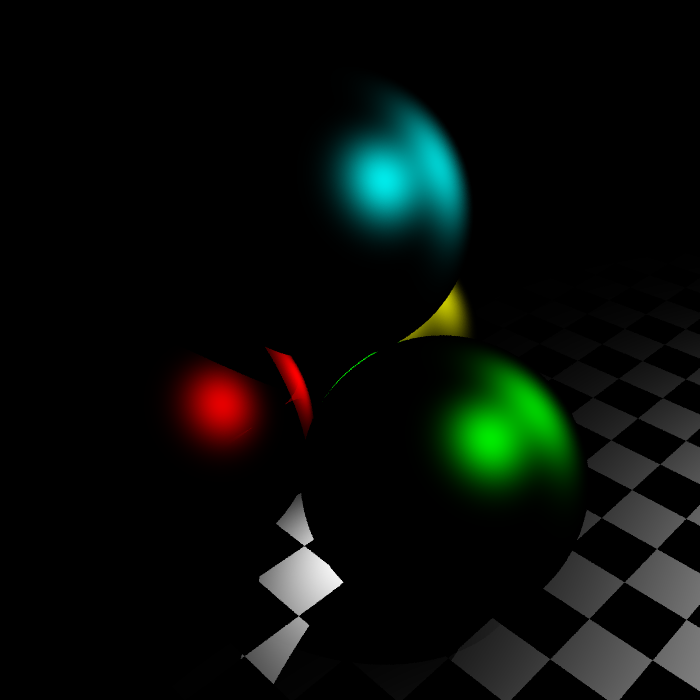
This is what happens if you apply only this lighting model:
Phong model
The Phong model, like the Lambert model, describes the point lighting. Unlike the Lambert model, this model takes into account the angle at which we look at the surface. Phong illumination is calculated as follows:
- We draw a beam from a light source to the point in question on the surface and reflect this beam from the surface.
- Find the cosine of the angle between the reflected beam and the direction in which we are looking at the surface.
- We build this cosine to a certain degree and multiply the resulting number by the power of the light source.
According to this model, the apparent illumination of a point on the surface will be maximum if we see a reflection of a light source in this surface, i.e. It is reflected directly in the eyes. Corresponding diffuse code:
rt.diffuse = function(r, hit) { var obj = hit.owner var m = obj.mat var sumlight = 0 for (var j in rt.lights) { var light = rt.lights[j] if (rt.inshadow(hit.at, light.at)) continue var dir = vec.norm(vec.sub(hit.at, light.at)) var lr = vec.reflect(dir, hit.norm) var vcos = -vec.dot(lr, r.dir) if (vcos > 0) { var phong = Math.pow(vcos, m.phongpower) sumlight += light.power * phong } } return vec.mul(sumlight, obj.color) } This is how it looks like:
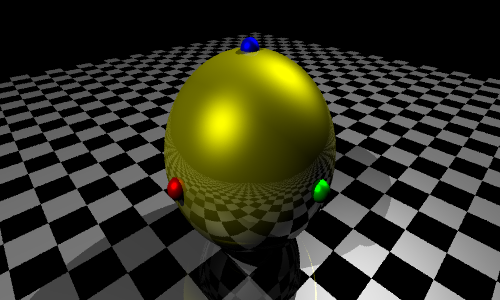
It can be seen that one Phong is not enough for good lighting, but if you take Phong lighting with one weighting factor and add Lambert lighting to it with another weighting, you get this picture:
I don’t give the code for the corresponding diffuse function: it is a combination of the previous two diffuse and can be found in the rt.js file in the example.
Reflection
To calculate the color of the reflected beam, you need to reflect this beam from the surface using the normal vector and run the already written function rt.color for the reflected beam. Here there is only one subtlety: the surface does not reflect all the energy of the beam, but only a certain percentage, therefore we add to the beam, in addition to the coordinates of the beginning and direction, also energy. This parameter will say whether it is still relevant to calculate the color of the beam, because if the energy is small, then the color of the beam, whatever it is, will make a small contribution to the total color obtained in rt.color.
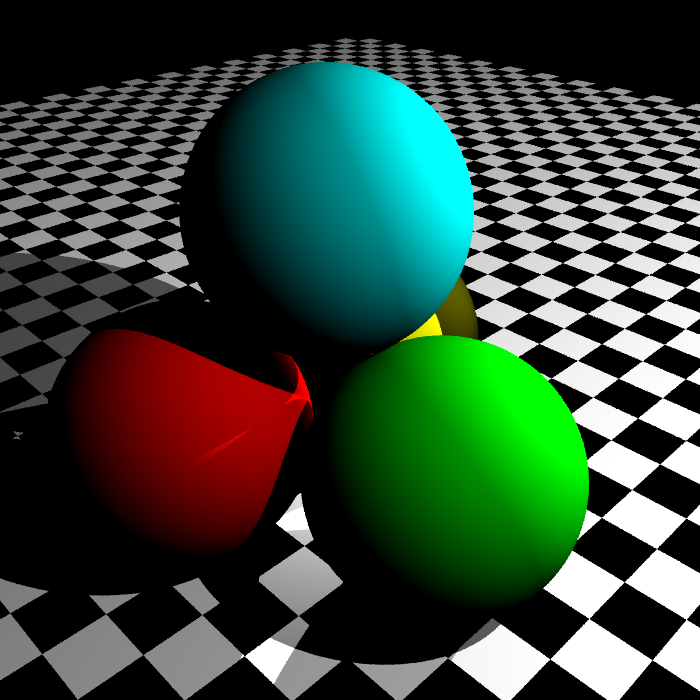
rt.reflection = function(r, hit) { var refl = hit.owner.mat.reflection if (refl * r.power < math.eps) return var q = {} q.dir = vec.reflect(r.dir, hit.norm) q.from = hit.at q.power = refl * r.power return rt.color(q) } vec.reflect = function(a, n) { var an = vec.dot(a, n) return vec.add(a, vec.mul(-2 * an, n)) } Now each object should have a reflection coefficient - it shows how much of the beam energy is reflected from the surface. After writing this function, you get this picture:

Refraction
When a beam of light passes from one medium to another, it is refracted. You can read about it in Wikipedia . The implementation of refraction is almost the same as the reflection:
rt.refraction = function(r, hit) { var m = hit.owner.mat var t = m.transparency if (t * r.power < math.eps) return var dir = vec.refract(r.dir, hit.norm, m.refrcoeff) if (!dir) return var q = {} q.dir = dir q.from = hit.at q.power = t * r.power return rt.color(q) } vec.refract = function(v, n, q) { var nv = vec.dot(n, v) if (nv > 0) return vec.refract(v, vec.mul(-1, n), 1/q) var a = 1 / q var D = 1 - a * a * (1 - nv * nv) var b = nv * a + Math.sqrt(D) return D < 0 ? undefined : vec.sub(vec.mul(a, v), vec.mul(b, n)) } Now every object has a coefficient of transparency - the fraction of light that it passes through the surface, and the coefficient of refraction - the number involved in the calculation of the direction of the refracted beam.

Fresnel coefficient
The amount of reflected light depends on the angle at which the beam falls on the surface and the refractive index. Formula can be viewed in Wikipedia . I did not take into account this effect in the raytracer, because it made subtle changes.
Smoothing
If one ray is run through each pixel, the lines are smooth in three-dimensional space will appear to be stepped on the screen after design. To avoid this, you can run several rays through each pixel, read each color and find the average between them.
Example
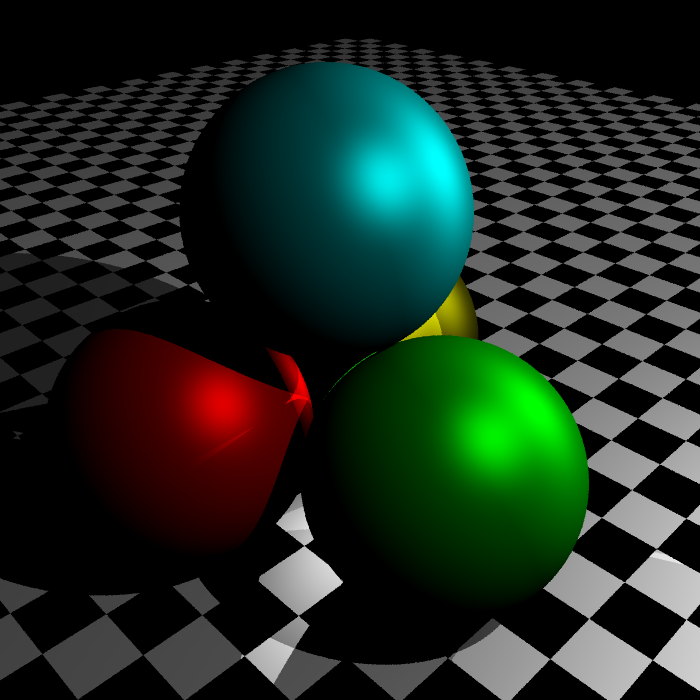
Here, the picture is 1000 × 1000 (RPS means Rays Per Second - the number of rays that the browser manages to calculate in one second), and here another picture is 800 × 800 . An example can be downloaded from this link . I compared the rendering speed in different browsers. It turned out the following:
| Opera | 33,000 RPS |
| Chrome | 38,000 RPS |
| Firefox | 16,000 RPS |
| Explorer | 20,000 RPS |
| Safari | 13,000 RPS |
I used the most recent version of browsers on February 5th, 2011.
What is not in this raytracer?
I looked at the basic features of the ray tracer. What if the object is in front of the mirror and you shine in the mirror? The back side of the subject will be illuminated by the reflected light. What if you shine a glass ball? It will collect the rays of light as a lens and on the stand under it will be a bright spot. What if there is only a small window in the room through which the light enters? The whole room will be weak, but lit. The raytracer does not know how to do this, but it is not difficult to add it, because the main idea of the raytracer allows this.
You can see that to calculate all the functions - lighting according to Lambert, Phong, reflection and refraction - all they need is the ability to add vectors, multiply them by a number and find the scalar product. These operations on vectors do not depend on the dimension of the space, so it is possible to write a four-dimensional raytracer, making some changes to the code.
Source: https://habr.com/ru/post/112944/
All Articles