We process pictures with Photoshop and ExtendScript Toolkit
Often we need to do something with a pack of pictures. There are several ways to achieve this:
Photoshop has a COM API in which many of the Photoshop features are covered. It can, of course, be used from JS or VBS scripts. Adobe has kindly provided its IDE to the developers, with autocomplete and breakpoint. Its supported languages are JScript, VBScript (Win) and AppleScript (Mac). I stopped at JScript, because the majority will be best understood it.
Her name is ExtendScript Toolkit. Here she is: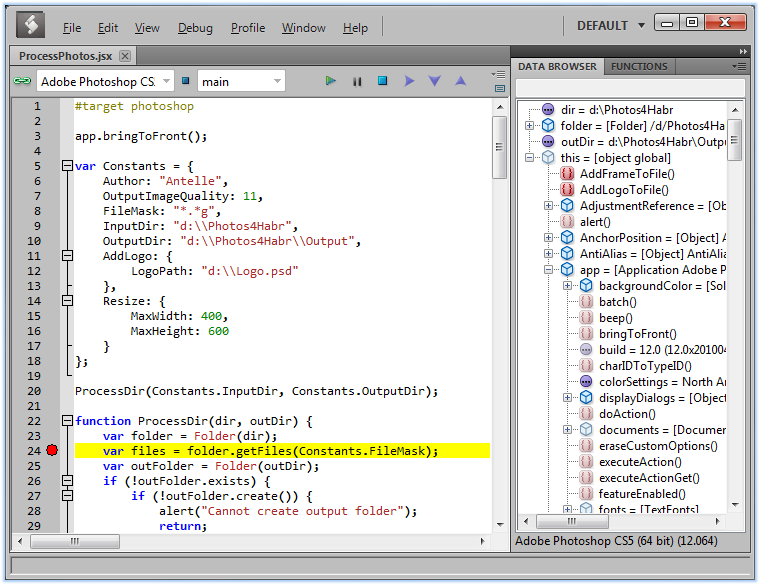
What struck me about her:
It's nice that jsx can be compiled (File → Export as binary), and a file with jsxbin extension will be created. Its content will be something like this:
So, at first glance, IDE is uncomfortable, but after working there for about 30 minutes, you get used to it.
It begins with the phrase
There are tools for working with the file system, support for sockets, reflection, XML. The class Object is.
To connect to Photoshop, there is a global app object, ActiveXObject is not necessary. The active document in it is app.activeDocumet. The alert function displays a message in Photoshop.
When the error falls, nothing happens, the script silently stops execution, as if it did not exist at all.
I liked how the measurements (px, pt, cm, mm) are converted into each other:
')
Task: there are 100 files in the folder. It is necessary to introduce in each of them the logo, which is in the PSD-file.
Example logo:
Here is the script:
An example of what happens:

Fully scripted on pastebin .
The most delicious thing in Photoshop is blending options! And they are just not in the API. There is copyLayerStyle, but it does not work correctly even from the GUI (you can check this by playing with the drop shadow parameters). Therefore, of course, we can insert the logo, but the result will not greatly exceed the same ImageMagick.
UPD: there are two ways to quickly and easily apply styles from a script:
After reading the docks (you can find them in% ProgramFiles% Adobe \ Adobe Photoshop CS5 \ Scripting \ Documents \), we learn that it turns out Photoshop can record user actions. For this you need:
But, having executed this code, we will find out that it works.
You can find that executeAction can either show a dialog to the user, or do its work silently (this defines the last parameter). The IDs themselves are not described anywhere, we can only guess about them (as well as what will happen to them in CS6).
However, the feature of logging actions is quite interesting, if you really need to, you can quickly add a script for yourself.
At the same time I wrote these functions:
API is delicious, very tasty. But the lack of support for the blending options is very depressing; if you need them, be prepared for messing with the scary code. If all you need (which is exactly what is needed in most cases from batch processing) is to frame a picture, I think ImageMagick will be faster and much more convenient in this case.
 filters, histograms
RAW
color profiles, as in Photoshop
javascript is a convenient language that almost everyone can understand.
documentation with examples
 lack of blending options
for work you need Photoshop / * suddenly * /
works rather slowly
Adobe Photoshop Scripting - official resource
Scripting Photoshop - a small but useful scraping tutorial in Photoshop
PS-Scripts - Photoshop scripts forum
As an exercise, a script is suggested that can really come in handy: make the logo on the photo be added in the same color scheme as the photo — for example, blue or yellow for the blue-yellow photo: this will make the logo not spoiling the overall color and mood of the photo . The logo should not merge with the color, i.e. don't be blue on blue. In addition, it will be cool if the logo is not on the surface like grass, you can try to move it to another corner or repaint.
- using ImageMagick is a very handy console utility that knows how to
- on The GIMP - there is a Scheme (lisp-a dialect) and Python
- standard tools: PHP + gd / Powershell + System.Drawing / Python + PIL
- in photoshop on JScript, VBScript or AppleScript
We will need
- Adobe Photoshop CS5 (can CS4)
- Adobe ExtendScript Toolkit (included in the Photoshop distribution)
- JScript knowledge
- Some photos
Theory
Photoshop has a COM API in which many of the Photoshop features are covered. It can, of course, be used from JS or VBS scripts. Adobe has kindly provided its IDE to the developers, with autocomplete and breakpoint. Its supported languages are JScript, VBScript (Win) and AppleScript (Mac). I stopped at JScript, because the majority will be best understood it.
IDE
Her name is ExtendScript Toolkit. Here she is:
What struck me about her:
- the default is not monospaced font, but some kind of rubbish. Immediately fixed
- No watch-s. For this it is necessary to execute. Their role is performed by the data browser and javascript console
- out of habit, pressed ctrl-D (copies the line in Resharper) - and lo and behold, it works!
- there is profiling
- The help is, on a content tolerable, but to the level msdn falls short.
It's nice that jsx can be compiled (File → Export as binary), and a file with jsxbin extension will be created. Its content will be something like this:
@JSXBIN@ES@2.0@MyBbyBnAIMVbyBn0AHJWnSo, at first glance, IDE is uncomfortable, but after working there for about 30 minutes, you get used to it.
Scripting language
It begins with the phrase
#target photoshopThere are tools for working with the file system, support for sockets, reflection, XML. The class Object is.
To connect to Photoshop, there is a global app object, ActiveXObject is not necessary. The active document in it is app.activeDocumet. The alert function displays a message in Photoshop.
When the error falls, nothing happens, the script silently stops execution, as if it did not exist at all.
I liked how the measurements (px, pt, cm, mm) are converted into each other:
app.activeDocument.width. as ( "px" );')
Living example
Task: there are 100 files in the folder. It is necessary to introduce in each of them the logo, which is in the PSD-file.
Example logo:
Here is the script:
#target photoshop
app.bringToFront(); // Photoshop. , , .
var Constants = { /* - */ }
ProcessDir(Constants.InputDir, Constants.OutputDir);
function ProcessDir(dir, outDir) {
var folder = Folder(dir); // Adobe-
var files = folder.getFiles(Constants.FileMask); // , (*.jpg,*.png) .
var outFolder = Folder(outDir);
if (!outFolder.exists) {
if (!outFolder.create()) {
alert( "Cannot create output folder" );
return ; //
}
}
var totalFiles = 0;
for ( var fileNum in files) {
var outFile = GetOutputFileName(files[fileNum], outFolder.fullName); //
AddLogoToFile(files[fileNum], outFile); // ,
totalFiles++;
}
alert(totalFiles + " files processed" ); // Photoshop-
}
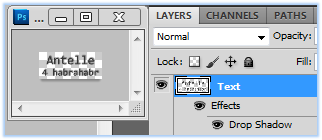
function AddLogoToFile(file, outputFile) {
var photoFile = File(file); // , open
var logoFile = File(Constants.AddLogo.LogoPath);
app.open(logoFile); //
app.activeDocument.artLayers[ "Text" ].copy(); // ArtLayers – . "Text"
var logoWidth = app.activeDocument.width. as ( "px" );
var logoHeight = app.activeDocument.height. as ( "px" );
app.activeDocument.close();
app.open(photoFile); //
var width = app.activeDocument.width. as ( "px" );
var height = app.activeDocument.height. as ( "px" );
var logoLayer = app.activeDocument.artLayers.add(); // ,
logoLayer.name = "Logo" ; //
app.activeDocument.paste(); // clipboard
var shape = [ // Photoshop ; ,
[(width - logoWidth) / 2, (height - logoHeight) / 2],
[(width - logoWidth) / 2, (height + logoHeight) / 2],
[(width + logoWidth) / 2, (height + logoHeight) / 2],
[(width + logoWidth) / 2, (height - logoHeight) / 2]
];
app.activeDocument.selection.select(shape);
app.activeDocument.selection.translate( // selection
new UnitValue((width - logoWidth)/ 2, "px" ),
new UnitValue((height - logoHeight) / 2, "px" ));
var minImageDimension = Math.min(width, height); // , 5
var logoScaleMultiplier = minImageDimension / 5 / logoWidth * 100;
app.activeDocument.selection.resize(logoScaleMultiplier, logoScaleMultiplier, AnchorPosition.BOTTOMRIGHT); //
app.activeDocument.selection.deselect();
app.activeDocument.artLayers[ "Logo" ].opacity = 75; //
app.activeDocument.artLayers[ "Logo" ].blendMode = BlendMode.LUMINOSITY; // ,
// blending options! .
SaveFile(outputFile); //
}
function SaveFile(outputFile) {
var isPng = /png$/i.test(outputFile);
var saveOptions;
if (isPng) {
saveOptions = new PNGSaveOptions();
} else {
saveOptions = new JPEGSaveOptions(); /* */
}
app.activeDocument.saveAs(File(outputFile), saveOptions, true , Extension.LOWERCASE)
app.activeDocument.close(SaveOptions.DONOTSAVECHANGES); //
}An example of what happens:
Fully scripted on pastebin .
About sad
The most delicious thing in Photoshop is blending options! And they are just not in the API. There is copyLayerStyle, but it does not work correctly even from the GUI (you can check this by playing with the drop shadow parameters). Therefore, of course, we can insert the logo, but the result will not greatly exceed the same ImageMagick.
UPD: there are two ways to quickly and easily apply styles from a script:
- writing Action with these settings and executing it (thanks for the hint serge2 )
- save the style in preset (using the “New Style” button in the “Blending Options” dialog)
Little about undocumented api
After reading the docks (you can find them in% ProgramFiles% Adobe \ Adobe Photoshop CS5 \ Scripting \ Documents \), we learn that it turns out Photoshop can record user actions. For this you need:
- Copy the file “ScriptListener.8li” from% ProgramFiles% Adobe \ Adobe Photoshop CS5 \ Scripting \ Utilities \ to% ProgramFiles% Adobe \ Adobe Photoshop CS5 \ Plug-ins \ Automate \
- (re) run Photoshop
- Make the action you want to know
- Find ScriptListener.jsx and ScriptListener.vbs files on your desktop
- Do not forget to remove ScriptListener.8li (it slows down the work of Photoshop)
var idsetd = charIDToTypeID( "setd" );
var desc15 = new ActionDescriptor();
var idnull = charIDToTypeID( "null" );
var ref6 = new ActionReference();
var idPrpr = charIDToTypeID( "Prpr" );
var idLefx = charIDToTypeID( "Lefx" );
ref6.putProperty( idPrpr, idLefx );
var idLyr = charIDToTypeID( "Lyr " );
var idOrdn = charIDToTypeID( "Ordn" );
var idTrgt = charIDToTypeID( "Trgt" );
ref6.putEnumerated( idLyr, idOrdn, idTrgt );
desc15.putReference( idnull, ref6 );
var idT = charIDToTypeID( "T " );
var desc16 = new ActionDescriptor();
var idScl = charIDToTypeID( "Scl " );
var idPrc = charIDToTypeID( "#Prc" );
desc16.putUnitDouble( idScl, idPrc, 100.000000 );
var idDrSh = charIDToTypeID( "DrSh" );
var desc17 = new ActionDescriptor();
var idenab = charIDToTypeID( "enab" );
desc17.putBoolean( idenab, true );
var idMd = charIDToTypeID( "Md " );
var idBlnM = charIDToTypeID( "BlnM" );
var idMltp = charIDToTypeID( "Mltp" );
desc17.putEnumerated( idMd, idBlnM, idMltp );
var idClr = charIDToTypeID( "Clr " );
var desc18 = new ActionDescriptor();
var idRd = charIDToTypeID( "Rd " );
desc18.putDouble( idRd, 0.000000 );
var idGrn = charIDToTypeID( "Grn " );
desc18.putDouble( idGrn, 0.000000 );
var idBl = charIDToTypeID( "Bl " );
desc18.putDouble( idBl, 0.000000 );
var idRGBC = charIDToTypeID( "RGBC" );
desc17.putObject( idClr, idRGBC, desc18 );
var idOpct = charIDToTypeID( "Opct" );
var idPrc = charIDToTypeID( "#Prc" );
desc17.putUnitDouble( idOpct, idPrc, 75.000000 );
var iduglg = charIDToTypeID( "uglg" );
desc17.putBoolean( iduglg, true );
var idlagl = charIDToTypeID( "lagl" );
var idAng = charIDToTypeID( "#Ang" );
desc17.putUnitDouble( idlagl, idAng, 120.000000 );
var idDstn = charIDToTypeID( "Dstn" );
var idPxl = charIDToTypeID( "#Pxl" );
desc17.putUnitDouble( idDstn, idPxl, 5.000000 );
var idCkmt = charIDToTypeID( "Ckmt" );
var idPxl = charIDToTypeID( "#Pxl" );
desc17.putUnitDouble( idCkmt, idPxl, 0.000000 );
var idblur = charIDToTypeID( "blur" );
var idPxl = charIDToTypeID( "#Pxl" );
desc17.putUnitDouble( idblur, idPxl, 5.000000 );
var idNose = charIDToTypeID( "Nose" );
var idPrc = charIDToTypeID( "#Prc" );
desc17.putUnitDouble( idNose, idPrc, 0.000000 );
var idAntA = charIDToTypeID( "AntA" );
desc17.putBoolean( idAntA, false );
var idTrnS = charIDToTypeID( "TrnS" );
var desc19 = new ActionDescriptor();
var idNm = charIDToTypeID( "Nm " );
desc19.putString( idNm, "Linear" );
var idShpC = charIDToTypeID( "ShpC" );
desc17.putObject( idTrnS, idShpC, desc19 );
var idlayerConceals = stringIDToTypeID( "layerConceals" );
desc17.putBoolean( idlayerConceals, true );
var idDrSh = charIDToTypeID( "DrSh" );
desc16.putObject( idDrSh, idDrSh, desc17 );
var idLefx = charIDToTypeID( "Lefx" );
desc15.putObject( idT, idLefx, desc16 );
executeAction( idsetd, desc15, DialogModes.NO );But, having executed this code, we will find out that it works.
You can find that executeAction can either show a dialog to the user, or do its work silently (this defines the last parameter). The IDs themselves are not described anywhere, we can only guess about them (as well as what will happen to them in CS6).
However, the feature of logging actions is quite interesting, if you really need to, you can quickly add a script for yourself.
More scripts
At the same time I wrote these functions:
- resizing images to a certain size (width is not more than X, height is not more than Y)
- adding frames to the pictures - the same as in this topic
Interesting Facts
- API has support for RAW. After you have processed the RAW files in Photoshop, saving the settings to them, you can quickly convert them to JPEG
- in contrast to the blending options, the filters are presented in the API quite well, for each of them there is a function
- code in jsx files can be hung on events in Photoshop: for example, when opening a file, add a new layer to it, and so on
- The API is for both Illustrator and Bridge.
- from the API there is access to the histogram and to the channels
findings
API is delicious, very tasty. But the lack of support for the blending options is very depressing; if you need them, be prepared for messing with the scary code. If all you need (which is exactly what is needed in most cases from batch processing) is to frame a picture, I think ImageMagick will be faster and much more convenient in this case.
+ / -
filters, histograms RAW color profiles, as in Photoshop javascript is a convenient language that almost everyone can understand. documentation with examples lack of blending options for work you need Photoshop / * suddenly * / works rather slowlyRead
Adobe Photoshop Scripting - official resource
Scripting Photoshop - a small but useful scraping tutorial in Photoshop
PS-Scripts - Photoshop scripts forum
To think
As an exercise, a script is suggested that can really come in handy: make the logo on the photo be added in the same color scheme as the photo — for example, blue or yellow for the blue-yellow photo: this will make the logo not spoiling the overall color and mood of the photo . The logo should not merge with the color, i.e. don't be blue on blue. In addition, it will be cool if the logo is not on the surface like grass, you can try to move it to another corner or repaint.
Source: https://habr.com/ru/post/112907/
All Articles