Cartographic capabilities of Samsung Bada, part 2
Bada cartography - from hard to easy
Hello! Today I wrote a topic dedicated to solving the problem of downloading a map to a smartphone from Bada and some simple manipulations with it. Frankly, the method is complex, requiring an abundance of code and at the same time the card itself does not indulge in detail. Fortunately, there is a way to make the same thing simpler, and at the same time kill two woodcocks with one cartridge - use Google’s detailed maps (or Yandex — is this why Google is halfway ahead of Yandex in Ukraine?) And at the same time, manipulations with the map are provided in a simpler way - familiar javascript.
(For newbies in Bada there is my first topic )
Let's get started
Idea
')
The idea will be as follows - we will use the capabilities of the Bada HTTP components, loading the real Google Maps on the form and displaying it with the existing control.
Implementation
Let's create a form-based application, go to the form header file and immediately add the “FWeb.h” file to the include section, which will provide us with the ability to use HTTP components. Then, in the private section of the form class, we will declare a link to the Web browser as
Osp::Web::Controls::Web *__pWeb; Now back to the implementation of the form class and declare a namespace there:
using namespace Osp::Web::Controls; Do not forget to initialize __pWeb in the form constructor.
Almost done:)
Find a method here
OnInitializing(void) and there we will create a browser so that it occupies the entire client area of the form (GetClientAreaBounds () method), add it to the form and load some URL into it: __pWeb = new Web(); r = __pWeb->Construct( GetClientAreaBounds()); AddControl(*__pWeb); __pWeb->LoadUrl(L"http://www.google.com"); Already for the sake of interest, you can start the application and see how it looks. I have this:

Here you can go with your html file. In the Res project folder we place the file test_map.html with the following content (for a simple description of the Google Maps API features you can contact here , thanks to the author!):
<html> <head> <script type="text/javascript" src="http://maps.google.com/maps/api/js?sensor=false"></script> <script type="text/javascript"> var map; function initialize() { var latlng = new google.maps.LatLng(48, 37.8); var myOptions = { zoom: 8, center: latlng, mapTypeId: google.maps.MapTypeId.ROADMAP }; map = new google.maps.Map(document.getElementById("map_canvas"), myOptions); } </script> </head> <body onload="initialize()"> <div id="map_canvas" style="width:100%; height:100%"></div> </body> </html> and modify the previous call to loadUrl so that it points to test_map.html:
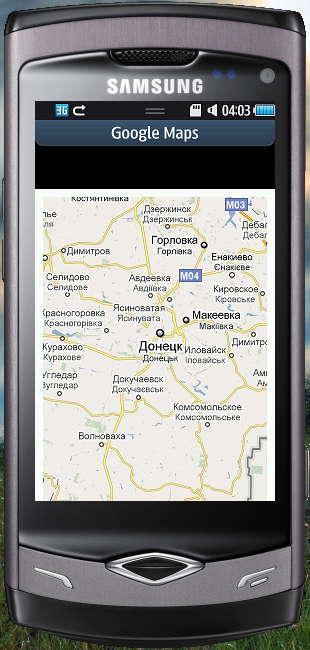
__pWeb->LoadUrl(L"/Res/test_map.html"); Run the simulator and admire the result:
How to do something with this card? Simply:)
Add a softkey to the form (SoftKey) - the details can be found in my previous articles - and assign an identifier and a “listener” to the button press event for it.
SetSoftkeyActionId(SOFTKEY_0,ID_ZOOM_IN); AddSoftkeyActionListener(SOFTKEY_0,*this); Previously, the ID_ZOOM_IN constant must be declared in the ptotected section of the form class.
The handler for clicking on this button will be in the form method actionPerformed, where you need to analyze the actionId parameter. Do it this way:
void FormGoogleMapBada::OnActionPerformed(const Osp::Ui::Control& source, int actionId) { switch(actionId) { case ID_ZOOM_IN: { Zoom++; __pWeb->EvaluateJavascriptN(L"map.setZoom("+Integer::ToString(Zoom)+");"); } break; default: break; } } (And I know, of course, what printf formatting is :)))
The only explanation is simple - the EvaluateJavascriptN function also works like the eval function from JavaScript, executing the string as code.
Run and see (for comparison, see the screenshot above):

In my opinion, a much more flexible and powerful way to use maps in Bada, unlike the standard one. Even in spite of the fact that an intermediate layer is used here for display — a web browser — and on the simulator and on the smartphone I did not feel the difference in speed. And the cool Google Maps API speaks for itself.
UPD: Forgot ... You can download an example here .
Source: https://habr.com/ru/post/112451/
All Articles