Cartographic capabilities of Samsung Bada
Preliminary notes
Hello. It will be about how to create a simple application for the Samsung Bada mobile platform that allows you to display a map on the screen of a smartphone, perform manipulations with it, and solve simple tasks. The beginning of development for Bada is described by me here .
Preliminary actions
The provider of map data for smartphones from Bada is not ... Google. (For me, after the Android world, this was a bit of a shock, and I felt some discomfort and immediately thought how easily we get used to the little things and how powerful virtual things are (I remembered the topic on Habré’s outraged users that Google removed its reader’s link from the home page ) However, I digress ...
')
Article built this way. First, the overall task of displaying a map with a minimum of functionality is solved to give an idea of the very logic of the SDK developers, and then a small but useful feature will be added. This approach is due to the fact that I spent quite a few hours before among the wilds of cunning and wise C ++ in examples and documentation to isolate the actual number of those actions that need to be taken for "initial acquaintance", and only then move on.
So, before programming, we need to perform a number of additional actions. First of all, register on the site of the map data provider for Samsung Bada deCarta (the link does not point to the main page, but directly to DevZone). The site, I must say, is unusual - when I log in with Chrome, I found that the password is entered into the form without the usual asterisks, and the actual response to the purpose of registration — getting a login and password to work with their cards — you have to wait for an email without any hint on this. In general, after registration (it is possible to directly indicate that you intend to work specifically for Bada) about 10 minutes passed after me, after which a letter came in which the login and password was specified, which we will use in the future.
Preliminary actions with the application
Having created a project with the help of BADA IDE form-based project, I immediately deleted a button, kindly added to the form, and its initialization code, which is in the form class method
result SimpleMapForm::OnInitializing(void) 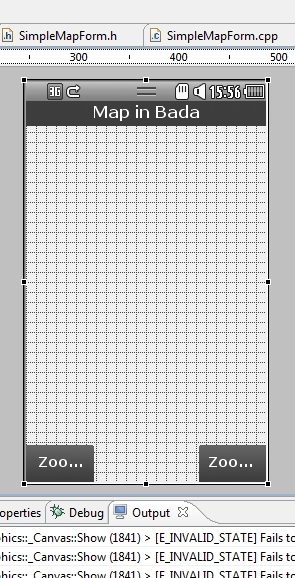
One of the typical tasks when working with a map on mobile devices is scaling, panning, etc. In order to be able to track the user's touch on the screen and interpret them in the map, for the form class I added a link to the “listener” (I don’t like English tracing words, so forgive this homegrown terminology) of these actions
public Osp::Locations::Controls::IMapEventListener in the form header file. The “listener” is declared in the header file <FLocations.h>, which is not present by default and you should remember to add it. In general, this part of the code looks like this: #include <FBase.h> #include <FGraphics.h> #include <FUiControls.h> #include <FApp.h> #include <FLocations.h> class SimpleMapForm : public Osp::Ui::Controls::Form, public Osp::Locations::Controls::IMapEventListener, public Osp::Ui::IActionEventListener { // Construction public: SimpleMapForm(void); virtual ~SimpleMapForm(void); For the added “listener”, it is necessary to define handlers for those events that can be triggered in response to various user manipulations with the map. For now, we will not implement their implementation, but simply add them to the public section of the form class:
// void OnMapMovingStarted(const Osp::Locations::Controls::Map& source){} void OnMapMovingEnded(const Osp::Locations::Controls::Map& source){} void OnMapZoomingStarted(const Osp::Locations::Controls::Map& source, const bool zoomIn){} void OnMapZoomingEnded(const Osp::Locations::Controls::Map& source, const bool zoomIn){} void OnMapDrawCompleted(const Osp::Locations::Controls::Map& source){} // void OnClosingEnded(const Osp::Locations::Controls::IMapInfoWindow& source){} void OnInfoWindowClicked(const Osp::Locations::Controls::IMapInfoWindow& source){} void OnMapClicked(const Osp::Locations::Controls::Map& source, const Osp::Graphics::Point& point, const Osp::Locations::Coordinates& coordinates){} void OnInfoWindowDoublePressed(const Osp::Locations::Controls::IMapInfoWindow& source){} As such, there is no Map GUI component in the IDE, so you will have to add it “in code”.
We will announce the card provider and the card itself in the application. To do this, let’s go back to the header file of the form class and in the private section (this is how the developers recommend, but I haven’t found a clear explanation of why such a detailed specification is added):
protected: private: Osp::Locations::Services::IMapServiceProvider* __pMapSvcProvider; Osp::Locations::Controls::Map* __pMap; Now in the cpp-file of the form class, add the namespace:
using namespace Osp::Locations; using namespace Osp::Graphics; using namespace Osp::Locations::Services; using namespace Osp::Locations::Controls; and initial initialization of the card provider and the card itself in the form class constructor
SimpleMapForm::SimpleMapForm(void): __pMapSvcProvider(null), __pMap(null) { } Now here you can now find the form initialization method.
result SimpleMapForm::OnInitializing(void) and add to it the creation of a provider and a map: const String providerName = L"deCarta"; const String extraInfo = L"ClientName=***;ClientPassword=***;HostUrl=http://developer.kr.dz.decarta.com:80/openls/openls"; const String prefProperty = L"global-mobile"; Coordinates center; Rectangle clientRect = GetClientAreaBounds(); __pMapSvcProvider = static_cast<IMapServiceProvider*>(ProviderManager::ConnectToServiceProviderN(providerName, LOC_SVC_PROVIDER_TYPE_MAP, extraInfo)); __pMap = new Map(); __pMap->Construct(Rectangle(0,0, clientRect.width, clientRect.height), *__pMapSvcProvider); center.Set(48,37.8, 200); __pMap->SetCenter(center, false); __pMap->SetZoomLevel(12.0, false); __pMap->AddMapEventListener(*this); AddControl(*__pMap); The code contains constants with fairly transparent names, the only thing next is that in extraInfo, in the line in the ClientName and ClientPassword sections, you must specify the login and password received by you from deCarta, respectively.
Next, in the clientRect we return the dimensions of the client area of the form (that is, without a header), create a map provider and the map itself, setting its dimensions to be the same size as the form. (I almost forgot, for Rectangle you need to add Osp :: Graphics space). Then, specifying the latitude, longitude and height of the center of the map, we transfer it to the SetCenter method. I set its second parameter, which is responsible for animation effects when working with the map, to false, because even without any animation, the speed of the simulator's operation is, to put it mildly, “not a fountain”. Then in SetZoomLevel we set the desired map scale (the second parameter is also responsible for the animation here), quickly add “listeners” to the map and add it to the form.
At this stage, you can already build the project, run it and see how it looks in Bada.
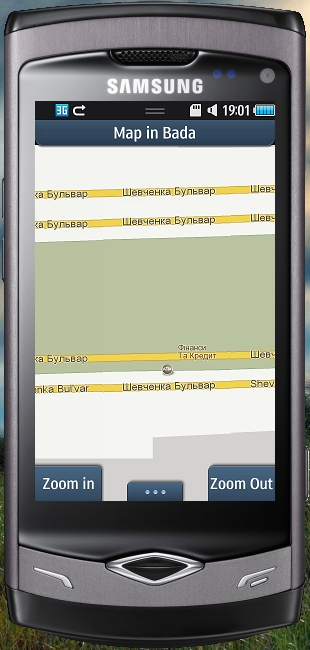
My simulator running the application looks like this:
In principle, quite nice and fairly detailed for a mobile card (we used the const "global-mobile" level of detail). Although, of course, the question of comparing this with maps from Google or Yandex remains open, and it seems that this will be the topic of the next topic.
Although this application already has some functionality - the map can be dragged, let's say - it doesn’t have any special meaning yet and you need some kind of utility for it.
Let the user scale the map - for this we added two soft-keys to the application (it is difficult to choose the corresponding Russian term).
For this, both keys should be assigned an event identifier that will be passed to the handler and the "listener" of this event. Perform this programmatically in method code.
SimpleMapForm::OnInitializing(void) class form. Add the following to it: result SimpleMapForm::OnInitializing(void) { result r = E_SUCCESS; SetSoftkeyActionId(SOFTKEY_0,ID_ZOOM_IN); AddSoftkeyActionListener(SOFTKEY_0,*this); SetSoftkeyActionId(SOFTKEY_1,ID_ZOOM_OUT); AddSoftkeyActionListener(SOFTKEY_1,*this); SetOptionkeyActionId(ID_OPTION_MENU); AddOptionkeyActionListener(*this); You must first return to the header file of the form class and add two constants ID_ZOOM_IN and ID_ZOOM_OUT to it, which will identify touch events on the buttons.
protected: // static const int ID_ZOOM_IN = 701; static const int ID_ZOOM_OUT = 702; With this in mind, we can already handle clicking on the Zoom In and Zoom Out buttons. To do this, in the cpp-file of the form class we find the method
SimpleMapForm::OnActionPerformed(constOsp::Ui::Control& source, int actionId) which is designed to handle all events that occur in the application by analyzing the actionId parameter.
Add the following code to it:
switch (actionId) { case ID_ZOOM_IN: { // float curZoomLevel = __pMap->GetZoomLevel(); if (curZoomLevel == __pMap->GetMaxZoomLevel()) { return; } ++curZoomLevel; if (curZoomLevel > __pMap->GetMaxZoomLevel()) { curZoomLevel = __pMap->GetMaxZoomLevel(); } __pMap->SetZoomLevel(curZoomLevel, true); RequestRedraw(true); // ----------------------------- } break; case ID_ZOOM_OUT:{ // float curZoomLevel = __pMap->GetZoomLevel(); if (curZoomLevel == 1.0) { return; } --curZoomLevel; if (curZoomLevel < 1.0) { curZoomLevel = 1.0; } __pMap->SetZoomLevel(curZoomLevel, true); RequestRedraw(true); //----------------------------- } break; default: break; } The meaning is as follows - the user presses a button, for example, Zoom In; this is followed by the assigned “listener” and the ID_ZOOM_IN constant that we assigned to this event is passed to OnActionPerformed, where we analyze the actionId; then actionId will be set to ID_ZOOM_IN and the corresponding case block will be executed. The code itself, I think, is understandable and hardly needs clarification, since method names have transparent names. The only point is that after changing the scale of SetZoomLevel, we ask the form to “redraw” :)
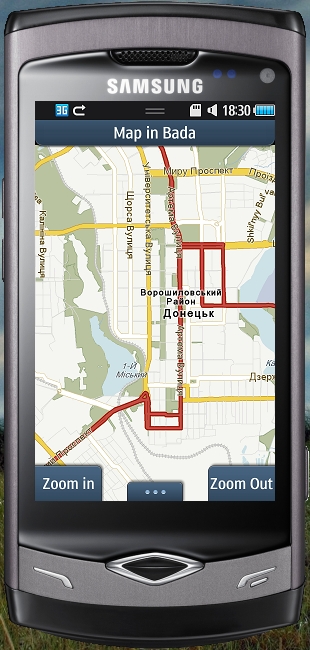
It looks like on the simulator:
1. Initial scale immediately after launch:
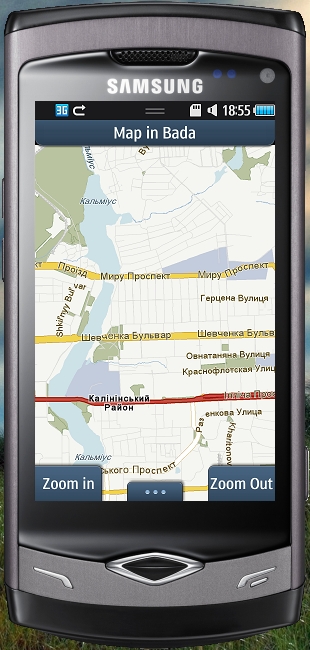
2. After Zoom In:
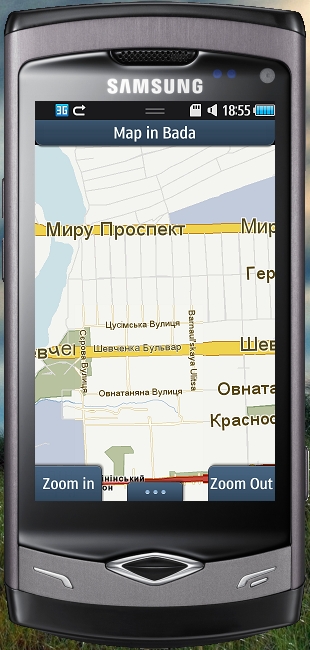
3. And almost the maximum Zoom:
Looking at the last snapshot of the simulator, you can easily notice that there are simply no house numbers (the first time I sat in the hope that they would load), unlike Google Maps or Yandex Maps, and this street is practically the center of Donetsk, although banks and even ATMs carefully marked.
And now almost the final - let's give the user the opportunity to see a certain place on the map according to certain coordinates.
In Bada, there are Popup popup windows that are very similar to MessageBox (what the last one looks like, you can see in my first article), but you can place controls on them, which seems to be quite convenient - you don’t need to create a whole form for a couple of input fields and buttons. We will take advantage of this.
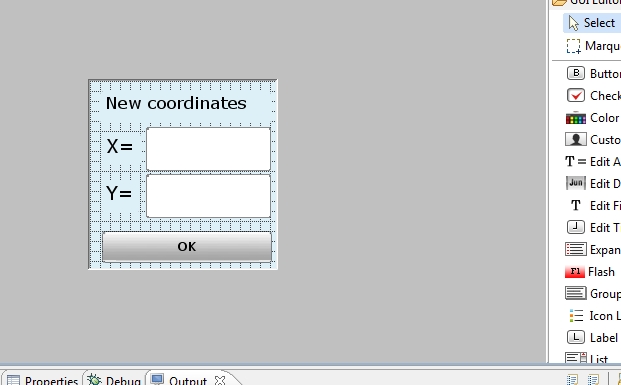
Create a Popup by going to the IDE in the Resources window and on the Popups tree node. Right click and select Open Insert Wizard. For the desired screen resolution, select Popup and click Finish — something like IDP_Popup1 will appear in the Resources. Click on “this” with the left mouse button and see how the visual interface builder opens, onto which, like the form, you can drag controls. I created the following popup:
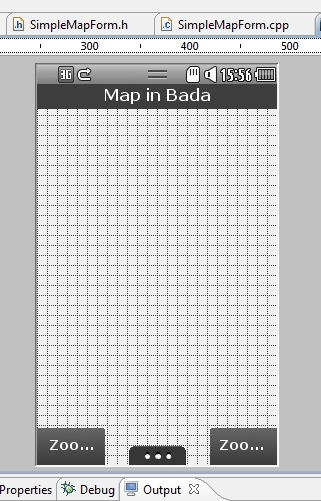
Now add the ability to click on something to make this popup appear. Let's go back to the form and add an optional menu to the form by setting the Show OptionKey property to True. We get something on the form:
For OptionKey, add an event identifier and its “listener” in the method
SimpleMapForm::OnInitializing(void) right after the similar code for Zoom In and ZoomOut, create it and add one item “Change place”: SetOptionkeyActionId(ID_OPTION_MENU); AddOptionkeyActionListener(*this); // __pOptionMenu = new OptionMenu(); __pOptionMenu->Construct(); __pOptionMenu->AddActionEventListener(*this); __pOptionMenu->AddItem(L"Change place",ID_OPTION_MENU_ACTION1); Please note, SetOptionkeyActionId (ID_OPTION_MENU) - Installation ID to display OptionKey, and __pOptionMenu-> AddActionEventListener (* this) and __pOptionMenu-> AddItem (L «Change place», ID_OPTION_MENU_ACTION1) set to "listener" and the identifier is to press the handler at the point OptionKey. Of course, ID_OPTION_MENU and ID_OPTION_MENU_ACTION1 must be added to the header file of the form class.
Below we will create a Popup and do the typical actions with it:
__pPopup = new Popup(); __pPopup->Construct(L"IDP_POPUP_SET_NEW_PLACE"); __pPopup->SetName(L"CommonPopup"); __popupX = static_cast<EditField *>(__pPopup->GetControl(L"IDC_EDITFIELD1")); __popupY = static_cast<EditField *>(__pPopup->GetControl(L"IDC_EDITFIELD2")); __popupButtonOK = static_cast<Button *>(__pPopup->GetControl(L"IDC_BUTTON1")); __popupButtonOK->SetActionId(BUTTON_OK_POPUP); __popupButtonOK->AddActionEventListener(*this); At the same time, I added declarations of all used identifiers to the private section of the form class — it now looks like this
private: Osp::Locations::Services::IMapServiceProvider* __pMapSvcProvider; Osp::Locations::Controls::Map* __pMap; Osp::Ui::Controls::OptionMenu* __pOptionMenu; Osp::Ui::Controls::Popup* __pPopup; // Popup Osp::Ui::Controls::Label* __popupLabelTitle; Osp::Ui::Controls::Label* __popupLabelX; Osp::Ui::Controls::Label* __popupLabelY; Osp::Ui::Controls::EditField* __popupX; Osp::Ui::Controls::EditField* __popupY; Osp::Ui::Controls::Button* __popupButtonOK; Here ... Now let's process the Popup display and the response to closing it in ActionPerformed - let's analyze the actionID accordingly for the ID_OPTION_MENU, ID_OPTION_MENU_ACTION1 and BUTTON_OK_POPUP values.
I did it like this:
case ID_OPTION_MENU:{ // __pOptionMenu->SetShowState(true); __pOptionMenu->Show(); RequestRedraw(true); //------------------------- } break; case ID_OPTION_MENU_ACTION1:{ // 1 - Popup __pPopup->SetShowState(true); __pPopup->Show(); RequestRedraw(true); // --------------------- } break; case BUTTON_OK_POPUP:{ // Coordinates newCenter; String newXStr(__popupX->GetText()); String newYStr(__popupY->GetText()); double newX; double newY; result r1=Double::Parse(newXStr,newX); result r2=Double::Parse(newYStr,newY); newCenter.Set(newX, newY, 200); __pMap->SetCenter(newCenter, false); __pPopup->SetShowState(false); __pPopup->Show(); RequestRedraw(true); //------------------ } Indented something: (
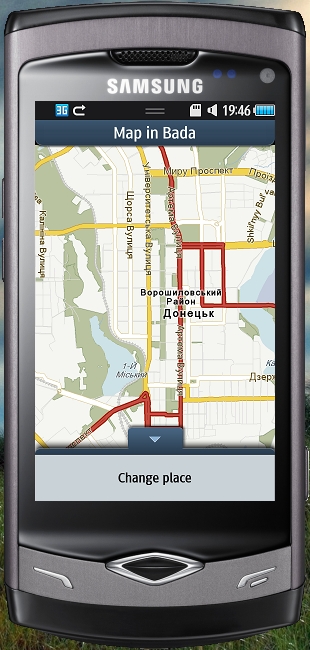
Here, in the end we get the following:
1. Click on OptionKey:
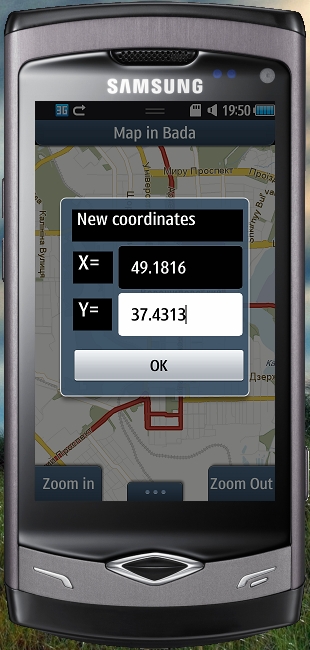
2. Click on the OptionKey button, popup appears and enter coordinates into it (you can overlook the background of the text, this is corrected by choosing the background color):
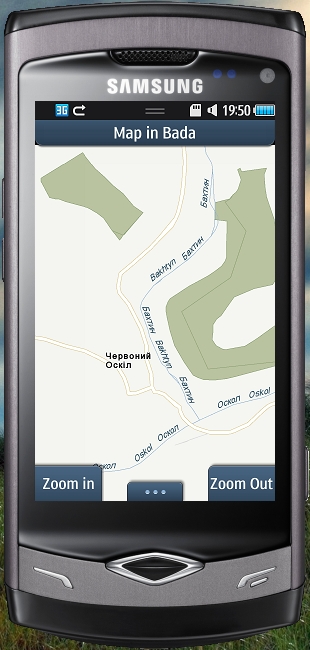
3. And the final is a view of a simulator with a map loaded at the new coordinates:
findings
It is difficult to program for Bada - my subjective opinion after the world of Android and WP7 (my task is more global than the one I described above). The speed of the simulator is not a fountain. Documentation - rather, to demonstrate the possibilities, for real work one has to go into examples. The lion's share of the developers forum is in Korean, although, to be honest, in the English-speaking branch, they answered me quickly. But ... it works !!! And it works quite stably with maps, with SQLite and even with the fact that I studied C ++ myself :)))
Good luck in programming for Bada!
By virtue of my modest abilities I will try to answer questions if such arise.
Thank you very much for your attention.
Source: https://habr.com/ru/post/112334/
All Articles