Unity3D for beginners - Tutorial 1
Foreword
Habralyudi showed some interest in Unity , so I open with this post a cycle of tutorials that highlight the main points of working with an object (a cycle of indefinite duration for now - if someone finds it useful to continue).
Immediately I say - in order to lower the threshold of entry, I will talk with people, who have never done anything like this in life. As the simplest shooter is the easiest to implement the basic functionality, let's start with it. In this lesson we will talk about how to create a land, a sky, a guided character, a camera through which we will look at the sky and the sun and a little about shooting red balls at white cubes. So, go…
Let's get it started
')
Pre-start preparation
To start, download and install Unity itself at the office by selecting a license with a Free price tag . You can also download the thirty-day trial of UnityPro, this is to your taste.
When you first start, the Project Wizard window will appear (you will be empty there):

For general information, you can open the included BootcampDemo, which in Windows is, oddly enough, in “DocumentsAndSettings \ AllUsers \ Documents \ Unity Projects \ Bootcamp Demo”.
To continue our learning, go to the Create New Project tab and check the sets of standard game objects and scripts that we need. We will need
- Character Controller
- Particles
- Physic materials
- Scripts
- Skyboxes
- Terrain assets
- Tree creator
And you can mark all that there can only tick. Reserve pocket does not shake.
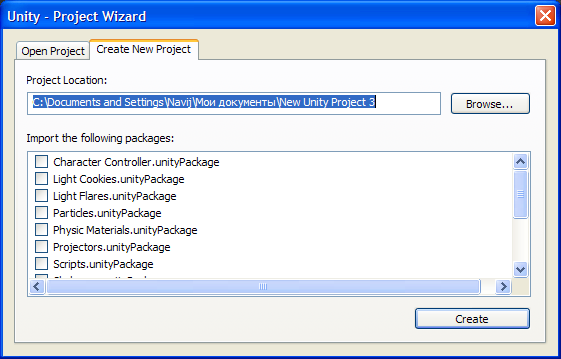
Select the destination folder, click Create and wait until the slow import process is completed. At the end, an empty field for experiments will appear before us:
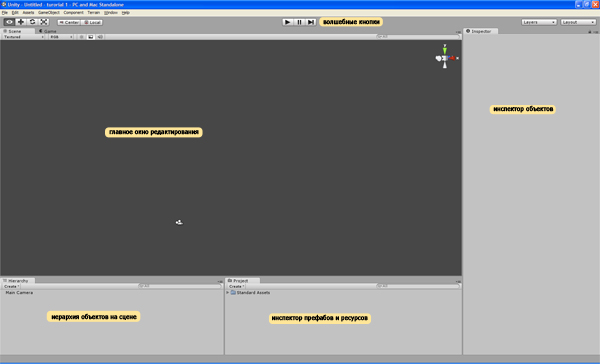
If you briefly go over the captions in the picture, then the inspector of prefabs and resources is the place where the added models, textures, sounds, and the prefabs themselves are stored - the objects saved for further reuse. Those. we have created an enemy object with a model attached to it and a script that controls its behavior, and we want that at each level we do not have to create it again, and that all copies of this object are changed not manually, separately, but all together. In this case, we save it as a prefab, and the next time we need to put the enemy, just drag the prefab to the stage; and changing the prefab changes all its copies.
The hierarchy of objects on the scene is a list of all objects at the current level, showing at the same time the Parent-Child relationship.
The object inspector shows the components and their properties of the currently selected object - model, texture, prefab.
Magic buttons allow you to start the scene right in the editor, drive it for bugs, pause it to check the status of any objects and fine-tune and control by frame-by-frame execution.
In the main editing window, we use all the charms of drag'n'throp for arranging objects in levels.
First, let's see what we already have in the default scene. Sparse, right? The object with the speaking name Main Camera, by clicking on the name of which in the hierarchy we will see the viewport cone and a small window with a view from the camera.
Immediately tell the main editing window controls:
- middle mouse - camera movement left and right (on the inner xy plane)
- left click is understandable, selecting an object (although it is hard to switch between Blender and unit :))
- right click - rotation "head"
- F - centering on the selected object
- dragging an object while holding ctrl - dragging in 1 coordinate increments
Speaking of coordinates, the developers advise you to take 1 unit of gaming space per 1 real meter, and it’s better to stick with it (at least to mess with physics less).
Promised land
But returning to our sheep, we will create a surface on which we will walk. We do not have models yet, so you can simply create a large plane ... But we will create the earth, I mean Terrain - it will be more colored than the bare plane. To do this, select the menu Terrain-> Create Terrain. Voila!
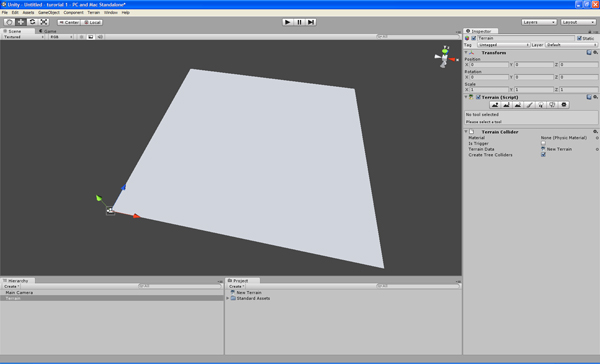
Again, not very impressive. To begin with, we will change the size of the earth fir through Terrain-> Set Resolution. By default, the Length and Width parameters are 2000, i.e. 2 km to 2 km. For test runners, we don’t need that much, so we write 500 and 500 to these fields - more than enough.
Now let's assign a texture to the ground. To do this, select the terrain (in the main window or in the hierarchy), and observe the available properties in the object inspector. There we will see tools for editing terranes (standard ones - raise / lower, smooth, etc.). You can immediately start painting the landscape you need, but at the moment we are interested in the button with a brush. Paint the terrain texture. And on the tab that she opens, the Edit textures button, in the menu, click Add Texture:
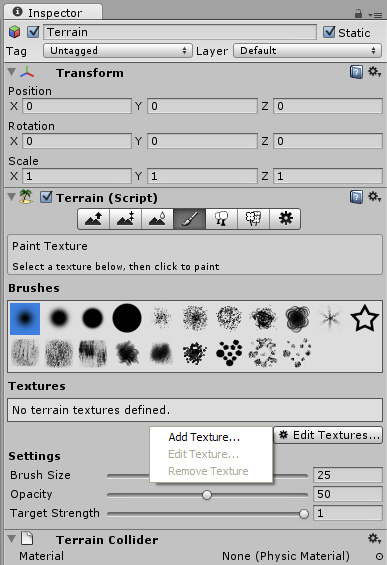
A window opens with parameters for the future texture. We find among them one with the meaning “None (Texture 2d)” and click on the ball with a dot to the right of these words. A selection of textures from those already added to the project resources will open. By the way, to add a texture to a project, simply copy it into the project folder — the unit will pick up everything. The import of everything else is analogous, and deleting a resource from a project means physical deletion from disk.
Select the desired texture, for example Grass (Hill). You can add a few more textures, for example Cliff (Layered Rock), and, using a brush chosen just above, paint at your own discretion. After previous manipulations, it turned out like this:

If at the moment we press the “Play” button at the top of the screen, then you will most likely see a piece of our poorly lit land on a blue background. But it’s not interesting, so before continuing, we need to add lighting on the stage, simulating the sun, and replace the blue background with the sky. Light is added through the main menu, GameObject-> Create other-> Directional light. Then, following the picture, press the button that changes the helper arrows around the selected object on the axis of rotation. For these axes, oddly enough, we rotate the lighting device so that the earth is colored more highlighted.

In order to have a sky instead of a blue canvas over your head, you must specify the skybox texture (skybox - “sky box”, the cube on which the texture is stretched from the inside, usually a panoramic photo of the sky, made in such a way that from the inside it looks like you are surrounded by This is how the sky is drawn in most games. To do this, go to the menu Edit-> Render Settings, find the property "Skybox material" and, as we did with the texture of the earth, click on the circle with a dot to the right of it. We will be shown the materials available in the project (in order not to go into the jungle of terminology, we will assume that the material is a texture and how it will be displayed - it will be transparent, or it will shine, etc.). Choose any with the word skybox, for example sunny2 skybox. Great, now our polygon looks livelier.
Control and camera
I wondered for a long time whether to include in the first tutorial script analysis and writing my camera and control from scratch. And yet decided to postpone it. Today we will simply assemble our character from the already finished pieces, and in the next tutorial I will begin to analyze the scripts.
In fact, Unity includes two game objects that provide a ready-made, already assembled solution for the camera and control. But I’ll not tell you about them yet, so that there is an incentive to collect with my own hands. :)
First, create an object for the player. Rather, in order not to produce unnecessary scripts, rename “Main Camera” to “player”. Now, having selected the camera, in the menu, select Component-> Physics-> Character Controller. Character controller is a component that processes the position of an object (or rather, a character) in space: its movement, turns, falls, jumps and collisions with other objects. All this can be done directly, without the help of this wrapper around the standard functions of moving objects and checking collisions, but then the implementation code of movement grows many times, which is bad for the first acquaintance with the engine. And so, in general, you can not code in the first lesson :)
<Lyrical digression>
As a lyrical digression worth talking about the components.

Any item that we see on the scene is an instance of a class with the telling name GameObject. He has a certain amount of so-called. components in turn are instances of their classes. Each component performs a utilitarian function. So, each GameObject should have a Transform component that is committed to storing the current coordinates, the angle of rotation, and the dimensions of the object in three-dimensional space. Well, at the same time it contains methods for performing actions on the position of an object in this space: displacement, turns, etc., i.e. when we in the editor pull the object by the arrow-controllers, we change the coordinates of its transform.
But for example, the RigidBody component deals with the fact that it processes the physical behavior of an object: everything that we see when the barrel from the shot falls on its side and rolls - the result of RigidBody. Which, by the way, cannot work correctly if you do not assign a component of a Collider type to an object, which stores in itself a three-dimensional model by which object collisions are determined. This model is not displayed, but it is she, and not the one that we see on the screen during the game, that is checked for collisions with the outside world.
</ Lyrical digression>
Around the camera, we now see green lines forming the cupula, which is used to calculate collisions with the player - his body, so to speak. The camera is in the middle of this capsule, but we don’t need eyes on the belt (although the situations are different :)), so we need to move the camera to the area of the character’s supposed head. But this capsule is part of an object with a single Transform, and therefore it cannot be moved separately from the camera. Fortunately, if in the object inspector we look at the properties available for the Character Controller, then we will see the Center property, with the parameters x, y, z. That is, we can move the center of the capsule relative to the center of the object. We put y = -0.8 and get the normal height of the eyes.
If we now put our player above the ground and turn on Play, our camera will still stand still. This is because the Character Controller only processes the incoming control commands to it, it does not take initiatives. To explain to her what to do, drag-n-drop-on player a script that lies in the prefab inspector in the Standart Assets \ Character Controllers \ Sources \ Scripts folder and is called “CharacterMotor”. His task is to use the Character Controller methods to carry out the main movement routine: implement the effect of gravity, jumping, calculate the current speed and direction of movement. Launching the level will now cause the player's camera to fall to the ground - already something.
But we are still standing still: after all, we don’t have a script that intercepted keystrokes and reported them to CharacterMotor. This is handled by the FPSInputController script in the same folder. We throw it at the player, launch and cheer - the W, S, A, D buttons now allow you to walk, and the spacebar to jump! But we walk somehow all in one direction, right-left and sidewise step. To turn your head and go where your eyes look, you will need another script, from the same: MouseLook. We throw, run - and get full control.
Now you can play with variables. Character Controller installed Character Motor along with itself - such properties as Gravity, Max Forward Speed, Jumping Base Height and all others are stored in its properties. Here they are, all the advantages of the Inspector - all the basic properties of classes are always in sight, you don’t even have to go into the code.
UPD: the sequel that fell out of the post thanks to my exceptional curvature:
Shooting occasionally moving targets
To run on personally made hills, lovingly painted with as many as three textures, is of course fun. But soon get bored. Therefore, we will select GameObject-> Create other-> Cube in the menu, place this cube in the air next to the player, in the Transform properties we will specify the following Scale (x, y, z) parameters: 3, 3, 3; and run the level to see what this cube will do. To do it will not be anything, to be honest. But if you select this cube, assign Component-> Physics-> Rigidbody to it, next time you launch it we will see a completely different picture. The cube is falling, spinning, almost like a real one, really like a cardboard - its default mass is 1 kg, which is not enough for such dimensions, but we will not touch it yet.
With the cube selected, press Ctrl + D (duplicate object), and with Ctrl pressed, drag the cube up until the cubes are placed one above the other. Now we have two absolutely identical cubes exactly above each other. Repeat this procedure cubes to 15, and look at the fall of the Tower of Babel.
Next, create a new cube, but do not assign it Rigidbody. From it we will make a flat surface for easy shooting. Ask him Scale: 150, 20, 150; and place it anywhere - the main thing is to place our tower and the player on it. I did this:

Now create weapons and ammunition. The cartridges will be the prefab, which we will create in the prefab inspector by clicking on the “Create” button at the top of the inspector, and selecting the Prefab there. A new prefab will be created in the folder that was opened at that moment in the inspector. It will be highlighted in gray, which symbolizes the absence of its components. In the main menu, click GameObject-> Create other-> Sphere, find the Sphere in the scene hierarchy, hang the Rigidbody on it. But for greater beauty, let's go into the properties of this Rigidbody that we just hung up and change the Mass parameter to 5.
After that, drag the sphere from the list in the hierarchy to the prefab we created. The prefab becomes blue, and with it the blue of the name of the sphere on the stage - this means that it is a clone of the prefab. Rename the prefab from the default name to, say, prefab_bullet. For beauty. The bullet is ready!
The next step will be the creation of a weapon, or rather, a script shooting at the click of the mouse with this very sphere. Next to the prefab, create a JavaScript file: Create-> JavaScript. We call it, for example, player (well, not to be confused). A built-in script editor will open in double-click on it, in which we replace the contents of the file with this one (we will not analyze it yet):
public var bulletImpulse = 300;
public var shootSpeed = 1;
public var bullet : GameObject;

public var lastShotTime : float;

function Start() {
lastShotTime = 0;
}

function Update () {

if (Input.GetKey(KeyCode.Mouse0)) {
if (Time.time>(lastShotTime + shootSpeed)) {
var bull_clone : GameObject;
bull_clone = Instantiate(bullet, transform.position, transform.rotation);
Physics.IgnoreCollision(bull_clone.collider, collider);
bull_clone.rigidbody.AddForce(transform.forward*bulletImpulse, ForceMode.Impulse);
lastShotTime = Time.time;

}
}

}
Next, save the script, and according to the established scheme - drag it from the window of prefabs to our player, which stands in the middle of the white plane. Selecting it now, we will see ... Here's what:
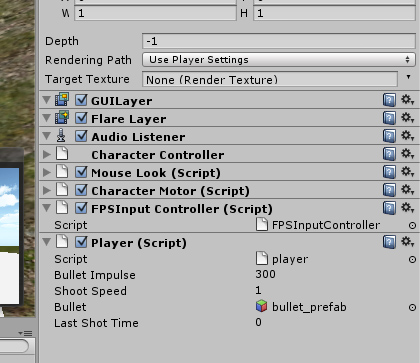
And this means that scripts cling to objects in the same way as components, and they can be managed in the same way. Rather, they are components, but this is not essential now. Now it’s essential to click the circle with a dot next to the Bullet parameter and in the opened selection to find our prefab with a sphere. By selecting it as a bullet, you can safely launch the level and enjoy shooting cores at cardboard boxes.
Unless, of course, the UFO interfered with my thoughts and I did not miss an important step.
Fuh.
Fin
I hope that I have covered in some detail what had to be covered, and did not dwell on unimportant trifles. Let this tutorial and is for informational purposes, I would like to believe that it will be really useful to someone. I look forward to rational criticism and suggestions for the next issue. Thanks for attention!
Source: https://habr.com/ru/post/112287/
All Articles