Settings in Android applications
I am interested in the topic of development for Android. I am writing a small application. Faced with the fact that I do not fully understand how to properly make settings for an application. Googled a bit, found an article that helped me figure it out. I decided to translate the article for the Russian-speaking community, including some comments on the original.
Settings are an important part of applications on Android (and not only on Android — hereafter, the translator’s note) . It is very important to allow users to change the settings of the application, depending on their preferences.
There are two ways to work with settings in Android - you can create a file preferences.xml in the res / xml directory, or work with settings from the code. In this article, I will show you how to work with settings using the preferences.xml file.
')
The setting items have the following attributes:
Currently the following types of settings are available:
The screenshots above were generated with the following preferences.xml :
The android: entries and android: entryValues attributes of the ListPreference refer to @ array / listArray and @ array / listValues, respectively. Values are taken from res / values / arrays.xml , which in our case looks like this:
In order to show the user a screen with settings, it is necessary to create an activity inherited from PreferenceActivity. Activation example:
And you can activate it with the settings by clicking on the button on our main activation:
In order to use the values set in the settings, we will add the getPrefs () method to the main activation that should be called on the onStart () event. It is necessary to use onStart () , and not onCreate () , in order to be sure that the actual settings are used, and not those that were during the creation of the main activit. Our getPrefs () method might look something like this:
And lastly, do not forget to add the created activit with the settings in androidmanifest.xml and add a new line with the name “set_preferences” to indicate the title of the screen with the settings, for example “Preferences”.
As a result, we get the following:
Settings are an important part of applications on Android (and not only on Android — hereafter, the translator’s note) . It is very important to allow users to change the settings of the application, depending on their preferences.
There are two ways to work with settings in Android - you can create a file preferences.xml in the res / xml directory, or work with settings from the code. In this article, I will show you how to work with settings using the preferences.xml file.
')
The setting items have the following attributes:
- android: key - the name of the setting, you can get its value later
- android: title - title element settings
- android: summary - a brief description of the configuration element
- android: defaultValue - default value
Currently the following types of settings are available:
- CheckBoxPreference is a simple checkbox that returns true or false values.
- ListPreference is a group of radio buttons (radioGroup) from which only one element can be selected. The android: entries attribute points to an array with values in res / values / arrays.xml , and android: entryValues points to an array with signatures.
- EditTextPreference - Displays a dialog box with an input field. Returns a string as a value.
- RingtonePreference - a group of radio buttons with a choice of ringtone.
- Preference - setting that works as a button.
- PreferenceScreen - a screen with settings. When one PreferenceScreen is nested in another, a new screen opens with settings.
- PreferenceCategory - category settings.
Screen with settings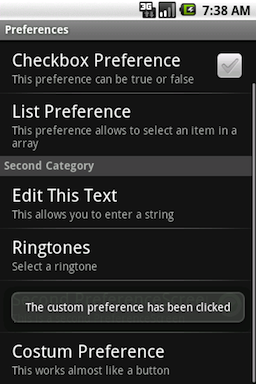 | EditTextPreference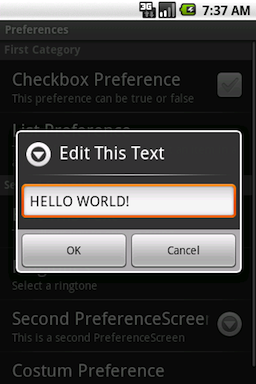 |
ListPreference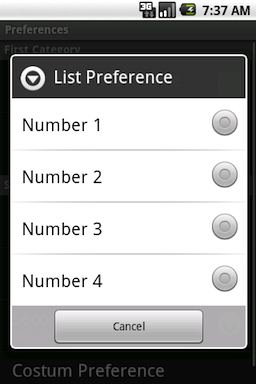 | RingtonePreference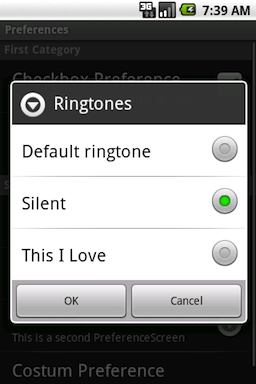 |
PreferenceScreen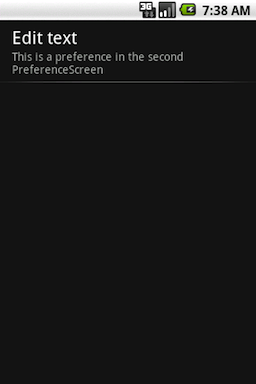 |
The screenshots above were generated with the following preferences.xml :
<?xml version="1.0" encoding="utf-8"?> <PreferenceScreen xmlns:android="http://schemas.android.com/apk/res/android"> <PreferenceCategory android:title="First Category"> <CheckBoxPreference android:title="Checkbox Preference" android:defaultValue="false" android:summary="This preference can be true or false" android:key="checkboxPref" /> <ListPreference android:title="List Preference" android:summary="This preference allows to select an item in a array" android:key="listPref" android:defaultValue="digiGreen" android:entries="@array/listArray" android:entryValues="@array/listValues" /> </PreferenceCategory> <PreferenceCategory android:title="Second Category"> <EditTextPreference android:name="EditText Preference" android:summary="This allows you to enter a string" android:defaultValue="Nothing" android:title="Edit This Text" android:key="editTextPref" /> <RingtonePreference android:name="Ringtone Preference" android:summary="Select a ringtone" android:title="Ringtones" android:key="ringtonePref" /> <PreferenceScreen android:key="SecondPrefScreen" android:title="Second PreferenceScreen" android:summary="This is a second PreferenceScreen"> <EditTextPreference android:name="An other EditText Preference" android:summary="This is a preference in the second PreferenceScreen" android:title="Edit text" android:key="SecondEditTextPref" /> </PreferenceScreen> <Preference android:title="Custom Preference" android:summary="This works almost like a button" android:key="customPref" /> </PreferenceCategory> </PreferenceScreen> The android: entries and android: entryValues attributes of the ListPreference refer to @ array / listArray and @ array / listValues, respectively. Values are taken from res / values / arrays.xml , which in our case looks like this:
<?xml version="1.0" encoding="utf-8"?> <resources> <string-array name="listArray"> <item>Number 1</item> <item>Number 2</item> <item>Number 3</item> <item>Number 4</item> </string-array> <string-array name="listValues"> <item>1</item> <item>2</item> <item>3</item> <item>4</item> </string-array> </resources> In order to show the user a screen with settings, it is necessary to create an activity inherited from PreferenceActivity. Activation example:
package org.kaloer.preferenceexample; import android.app.Activity; import android.content.SharedPreferences; import android.os.Bundle; import android.preference.Preference; import android.preference.PreferenceActivity; import android.preference.Preference.OnPreferenceClickListener; import android.widget.Toast; public class Preferences extends PreferenceActivity { @Override protected void onCreate(Bundle savedInstanceState) { super.onCreate(savedInstanceState); addPreferencesFromResource(R.xml.preferences); // Get the custom preference Preference customPref = (Preference) findPreference("customPref"); customPref .setOnPreferenceClickListener(new OnPreferenceClickListener() { public boolean onPreferenceClick(Preference preference) { Toast.makeText(getBaseContext(), "The custom preference has been clicked", Toast.LENGTH_LONG).show(); SharedPreferences customSharedPreference = getSharedPreferences( "myCustomSharedPrefs", Activity.MODE_PRIVATE); SharedPreferences.Editor editor = customSharedPreference .edit(); editor.putString("myCustomPref", "The preference has been clicked"); editor.commit(); return true; } }); } } And you can activate it with the settings by clicking on the button on our main activation:
@Override public void onCreate(Bundle savedInstanceState) { super.onCreate(savedInstanceState); setContentView(R.layout.main); Button prefBtn = (Button) findViewById(R.id.prefButton); prefBtn.setOnClickListener(new OnClickListener() { public void onClick(View v) { Intent settingsActivity = new Intent(getBaseContext(), Preferences.class); startActivity(settingsActivity); } }); } In order to use the values set in the settings, we will add the getPrefs () method to the main activation that should be called on the onStart () event. It is necessary to use onStart () , and not onCreate () , in order to be sure that the actual settings are used, and not those that were during the creation of the main activit. Our getPrefs () method might look something like this:
boolean CheckboxPreference; String ListPreference; String editTextPreference; String ringtonePreference; String secondEditTextPreference; String customPref; private void getPrefs() { // Get the xml/preferences.xml preferences SharedPreferences prefs = PreferenceManager .getDefaultSharedPreferences(getBaseContext()); CheckboxPreference = prefs.getBoolean("checkboxPref", true); ListPreference = prefs.getString("listPref", "nr1"); editTextPreference = prefs.getString("editTextPref", "Nothing has been entered"); ringtonePreference = prefs.getString("ringtonePref", "DEFAULT_RINGTONE_URI"); secondEditTextPreference = prefs.getString("SecondEditTextPref", "Nothing has been entered"); // Get the custom preference SharedPreferences mySharedPreferences = getSharedPreferences( "myCustomSharedPrefs", Activity.MODE_PRIVATE); customPref = mySharedPreferences.getString("myCusomPref", ""); } And lastly, do not forget to add the created activit with the settings in androidmanifest.xml and add a new line with the name “set_preferences” to indicate the title of the screen with the settings, for example “Preferences”.
<activity android:name=".Preferences" android:label="@string/set_preferences"> </activity> As a result, we get the following:
Main Activation Screen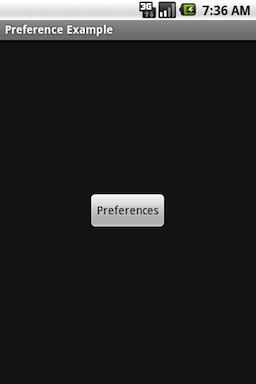 | Activate with settings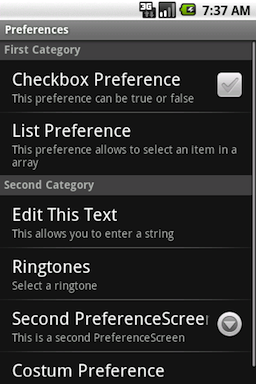 |
Source: https://habr.com/ru/post/112100/
All Articles