Configuring Eclipse to work with Arduino Uno
Preamble
I have an oil heater at home. To measure the level of oil in the tank using antediluvian sensor with an arrow and a float on a rope. The principle of operation of the sensor is striking in its inaccuracy. But since we live in the distant future, in relation to my childhood, I wanted to make a sensor that meets the following conditions:
- The sensor must be digital.
- His testimony must remain for further processing.
- Data should be available to me anytime, anywhere.
- The entire device should be cheaper than 200 €.
It was possible, of course, to switch to the beloved Visual Studio, but at the moment I am rediscovering Linux myself, so the Windows is not available.
Today, I want to share with you how to configure Eclipse to work with Arduino Uno under Ubuntu 10.10.
What do we need
Soft
- PC with Ubuntu 10.10 installed
- Eclipse IDE, I used version 3.5.2
- C Development Toolkit, I used version 6.0.2
- AVR Plugins for Eclipse, I used version 2.3.4
- GNU AVR-GCC toolchain
- Arduino IDE, I used version 0022
- Arduino uno
- USB cable for connecting the Arduino to the computer
- Free USB port in the computer.
Software installation
1.1 We install Eclipse, for this we go to the Ubuntu Software Center, enter the word “Eclipse” in the search, in the Eclipse line, click the “Install” button.
Alternatively, you can write in the terminal:
sudo apt-get install eclipse-platform1.2 Install the C Development Toolkit. To do this, open Eclipse, go to the Help menu, then click on "Install New Software ...".
')
A window opens. In the “Work with” field, select the “Galileo Update Site” page.
Insert the line “Eclipse C / C ++ Development Tools” into the search field

We tick the
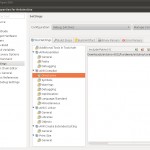
1.3 Install AVR Plugins. Open the window "Install New Software", click on the button "Add ...", to enter the address where to get the plugin. Enter in the Name field “AVR plugins for Eclipse”, and in the “Location” field enter:
http://avr-eclipse.sourceforge.net/updatesite/and click OK. Mark the line “AVR Eclipse Plugin” and execute the combo from step 1.2. Close Eclipse.
1.4 Installing the GNU AVR-GCC toolchain from the terminal. To do this, insert the line into the terminal:
sudo apt-get install avrdude binutils-avr gcc-avr avr-libc gdb-avrClick Enter and wait a bit.
Eclipse setup
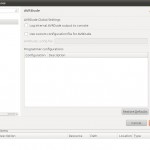
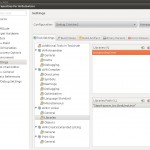
After installing all the necessary plugins for Eclipse, we need to configure AVRDude. To do this, go to Eclipse, in the settings menu ( Window → Prefrences ).We write in the search bar "AVRDude" click Enter and see the following window.
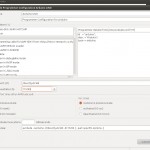
Click the “Add” button and add a new configuration for the programmer. To do this, in the opened window, we change the name and description of the configuration (for order). Select the Arduino in the “Programmer Hardware (-c)” list. In the “Override default baudrate (-b)” field, select the value 115200 and in the “Override default port (-P)” field the value should be / dev / ttyACM0 (The port to which the Arduino is connected may differ from mine. You can watch the port value Arduino IDE).
Click OK. Then OK again.
Create a project for Arduino
For the first project we will have to adjust the project with handles. Therefore, I recommend creating this project as a “base” project for Arduino, and then copying it as necessary.2.1 In Eclipse, go to the menu ( File → New → Project ... ), select “C Project” and click Next.
2.2 We call the child, in my case ArduinoUno and choose the type of project, we should have “ AVR Cross Target Application “. Click Finish.
2.3 Select our project in the “Project Explorer” window and go to change the project settings ( Project → Properties ). In the left pane of the window that opens, find the AVR tab, expand it.
2.4 Click on AVRDude, select the configuration of the programmer (we created it earlier).
2.5 Connect the Arduino to your computer using a USB cable. Make sure the Arduino is turned on.
2.6 Left click on Target Hardware. On the right we see the button “Load from MCU”, we press it. The MCU Type and frequency should change to match your microcontroller. We compare the type with the inscription on the crystal, if it is the same, well. If the controller cannot be automatically identified, we smoke the description for the hardware and set the values by hand. In the case of Uno, the type is identified as ATmega328P and the frequency is 16 MHz.
2.7 Close the Properties window by clicking on OK.
Create a library for Arduino Uno
For each project with Arduino, we need a kernel library. There are several ways to get it, the fastest is to pull it out of the original Arduino development environment. What we now do.3.1 We start the Arduino IDE
3.2 Selecting our hardware ( Tools → Board → ... ) In this example, choose Arduino Uno.
3.3 Load any sample code, for example Blink ( File → Examples → Basics → Blink ).
3.4 Click on the Verify button
3.5 Now we go to the folder where the library we need lies. You need to look for it in the /tmp/buildXXXXXXXXX.tmp/ folder where XXXXXXXXX is a bunch of numbers. If there are several such folders, erase all the directories and goto 3.4
3.6 Rename the core.a file to libArduinoUnoCore.a
3.7 Drag and drop a file into our Eclipse project and drop it there.
Customize build
Now you just have to make a few settings for a successful build and you're done.4.1 In Eclipse, press Alt + Enter and get into the project settings.
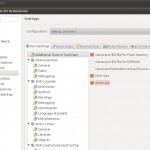
4.2 Go to the C / C ++ branch ( Build → Settings ). In the Tool Settings tab, select the item Additional Tools in Toolchain and tick the boxes
- Generate HEX file for Flash memory
- Print size
- Avrdude
4.4 Go to the AVR Compiler tab, click on it and change the value of the Command field from “avr-gcc” to “avr-g ++”.
4.5 Next, go to the branch AVR Compiler → Directories , add the path where you can find the header files to our libArduinoUnoCore.a. The path we need is in the folder with the Arduino IDE. I have ... / arduino-0022 / hardware / arduino / cores / arduino / (replace the dots on your way to the IDE). This is the path we indicate to the compiler.
4.5 Next we go to the AVR Compiler → Debugging branch, set the Generate Debugging Info value to No debugging Info.
4.6 Go to the AVR Compiler → Optimization branch, set the Optimization Level to Size Optimizations (-Os)
4.7 In the AVR Assembler → Debugging branch, set the Generate Debugging Info value to No debugging Info.
4.8 In the AVR C Linker → General branch, in the Other Arguments field we write “--cref -Wl, -gc-sections”. This should reduce the HEX file four times.
4.9 And the final touches in AVR C Linker → Libraries :
- Adding the ArduinoUnoCore Library to Libraries (-l)
- Add a path to the Libraries Path (-L), in this project “ $ {workspace_loc: / ArduinoUno} “
Create main.c
Well, we got to the coveted main file. As we remember from the Arduino IDE, there we need to create two functions and everything works (setup and loop). In our project we need to write more code and I suggest simply creating a new file in the project with the name main.c (File → New → Source File). And paste the following code into it:/ *
* main.c
*
* Created on: 01/12/2011
*
* Basic main file for the Arduino Project.
* /
#include "WProgram.h"
// Global variables
int g_LedPin = 13; // LED on digital pin 13
void setup ()
{
// opens serial port, sets data rate to 9600 bps
Serial.begin (9600);
// sets the pin as output
pinMode (g_LedPin, OUTPUT);
Serial.println ( "********************" );
Serial.println ( "* hello world *" );
Serial.println ( "********************" );
}
void loop ()
{
digitalWrite (g_LedPin, HIGH); // set the LED on
delay (1000); // wait for a second
digitalWrite (g_LedPin, LOW); // set the LED off
delay (1000); // wait for a second
}
extern "C" void __cxa_pure_virtual ()
{
while (1);
}
int main ( void )
{
init ();
setup ();
// endless loop
for (;;)
{
loop ();
}
return 0;
}
Having inserted the code, we just need to build our project. But I think that you can handle it yourself. And yet, in the proposed version, the size of the HEX file competes with the original development environment for Arduino.
Source: https://habr.com/ru/post/111908/
All Articles