The algorithm "diamond-square" to build fractal landscapes
 I think many are familiar with the very unusual Minecraft game (on the right is an example of a map generated in it), in which the player is on the (almost) infinite surface of the Earth and can explore the world with minimal restrictions.
How did the author of the game, Notch, manage to achieve a similar similarity between his random "worlds" and earthly expanses? In this topic, I’ll just consider one of the ways to build an artificial landscape of this kind (and briefly mention a couple of other ways), and also talk about my small improvement of this algorithm, which allows you to significantly increase the size of the landscape without noticeable loss in performance.
Inside you will find several schemes and beautiful pictures, quite a few letters and a link to an example of the implementation of the algorithm.
')
General action plan
What is the general meaning of landscape generation? If we talk about creating (almost in real time) a level for a computer game - such as Minecraft itself, this process consists of the following points:
- Creating a height map . Initially, we have a flat two-dimensional grid and we assign a certain height to each of its cells. How? This will be discussed further. By the way, the grid does not have to be rectangular - for example, a similar algorithm for a grid consisting of triangles is described here . However, in most cases, a grid consisting of square pixel cells is more convenient. Together with a height map, areas covered by water are also set — at a minimum, seas and oceans (as a rule, only those cells that lie below a certain level become water).
 The distribution of biomes . Here you will need some knowledge in geography (however, the whole process of creating a landscape requires it). To determine where the tundra should be, where there is a desert, and where there is a rainforest - the already created altitude map and, for example, the distance from water spaces or to some predefined points (equator / poles) will help. In turn, biomes will set many other parameters - for example, grass cover, number of stony areas, plants, number of rivers and lakes, etc.
- We created the earth, the oceans and the seas, too, the geographical zones were distributed. What have you forgotten? Let the river , of course! In addition to the water itself, which will flow from the mountains and descend into the seas or form lakes in hollows, they should be emulated by their impact on the surface of the earth - to form river beds and transfer sand and soft soil along the stream to form beaches on the shores of lakes and other water bodies. Unfortunately, this process, called water erosion , like other types of erosion , I have to leave outside the scope of this article. However, in the list of references there are a couple of links to very good materials on this topic.
- Additional actions . In fact, the landscape has already been created, but there are still many things that can be improved on it - for example, in Minecraft, the space under the ground is completely dug up with natural caves, and many trees are growing on the surface. In addition, of course, depending on the biomes, you can diversify the flora and fauna - if the goal is to get as close as possible to what is happening in the present nature.
Finally, the generated landscape will only draw. Here, I would like to notice only one detail - while the triangular grid mentioned above would be useful when traditional rendering a three-dimensional map, for square cells, voxels can be very useful. However, this is a completely different story.
Ways to build a height map
So, we will deal with the most important stage in the construction of the landscape - the definition of how high each point of the earth’s surface is. The most commonplace idea is to go over both coordinates and make map [x] [y] = random () - oddly enough, it will not give acceptable results, so you need to use something more cunning.
Creating hills "by hand"
A rather simple algorithm: initially we believe that all points are on the same level and begin to add, in arbitrary places, such “bulges” - hills of different heights. As a result of the careful imposition of these hills on each other (and, perhaps, adding the slight noise mentioned above), it is already possible to get something similar to the truth. But much more realistic landscapes can be achieved by the algorithms listed below, so I will not dwell on the “hills” method.
Landscape based on the Voronoi diagram
In fact, until recently, the next approach for me was completely unknown and I was quite surprised that it was capable of producing very impressive results.
 It all starts with a random throwing points on the map. Then, using these points, we construct the Voronoi diagram (and, accordingly, the Delaunay triangulation ), and several iterations of Lloyd's relaxation are performed on it to get rid of too small polygons.
If the previous paragraph was not clear to you - it is not scary, its essence boils down to creating approximately such a grid as in the figure on the right. Its main property is its irregularity. This allows the landscape based on it not to look too “square”.
 Further actions are trivial - we randomly select polygons to be filled with water, and make the height of points belonging to the other polygons equal to the shortest distance to the sea-ocean. It remains to add all the same noise (both to the actual height and to the boundaries of the polygons) - and we get a very nice island (or continent, depending on the scale).
I did not deal with the implementation of this algorithm and, to simplify the article, I omitted several details and intermediate ones. A detailed article (from which pictures and most of the information were borrowed) can be found here (in English), there is also a wonderful swf demo , which very clearly illustrates all stages of the process.
Diamond-square algorithm
The most common and giving one of the most realistic results is the diamond-square (or square-diamond) algorithm, an extension of the one-dimensional midpoint displacement algorithm to a two-dimensional plane. The landscapes resulting from it are usually referred to as fractal, although, it must be admitted, in fact, they are not so self-similar — on the contrary, as we shall see later, their not very pleasant property is that on a large scale they become relatively smooth. , and in the shallow turn into a kind of sandpaper.

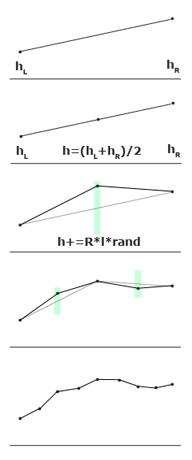 Let's start with a simpler midpoint displacement algorithm. As already mentioned, it works not on a two-dimensional plane, but on a one-dimensional segment (therefore, it can be used, for example, to create a horizon line).
What makes this algorithm related to fractals is its recursive behavior. Initially, in any way we set the height at the ends of the segment and divide it by a point in the middle into two sub-segments. We shift this point by a random value and repeat the splitting and offset for each of the obtained sub-segments. And so on - until the segments become one pixel long. That's the whole algorithm (see the figure on the right). Oh yes, an important note: random displacements should be proportional to the lengths of the segments into which the partitions are made. For example, we divide a segment of length l - then a point in the middle of it should have a height
h = ( h L + h R ) / 2 + random (- R * l , R * l )
( h L and h R are the heights on the left and right ends of the segment, and the constant R determines the roughness of the resulting broken line and is the main parameter in this algorithm).
 Let's try to generalize this algorithm for a two-dimensional height map. We start by assigning random heights to the four corners of the entire map and divide it (for convenience, I assume that we work with a square card, and its side is a power of two) into four equal squares. Each of them knows the value in one of the corners. Where to get the rest?
All the same interpolation, as in the one-dimensional midpoint displacement - a point in the center is obtained by averaging the heights of all 4 corner points, and each midpoint on the side of a large square is averaged by a pair of points lying at the ends of the corresponding side. It remains to introduce a bit of noise - randomly moving the center point up or down (within the limits proportional to the side of the square) - and our actions can be repeated recursively for the resulting sub-squares. Everything? All, yes, not all.
This is not diamond-square yet - this algorithm, as a rule, is also called the midpoint displacement algorithm, and despite the fact that it already provides relatively acceptable results, you can easily notice its “straight-line” nature in the resulting image.
 The diamond-square algorithm - the one that allows you to get "real" fractal landscapes - differs from the two-dimensional midpoint displacement in that it consists of two steps. The first is the so-called. “Square” - in the same way determines the center point in a square by averaging angular and adding displacement itself - random deviation. The second step - "diamond" - is designed to determine the height of the points lying on the middle of the sides. Here, not two points are averaged - “above” and “below” (if we talk about points on the vertical side), but also a couple of points “left” and “right” - that is, two more central points obtained in step “square”. It is important to note that these two heights that we got in the previous step should already be calculated - so you need to calculate the “layers”, first perform the “square” step for all squares - then perform the “diamond” step for all diamonds - and go to smaller squares.
The explanations, I think, may seem confusing, so I advise you to carefully study the attached schemes - it should make it clearer from them which heights are calculated at each stage.
In addition to the need to use, say, a walk in width instead of a walk in depth, there is another subtlety - the situation at the edges of the landscape. The fact is that at the diamond stage, the algorithm uses the height of points that are outside the current square and, possibly, the entire map. How to be? There are two options (although you can come up with your own, of course): either consider these heights as 0 (or 1, or any other constant; this, by the way, is convenient for submerging the edges of our landscape under water), or imagine that our plane is collapsed into torus (toroidal planet, hmm ...) and trying to find out the height of a point lying 64 pixels to the left of the left border of the map, we find out the height of a point that is 64 points from the right border. It is implemented very simply (as, however, the first option) - we will be helped by taking the coordinates in absolute value equal to the size of the map.
 So, these are the basic algorithms for constructing maps of heights for artificially generated landscapes. In my opinion, the most realistic result comes from the last one, diamond-square - although it is not without some drawbacks. For example, creating a map that looks good with a strong approximation - when viewed entirely, you will see a lot of small islands (or even continuous noise, from which we started) instead of several large continents and oceans. Self-similarity does not come out. This can be corrected by various combinations of fractal landscapes of various scales. Their values can be multiplied, added, used different coefficients or, for example, to introduce data obtained using the Voronoi diagram - in general, the scope for experiments is quite large. By the way, even using only one diamond-square, the values obtained (previously normalized, that is, in the range from 0.0 to 1.0) are useful to square - this will make the plains more gentle, and the mountain slopes are steeper (remember about erosion?).
Modification of the diamond-square algorithm for large cards
And finally - a few words about my implementation of the diamond-square algorithm. The main question you ask yourself when generating a landscape is how to make it possible to significantly increase its size? The standard implementation of the algorithm under discussion makes it possible to easily increase the level of detail (move “inwards”), but not dimensions (“breadth”).
This problem was solved by me as follows. I don’t know - maybe this decision will be well-known or quite obvious to someone - but before that I didn’t come across it and it didn’t happen at once (moreover - “from scratch” there was one unexpected hitch that could be solved “correctly” and failed - on this below).
So, the approach is as follows: let our landscape was originally conceived of gigantic dimensions (for example, 16777216x16777216 pixels, although this is far from the limit). The important thing is that we are not going to recognize the height at each point , but instead we will have some much smaller “window” (for example, 128x128 pixels), which we will need to move over our height map. It turns out that the original algorithm is easily modified so that we will need to calculate the “window” the number of operations proportional to the size of the window, but little dependent on the size of the landscape. That is why we can initially set the landscape almost arbitrarily large.

We will come to the aid of a technique called lazy dynamics . Those who know what they are talking about, I think, everything has become clear, for the ignorant in the question I will explain. We "turn" the whole process inside out - instead of starting with large squares and going down to each pixel, we accept a query like "find out the height at point (x, y)" and then go up: our point, as we know was obtained by averaging four other points and a random shift. The most difficult thing is to understand what these 4 points were. After we understand this, it will be enough for us to repeat the request to “find out the height”, but for each of these points. These requests, in turn, will rise even higher - and so on, until they reach the very top, to the corner points of the map (I have them, like the points outside the map, are 0.0). In the source, it all looks like this:
function val(x, y, v) { if (typeof(v) != 'undefined') data[x + '_' + y] = Math.max(0.0, Math.min(1.0, v)); else { if (x <= 0 || x >= size || y <= 0 || y >= size) return 0.0; if (data[x + '_' + y] == null) { // . base = 1; while (((x & base) == 0) && ((y & base) == 0)) base <<= 1; if (((x & base) != 0) && ((y & base) != 0)) squareStep(x, y, base); else diamondStep(x, y, base); } return data[x + '_' + y]; } } function displace(v, blockSize, x, y) { return (v + (randFromPair(x, y, seed) - 0.5) * blockSize * 2 / size * roughness); } function squareStep(x, y, blockSize) { if (data[x + '_' + y] == null) { val(x, y, displace((val(x - blockSize, y - blockSize) + val(x + blockSize, y - blockSize) + val(x - blockSize, y + blockSize) + val(x + blockSize, y + blockSize)) / 4, blockSize, x, y)); } } function diamondStep(x, y, blockSize) { if (data[x + '_' + y] == null) { val(x, y, displace((val(x - blockSize, y) + val(x + blockSize, y) + val(x, y - blockSize) + val(x, y + blockSize)) / 4, blockSize, x, y)); } } The main thing is to memorize (and add to any cache) all heights that we have already calculated. This will allow us not to do the same thing many times. Actually, even having calculated the first point in our “window”, we will in the process find out a number of other points that also belong to this “window”. In fact, having run through all the points of the “window”, we will not do so many unnecessary operations - although their exact number strongly depends on whether the “window” (its upper left corner and size) has been aligned in powers of two.
As already mentioned, there are several magic lines in the algorithm - here they are:
base = 1; while (((x & base) == 0) && ((y & base) == 0)) base <<= 1; if (((x & base) != 0) && ((y & base) != 0)) squareStep(x, y, base); else diamondStep(x, y, base); Here it is determined whether the current point is the center of a square or a rhombus and what is the size of this shape. To be honest - this code was written simply on a whim, I cannot give an exact mathematical justification. We simply find the least significant bit, which is non-zero at least at one of the coordinates - it will be the desired size. And in order to determine whether the figure was a square, we check that both coordinates had this bit set. Both coordinates are zero-indexed.
And finally, an unexpected underwater stone: a pseudo-random number generator. In my code, unusual demands were made of it: for each point (x, y) you always want to get the same random number, and do it quickly. Many programming languages in the random number generator have the ability to specify a so-called. A “seed” (seed) on which the entire following sequence of generated numbers will depend (in JavaScript this is not the case, but for it there is an implementation of the common Mersenn vortex ). The problem is that the sequence does not suit us - when you shift the window (and clear the cache), we will approach one point from a completely different side and the random shift will become different. We want a static landscape, under whatever conditions we consider it. An attempt to initialize a Mersenne vortex each time with a “grain” depending on both coordinates failed: its initialization lasts too long.
After some reflection, I came to the conclusion that a quick way to convert two coordinates into a number that would be hardly correlated with them is basically impossible. As a result, I settled on such a function, which gives acceptable results due to repeated taking of numbers using simple modules:
function randFromPair(x, y) { for (var i = 0; i < 80; i++) { var xm7 = x % 7; var xm13 = x % 13; var xm1301081 = x % 1301081; var ym8461 = y % 8461; var ym105467 = y % 105467; var ym105943 = y % 105943; y = x + seed; x += (xm7 + xm13 + xm1301081 + ym8461 + ym105467 + ym105943); } return (xm7 + xm13 + xm1301081 + ym8461 + ym105467 + ym105943) / 1520972.0; } In addition, it was possible to easily introduce a “global grain” into this function, which determines the entire landscape as a whole, and because of taking the residues, its return values turned out to be fairly evenly distributed over the [0, 1) range. However, I am sure that you can come up with a quicker and elegant solution - you can consider this as “homework” in this article :)
As everyone probably guessed, I wrote the implementation in JavaScript, which makes it equally easy to experiment with both the values and the source code. The actual page is available at http://denull.ru/terrain.htm , and all the code is located in the file http://denull.ru/terrain.js . To view, you will need a browser that supports html5 (to be honest, I tested it only in Google Chrome), since the rendering goes to the canvas (and, it should be noted, the actual rendering also takes some time).
Materials on the topic
- Realtime Procedural Terrain Generation (PDF, 1.52 MB). Very detailed and interesting material on the creation of landscapes - both using the Voronoi diagram and the diamond-square algorithm, with a description of erosion methods and a variety of illustrations and formulas.
- Polygonal Map Generation , a wonderful article about building a landscape based on the Voronoi diagram. Well illustrated, there is a demo swf-file, many links to other materials.
- Fast Hydraulic Erosion Simulation and Visualization on GPU . An article about optimizing the simulation of water erosion, in the presence of not only PDF and images, but also a few videos that help you understand what it is about. Whatever the idea of optimizing the process, shifting the load on the GPU, there is enough information in the document about the mechanisms of erosion.
- Several short articles on fractal algorithms: Generating Random Fractal Terrain , Fractal landscape , Fractal Terrains , Diamond-square algorithm .
Source: https://habr.com/ru/post/111538/
All Articles