Installing Ubuntu Desktop on LVM
 Classic partitions, which are often divided into a hard drive for system installation and data storage, have a number of significant drawbacks. Their size is very difficult to change, they are in strict sequence and just take a piece from the first section and add to the last will not work if there are still sections between them. Therefore, very often at the initial partition of the hard drive, users break their heads - how much space to allocate for a particular section. And almost always in the process of using the system they come to the conclusion that they did not make the right choice.
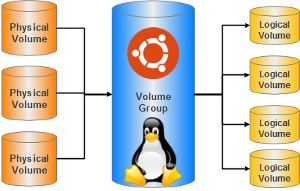
Fortunately, most of these problems in Linux can LVM technology. It creates an additional abstraction - logical volumes that are visible in the system as regular sections, but they are not really. This technology is very useful for servers, however, and on home computers, it is very relevant. I don’t think anymore what disk size to allocate for the system so that some texlive would not fill the whole place, but also so that the extra 5 - 10 gigabytes would not disappear just like that. LVM has a number of significant advantages, greatly simplifying life:
- LVM logical volumes are no longer tied to a physical location. Within LVM there is no such thing as the order of logical volumes.
- The size of logical volumes can be increased right on the fly, and unmounted volumes can also easily be reduced in size without leaving the system.
- If necessary, you can blur logical volumes across multiple physical hard drives, thereby increasing the available space. In this case, the system will still see only one logical volume, although its size will exceed the available sizes of hard drives. You can also perform the reverse operation, removing the hard drive from LVM, thus freeing it for another use.
- LVM supports snapshots - instant copies of the file system of the volume. This can be very useful for creating backups.
- There are plenty of advantages, which can be read in specialized articles about LVM.
 Ubuntu fully supports LVM, but the utilities from the Desktop version of the installation disk have been removed. In addition, the installer of the Desktop version does not know how to change the LVM volume. Therefore, if you want to use LVM, then you will have to either install the system from the Alternate disk, or be a bit tortured with the usual LiveCD . Installing with Alternate is inconvenient and causes discomfort to many, and besides most often the Alternate disk is not at hand, so let's consider the option with the LiveCD.
Note that LVM is managed through the terminal, so in order not to break anything, you must first learn how to work with it more or less comfortably. In addition, familiarize yourself with the principles of operation and basic concepts of LVM in order to understand what it is. The article is not intended for beginners, but for those who have already figured out the basics of Ubuntu.
')
Preliminary preparation
You need to start the system from the LiveCD and connect the computer to the Internet. Next, open the terminal and install the necessary utilities directly into the LiveCD session with the command:
sudo apt-get install lvm2 Everything, now it is possible to begin work with LVM. But first you need to select the place where we will create LVM. To do this, you need the Gparted partition editor, which is located in the System → Administration menu. Use it to create a partition on top of which you will deploy LVM. If you are ready to allocate an entire hard disk for LVM, then create a partition for the entire hard disk. Do not select any file system for a partition — just an empty partition (unformatted). Do not forget, to apply all the changes you have made via Gparted, click on the green check mark on the top bar or select Apply from the Edit menu.
After the changes to the markup are successfully made, you will need to change the type of the partition you need to Linux LVM . To do this, right-click on the section, and select Manage flags . In the window that opens, check the box with the name lvm , wait until all changes are applied and close Gparted. At this preparatory stage is over.
Create LVM logical volumes
Now it's time to start creating LVM directly. For example, we assume that we are creating LVM over the / dev / sda1 partition. In this case, you must first initialize the physical partition with the command:
sudo pvcreate /dev/sda1 Next, create a volume group (about what it is, see the articles about LVM), with the command
sudo vgcreate local /dev/sda1 And finally, create the logical volumes you need. It is worth noting here that since it is easy to increase the size of LVM volumes directly in the running system, it is best to allocate the minimum required size for logical volumes. Do not be afraid that a large volume will remain unallocated within the volume group, it will not disappear. As soon as you need additional space, you can easily add it to any logical volume. But to reduce the size of the logical volume is much more difficult.
Usually, a system requires a partition for the root, a partition for / home , a partition for the swap, and sometimes a partition for the data. You can create logical volumes under these four tasks with the following commands:
sudo lvcreate -L 7G -n root local sudo lvcreate -L 5G -n home local sudo lvcreate -L 3G -n swap local sudo lvcreate -L 10G -n data local The -n option , if you have not understood, sets the name of the logical volume, -L - its size.
Now you need to create file systems on the created logical volumes. You can do this with the following commands:
sudo mkfs.ext4 /dev/local/root sudo mkfs.ext4 /dev/local/home sudo mkswap -f /dev/local/swap sudo mkfs.ext4 /dev/local/data Note that the names of LVM logical volumes on the system look like / dev / {volume_name_group} / {volume_name} .
In addition, the default ext4 file system reserves some of the space for system data. Since there will never be any system data on / home , and even more so on the partition with user files, it is better to cancel this reservation in order to free up the wasted space. For this command will be useful
sudo tune2fs -r 0 /dev/local/home sudo tune2fs -r 0 /dev/local/data Do not cancel the reservation for the root partition, otherwise the system may stop working altogether!
Finally, you may want to assign a normal label to the data section so that it is beautifully displayed in the installed system. You can do it like this:
sudo tune2fs -L Data /dev/local/data Now you can proceed directly to the installation on the logical volumes created by us.
System installation
The installation itself is standard , but when you are prompted to choose a partitioning method, select the manual mode. In the window that opens, you will see all the LVM volumes you created. Specify the appropriate mount point for each, but do not put a formatting check mark. For the section under the data, you can specify the mount point / media / data .
Wait until the installation is complete, but do not restart the computer!
If you restart your computer, your new system will not start. In this case, you will need to go back into the LiveCD, install the LVM utilities, and then execute the command
sudo vgchange -ay Then follow the instructions below.
Activating LVM in the installed system
You have installed the system, but one small problem remains - in the installed Ubuntu there are no utilities for working with LVM, which means it simply will not start. This is easy enough to fix.
To begin with, without leaving the LiveCD, mount the logical volume that you have allocated at the root into the / mnt folder. You can do this with the command
sudo mount /dev/local/root /mnt Now you will need to log into the installed system using chroot , however, you must first temporarily plug into it some important system resources. To do this, run the command
sudo mount --bind /dev /mnt/dev sudo mount --bind /proc /mnt/proc sudo mount --bind /sys /mnt/sys Now go to the installed system with the command
sudo chroot /mnt /bin/bash And install the necessary utilities with the command
apt-get install lvm2 Everything, installation is complete. Close the terminal, press Ctrl-Alt-Del and reboot the computer. Do not forget to get the LiveCD from the drive. The computer should boot into the newly installed system.
Further work
Suppose at some point you no longer miss the 5 gigabytes that you have allocated under the section / home . No problem. See how much unused space is left in the volume group with the command
sudo vgdisplay local Now increase the size of the logical volume / dev / local / home to the required one with the command
sudo lvresize -L 15G /dev/local/home Note that the -L parameter specifies the full desired size, not its increment. After increasing the size of the logical volume, all that remains is to stretch the file system to the entire new volume. You can do this with the command
sudo resize2fs /dev/local/home Everything, the size of the logical volume is increased.
In addition to increasing the size of logical volumes on the fly, LVM can do a lot more. For example, create instant snapshots. However, about all the intricacies of working with this technology, read the specialized articles.
Links
Current version of the article
The latest and most current version of this article is on the official Russian-language Wiki-resource for Ubuntu documentation. There you can freely improve and supplement the laid out reference and training materials, as well as add your own. If you have something to tell other Ubuntu users, then a huge request - write or edit the relevant article on help.ubuntu.ru . Even with small improvements and additions you will help thousands of people, and some of them, in turn, will describe something useful and interesting for you.
Source: https://habr.com/ru/post/111503/
All Articles