We create Web Services on the Oracle WebLogic Server platform, we test with SoapUI

Introduction
In this post I will tell and show you how to create two small applications using SOAP Web Services for Oracle WebLogic Server 11g application server. This is the service itself and the client interacting with it.
Oracle WebLogic Server 11g implements the J2EE 5 platform, which in turn includes a description of a number of technologies, including the Java API for developing Web Services using XML (JAX-WS).
Among other things, I will describe the process of testing Web Services using SoapUI.
Environment
All the examples in this article are made with the assumption that you already have Oracle WebLogic Server 11g installed. It was also configured: a domain was created at localhost: 7001. Your configuration may differ naturally, just take note of this when learning the examples. Find the installer here .
')
In addition, you need to install Ant (Java utility to automate the process of building software products). It is in the repositories of all modern Linux distributions, for Microsoft Windows it can be downloaded here .
Creating a service
The starting point in the creation of a Web Service will be a Java class, whose methods will eventually fulfill the role of Web Methods (operations). In WebLogic terminology, such a class is called a JWS (Java Web Service) file. The JWS file is a standard Java class that uses Java annotations to describe the Web Service. In our case, it will contain only one mandatory JWS annotation @WebService and provide only one method.
A full list of JAX-WS annotations can be found here .
Below, I will describe the steps to create the HelloService Web Service, which includes just one operation sayHello. For simplicity, all input and output parameters will be string.
From time to time I will give examples of working with the console, to illustrate certain actions. In this case, nothing prevents you from using your favorite IDE, or other available means.
Step 1
First of all, we need to create a directory for the project:
prompt> mkdir /HelloServiceStep 2
Inside it we will create a section for source codes, which in turn contains the directories for the package in which our JWS file will be located:
prompt> cd /HelloService
prompt> mkdir -p src/my/services
Step 3
In the newly created package we will place the HelloImpl.java class as follows:
package my.services;<br><br> // @WebService <br>import javax.jws.WebService;<br><br>@WebService(name= "Hello" , serviceName= "HelloService" )<br><br> /** <br> * JWS- WebLogic <br> * : sayHello <br> */ <br> public class HelloImpl {<br> // -, () <br> public String sayHello( String title) {<br> return “Hello, “ + title;<br> }<br>}<br> <br> * This source code was highlighted with Source Code Highlighter .This example illustrates a Java class called HelloImpl and contains the public method sayHello (String). The @WebService annotation indicates that this class implements a Web Service with the name HelloService. By default, all public methods of this class will be operations.
Step 4
In the root directory of our project / HelloService, we will create a standard Ant configuration - build.xml file with the following content:
< project name ="webservices-helloservice" default ="build" > <br> < taskdef name ="jwsc" <br> classname ="weblogic.wsee.tools.anttasks.JwscTask" /> <br><br> < target name ="build" > <br> < jwsc <br> srcdir ="src" <br> destdir ="output/helloService" > <br> < jws file ="my/services/HelloImpl.java" type =” JAXWS ” /> <br> </ jwsc > <br> </ target > <br><br> </ project > <br><br> * This source code was highlighted with Source Code Highlighter .In the listing above, you can see that we are operating with some jwsc Ant task. This is one of the tools that comes with WebLogic, which allows you to automatically generate additional artifacts (xml-configs, Java-classes), compile all this and pack into an archive (WAR), ready for installation on an application server.
Please note that the listing explicitly indicates the type (type) of the generated service - JAXWS. By default, this is JAXRPC and the programming of such a service will be slightly different.
More about jwsc, all options and examples of its use, here .
Step 5
Before running the assembly, you need to set the WebLogic Server environment variables. Including the CLASSPATH variable will be set, which will allow Ant to correctly connect the jwsc task.
To do this, you need to execute the setDomainEnv.cmd (Windows) or setDomainEnv.sh (UNIX) script on the command line. These scripts are located in the bin subdirectory within the directory of your WebLogic domain. By default, WebLogic Server domains are located in BEA_HOME / user_projects / domains / domainName, where BEA_HOME is the directory where Oracle products are installed, and domainName is the name of your domain.
If the IDE is used to run Ant, I assume that it will be enough to build a Java library from the lib subdirectory of the directory in which the Oracle WebLogic Server core is installed, something like:
Oracle/Middleware/wlserver_10.3/server/libStep 6
Run the application build
prompt> ant buildThe files generated by jwsc should appear in the output / helloService directory. In particular, in the output / helloService / my / services / subdirectory you can find HelloImpl.war - this is the web application in which the created Web Service is packaged.
Step 7
Now we need to place our Web Service on the application server. Copy the WAR archive to the autodeploy subdirectory inside your WebLogic domain:
prompt> cp HelloImpl.war /path/to/domain/autodeploy/This can also be done through the administrative console of the server, or by using another WebLogic tool: the wldeploy Ant task.
Step 8
Make sure that the Web Service is correctly installed on the server by requesting the WSDL browser on it:
http: // localhost: 7001 / HelloImpl / HelloService? WSDL
The URL consists of default values for contextPath and serviceUri. By default, contextPath is the name of the Java class in the JWS file, and serviceURI is the serviceName element of the @WebService annotation if it is of course specified, otherwise it is the name of the JWS file without an extension plus the word Service. For example, if the serviceName attribute of the @WebService annotation is not specified and the JWS file name is HelloImpl.java, then the default value for the serivceUri will be HelloImplService. All these attributes can be explicitly set. In this case, the URL may be different.
If the request returned you an XML file describing the created Web Service (WSDL), the result can be considered successful.
How to test its work using the specialized tool SoapUI will be discussed in the section “Testing the service”, later in this article.
Customer creation
Oracle WebLogic Server, among other things, includes tools for generating libraries that provide high-level Java API for accessing SOAP Web Services developed on any platform. All that is needed for this WebLogic-ku is a WSDL file that describes the service. These libraries will serve as the basis for the interaction of the client application with the service.
We already have a Web Service created in the previous section. Now let's try to write a client application for it. This will be a JSP form page that uses automatically generated libraries.
Step 1
Create a directory for the project:
prompt> mkdir /HelloClientStep 2
Go to it and create the Ant configuration of build.xml with the following content:
< project name ="webservices-helloclient" default ="generate" > <br> < taskdef name ="clientgen" <br> classname ="weblogic.wsee.tools.anttasks.ClientGenTask" /> <br><br> < target name ="generate" > <br> < delete dir ="lib" /> <br> < mkdir dir ="lib" /> <br> < clientgen wsdl ="http://localhost:7001/HelloImpl/HelloService?WSDL" <br> destFile ="lib/HelloServiceAPI.jar" <br> packageName ="my.client" <br> type ="JAXWS" /> <br> </ target > <br><br> </ project > <br><br> * This source code was highlighted with Source Code Highlighter .From the file above you can see that we are working with the clientgen ant task. We tell her where to get the WSDL for the Web Service (do not forget to raise the server and make sure that the WSDL file is available at the specified URL), the name of the package in which the generated Java classes will be located and the archive in which all this will be packaged. Read more here .
Step 3
Run the Ant configuration described above and verify that the library appeared in the specified location (lib / HelloServiceAPI.jar):
prompt> ant generateStep 4
Now create a web directory in our project:
prompt> mkdir webIn it we place a JSP page index.jsp with an HTML form containing a single element for entering the Name and a button that sends the form values to the server. We will also need a place where the result of the SOAP request will be displayed.
Of course, it’s more convenient to develop this JSP in a modern IDE by connecting the library generated in the previous step, so that the IDE tells us which classes in this library are and how to work with them from JSP. But since the example is rather trivial, I will immediately cite the page code:
<%@page import= "my.client.Hello" %><br><%@page import= "my.client.HelloService" %><br><%@page contentType= "text/html" pageEncoding= "UTF-8" %><br><%<br><br> String name;<br> String result = null ;<br> if ((name = request.getParameter( "name" )) != null && ! "" .equals(name))<br> {<br> // <br> HelloService service = new HelloService();<br> // “” ( ) <br> Hello hello = service.getHelloPort();<br><br> // sayHello <br> // SOAP , <br> // HTTP ... <br> result = hello.sayHello(name);<br> }<br><br>%> <! DOCTYPE HTML PUBLIC "-//W3C//DTD HTML 4.01 Transitional//EN" <br> "http://www.w3.org/TR/html4/loose.dtd" > <br> < html > <br> < head > <br> < meta http-equiv ="Content-Type" content ="text/html; charset=UTF-8" > <br> < title > Hello Client </ title > <br> </ head > <br> < body > <br> < form > Name: < input name ="name" /> < input type ="submit" /></ form > <br> <% if (result != null ) { %> <br> < br /> Result: <% = result %> <br> <% } %> <br> </ body > <br> </ html > <br><br> * This source code was highlighted with Source Code Highlighter .In this form, all SOAP requests will always go to the service from which the WSDL was taken, but in reality, the so-called endpoint URL must be configurable. It is useful to us and when testing our client. Therefore, add another field to the form:
< form > Name: < input name ="name" />< br /> Location: < input name ="location" />< br />< input type ="submit" /></ form > <br><br> * This source code was highlighted with Source Code Highlighter .And also a few lines in the form handler:
<%@page import= "java.util.Map" %><br><%@page import= "javax.xml.ws.BindingProvider" %><br><%@page import= "my.client.Hello" %><br>…<br><br>String name;<br> String result = null ;<br> String url = request.getParameter( "location" );<br> if ((name = request.getParameter( "name" )) != null && ! "" .equals(name))<br> {<br> HelloService service = new HelloService();<br> Hello hello = service.getHelloPort();<br><br> if (url != null && ! "" .equals(url)) {<br> Map<String, Object> rc = ((BindingProvider) hello).getRequestContext();<br> // endpoint URL, WSDL- <br/> rc.put(BindingProvider.ENDPOINT_ADDRESS_PROPERTY, url);<br> }<br><br> result = hello.sayHello(name);<br> } <br><br> * This source code was highlighted with Source Code Highlighter .Step 5
In the web directory, create a WEB-INF subdirectory in which two files will be placed: web.xml and weblogic.xml - with the following content:
web.xml
<? xml version ="1.0" encoding ="UTF-8" ? > <br> < web-app version ="2.5" xmlns ="http://java.sun.com/xml/ns/javaee" <br> xmlns:xsi ="http://www.w3.org/2001/XMLSchema-instance" <br> xsi:schemaLocation ="http://java.sun.com/xml/ns/javaee java.sun.com/xml/ns/javaee/web-app_2_5.xsd" > <br> < welcome-file-list > <br> < welcome-file > index.jsp </ welcome-file > <br> </ welcome-file-list > <br> </ web-app > <br><br> * This source code was highlighted with Source Code Highlighter .weblogic.xml
<? xml version ="1.0" encoding ="UTF-8" ? > <br> < weblogic-web-app xmlns ="http://www.bea.com/ns/weblogic/90" <br> xmlns:j2ee ="http://java.sun.com/xml/ns/j2ee" <br> xmlns:xsi ="http://www.w3.org/2001/XMLSchema-instance" <br> xsi:schemaLocation ="http://www.bea.com/ns/weblogic/90 www.bea.com/ns/weblogic/90/weblogic-web-app.xsd" > <br> < context-root > /HelloClient </ context-root > <br> </ weblogic-web-app > <br><br> * This source code was highlighted with Source Code Highlighter .In these files, we specified a JSP page, which will open by default (welcome-file) and the path by which our web application will be accessible on the server (context-root).
Step 6
In the Ant-config created earlier (in the second step), we will add another section that automates the packaging of our library along with the JSP page to the web application (WAR archive).
< target name ="build" depends ="generate" > <br> < war destfile ="HelloClient.war" webxml ="web/WEB-INF/web.xml" > <br> < fileset dir ="web" /> <br> < lib dir ="lib" /> <br> </ war > <br> </ target > <br><br> * This source code was highlighted with Source Code Highlighter .This task is dependent on the generate task, therefore, with each rebuilding of the archive, the generation of the Web Service API library will be launched.
Step 7
Run the build
prompt> ant buildMake sure that the HelloClient.war archive appears in the project directory.
Step 8
The resulting archive is installed on the server as well, as described in the section on developing a Web Service, step 7:
prompt> cp HelloClient.war /path/to/domain/autodeploy/
You can test it immediately if you meet several conditions. Firstly, the Web Service itself (for which we wrote the client) must be deployed on the server and run, secondly the Location field must be empty so that the default endpoint URL is taken.
Below in the section "Testing the client" I will tell you how to test our client to the Web Service on the emulator using SoapUI.
SoapUI
When telling about Web Services, one cannot but mention a powerful tool that allows you to test both server and client side SOAP services, this is SoapUI. Download this application here .
There are free versions for both Microsoft Windows and Linux distributions. Installation will not cause problems.
Service testing
To test the Web Service (its server part), you need to run SoapUI and create a new project, as shown in the figure:

In the Initial WSDL / WADL field, we specify a WSDL file describing the service being tested, and you can specify both the path to the file on the local machine and the URL (which is actually done in the example). Also put a tick near Create Requests, this will tell SoapUI that you need to create an interface for generating SOAP requests for each operation, which is described in the WSDL file.

Our Web Service contains only one method - sayHello. You can go to the request object created under it. Screenshot from Linux version of SoapUI above. It shows that you can write the input parameters by correcting the XML and execute the query (the green triangle in the left corner). As a result, the service response will also be received in XML format.
The Windows version is somewhat richer and contains an additional user-friendly input form for input parameters.
This way you can test the SOAP service written on any platform. There are a lot of possibilities for configuring requests, for example, you can send HTTP headers (Authorization for example), you can build automatic testing, etc.
Customer testing
In order to test the client application, you need to force SoapUI to work in the Web Service emulation mode. To do this, create a project, as shown in the screenshot below:
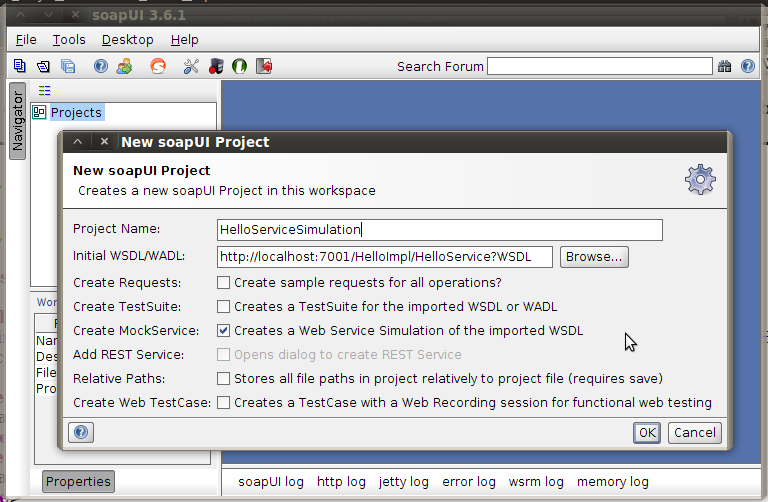
The WSDL file is still the same, to illustrate the process, we will emulate a Web Service, which, in fact, we have already written. But let's imagine that this is some kind of third-party system, access to which we do not yet have, there is only WSDL and we need to make sure that our client is working.
So, we specify the WSDL in the Initial WSDL / WADL field and tick the Create MockService box. This checkbox will tell SoapUI to create an emulator for the operations that are present in the WSDL file.
In the second step, we will be asked to select specific operations that should be emulated.

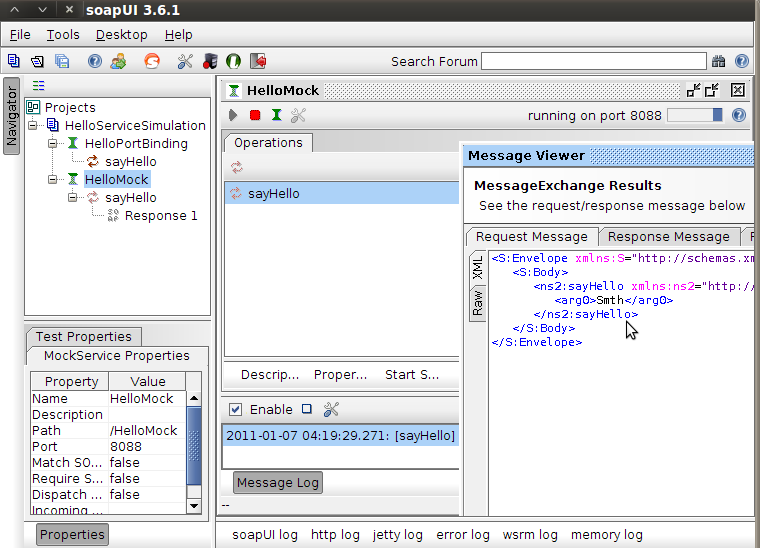
Put a tick near Start MockService and after clicking OK we get an emulator on port 8088. You can check that everything really works by following the link:
http: // localhost: 8088 / HelloMock? WSDL
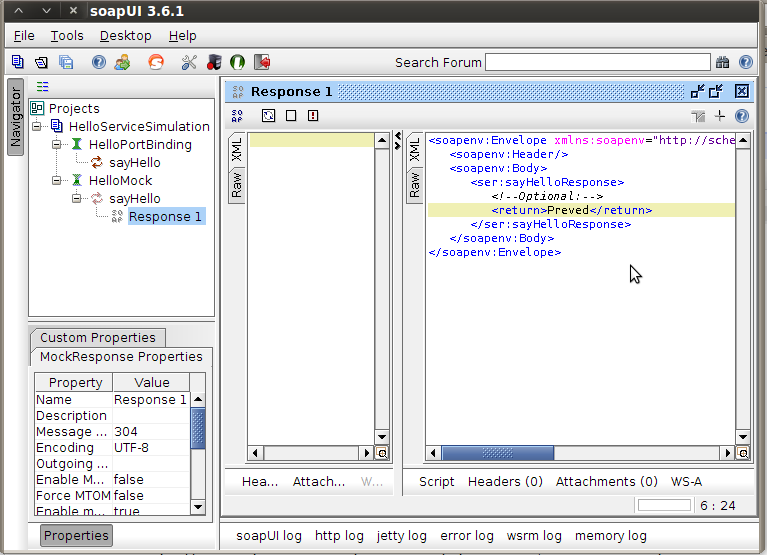
Before moving on to our client application, it would be nice to configure the answers that our pseudo Web Service will generate. To do this, open the response object under the sayHello method and correct the XML that will be returned to the client for each call to this operation.
Now is the time to return to the client. Endpoint URL should point to localhost : 8088 / HelloMock - the address of the Web Service emulator that was just launched. Let's write this line in the Location field of our JSP page.

Click Submit Query. Next to the button the result of the query should appear:

If you now go to SoapUI, then on the HelloMock emulator in the Message Log section you can see the completed SOAP request. You can open it and see all the information about it.
Accordingly, if we do not have a real Web Service at hand, or the existing one cannot be used for testing (production server), the correct approach would be to take its WSDL file and create an emulator. Test on it, playing with the output parameters.
Conclusion
In this article I tried to describe the development process of Web Services (both server-side and client) on the Oracle WebLogic Server platform using the available toolkit (Ant tasks jwsc and clientgen). Were also considered general approaches to testing any Web Services with the help of SoapUI.
Sources server side here .
Sources client side here .
Official literature is here .
Source: https://habr.com/ru/post/111486/
All Articles