HTML5 CANVAS step by step: Images
CANVAS step by step:
Continuation of the article about drawing on canvas , in which we learn to use images. Naturally, painting on canvas with primitives is not very convenient and requires certain labor costs, and the result is sometimes limping in quality. Therefore, naturally, canvas api provides for interaction with images. Adding an image can be divided into two steps: creating a JavaScript Image object, and the second and final step is to draw the image on the canvas using the drawImage function. Consider both steps in more detail.
Creating a new graphic object:
By the way, as the source of the image, you can specify the following line in which the image is described:
Now we turn to drawing the image on the canvas. For this there is a function drawImage.
It is worth noting that the image is loaded immediately after the image source is assigned to the object, and if it does not load completely by the time the drawing function is called, it will simply not be painted on the canvas. To avoid this situation, use this structure:
So we probably got to the point where we can consider an elementary example:
Link to fidl with examples for this to become.
But if everything was limited to a simple drawing with an image, then a separate article could not be written, but confined to the sub-item “Images” in the previous post. So now we will try to scale the image and for this there is another way to call the function drawImage:
Take the previous example and make some changes to drawImage:
Link to fidl with examples for this to become.
')
The third drawImage call with eight parameters looks something like this:
Let's take the same example and adjust the drawImage function for the third time:
Link to fidl with examples for this to become.
Now it remains to fix everything covered by a practical example. As in the example, it will be a small map, but not from some kind of existing game, but invented by us. In order for it to work normally, we will need to create in any graphic editor an image composed of fragments that we will need to draw a track, a house and a meadow. In general, map fragments are called tiles, and the file in which they are all assembled into one image is called a tileset. I drew this image myself in Pinta under Ubuntu.
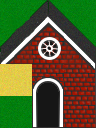
So, the dimension will be 8 by 8 square blocks 32 pixels wide. On the map we will need to portray the house and the track. The elements of the house are painted with pens, you can say each brick. Grass and sand was made by pouring the area with appropriate color and adding noise. All of course presented very primitive, but significant.
Consider with tweezers such a piece of code as var map = [[{x: 1, y: 4} ... the values of x and y indicate which element from the picture to take. Those. if the original drawing is divided into a 32 × 32 square, it will become clearer.
And forerun :
See an example
Continuation of the article about drawing on canvas , in which we learn to use images. Naturally, painting on canvas with primitives is not very convenient and requires certain labor costs, and the result is sometimes limping in quality. Therefore, naturally, canvas api provides for interaction with images. Adding an image can be divided into two steps: creating a JavaScript Image object, and the second and final step is to draw the image on the canvas using the drawImage function. Consider both steps in more detail.
Creating a new graphic object:
var img = new Image(); // img.src = 'image.png'; // By the way, as the source of the image, you can specify the following line in which the image is described:
img.src = 'data:image/gif;base64,R0lGODlhDAAMAOYAANPe5Pz//4KkutDb4szY3/b+/5u5z/3//3KWrfn//8rk8naasYGkuszY4Mbg8qG+0dzv9tXg5sTg8t/o7vP8/4iqv9ft9NPe5qfD1Mfc56O/0YKlu+Lr8M3Z4JCwxuj2/Of0+eDz9+rw9Z68z8/n8sHe8sbT3Ju6zuDv96nE1Onw9Nbh6cvX39Hq89Hq8u77/srW3tbh54Kku8ba56TD1u37/vL8/vL8/9ft9ebu8+Ps8bzM1Ymsw7XR4Nnj6Yanvsnj8qrI2Or2/NTf5tvl68vY3+r3/HqdtNji6OXt8eDz+dLc477c7bDO3t7n7d7v9s3Z4dbs9N/y98Pd6PX+/8/b4f7//+Hp7tDo8vv//+fu84GjunKWro6uxHqctOfu9P///wAAAAAAAAAAAAAAAAAAAAAAAAAAAAAAAAAAAAAAAAAAAAAAAAAAAAAAAAAAAAAAAAAAAAAAAAAAAAAAAAAAAAAAAAAAAAAAAAAAAAAAAAAAAAAAAAAAAAAAAAAAACH5BAAAAAAALAAAAAAMAAwAAAeEgCJfg4RfWlo5KlpgjI2OOklWBwcBAVmXCQlXHAUFVBkGBjMUNzZOEy81IF2sXUZCH0QrDyhPGzICAkohUj4XHhoQKQsLGDgWUTFIJxUjUy0uWNIkQxE9W9gMDD9BCgpLAEBNXl5H5F40DlUDEkxc71wICDwlDQBQHQ0EBEUsJjswBgQCADs='; 1. drawImage
Now we turn to drawing the image on the canvas. For this there is a function drawImage.
drawImage(image, x, y) // x y , It is worth noting that the image is loaded immediately after the image source is assigned to the object, and if it does not load completely by the time the drawing function is called, it will simply not be painted on the canvas. To avoid this situation, use this structure:
var img = new Image(); // img.onload = function() { // /* - */ } img.src = 'myImage.png'; // So we probably got to the point where we can consider an elementary example:
<!doctype html> <html> <meta charset='utf-8'> <head> <title>imgExample</title> </head> <body> <canvas id='example'> </canvas> <script> var example = document.getElementById("example"), ctx = example.getContext('2d'), // pic = new Image(); // "" pic.src = 'http://habrahabr.ru/i/nocopypast.png'; // , pic.onload = function() { // onLoad, ctx.drawImage(pic, 0, 0); // 0, 0 } </script> </body> </html> Link to fidl with examples for this to become.
2. Pull-pull
But if everything was limited to a simple drawing with an image, then a separate article could not be written, but confined to the sub-item “Images” in the previous post. So now we will try to scale the image and for this there is another way to call the function drawImage:
drawImage(image, x, y, width, height) // width, height Take the previous example and make some changes to drawImage:
ctx.drawImage(pic, 0, 0, 300, 150); Link to fidl with examples for this to become.
')
3. Draw a fragment of the image
The third drawImage call with eight parameters looks something like this:
drawImage(image, sx, sy, sWidth, sHeight, dx, dy, dWidth, dHeight); // // sx, sy, sWidth, sHeight - // dx, dy, dWidth, dHeight Let's take the same example and adjust the drawImage function for the third time:
ctx.drawImage(pic, 25, 42, 85, 55, 0, 0, 170, 110); Link to fidl with examples for this to become.
4. Task
Now it remains to fix everything covered by a practical example. As in the example, it will be a small map, but not from some kind of existing game, but invented by us. In order for it to work normally, we will need to create in any graphic editor an image composed of fragments that we will need to draw a track, a house and a meadow. In general, map fragments are called tiles, and the file in which they are all assembled into one image is called a tileset. I drew this image myself in Pinta under Ubuntu.
So, the dimension will be 8 by 8 square blocks 32 pixels wide. On the map we will need to portray the house and the track. The elements of the house are painted with pens, you can say each brick. Grass and sand was made by pouring the area with appropriate color and adding noise. All of course presented very primitive, but significant.
Consider with tweezers such a piece of code as var map = [[{x: 1, y: 4} ... the values of x and y indicate which element from the picture to take. Those. if the original drawing is divided into a 32 × 32 square, it will become clearer.
And forerun :
<!doctype html> <html> <meta charset='utf-8'> <head> <title>imgExample</title> </head> <body> <canvas id='example'> </canvas> <script> var example = document.getElementById('example'), // ctx = example.getContext('2d'), // cellSize = 32, // pic = new Image(), // "" map = // [ [{x:1,y:4},{x:1,y:4},{x:1,y:4},{x:1,y:4},{x:1,y:4},{x:1,y:4},{x:1,y:4},{x:1,y:4}], // 1 [{x:1,y:4},{x:1,y:1},{x:2,y:1},{x:3,y:1},{x:1,y:4},{x:1,y:4},{x:1,y:4},{x:1,y:4}], // 2 [{x:1,y:4},{x:1,y:2},{x:2,y:2},{x:3,y:2},{x:1,y:4},{x:1,y:3},{x:1,y:3},{x:1,y:3}], // 3 [{x:1,y:4},{x:3,y:4},{x:2,y:3},{x:3,y:4},{x:1,y:4},{x:1,y:3},{x:1,y:4},{x:1,y:4}], // 4 [{x:1,y:4},{x:3,y:4},{x:2,y:4},{x:3,y:4},{x:1,y:4},{x:1,y:3},{x:1,y:4},{x:1,y:4}], // 5 [{x:1,y:4},{x:1,y:4},{x:1,y:3},{x:1,y:4},{x:1,y:4},{x:1,y:3},{x:1,y:4},{x:1,y:4}], // 6 [{x:1,y:4},{x:1,y:4},{x:1,y:3},{x:1,y:3},{x:1,y:3},{x:1,y:3},{x:1,y:4},{x:1,y:4}], // 7 [{x:1,y:4},{x:1,y:4},{x:1,y:4},{x:1,y:4},{x:1,y:4},{x:1,y:4},{x:1,y:4},{x:1,y:4}] // 8 ]; // (x y ) // 88 example.width = 8 * cellSize; example.height = 8 * cellSize; pic.src = 'https://habrastorage.org/getpro/habr/post_images/e85/727/cb1/e85727cb1a88099325eaf5b243d4c41f.png'; pic.onload = function() { // onLoad, for (var j = 0 ; j < 8; j ++) for (var i = 0; i < 8; i ++) // '' ctx.drawImage(pic, (map[i][j].x-1)*cellSize, (map[i][j].y-1)*cellSize, 32, 32, j*cellSize, i*cellSize, 32, 32); } </script> </body> </html> See an example
Source: https://habr.com/ru/post/111385/
All Articles