Native interfaces in Qt

This article focuses on GUI programming on the Nokia Qt framework. We will look at how to develop interfaces for native display on Windows, Linux and Mac OS X platforms.
Presentation [1] was led by Jens
')
From the translator: further, since this is a
So let's get started. Each graphical environment has its own set of rules (User Interface Guidelines, UIG) for creating interfaces designed for these environments. Among the main ones, there are such manuals as Windows User Experience Interaction Guideline, Apple Human Interface Guideline, KDE User Interface Guideline and GNOME HID. Each of these guides "determines the position of buttons and frills" of a particular environment. The Qt framework, in turn, provides support for all of these guides, giving the developer the ability to create programs using widgets that “adapt” to the environment.
QStyle
QStyle is a base class that allows an application to fit into the graphical environment of the operating system.
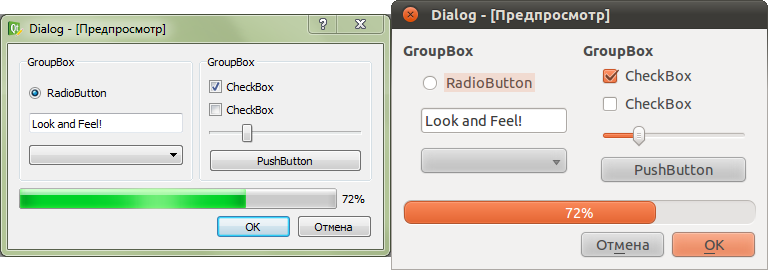
Interfaces Windows 7 and Ubuntu 10.10, respectively:
QStyle is responsible for the appearance, size, shape, and any platform-specific settings for displaying the style (theme).
To modify existing styles in their projects there is a class QStyleOption . Example of use:
QStyleOption opt ; <br/>
opt. rect = arrowRect ; <br/>
opt. state = QStyle :: Sate_Item | QStyle :: State_Children ; <br/>

if ( expanded ) <br/>
opt. state |= QStyle :: State_Open ; <br/>
style ( ) -> drawPrimitive ( QStyle :: PE_IndicatorBranch , & opt , painter , this ) ;
The QStyleOption class stores parameters used by QStyle functions.
If you need to modify the style, there is no need to inherit it. It is possible and necessary to use QProxyStyle (introduced with Qt 4.6). It allows you to easily modify the system style without disturbing it.
class MyProxyStyle : public QProxyStyle<br/>

{ <br/>
public : <br/>
int styleHint ( StyleHint hint , const QStyleOption * option = 0 , <br/>

const QWidget * widget = 0 , QStyleHintReturn * returnData = 0 ) const <br/>
{ <br/>
if ( hint == QStyle :: SH_UnderlineShortcut ) <br/>

return 0 ; <br/>
return QProxyStyle :: styleHint ( hint , option , widget , returnData ) ; <br/>

} <br/>
} ; <br/>
<br/>
int main ( int argc , char ** argv ) <br/>
{ <br/>
QApplication a ( argc , argv ) ; <br/>

a. setStyle ( new MyProxyStyle ) ; <br/>
//... <br/>
}
Style sheets
The use of style sheets should be approached with caution, as their use can spoil the look. You should try to mix them with the system palette: use translucency and system palette.
Color coding should be avoided:
QString css = "QLabel { color:palette(highlight); }" ;And if you want your own color:
QColor color ( 255 , 0 , 0 ) ; <br/>

QString css = QString ( "QLabel { color: %1; }" ) . arg ( color. name ( ) ) ;
To create segmented buttons, you will need some big manipulations using background images for buttons and juggling with indents.
QWidget * segBtn = new QWidget ( this ) ; <br/>
QToolButton * backBtn = new QToolButton ; <br/>

QToolButton * forwardBtn = new QToolButton ; <br/>
segBtn -> setLayout ( new QHBoxLayout ) ; <br/>
segBtn -> layout ( ) -> setSpacing ( 0 ) ; <br/>

segBtn -> layout ( ) -> setMargin ( 0 ) ; <br/>
backBtn -> setIcon ( QIcon ( ":/imgs/arrow-back.png" ) ) ; <br/>
backBtn -> setFixedSize ( 29 , 32 ) ; <br/>

backBtn -> setStyleSheet ( "QToolButton { border-image: url(:/imgs/button-left.png); }" <br/>
"QToolButton:hover { border-image: url(:/imgs/button-left-hover.png); }" ) ; <br/>
forwardBtn -> setIcon ( QIcon ( ":/imgs/arrow-forward.png" ) ) ; <br/>

forwardBtn -> setFixedSize ( 29 , 32 ) ; <br/>
forwardBtn -> setStyleSheet ( "QToolButton { border-image: url(:/imgs/button-right.png); }" <br/>

"QToolButton:hover { border-image: url(:/imgs/button-right-hover.png); }" ) ; <br/>
segBtn -> layout ( ) -> addWidget ( backBtn ) ; <br/>
segBtn -> layout ( ) -> addWidget ( forwardBtn ) ; <br/>

mainToolBar -> addWidget ( segBtn ) ;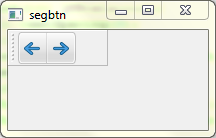
As can be seen from the example (borrowed from the article “Using Blur Behind on Windows” [2] ), pseudo-classes are also available.
Using attribute selectors, you can customize the display for each system style:
"QToolButton[style=QMacStyle] { border-image: url(:/imgs/button-mac-right.png); }" <br/>
"QToolButton[style=QWindowsVistaStyle] { border-image: url(:/imgs/button-vista-right.png); }"
Dialogues
According to the guidelines, each operating system (graphical environment) has its own ideas why the “Save”, “Cancel”, “OK” buttons and so on must be “exactly there, not here”. And so on in the same way about the system icons on the buttons, different inscriptions
Using standard buttons in dialogs, taking into account the UIG environment, is achieved using QDialogButtonBox .
QDialogButtonBox box ( QDialogButtonBox :: Cancel | QDialogButtonBox :: Help | <br/>

QDialogButtonBox :: Ok | QDialogButtonBox :: Save ) ;

You can also add your own buttons with their role:
QDialogButtonBox box ; <br/>

box. addButton ( myButton , QDialogButtonBox :: AcceptRole ) ;
The significance of specifying the role of a button is clearly seen in the example of a simple modal dialog:
MyQDialogSubcass dialog ; <br/>
//... <br/>

if ( dialog. exec == QDialog :: Accept ) { <br/>
//Make some noise? <br/>
}
It should be remembered that you should not abuse modal dialogues. So, for example, on Windows, it is recommended to use them for critical or rarely used, one-time tasks that need to be completed before proceeding. In KDE, using modal dialogs is only necessary in cases where user interaction with the program can lead to data loss or other problems (defined by the UIG).
What happens when using modal dialogs?

(Example [3] is based on the sdi code from the examples shipped with the Qt libraries)
There are several ways to display a dialog box:
- QDialog :: show () is not modal;
- QDialog :: exec () - modal to the program;
- QDialog :: open () - modal to the window.
Thus, it is possible to create non-modal dialogs, modals relative to the application and relative to a specific window or widget.
Also, it is not uncommon when a dialogue is a form for entering
Another thing that shows the difference in manuals is the use of markup for input forms ( QFormLayout is a 2-column layout). Everything is perfectly visible and clear:

QFormLayout * layout = new QFormLayout ( ) ; <br/>
layout -> addRow ( tr ( " :" ) , <br/>

userName ) ; <br/>
layout -> addRow ( tr ( ":" ) , <br/>
eMail ) ; <br/>
layout -> addRow ( tr ( ":" ) , <br/>

passWord ) ; <br/>
layout -> addRow ( tr ( " :" ) , <br/>
passWordAgain ) ;
Cross platform notes
How to show the user that the current document has been modified?
setWindowModified ( ture ) ; <br/>
setWindowFilePath ( "Untitled 1.txt" ) ;
Use relative paths to files (for example, to documentation: “
How to attract the user's attention?
void QApplication :: alert ( QWidget * widget , int msec = 0 ) [ static ]On Mac, the icon in the dock will start jumping, and on Windows, the application window button will flash on the taskbar.

To find addresses of storages (photos, videos, temporary files ...) use QDesktopServices :: storageLocation ().
To send an email from your application, open a page in a browser, or
QDesktopServices :: openUrl ( "mailto:support@habrahabr.ru" ) ; <br/>

QDesktopServices :: openUrl ( "habrahabr.ru" ) ; <br/>
QDesktopServices :: openUrl ( QUrl :: fromLocalFile ( ... ) ) ;
To use hot keys in an application, it’s best to use standard combinations . Some combinations on different platforms differ, it’s worth considering (of course, no one forbids adding your combinations, for example, to exit Ctrl + Q in Windows - it’s convenient, but not standard )
// "" <br/>
QList < QKeySequence > keys = QKeySequence :: keyBindings ( QKeySequence :: Cut ) ; <br/>

foreach ( QKeySequence key , keys ) { <br/>
logStream << key. toString ( QKeySequence :: PortableText ) ; <br/>
// ... <br/>

}
It is recommended to use a similar to the original theme of icons, so that they do not differ much with the environment of the OS. With Linux is easier. There is support for:
QIcon :: fromTheme ( "edit-cut" , QIcon ( ":/edit-cut.png" ) ) ;If the system finds an icon for the
The specification of the names of icons from FreeDesktop is available here .

Prioritize for QAction . This will highlight the highest priority actions in the user interface. For example, when the toolbar is set to Qt :: ToolButtonTextBesideIcon, the actions with low priority ( LowPriority ) will be displayed without signatures
void QAction :: setPriority ( Priority priority )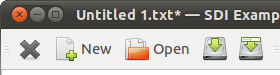
Menu icons are not used on Mac, but used on Windows and KDE. In GNOME, it depends on the settings. To "rewrite" this to help us have:
void QAction :: setIconVisibleInMenu ( bool visible ) <br/>
QApplication :: setAttribute ( Qt :: AA_DontShowIconsInMenus ) ;
GNOME and Mac users are used to the fact that the settings are applied immediately after they have been changed, and Windows and KDE users are spoiled with the ability to apply (and undo) the changes they have made, without applying the settings before clicking the corresponding button.
About MDI Interfaces: Mac and GTK + do not support them. In Windows, they are still used, but somehow it no longer fits into the image of the modern OS.
If you need to use some platform-dependent functions (WinAPI, Cocoa ...), then there are macros Q_WS_WIN , W_WS_MAC , Q_WS_X11 , ...
#ifdef Q_WS_WIN <br/>

actionClose -> setShortcut ( QKeySequence ( "Ctrl+Q" ) ) ; <br/>
#endif
You may also need QWidget :: winId () for these tasks, which returns the system pointer HWND , NSView * or X11 handle (on Windows, Mac and Linux, respectively). It should be remembered that the window identifier may change during the execution of the program - the QEvent :: WinIdChange event will be received.
Platform-Specific Notes
Mac
Use the high resolution application icon.
For the notification area, use the
Create QMenuBar without a parent, he does not need him. The first QMenuBar created will be used by default.
The QMainWindow :: setUnifiedTitleAndToolBarOnMac option (bool set) will merge your panels into one with the window title. But remember, this will lead to
- impossibility to move toolbars;
- there will be only 1 line without breaks (there were several panels above each other - there will be one);
- in full screen mode the panels will not be visible;

There is a menu in the dock too. To use it in your application:
QMenu * menu = new QMenu ; <br/>

// ... <br/>
extern void qt_mac_set_dock_menu ( QMenu * ) ; <br/>
qt_mac_set_dock_menu ( menu ) ;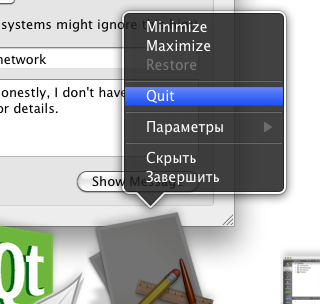
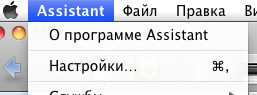
Qt will automatically rearrange (and rename, if that) your menu items to their rightful places in Mac, if you set them to roles with QAction: setMenuRole ( MenuRole menuRole). For example, the menu of the tincture will be moved to “ Program → Settings ... ”
X11
Here the main point is to follow the standards of freedesktop.org - this is:
- menu specifications;
- icon themes;
- autostart;
- bookmarks;
- file .desktop .
A simple configuration .desktop file contains:
- application icon;
- button for the menu;
- registration of
mime types ; - ...
How to determine if a user uses KDE or GNOME? Actually, there is no 100% way. You can try to check the variable " DESKTOP_SESSION ".
$ echo $DESKTOP_SESSION <br/>

gnome
Of course, do not forget about the different behavior of applications in GNOME and KDE. We are testing.
Windows
QSettings in Windows uses the registry. Here you can use it to read system settings.
QSettings settings ( "HKEY_CURRENT_USER\\...\\Explorer\\Advanced" , QSettings :: NativeFormat ) ; <br/>

bool result = settings. value ( "EnableBalloonTips" , true ) . toBool ( ) ;
You can also use themes such as DotNet or Explorer. All this can be found in solutions (ftp) .
You can also enable Blur Behind (2) , but Qt does not yet provide an API for this. However, you can use WinAPI directly by setting the WA_TranslucentBackground attribute and not forgetting to enable the WA_NoSystemBackground from the widget.
Footnotes
[1] - Presentation and its transcription ;
[2] - The “ Using Blur Behind on Windows ” article by Qt Labs (and the article “ Creating background blur under a window in Windows ” here);
[3] - Source code of the rewritten example sdi.
Successes in the new 365-day!
Source: https://habr.com/ru/post/111345/
All Articles