We program in C / C ++ in Visual Studio under Arduino
This post will help beginners save a few hours (days) for setting up the Visual Studio environment for developing for Arduino in C / C ++.
')
A couple of months ago I saw a teacher with a kind of scarf connected to a computer. On a scarf seven-segment indicators and several LEDs were visible. The teacher was versed in some kind of code; in the meantime, the veil signaled to him something vividly. I was immediately interested in what he was doing there ... However, all I can learn from him is that the name is debugging. By a short googling I go out on a toy called “Arduino”. I order myself an Arduino mega, the one with the Atmega1280 (only $ 29.99) and in two weeks running to the post office to receive the cherished toy.
Because I am an avid Windows developer accustomed to the VS environment, then I decided to immediately distract myself from the Arduino IDE native environment.
So, we will need:
All googled at once.
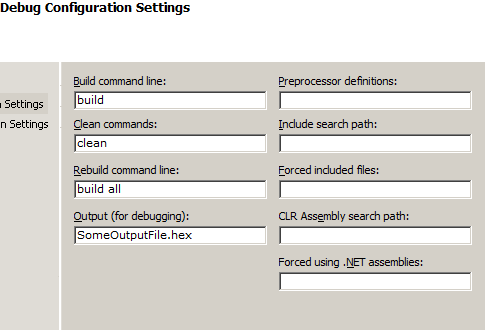
So let's get started. Install WinAVR, avr-libc, download Avrdude. Connect the Arduino to the computer and install the driver. Create a “makefile project” in Visual Studio. Fill in the fields as shown below.
In the place where WinAVR was installed in the sample subdirectory, there is a Makefile that can be used to build the project. We copy to ourselves, in the folder created by the makefile project, and change some lines:
This string will be passed as parameters for Avrdude.
Change the all section to something like this:
Add to the list of tasks «program». With a successful compilation, this will automatically load the firmware into the MC.
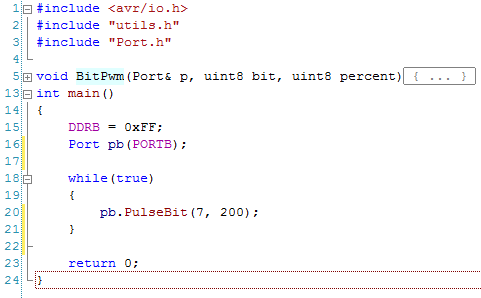
Basically, everything is ready. We try to write a minimal program (blinker LED L). We look at the file arduino-mega-schematic.pdf and see that port 13 of the Arduino is nothing like PB7. We write about the following program:
The minimum interface for working with I / O ports:
Save the makefile, build the project, admire the result.
P.S. By the 10th, a set of various sensors and sensors will arrive. By February, I will assemble an ultrasonic rangefinder and a photographic recorder.
Preamble
')
A couple of months ago I saw a teacher with a kind of scarf connected to a computer. On a scarf seven-segment indicators and several LEDs were visible. The teacher was versed in some kind of code; in the meantime, the veil signaled to him something vividly. I was immediately interested in what he was doing there ... However, all I can learn from him is that the name is debugging. By a short googling I go out on a toy called “Arduino”. I order myself an Arduino mega, the one with the Atmega1280 (only $ 29.99) and in two weeks running to the post office to receive the cherished toy.
Plot
Because I am an avid Windows developer accustomed to the VS environment, then I decided to immediately distract myself from the Arduino IDE native environment.
So, we will need:
- Actually, the environment itself;
- Visual Assist X - optional, to facilitate development. Replaces itself with built-in IntelliSense built-in VS. A bunch of additional options. Pay;
- WinAVR latest version. This is a C / C ++ program compiler for the AVR “platform”;
- avr-libc. Minimal implementation of the standard C library for AVR. Contains such useful functions as, for example, _delay_ms or _delay_us (delay in milli- and microseconds);
- Avrdude. Desirable fresh version, universal programmer for AVR;
- FTDI Virtual Com Port Drivers. Without going into details, we will call it “drivers for Arduino”;
- AvrStudio - optional. It has a built-in simulator of the microcontroller that allows you to debug the program step by step;
- Arduino schematic. You will need this pdf-file in order to find out which ports of the Arduino outputs are connected to which ICs.
All googled at once.
So let's get started. Install WinAVR, avr-libc, download Avrdude. Connect the Arduino to the computer and install the driver. Create a “makefile project” in Visual Studio. Fill in the fields as shown below.
In the place where WinAVR was installed in the sample subdirectory, there is a Makefile that can be used to build the project. We copy to ourselves, in the folder created by the makefile project, and change some lines:
MCU = atmega1280
F_CPU = 16000000
FORMAT = ihex
TARGET = ATMEGA-1280-DEV-BOARD
SRC = $(TARGET).C- The first line indicates the type of microcontroller. For Arduino, mega is atmega1280;
- The second line sets the frequency at which our MK will work;
- The third line is the output file format. It is better to leave intel hex;
- The fourth is the name of your project;
- The fifth is a list of project source files.
PROGRAMMER_FLAGS = -p m1280 -c arduino -b 57600 -P COM3 -U flash:w:$(TARGET).hexThis string will be passed as parameters for Avrdude.
- The -p option specifies the type of device to be sewn;
- -c indicates the type of programmer. Arduino uses the information exchange protocol borrowed from the STK500 programmer, so here you can safely enter stk500. However, in the new version of avrdude they added Arduino as a programmer, so with confidence we enter arduino here with confidence;
- The next option indicates at what speed the data transfer will occur. Here you should always put 57600;
- The -P option specifies the port to which the programmer is connected;
- The last option indicates which operation should be performed. For us, this is loading the program's microcontroller into flash memory.
Change the all section to something like this:
all: build programAdd to the list of tasks «program». With a successful compilation, this will automatically load the firmware into the MC.
Basically, everything is ready. We try to write a minimal program (blinker LED L). We look at the file arduino-mega-schematic.pdf and see that port 13 of the Arduino is nothing like PB7. We write about the following program:
#include <avr/io.h>
#include <util/delay.h>

int main()
{
DDRB = 0xFF;
while ( true )
{
PORTB |= (1 << 7);
_delay_ms(500);
PORTB &= ~(1 << 7);
_delay_ms(500);
}
return 0;
}

* This source code was highlighted with Source Code Highlighter .
The minimum interface for working with I / O ports:
#include "utils.h"

class Port
{
public :
Port(PORT& p) : _p(p) {};
Port& operator ! ();
Port& operator += (uint8 b);
Port& operator -= (uint8 b);
Port& operator = (Port& p);
void SetLow();
void SetHigh();
PORT& GetValue();
bool ClearBit(uint8 b);
bool SetBit(uint8 b);
void Pulse(uint8 t);
void PulseBit(uint8 b, uint8 t);
private :
PORT& _p;
};

* This source code was highlighted with Source Code Highlighter .
Save the makefile, build the project, admire the result.
P.S. By the 10th, a set of various sensors and sensors will arrive. By February, I will assemble an ultrasonic rangefinder and a photographic recorder.
Source: https://habr.com/ru/post/111321/
All Articles