Netgear WNR3500L: Turning a router into a NAS
The purchase history of the router Netgear WNR3500L is similar to the proverb of motorists: car tuning begins after an accident. So in my case. An old and buggy D-Link DIR300 died the death of the brave (most likely overheating from the load). Since he worked, to put it mildly, unsatisfactorily, it was decided to buy a more powerful and modern piece of metal.
Among the applicants were 3 models: Asus N16, Linksys WRT160NL and Netgear WNR3500L. All of them met several criteria: fast processor, a lot of RAM, USB for connecting a hard disk and the ability to install alternative firmware. Despite the great love of the Linksys brand, the choice fell towards Netgear. The reason is simple: linksysis was simply not available anywhere, I bought the asus right in front of my nose, and the router was very necessary. As a drive was chosen 3.5 ”WD Elements at 1.5TB.
WNR3500L is positioned by Netgear as an open source router. The most popular firmware for it is Tomato, OpenWRT and DD-WRT. I stopped at DD-WRT. I liked it both in speed and in functionality, which is extended by installing Optware packages. Earlier, the topic of installing Samba on DD-WRT (right here ) was already revealed in Habré, but in this topic I will try to solve the issue of installation and initial configuration of this router as much as possible according to the method that our foreign colleagues call “The Right Way”.
')
First we follow the link and type in the model of the router in the search box. Next, select from the found a specific model. In my case, this is the WNR3500L. Now you need to download 2 files: the actual firmware and Netgear WNR3500L Firmware: Special File for initial flashing. Since the flash memory in the router is as much as 8MB, I chose the NEWD K2.6 Big Generic firmware.
Now everything is ready for the firmware. Since the router "out of the box" does not understand the firmware in * .bin format, we first d-wrt.v24-14896_NEWD-2_K2.6_mini-WNR3500L.chk . Go to the router (192.168.1.1 by default) in the section "Update router", select * .chk and click "Download".

Now we just wait and do nothing. After the update is complete, you need to reset the router using the hardware button and wait for the download. Again we go to the router and see the DD-WRT web interface asking to enter a new password.

After entering the password, go to the Administration> Firmware Upgrade section, select the fully-fledged firmware in * .bin format and click Upgrade.

After a few minutes, enjoy the result. Next, we proceed to setting up an Internet connection, but since the settings are different for each provider, I don’t see any reason to describe this process in detail, they are as simple as setting up any other router. In my case, this is VPN via PPTP. All Internet connection settings are on the Setup> Basic Setup tab.
In order for the disk to be correctly mounted to the system, it must be properly partitioned and formatted. For the disk we will use the ext3 file system. You can format it in any Linux distribution (the Live CD will do), or directly from under Windows, using disk utilities (Acronis Disk Director Suite or Partition Magic). I chose the second path. The disk should be divided into 4 partitions (Primary, or Main in the Russian version), in exactly this order:
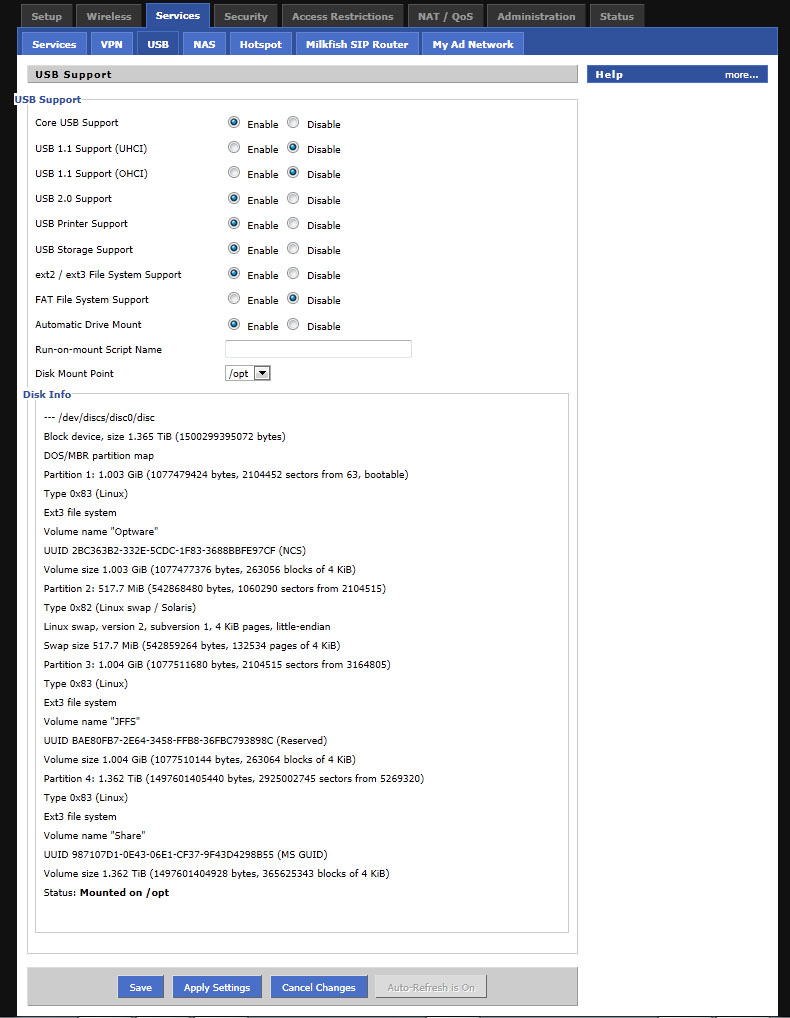
This procedure is needed for proper automounting in DD-WRT. Earlier (using the old method), the disk was mounted in / jffs, the mount scripts were written to the startup. This is no longer needed. After splitting the disk go to the settings of the router. The Services> USB tab is shown as follows:

We connect the disk to the router and reboot it with the “iron” button (I did not pick up the disk after the soft reset). After loading the router, again go to the web interface to the Services> USB tab, and if the previous steps were performed correctly, we see something like the following:
Now we proceed to the installation of samba. First connect to the router with any telnet client (I used putty)
Login: root
Password: the one that you specified at the very beginning in the web interface.
and using the mount command, check if the disks were mounted correctly. Should issue something like this:
Next is the installation of the basic Optware packages. For this you need to run the following commands:
This is probably the longest stage. On my 4 MB channel, it took about 20 minutes. After this procedure is completed, you need to wait about 1-2 minutes (temp is cleared), and then restart the router with the reboot command.
By rebooting the router, you can check the free space on mounted disks with the df -h command
as well as running services with the service command

Now you need to update the samba to the latest available version (3.5 at the time of this writing). Do the following: copy the configs of the old samba
then move the copies to a safe place.
Next you need to edit the samba config. Open the copied version.
and look for the string interfaces = . We replace it with interfaces = 192.168.1.1/24 . Save the config and go ahead - stop the samba services
remove samba2 and install samba35 + SWAT (web interface).
Samba swears at configs, but we do not pay attention to it and continue. We transfer the copies made earlier to the legal place and we delete configs made by samba35.
We start samba services
Reboot and enjoy!
After the reboot, you need to start the xinetd service. It will allow you to use the samba web interface, which will be available at http://192.168.1.1:901 .
Initially, samba is already configured quite competently. Those interested can pick it up more, but I did not touch it. The created samba will be available at \\ 192.168.1.1 \ public. Next, I advise you to turn off Twonky. This is a good media server, but it eats an incredible amount of router resources (although you can try using it on the WNDR3700). All you need is 2 teams.
He won't bother us anymore. Now came a series of Transmission torrent client. First you need to run it
then go to the web interface at http://192.168.1.1:9091 and start using! For more convenient use of the torrent I will advise one good thing - Transmisson Remote GUI . With it you can more fully control the download process. But the most useful feature is the transfer of torrents. Transmission initially downloads all files to its folder: / mnt / Torrent / work. But with the help of Transmisson Remote you can drag them out into the necessary directories after downloading. I tested the torrent on multiple connections, the results are as follows: the router's processor is loaded 100% (4 MB / s channel) with about 3k connections, but the router does not hang and outwardly does not show any signs of its loading (which is very strange).
That's all. About an hour of time spent converting this router to a NAS. During the tests of samba, the router showed a speed of approximately 5.5MB / s (over the wire), which I consider sufficient for the functions assigned to it. Wi-Fi speed is lower. Screenshot of a small test:

Disabling encryption on Wi-Fi does not give a significant increase in speed. The average speed is 2.4MB \ sec. The maximum that managed to squeeze out of Wi-Fi - 3MB \ s (disabled all services except samba). CPU power - with a margin.
I also note that what is described in this topic is not all the capabilities of DD-WRT firmware. Optware packages allow you to greatly expand the functionality of the device, but do not forget that this is a home router and you should not demand high performance from it with a huge number of connected services. In all you need to know when to stop.
In the next topic, I will describe the configuration of the print and media server on this router. Thanks for attention.
Among the applicants were 3 models: Asus N16, Linksys WRT160NL and Netgear WNR3500L. All of them met several criteria: fast processor, a lot of RAM, USB for connecting a hard disk and the ability to install alternative firmware. Despite the great love of the Linksys brand, the choice fell towards Netgear. The reason is simple: linksysis was simply not available anywhere, I bought the asus right in front of my nose, and the router was very necessary. As a drive was chosen 3.5 ”WD Elements at 1.5TB.
WNR3500L is positioned by Netgear as an open source router. The most popular firmware for it is Tomato, OpenWRT and DD-WRT. I stopped at DD-WRT. I liked it both in speed and in functionality, which is extended by installing Optware packages. Earlier, the topic of installing Samba on DD-WRT (right here ) was already revealed in Habré, but in this topic I will try to solve the issue of installation and initial configuration of this router as much as possible according to the method that our foreign colleagues call “The Right Way”.
')
Step one: Install DD-WRT.
First we follow the link and type in the model of the router in the search box. Next, select from the found a specific model. In my case, this is the WNR3500L. Now you need to download 2 files: the actual firmware and Netgear WNR3500L Firmware: Special File for initial flashing. Since the flash memory in the router is as much as 8MB, I chose the NEWD K2.6 Big Generic firmware.
Now everything is ready for the firmware. Since the router "out of the box" does not understand the firmware in * .bin format, we first d-wrt.v24-14896_NEWD-2_K2.6_mini-WNR3500L.chk . Go to the router (192.168.1.1 by default) in the section "Update router", select * .chk and click "Download".
Now we just wait and do nothing. After the update is complete, you need to reset the router using the hardware button and wait for the download. Again we go to the router and see the DD-WRT web interface asking to enter a new password.
After entering the password, go to the Administration> Firmware Upgrade section, select the fully-fledged firmware in * .bin format and click Upgrade.
After a few minutes, enjoy the result. Next, we proceed to setting up an Internet connection, but since the settings are different for each provider, I don’t see any reason to describe this process in detail, they are as simple as setting up any other router. In my case, this is VPN via PPTP. All Internet connection settings are on the Setup> Basic Setup tab.
Step Two: Preparing the Disk and Installing Samba
In order for the disk to be correctly mounted to the system, it must be properly partitioned and formatted. For the disk we will use the ext3 file system. You can format it in any Linux distribution (the Live CD will do), or directly from under Windows, using disk utilities (Acronis Disk Director Suite or Partition Magic). I chose the second path. The disk should be divided into 4 partitions (Primary, or Main in the Russian version), in exactly this order:
- Partituon # 1. Optware (ext3): mounted on / opt. Optware packages will be installed here. Size not less than 512 megabytes.
- Partituon # 2. Swap (Linux Swap): swap itself. Large size is not needed. 128 MB is enough.
- Partituon # 3. JFFS (ext3): mounted on / temp. Size not less than 128 megabytes.
- Partituon # 4. Share (ext3): mounted on / mnt. Actually there will be a ball for samba.
This procedure is needed for proper automounting in DD-WRT. Earlier (using the old method), the disk was mounted in / jffs, the mount scripts were written to the startup. This is no longer needed. After splitting the disk go to the settings of the router. The Services> USB tab is shown as follows:
We connect the disk to the router and reboot it with the “iron” button (I did not pick up the disk after the soft reset). After loading the router, again go to the web interface to the Services> USB tab, and if the previous steps were performed correctly, we see something like the following:
Now we proceed to the installation of samba. First connect to the router with any telnet client (I used putty)
Login: root
Password: the one that you specified at the very beginning in the web interface.
and using the mount command, check if the disks were mounted correctly. Should issue something like this:
root@berry:~# mount
rootfs on / type rootfs (rw)
/dev/root on / type squashfs (ro)
none on /dev type devfs (rw)
proc on /proc type proc (rw)
ramfs on /tmp type ramfs (rw)
sysfs on /sys type sysfs (rw)
devpts on /dev/pts type devpts (rw)
devpts on /proc/bus/usb type usbfs (rw)
/dev/discs/disc0/part1 on /opt type ext3 (rw,noatime,data=ordered)
Next is the installation of the basic Optware packages. For this you need to run the following commands:
wget -O /tmp/prep_optware wd.mirmana.com/prep_optware
sh /tmp/prep_optware
This is probably the longest stage. On my 4 MB channel, it took about 20 minutes. After this procedure is completed, you need to wait about 1-2 minutes (temp is cleared), and then restart the router with the reboot command.
By rebooting the router, you can check the free space on mounted disks with the df -h command
root@berry:~# df -h
Filesystem Size Used Avail Use% Mounted on
rootfs 5.7M 5.7M 0 100% /
/dev/root 5.7M 5.7M 0 100% /
/dev/discs/disc0/part1
1010M 387M 573M 41% /opt
/dev/sda4 1.4T 19G 1.3T 2% /mnt
/dev/sda3 1010M 33M 927M 4% /tmp/c
as well as running services with the service command
Now you need to update the samba to the latest available version (3.5 at the time of this writing). Do the following: copy the configs of the old samba
cp /opt/etc/samba/smb.conf /opt/etc/samba/smb.conf.copy
cp /opt/etc/init.d/S80samba /opt/etc/init.d/S80samba.copy
then move the copies to a safe place.
mv /mnt/smb.conf.copy /opt/etc/samba/smb.conf.copy
mv /mnt/S80samba.copy /opt/etc/init.d/S80samba.copy
Next you need to edit the samba config. Open the copied version.
vi /opt/etc/samba/smb.conf.copy
and look for the string interfaces = . We replace it with interfaces = 192.168.1.1/24 . Save the config and go ahead - stop the samba services
service samba stop
service samba off
remove samba2 and install samba35 + SWAT (web interface).
ipkg-opt remove samba2
ipkg-opt install samba35
ipkg-opt install samba35-swat
Samba swears at configs, but we do not pay attention to it and continue. We transfer the copies made earlier to the legal place and we delete configs made by samba35.
cp /opt/etc/samba/smb.conf.copy /opt/etc/samba/smb.conf
cp /opt/etc/init.d/S80samba.copy /opt/etc/init.d/S80samba
rm /opt/etc/init.d/S08samba
rm /opt/etc/init.d/S80samba.copy
We start samba services
service samba on
service samba start
Reboot and enjoy!
rebootStep Three: Configure Samba and Transmission
After the reboot, you need to start the xinetd service. It will allow you to use the samba web interface, which will be available at http://192.168.1.1:901 .
service xinetd on
service xinetd start
Initially, samba is already configured quite competently. Those interested can pick it up more, but I did not touch it. The created samba will be available at \\ 192.168.1.1 \ public. Next, I advise you to turn off Twonky. This is a good media server, but it eats an incredible amount of router resources (although you can try using it on the WNDR3700). All you need is 2 teams.
service twonky stop
service twonky off
He won't bother us anymore. Now came a series of Transmission torrent client. First you need to run it
service transmission on
service transmission start
then go to the web interface at http://192.168.1.1:9091 and start using! For more convenient use of the torrent I will advise one good thing - Transmisson Remote GUI . With it you can more fully control the download process. But the most useful feature is the transfer of torrents. Transmission initially downloads all files to its folder: / mnt / Torrent / work. But with the help of Transmisson Remote you can drag them out into the necessary directories after downloading. I tested the torrent on multiple connections, the results are as follows: the router's processor is loaded 100% (4 MB / s channel) with about 3k connections, but the router does not hang and outwardly does not show any signs of its loading (which is very strange).
That's all. About an hour of time spent converting this router to a NAS. During the tests of samba, the router showed a speed of approximately 5.5MB / s (over the wire), which I consider sufficient for the functions assigned to it. Wi-Fi speed is lower. Screenshot of a small test:
- Channel: Wi-Fi
- Encryption: WPA2
- File: 9Gb * .mkv
Disabling encryption on Wi-Fi does not give a significant increase in speed. The average speed is 2.4MB \ sec. The maximum that managed to squeeze out of Wi-Fi - 3MB \ s (disabled all services except samba). CPU power - with a margin.
I also note that what is described in this topic is not all the capabilities of DD-WRT firmware. Optware packages allow you to greatly expand the functionality of the device, but do not forget that this is a home router and you should not demand high performance from it with a huge number of connected services. In all you need to know when to stop.
In the next topic, I will describe the configuration of the print and media server on this router. Thanks for attention.
Source: https://habr.com/ru/post/111312/
All Articles