Assembler for Windows using Visual Studio
Many of us studied assembler at a university, but almost always it was limited to simple algorithms under DOS. When developing programs for Windows, it may be necessary to write part of the code for assembler, in this article I want to tell you how to use assembler in your programs under Visual Studio 2005.

In this article, we will look at how to call the assembler from C ++ code and back, transfer data, and use the debugger built into Visual Studio 2005 to debug the assembler code.
First we need to create a project. Turn on Visual Studio, choose File> New> Project. Visual Studio does not have an assembler language in the project type selection window, so we create a C ++ Win32 project. In the settings window of the new project, select the “Empty Project”.
')

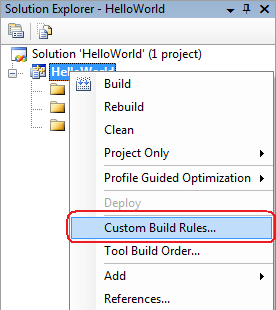
By default, Visual Studio does not recognize files with assembly code. In order to enable assembler support, we need to set up build conditions in the draft specifying which program to compile * .asm files for. To do this, select the menu item "Custom Build Rules ...".
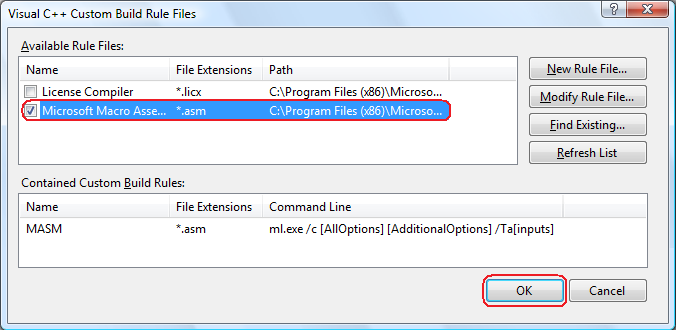
In the window that opens, we can specify special compilation rules for various files, Visual Studio 2005 already has a ready-made rule for * .asm files, we only need to enable it by checking the “Microsoft Macro Assembler” rule box.
Let's move on to writing the source code of our project. Let's start by adding source code to c ++. Add a new file to the Source Files folder. As the Template, select the C ++ File and enter the desired file name, for example main.cpp. Let's write a function that will read the name entered by the user, formatting it as a function readName () which will return a link to the read name. We will get the following file contents:
Now that we know the username, we can output the greeting, it will be output by the sayHello () function that we write to the assembler. To use this function, we must first specify that it will be defined in another file, for this we will add a block to main.cpp:
This block tells the compiler that the sayHello () function will be declared in another file and will have call rules “C”. The C ++ compiler distorts the function names so that the call rules must be specified. In addition, we want to use the readName () function from the sayHello () function, for this you need to add extern “C” before the definition of the readName () function, this will allow you to call this function from other files using the “C” calling rules.
It's time to add the code to the assembler, for this we will add a new file to the Source Folder. Choose the type Text File (.txt) and in the name field replace .txt with .asm, let's call our file hello.asm. We declare the sayHello () function and specify the external functions that we want to use. We get the following code:
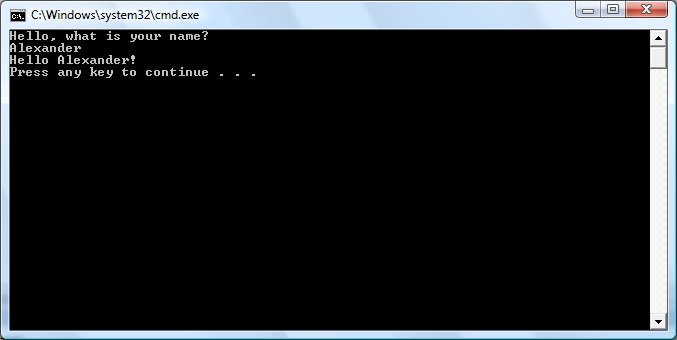
Now we can start the project, for this we simply choose Debug> Start Without Debugging or press the Ctrl-F5 combination. If everything is done correctly, you will see the program window:
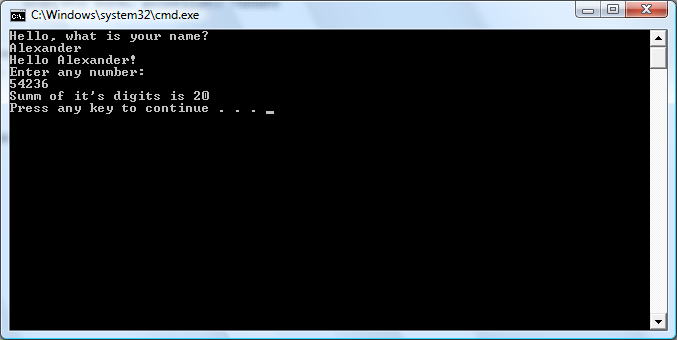
Let's slightly complicate the task, let's try to write a function to the assembler that takes a parameter and returns a value. For example, we write the function calcSumm () which will take an integer and return the sum of its numbers. Let's change our C ++ code by adding to it information about the calcSumm function, entering the number and the actual function call. Add a function to the hello.asm file, the return value is placed in eax, the parameters are declared after the PROC keyword. All parameters can be used in the procedure code, they are automatically removed from the stack. Also in the procedures, you can use local variables. You cannot use these variables outside the procedure. They are stored on the stack and removed upon return from the procedure:
Running the project, we will see the following execution result:
Of course, there is nothing difficult in this task and it does not require the use of an assembler at all. It will be more interesting to consider, and what Visual Studio gives us for development on assembler. Let's try to enable debug mode and set a breakpoint in hello.asm, run the project, we will see the following:
The Disassembly window (Debug> Windows> Disassembly) shows the assembler commands for this object file. The code we wrote in C ++ is shown in black. Disassembled code is shown in gray after its corresponding C ++ / assembler code. The Disassembly window allows you to debug code and stepping on it.
The register window (Debug> Windows> Registers) allows you to see the value of registers.
The memory window (Debug> Windows> Memory) allows you to see the memory dump, on the left we see the hexadecimal address, on the right the hexadecimal values of the corresponding memory cells, you can move by entering the address in the appropriate field at the top of the window.
Creating a project
In this article, we will look at how to call the assembler from C ++ code and back, transfer data, and use the debugger built into Visual Studio 2005 to debug the assembler code.
First we need to create a project. Turn on Visual Studio, choose File> New> Project. Visual Studio does not have an assembler language in the project type selection window, so we create a C ++ Win32 project. In the settings window of the new project, select the “Empty Project”.
')
By default, Visual Studio does not recognize files with assembly code. In order to enable assembler support, we need to set up build conditions in the draft specifying which program to compile * .asm files for. To do this, select the menu item "Custom Build Rules ...".
In the window that opens, we can specify special compilation rules for various files, Visual Studio 2005 already has a ready-made rule for * .asm files, we only need to enable it by checking the “Microsoft Macro Assembler” rule box.
Adding Source Code
Let's move on to writing the source code of our project. Let's start by adding source code to c ++. Add a new file to the Source Files folder. As the Template, select the C ++ File and enter the desired file name, for example main.cpp. Let's write a function that will read the name entered by the user, formatting it as a function readName () which will return a link to the read name. We will get the following file contents:
  #include <stdio.h>

 void main ()
 {
     printf ("Hello, what is your name? \ n");
 }

 void * readName ()
 {
     char name [255];
     scanf ("% s", & name);
     return & name;
 }
Now that we know the username, we can output the greeting, it will be output by the sayHello () function that we write to the assembler. To use this function, we must first specify that it will be defined in another file, for this we will add a block to main.cpp:
  extern "C"
 {
     void sayHello ();
 }
This block tells the compiler that the sayHello () function will be declared in another file and will have call rules “C”. The C ++ compiler distorts the function names so that the call rules must be specified. In addition, we want to use the readName () function from the sayHello () function, for this you need to add extern “C” before the definition of the readName () function, this will allow you to call this function from other files using the “C” calling rules.
It's time to add the code to the assembler, for this we will add a new file to the Source Folder. Choose the type Text File (.txt) and in the name field replace .txt with .asm, let's call our file hello.asm. We declare the sayHello () function and specify the external functions that we want to use. We get the following code:
  .686
 .MODEL FLAT, C
 .STACK

 .DATA
     helloFormat BYTE "Hello% s!", 10,13,0

 .CODE
 readName PROTO C
 printf PROTO arg1: Ptr Byte, printlist: VARARG
 sayHello PROC
     invoke readName
     invoke printf, ADDR helloFormat, eax
     ret
 sayHello ENDP
 END
Now we can start the project, for this we simply choose Debug> Start Without Debugging or press the Ctrl-F5 combination. If everything is done correctly, you will see the program window:
Let's slightly complicate the task, let's try to write a function to the assembler that takes a parameter and returns a value. For example, we write the function calcSumm () which will take an integer and return the sum of its numbers. Let's change our C ++ code by adding to it information about the calcSumm function, entering the number and the actual function call. Add a function to the hello.asm file, the return value is placed in eax, the parameters are declared after the PROC keyword. All parameters can be used in the procedure code, they are automatically removed from the stack. Also in the procedures, you can use local variables. You cannot use these variables outside the procedure. They are stored on the stack and removed upon return from the procedure:
  .686
 .MODEL FLAT, C
 .STACK
 .DATA
     helloFormat BYTE "Hello% s!", 10,13,0

 .CODE
 readName PROTO C
 printf PROTO arg1: Ptr Byte, printlist: VARARG

 sayHello PROC
     invoke readName
     invoke printf, ADDR helloFormat, eax
     ret
 sayHello ENDP

 calcSumm PROC a: DWORD
     xor esi, esi
     mov eax, a
     mov bx, 10
 @div:
     xor edx, edx
     div bx
     add esi, edx
     cmp ax, 0
     jne @div
     mov eax, esi
     ret
 calcSumm ENDP

 END
Running the project, we will see the following execution result:
Debugging
Of course, there is nothing difficult in this task and it does not require the use of an assembler at all. It will be more interesting to consider, and what Visual Studio gives us for development on assembler. Let's try to enable debug mode and set a breakpoint in hello.asm, run the project, we will see the following:
The Disassembly window (Debug> Windows> Disassembly) shows the assembler commands for this object file. The code we wrote in C ++ is shown in black. Disassembled code is shown in gray after its corresponding C ++ / assembler code. The Disassembly window allows you to debug code and stepping on it.
The register window (Debug> Windows> Registers) allows you to see the value of registers.
The memory window (Debug> Windows> Memory) allows you to see the memory dump, on the left we see the hexadecimal address, on the right the hexadecimal values of the corresponding memory cells, you can move by entering the address in the appropriate field at the top of the window.
Source: https://habr.com/ru/post/111275/
All Articles