[Programming] Working with the status bar in Android
This article is about how to work with the status bar in Android. The article is designed for novice Android programmers who only master the development for a platform. It is also worth noting that the status bar is mostly used to notify the user about any events that have occurred in the system, which makes it related to the Toast pop-up notifications for the target task. On Habrahabr there is already a fairly complete article on working with Toast, and this post only develops the topic of notifications.
The text of the article itself was written for the sandbox, and in fact the Hello world as it is. Now I'm wondering if anyone is interested in either this direction or is it not worth it.
Briefly about the notification line
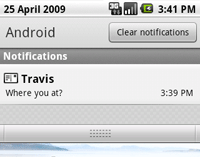
The first screenshot shows the expanded status bar in the standard Android shell (some mobile device manufacturers in their shells can change its appearance, although the essence remains the same). The status bar in Android is mostly used to notify the user about any events that occurred in the system, as well as the results of any applications. The essential difference from the Toast pop-up notifications is that the notifications in the status bar do not disappear after a while, and “hang” there as long as the user somehow responds to them. It is convenient to use the status bar to receive notifications from applications running in the background, as well as with the appearance of a notification, you can play any sound, vibration, or use the flashing indicators on the device (if any). The notification presented in the screenshot is exactly what we are going to achieve today.
')
Creating a simple notification in the status bar
To begin with, let's try creating a standard command line notification, as recommended by Google. We leave the markup of the application interface unchanged (the notification will appear immediately after its launch). And so, the example code (with the comment that it may not be clear):
public class NotificationBar extends Activity {
/** Called when the activity is first created. */

private static final int NOTIFY_ID = 1; //
@Override

public void onCreate(Bundle savedInstanceState) {
super.onCreate(savedInstanceState);
setContentView(R.layout.main);
NotificationManager mNotificationManager = (NotificationManager) getSystemService(Context.NOTIFICATION_SERVICE); //
int icon = android.R.drawable.sym_action_email; // , Email
CharSequence tickerText = "Hello Habrahabr" ; //
long when = System.currentTimeMillis(); //
Notification notification = new Notification(icon, tickerText, when); // ,
Context context = getApplicationContext();
CharSequence contentTitle = "Habrahabr" ; //
CharSequence contentText = " " ; //
Intent notificationIntent = new Intent( this , NotificationBar. class ); // Intent
PendingIntent contentIntent = PendingIntent.getActivity( this , 0, notificationIntent, 0); class ); // UPD
notification.setLatestEventInfo(context, contentTitle, contentText, contentIntent); //
mNotificationManager.notify(NOTIFY_ID, notification); // ID
}
}
* This source code was highlighted with Source Code Highlighter .
CharSequence tickerText = "Hello Habrahabr"; - in this line we indicate the text that will be shown in the collapsed status bar for a few seconds when a notification appears. After a few seconds, it will disappear, and only the icon will remain in the line.
That's probably all. You can open the champagne, and watch what we have.
Creating an extended notification in the status bar
Now we will somewhat complicate the task - we will create a notification not according to the template offered by Google, but according to our own markup (there is a good opportunity). And so create a new markup file in the layout folder, you should have it like this:
< LinearLayout xmlns:android ="http://schemas.android.com/apk/res/android"
android:orientation ="horizontal"
android:layout_width ="fill_parent"
android:layout_height ="fill_parent"
android:padding ="3dp"
>
< ImageView android:id ="@+id/image"
android:layout_width ="wrap_content"
android:layout_height ="fill_parent"
android:layout_marginRight ="10dp"
/>
< TextView android:id ="@+id/text"
android:layout_width ="wrap_content"
android:layout_height ="fill_parent"
android:textColor ="#000"
/>
</ LinearLayout >

* This source code was highlighted with Source Code Highlighter .
Also add some kind of image to the drawable folder in order to set it in ImageView.
Now the code. The code is not much different from the simple notification code, but still requires a comment.
public class NotificationBar extends Activity {
/** Called when the activity is first created. */
private static final int NOTIFY_ID = 1; //
@Override
public void onCreate(Bundle savedInstanceState) {
super.onCreate(savedInstanceState);
NotificationManager mNotificationManager = (NotificationManager) getSystemService(Context.NOTIFICATION_SERVICE); //
int icon = android.R.drawable.sym_action_email; // , Email
CharSequence tickerText = "Hello Habrahabr" ; //
long when = System.currentTimeMillis(); //
Intent notificationIntent = new Intent( this , NotificationBar. class ); // Intent
Notification notification = new Notification(icon, tickerText, when); // ,
PendingIntent contentIntent = PendingIntent.getActivity( this , 0, notificationIntent, 0); // UPD
RemoteViews contentView = new RemoteViews(getPackageName(), R.layout.notlayout); // RemoteViews
contentView.setImageViewResource(R.id.image, R.drawable.habr); // ImageView
contentView.setTextViewText(R.id.text, " Habrahabr! , ..." ); // TextView
notification.contentIntent = contentIntent; // contentIntent
notification.contentView = contentView; // contentView
mNotificationManager.notify(NOTIFY_ID, notification); //
}
}
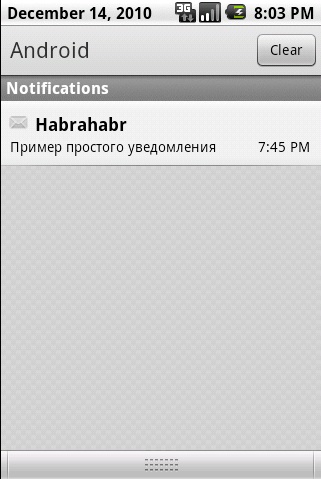
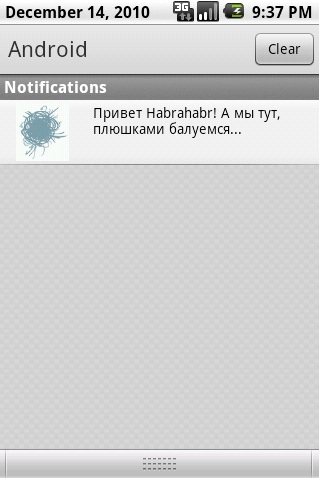
* This source code was highlighted with Source Code Highlighter .As a result, we can open the second bottle, and observe something like this:
Add sound and vibration, blink lights.
For greater importance, we add sound when displaying a notification and vibration. It is not at all difficult to do.
notification.defaults | = Notification.DEFAULT_SOUND; - this line assigns to the notification a sound that is used by default in the system.
notification.sound = Uri.parse ("file: ///sdcard/notification/ringer.mp3"); - this way you can set the sound from the file on the SD card.
notification.defaults | = Notification.DEFAULT_VIBRATE; - this line adds vibration in the default amount of time.
In addition, it is possible to set the vibration time independently. This is done in two lines.
long [] vibrate = {0,100,200,300} ; - create an array in which the 1st number is the time that should be waited before starting the vibration. The second value is the time of the first vibration in milliseconds (similarly, the 3 and 4 values). The number of vibrations can be infinitely large at the discretion of the programmer.
notification.vibrate = vibrate; - assign an array to our notification.
notification.defaults | = Notification.DEFAULT_LIGHTS; - this line we can blink indicators with default parameters.
Of course, you can customize the settings manually. To do this, we need 4 lines:
notification.ledARGB = 0xff00ff00; - set the color for the RGB indicator.
notification.ledOnMS = 300; - set the time between flashes
notification.ledOffMS = 1000; - set the time after which the burning indicator goes out
notification.flags | = Notification.FLAG_SHOW_LIGHTS; - we allow to blink
Here it should be noted that not all devices have any indicators at all.
Naturally, all these settings need to be done before the line for calling the notification.
Conclusion
That's probably all. The post does not claim to be complete, and yet this information should be quite enough for beginners. As a source, as well as a more complete description of working with NotificationBar, I can cite an original article on developer.android.com . I hope this article will help anyone in exploring the capabilities of the platform. Thanks for attention.
UPD : on closer examination, it turned out that there is no comment on one of the lines of the code (it promises to be explained under the code, but there is no explanation itself). It corrects the annoying error, and also a number of f-and status lines about which I inform the user forgot to fill in djvu , you can take a look in the comments: 1 , 2 . About the existence of serious pitfalls sdmitry reports here .
Source: https://habr.com/ru/post/111238/
All Articles