WPF animations
Foreword
Greetings to you, dear habrayuzer! Today I want to tell you about animation in WPF. About her, of course, wrote earlier on Habré, but I will try to tell you more. My post will rather be more theoretical, however, I hope you will benefit from it.
Animation in WPF is different from everything you've seen before with its clarity and simplicity. Previously, you had to manually redraw the scene by timer, of course, writing a fairly large amount of code. Now you can create an animation in a XAML file without writing a single line of C # code (or any other .Net language). Of course, there was an opportunity to create an animation in the code, but we'll talk about it later. Animation in WPF does not redraw an element, but changes its properties at regular intervals (by default, about 60 times per second, unless you change it in Storyboard). This allows it to remain itself, for example, if you animate a button, then during the animation it will remain a “button”, i.e. you can click on it and make various manipulations on it.
A lot of code, examples and images under the cut ...
Architecture
All animations in WPF are in the System.Windows.Media.Animation namespace . All animation classes start with an animated type name, for example DoubleAnimation animates Double properties.
')
Animations are divided into three categories:
1. Animations using linear interpolation ( Property Type Animation )
2. Animations using keyframes ( Property Type UsingKeyFrames )
3. Animations using the path ( Type UsingPath Properties )
All animations are inherited from Type Property AnimationBase . In this namespace, there are animation classes for most BCL types.
First, let's look at the simplest animation in XAML:
< Button >
< Button.Triggers >
< EventTrigger RoutedEvent ="Button.Click" >
< BeginStoryboard >
< Storyboard >
< ThicknessAnimation
From ="0"
To ="200"
Duration ="0:0:5"
Storyboard . TargetProperty
="Margin" />
</ Storyboard >
</ BeginStoryboard >
</ EventTrigger >
</ Button.Triggers >
</ Button >

* This source code was highlighted with Source Code Highlighter .
Consider each class in more detail:
• ThicknessAnimation - the animation itself.
• Storyboard - “timeline”. We will talk about it later.
• BeginStoryboard - “wrapper” for Storyboard, which starts the animation.
• EventTrigger - event trigger.
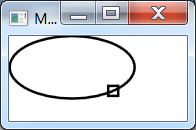
After pressing the button, we see that it has decreased:

Left before pressing, right after.
Similar example on MSDN. The object tag, unfortunately, habraparser does not skip.
Animation can also be run when the dependency property changes:
< Button >
< Button.Style >
< Style >
< Style.Triggers >
< Trigger Property ="Button.IsPressed"
Value ="True" >
< Trigger.EnterActions >
< BeginStoryboard >
< Storyboard >
< ThicknessAnimation
From ="0" To ="200"
Duration ="0:0:5"
Storyboard . TargetProperty
="Margin" />
</ Storyboard >
</ BeginStoryboard >
</ Trigger.EnterActions >
</ Trigger >
</ Style.Triggers >
</ Style >
</ Button.Style >
</ Button >

* This source code was highlighted with Source Code Highlighter .
However, in this case, it will give the same result.
More fine tuning
Storyboard.TargetProperty Property
This attachment property sets the target property for the animation. In this case, we apply the animation to the Margin property.
Storyboard.TargetName property
This attachment property sets the name of the target element within the scope of XAML. Used if we want to apply animation to another element in XAML.
Storyboard.Target property
This attachment property specifies the target element to which we want to apply the animation. Usually used when creating animations in code. An example on MSDN.
Property From
This property sets the initial value, i.e. this value will be used at the start. However, this property can be omitted, and then the current value will be used as the initial value. This allows, without waiting for the end of one animation, to launch another, and at the same time there will be no “jerk”. If you are animating the Width and Height properties, then check that the property value is not equal to Double.NaN .
To property
This property sets the final value. It can also be omitted, and the value that the property took before the animations will be used. For example, you can make an extension animation when you hover the cursor on a button, and when you leave the cursor, make an animation without the To property, then when you leave, the button will “narrow” to its original size.
By property
This property sets the value by which the final property changes. Simply put, when assigning a value to the By property, the To property takes the value From + By . This is done to facilitate the use of animations in XAML.
The By property is not implemented by all classes. Basically, this property is present in numerical animations.
IsAdditive property
This property allows you to make the values From and To relative. Roughly speaking, if this property has the value True, then the initial value will be equal to the “current value + From ”, and the final value to the “current value + To ”.
Duration property
This property sets the duration of the animation. Note - the type of this property is not TimeSpan , but Duration . Why does it take time then? Because there is an implicit cast to TimeSpan . “But then why do we need Duration ?” You say. Then, that Duration can also be set to Duration.Automatic (equivalent to 1 second) and Duration.Forever (the animation does nothing).
BeginTime property
This property sets the delay before the animation starts. I think everything is obvious here. An example on MSDN.
SpeedRatio property
This property sets the speed of the animation. Its initial value is 1D. When it increases, the speed will increase accordingly, and when it decreases, slow down. For example, if this property is assigned to 2D, then the speed will double.
AccelerationRatio and DecelerationRatio properties
These properties set the acceleration or deceleration time. Its value is indicated as a percentage. For example, if the AccelerationRatio property is set to 0.5, then half of its time the animation will accelerate. Or if you assign AccelerationRatio and DecelerationRatio 0.25 to the properties, with a total duration of 4 seconds, then everything will happen like this:
1. Acceleration of animation for 1 second
2. Constant speed for 2 seconds
3. Slow down animation for 1 second
The value of these properties cannot be greater than 1 or less than 0.
AutoReverse property
If this property is True, then at the end of the animation it will be restarted in the opposite direction. Those. if the button is increased, it will decrease.
BeginTime is applied only at the very beginning of the animation, in the opposite direction there will be no delay.
Types of animations
Now consider each view in more detail:
Linear animation
Everything is simple here - it animates a property from one value to another, using the linear interpolation function. Everything we considered earlier was linear animation.
Animation using keyframes
This animation animates the property by keyframes. If you dealt with 3D animation, then you will understand me.
Animation of keyframes is similar to regular animation, with only one condition - the final values can be greater than 1.
Consider this XAML snippet:
< Border Background ="White" >
< Border.Triggers >
< EventTrigger RoutedEvent ="Border.MouseDown" >
< EventTrigger.Actions >
< BeginStoryboard >
< Storyboard >
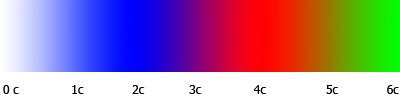
< ColorAnimationUsingKeyFrames
Storyboard . TargetProperty
="(Border.Background).
(SolidColorBrush.Color)" >
< LinearColorKeyFrame
KeyTime ="0:0:2"
Value ="Blue" />
< LinearColorKeyFrame
KeyTime ="0:0:4"
Value ="Red" />
< LinearColorKeyFrame
KeyTime ="0:0:6"
Value ="Green" />
</ ColorAnimationUsingKeyFrames >
</ Storyboard >
</ BeginStoryboard >
</ EventTrigger.Actions >
</ EventTrigger >
</ Border.Triggers >
</ Border >
* This source code was highlighted with Source Code Highlighter .ColorAnimationUsingKeyFrames - color animation using keyframes.
LinearColorKeyFrame - keyframes of color animation with interpolation.
We have 3 keys. Now let's imagine the animation itself, so to say “frame it” :):
There are four types of key frames:
1. Linear KeyFrame Property Type - a keyframe using linear interpolation.
2. Discrete Type The KeyFrame property is a keyframe without interpolation. Used when you need to drastically change the value of a property. The only kind of keyframes for ObjectAnimationUsingKeyFrames .
3. Spline KeyFrame Property Type - keyframe with interpolation along a Bezier curve. The points of the curve are set by the KeySpline property. The rest is similar to LinearKeyFrame (type omitted for simplicity).
4. Easing the KeyFrame Property Type is similar to LinearKeyFrame , it only allows using the smoothness function. The EasingFunction property accepts an object of type EasingFunctionBase , which is a function of smoothness. See all available smoothness features here. Gallery of smoothness features on MSDN.
Each keyframe has two properties:
• KeyTime - sets the time when the property will take the target value.
• Value - target value of the frame. Depends on the type of animation.
Path Based Animation
Path-based animation uses the PathGeometry object to set the value.
Let's take a closer look at this XAML snippet:
< Window.Resources >
< PathGeometry x:Key ="path" >
< PathFigure IsClosed ="True" >
< ArcSegment Point ="1,0"
Size ="50,25"
IsLargeArc ="True" />
</ PathFigure >
</ PathGeometry >
< Storyboard x:Key ="storyboard"
Storyboard . TargetName ="rect" >
< DoubleAnimationUsingPath
Storyboard . TargetProperty ="(Canvas.Left)"
PathGeometry ="{StaticResource path}"
Source ="X" Duration ="0:0:5" />
< DoubleAnimationUsingPath
Storyboard . TargetProperty ="(Canvas.Top)"
PathGeometry ="{StaticResource path}"
Source ="Y" Duration ="0:0:5" />
</ Storyboard >
</ Window.Resources >
< Canvas >
< Path Data ="{StaticResource path}"
StrokeThickness ="2" Stroke ="Black"
Canvas . Left ="50" />
< Rectangle x:Name ="rect" Stroke ="Black"
StrokeThickness ="2" Width ="10"
Height ="10" >
< Rectangle.RenderTransform >
< TranslateTransform X ="45" Y ="-5" />
</ Rectangle.RenderTransform >
</ Rectangle >
</ Canvas >

* This source code was highlighted with Source Code Highlighter .
All the same, only path based animation is used. The PathGeometry property sets the PathGeometry object containing the path geometry. The Source property sets its output value, such as the X or Y coordinate.
Final result
An example on MSDN. An example, of course, is about managing animation playback, but this is the only example I found that uses path-based animation.
Storyboard - what kind of beast is this?
You have already noticed that I often use Storyboard . I think it was obvious to you that this is not an animation. This class allows you to group multiple animations (because it is inherited from the TimelineGroup ). We can say that this is a container for animations. It is very convenient in that it allows you to manage them all at once, i.e. using for example the Begin () method, run 10 animations at once. Of course, for single animations it is not necessary at all. However, as I wrote above, the BeginStoryboard.Storyboard property is of type Storyboard , so to use it you need to “wrap” the animation.
Creating animation in code
Everything is simple here, if you understand XAML. If you want to apply an animation to a single element, it is enough to create it and call the BeginAnimation () method on the final element.
var animation = new ThicknessAnimation(); animation.From = new Thickness(20); animation.To = new Thickness(100); animation.Duration = TimeSpan.FromSeconds(5); button.BeginAnimation(MarginProperty, animation); You can also manually set the target element and property for the animation using the attached Storyboard.Target and Storyboard.TargetProperty properties I wrote about above.
var animation1 = new ThicknessAnimation(); animation1.From = new Thickness(5); animation1.To = new Thickness(25); animation1.Duration = TimeSpan.FromSeconds(5); Storyboard.SetTarget(animation1, button1); Storyboard.SetTargetProperty(animation1, new PropertyPath(MarginProperty)); var animation2 = new ThicknessAnimation(); animation2.From = new Thickness(5); animation2.To = new Thickness(25); animation2.Duration = TimeSpan.FromSeconds(5); Storyboard.SetTarget(animation2, button2); Storyboard.SetTargetProperty(animation2, new PropertyPath(MarginProperty)); var storyboard = new Storyboard(); storyboard.Children = new TimelineCollection {animation1, animation2}; storyboard.Begin(); PS Taking advantage of the moment, I want to congratulate you on the past New Year!
PSS Markup code is “compressed” to improve readability on mobile devices (I often read the Habra myself from my WP7).
Source: https://habr.com/ru/post/111126/
All Articles