Step-by-step description of creating a simple application for Samsung Bada
Preliminary notes
Hello. First of all, I would like to wish everyone a Happy New Year and go straight to the point. This article will be devoted to the creation of simple programs for Bada - the operating system for mobile devices, which produces Korean Samsung. In advance I want to say that under the cut a simple recipe for making a simple application without lengthy arguments about the optimality and harmony of the code.
On Habré there are already quite detailed articles that are devoted to Bada, for example, this and this , but there is no step-by-step description of creating applications for beginners. Who cares - I ask under the cat.
The topic for writing arose by chance - a friend is actively engaged in establishing the boundaries of land with the help of GPS in a geodesic company; the specificity of the work (where it came from is a good question) is that the obtained geodetic coordinates (let me explain what latitude and longitude is meant) must be converted to rectangular right after they are received. The company has no laptops capable of withstanding an 8-hour working day and is not planned, but a friend recently bought a Samsung smartphone, actively promoted in Ukraine, with the Bada operating system, then a question followed: if you can download games for the phone, is there an application that can solve described purely engineering problem? Of course, there was no such application, and I received a kind offer to write it for a known fee.
Tools
For the development of applications for Bada, Bada SDK 1.2.0 is used, which can be downloaded by registering on the Bada developer site . There is nothing difficult in this process, but at the stage of selecting files for downloading, I honestly said that I “downloaded” the SDK, but the so-called language pack (language pack) isn’t, hoping that, as written on the site, downloading it will happen after installing the SDK automatically. However, at the installation stage, something went wrong, the installation continued without downloading the language pack, which later made it impossible to either build or, moreover, run the application.
After loading the SDK and the language pack, they should be put in one place, and when installing the SDK or when modifying it, the installer will pick up the language pack and install it on its own.
')
Actually creating an application
The development environment is based on Eclipse, the programming language used is C ++. To begin with, let's move on to creating a new application with the obvious File -> New -> bada Application Project command. In the window that appears, you should define the name of the project in the Project name field, in the Project Type list select the type of application - bada Form Based Application.
Next, the environment will ask you to determine the technical parameters of the device for which the application will be intended (screen resolution, GPS availability, etc.). These parameters are defined in the Manifest.xml special manifest file, which can be selected from the SDK files, created and downloaded from the Bada Developers website, or you can create your own. Without further ado, I used a manifest file from the Samples examples folders, which are installed with the SDK, because my application did not require any bells and whistles, and only the screen resolution was important.
Next, the environment will ask for the root directory of the SDK, there should be no problems with this. After selecting, the name of the device model and its API will appear in the list, which will be used later for programming.
The next step is to determine the name of the default form, which will appear immediately after the application starts. By this name will be generated * .h and * .cpp files.
Next, you need to determine whether to add support for auto-scaling and the best screen resolution, if this feature is added. I understand that this is better done because the application can work on different devices with different resolutions and will not have to be redone.
The next link in the long chain of settings is the definition of the Application ID, to certify the functions of the application if it needs to read and write to protected folders. I did not need this, so I omitted this step.
Almost end - definition of the obvious properties of the application Name, Vendor and Description.
And now almost the end is the definition of the necessary configurations for development: I recommend leaving everything as default, and now the most important configuration is Simulator-Debug - this is the ability to debug the code on the device simulator, Target-Release is the configuration to compile the application before unloading it real device.
The last step is the information summarized in all settings in the Summary window, which you can read again and make sure that everything is selected correctly.
After the final settings, the future application appears in the Project Explorer, clicking on it opens the resource files in the Resources window and the following window appears:
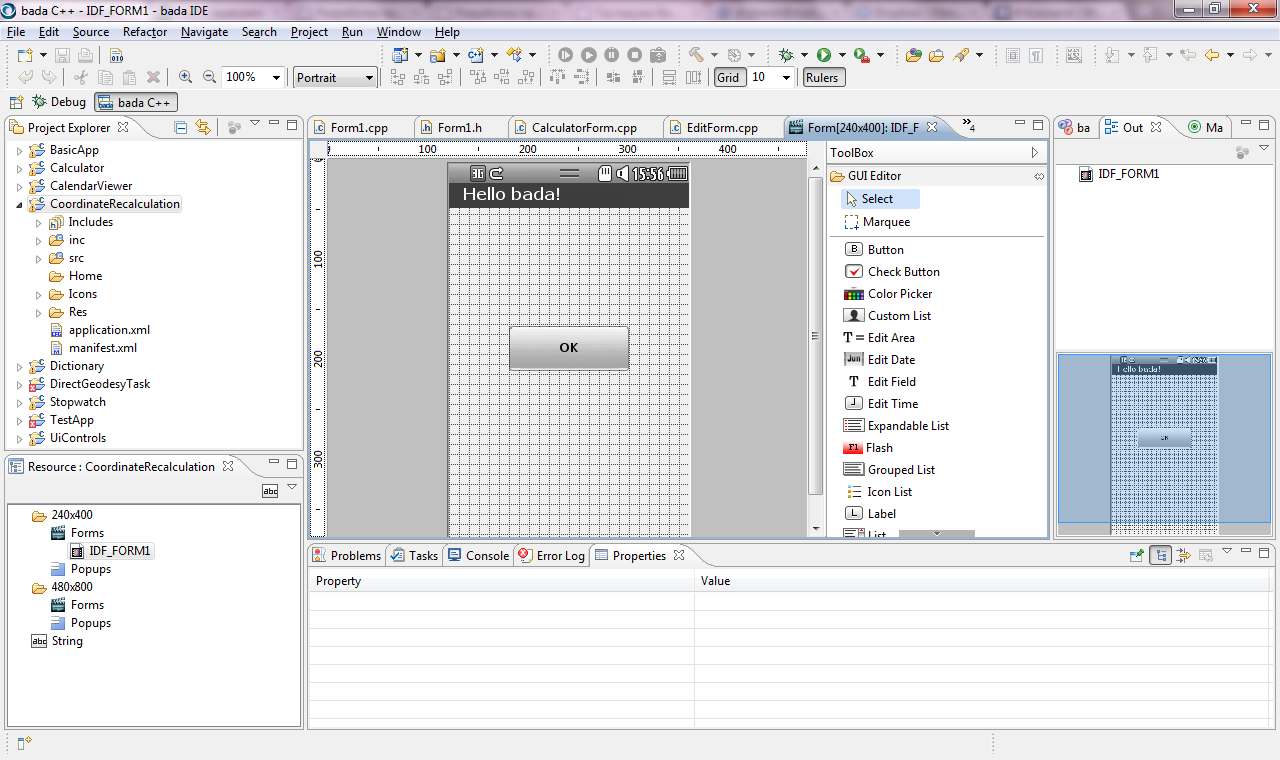
After clicking on the form (and generally on any control) on the Properties tab, you can change the obvious properties of the application, such as the text in the title, the background color, the presence and name of the soft keys.
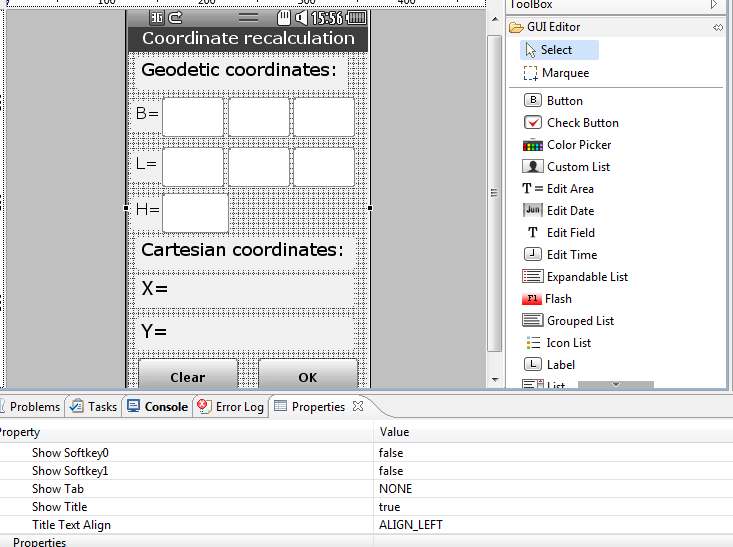
I immediately transferred the already finished button, which the environment kindly generated, below and wrote Calculate on it. Placing the GUI Editor it is easy to get the following interface, which is well suited for my task (I suppose that the process of transferring controls to a form and setting their properties does not cause any difficulties); an obvious Label was used as captions to the input fields, and EditField was used as the input fields; Label is also used to show the result of the calculations, since there is no provision for editing them:
Now the actual coding.
The running application goes through several stages (Help is very detailed, there you can find out the details), now we are primarily interested in the phase of initializing the application, which is responsible for the OnInitializing (void) form class, which can be found in the <YOUR_FORM> .cpp file in the src folder project.
By default, this method looks like this:
result Form1::OnInitializing(void) { result r = E_SUCCESS; // TODO: Add your initialization code here // Get a button via resource ID __pButtonOk = static_cast<Button *>(GetControl(L"IDC_BUTTON_OK")); if (__pButtonOk != null) { __pButtonOk->SetActionId(ID_BUTTON_OK); __pButtonOk->AddActionEventListener(*this); } return r; } Here you have created a button with the identifier __pButtonOk, which was generated by the environment. The inc folder contains the header file of the form, in which you should add a new field to the protected section, which will correspond to the second Clear button, and the event ID (Id Action) of the button as an integer constant that will be used to determine which form button pressed in the OnActionPerformed method. I also added special constants here that are needed for calculations.
I did it like this:
protected: static const int ID_BUTTON_OK = 101; // new action ID for button CLEAR static const int ID_BUTTON_CLEAR=102; // geodetic constants static const int a=6378137; static const float alfa=1/298.257223563; Osp::Ui::Controls::Button *__pButtonOk; // new field: button Osp::Ui::Controls::Button *__pButtonClear; // new fields: edits and labels Osp::Ui::Controls::EditField *__pB_deg; Osp::Ui::Controls::EditField *__pB_min; Osp::Ui::Controls::EditField *__pB_sec; Osp::Ui::Controls::EditField *__pL_deg; Osp::Ui::Controls::EditField *__pL_min; Osp::Ui::Controls::EditField *__pL_sec; Osp::Ui::Controls::EditField *__pH; Osp::Ui::Controls::Label *__pX; Osp::Ui::Controls::Label *__pY; Now in the OnInitializing (void) method, you can create a Clear button and assign it an Id Action and a “listener” Event Listener. We will do the same with EditField and Label without adding to them, however, Id Action and Event Listener because their response to user actions in our simple application is not provided (IDC_BUTTON1, IDC_EDITFIELD1, etc. - the Name property values for the button).
__pButtonOk = static_cast<Button *>(GetControl(L"IDC_BUTTON_OK")); __pButtonClear = static_cast<Button *>(GetControl(L"IDC_BUTTON1")); if (__pButtonOk != null) { __pButtonOk->SetActionId(ID_BUTTON_OK); __pButtonOk->AddActionEventListener(*this); } if (__pButtonClear != null) { __pButtonClear->SetActionId(ID_BUTTON_CLEAR); __pButtonClear->AddActionEventListener(*this); } // Get fields and labels __pB_deg = static_cast<EditFields *>(GetControl(L"IDC_EDITFIELD1")); __pB_min = static_cast<EditFields *>(GetControl(L"IDC_EDITFIELD2")); __pB_sec = static_cast<EditFields *>(GetControl(L"IDC_EDITFIELD3")); __pL_deg = static_cast<EditFields *>(GetControl(L"IDC_EDITFIELD4")); __pL_min = static_cast<EditFields *>(GetControl(L"IDC_EDITFIELD5")); __pL_sec = static_cast<EditFields *>(GetControl(L"IDC_EDITFIELD6")); __pH = static_cast<EditField *>(GetControl(L"IDC_EDITFIELD7")); At this stage, you can start the application and see how the data is entered into the simulator, but of course there is no use, until the button press events are processed.
To solve this problem, the OnActionPerformed form class method (const Osp :: Ui :: Control & source, int actionId) is used. As you can see, the second parameter is the Action Id already mentioned above. When the application runs, it listens for button press events and its assigned Action Id is passed to OnActionPerformed (const Osp :: Ui :: Control & source, int actionId). If processing is provided for such an identifier here, it is executed.
In OnActionPerformed there is a switch preset for analyzing the actionId parameter, it is convenient to use. Next, let me give the code of this method with detailed comments:
void Form1::OnActionPerformed(const Osp::Ui::Control& source, int actionId) { const int MAX_BUFF_SIZE = 512; switch(actionId) { case ID_BUTTON_OK: // Calculate { // , ... String B_deg_str(__pB_deg->GetText()); String B_min_str(__pB_min->GetText()); String B_sec_str(__pB_sec->GetText()); //... String L_deg_str(__pL_deg->GetText()); String L_min_str(__pL_min->GetText()); String L_sec_str(__pL_sec->GetText()); // ... String H_str(__pH->GetText()); double B_deg,B_min,B_sec; double L_deg,L_min,L_sec; double H; // result r1=Double::Parse(B_deg_str,B_deg); result r2=Double::Parse(B_min_str,B_min); result r3=Double::Parse(B_sec_str,B_sec); result r4=Double::Parse(L_deg_str,L_deg); result r5=Double::Parse(L_min_str,L_min); result r6=Double::Parse(L_sec_str,L_sec); result r7=Double::Parse(H_str,H); // double b_in_decimal=B_deg+B_min/60+B_sec/3600; double l_in_decimal=L_deg+L_min/60+L_sec/3600; double eSqr=2*alfa-(alfa*alfa); double N=a/Math::Sqrt(1-eSqr*(Math::Sin(b_in_decimal))*(Math::Sin(b_in_decimal))); double X=(N+H)*Math::Cos(b_in_decimal)*Math::Cos(l_in_decimal); double Y=(N+H)*Math::Cos(b_in_decimal)*Math::Sin(l_in_decimal); String strX; String strY; // strX.Format(MAX_BUFF_SIZE,L"%f",X); strY.Format(MAX_BUFF_SIZE,L"%f",Y); // Label __pX->SetText(L"X="+strX);__pY->SetText(L"Y="+strY); __pX->Draw();__pY->Draw(); __pX->Show();__pY->Show(); } break; case ID_BUTTON_CLEAR: { // Clear // OK CANCEL - ? MessageBox *pMessageBox = new MessageBox(); pMessageBox->Construct(L"MessageBox", L"Clear all fields?" , MSGBOX_STYLE_OKCANCEL ,9000); int ModalResult; pMessageBox->ShowAndWait(ModalResult); // , ... if (ModalResult==MSGBOX_RESULT_OK) { // ... Label __pB_deg->Clear(); __pB_min->Clear(); __pB_sec->Clear(); __pL_deg->Clear(); __pL_min->Clear(); __pL_sec->Clear(); __pH->Clear(); __pX->SetText(L"X=");__pY->SetText(L"Y="); } // MessageBox delete pMessageBox; } break; default: break; } } The appearance of the simulator running the program is as follows:

It is with MessageBox:

That seems to be all. I want to note that the application does not pretend to the breadth and correctness of all formulations, for example, there is absolutely no “protection against a fool”, because I hope that my friend and four of his colleagues for whom this program is responsible.
More recently, another application for development for Bada has been received - it is necessary to search for and display on the map the nearest objects, such as ATMs or recharge terminals. If this topic is interesting to anyone, I will be happy to share my experience.
If someone had a question about what to do next with the program, then this is covered in detail in the articles on the Bada Developer website, I will not touch on this, since programming is still a more complicated topic.
Sources of the application are available here .
If something is wrong I did with hosting, sorry, please :)
UPD: Sorry, forgot to add - all added fields of the form class (__pB_deg, _pB_min, etc.) should be initialized in the form constructor like this:
Form1::Form1(void): __pB_deg(null),__pB_min(null),__pB_sec(null), __pL_deg(null),__pL_min(null),__pL_sec(null), __pH(null), __pX(null),__pY(null) { } Source: https://habr.com/ru/post/111080/
All Articles