Citrix XenClient Testing: Work and Fun in a Virtual Environment
 Our first material on the Citrix blog on Habré was the announcement of the XenClient solution — the first type of hypervisor, which allows you to run a home and corporate OS on your laptop. This approach provides more freedom not only to the user, employee of the company, but also to the system administrator.
A typical user-administrator relationship is as follows. An employee is given a laptop with an installed operating system and limited rights: to ensure security and simply stability, so that he does not accidentally break his work tool by catching a virus or simply by fiddling with the settings. As a result, the user is dissatisfied with the fact that he “cannot be put on ICQ”, and the administrator is not satisfied with the fact that this “ICQ”, and the security policies do not save him from failures.
Now we take option with XenClient. Two virtual machines are installed on the laptop: user and working. In the custom laptop owner is free to do whatever he pleases. The worker is set up as is customary in the company, with the necessary programs, restrictions and security systems. The corporate OS is synchronized with the server, but the user can work in it without connecting to a working computer network. Manage, update programs and, if necessary, restore the OS - everything is configured and performed centrally on the server: the employee does not even have to bring a laptop to the office to get the necessary maintenance. The idea is good, but how does it work in practice? Everyone can check it: XenClient is available for free download on the Citrix site. In this article, I will share my own impressions of XenClient from a user's perspective.
')
Computer and user requirements
First of all, let's talk about the technical requirements for the laptop on which the XenClient is installed. The hypervisor was developed by Citrix in collaboration with Intel, hence the first requirement - the choice of processors is limited to Intel Core 2 Duo, Core 2 Quad, Core i5 or Core i7. The processor must support VT-x virtualization technology and (optionally, but highly desirable) VT-d technology, which provides direct access to hardware resources from the virtual OS. And if there are no problems with the VT-x in the mentioned Intel processors, then the VT-d is not supported everywhere, but it is available in the older models, such as Core i5-540M (2.53 GHz) and Core i7-620M (2.66 GHz ).
The second requirement is necessary for the correct operation of 3D applications: so far only Intel Integrated GMA X4500 or Intel GMA HD graphics are supported. And finally, for normal operation of several operating systems, the laptop must be equipped with a sufficient amount of RAM. Under these requirements, the laptop we chose is completely suitable - Lenovo ThinkPad X201 with an Intel Core i7-620M processor, 4 gigabytes of RAM, a 500-gigabyte hard drive and integrated Intel graphics. There are also requirements for the type of wireless module: Intel and Broadcom Wi-Fi cards are supported, but not Realtek.
As for the requirements for the user, everything is simpler: as it turned out, the installation program practically does not ask any questions that can stump an ordinary user. My relatively little experience with Linux came in handy later when I moved from the standard methods of working with virtual OSes, to, uh, let's say, non-standard.
Installation and Setup
You can download the XenClient distribution (about 350 MB boot disk image) on this page of the Citrix site after a quick registration. ThinkPad X201 does not have its own optical drive, so I used the external one, although it is possible to download and install the distribution from a USB flash drive . Perhaps the only thing you need to pay attention to when installing:
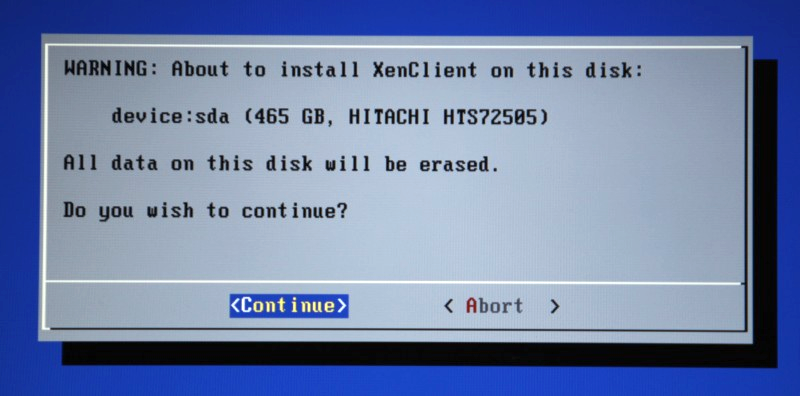
All data from the hard disk of the laptop is deleted. Installing XenClient takes about 10 minutes, and after the first boot, the system interface opens. Here you can immediately connect to the Internet via WiFi:
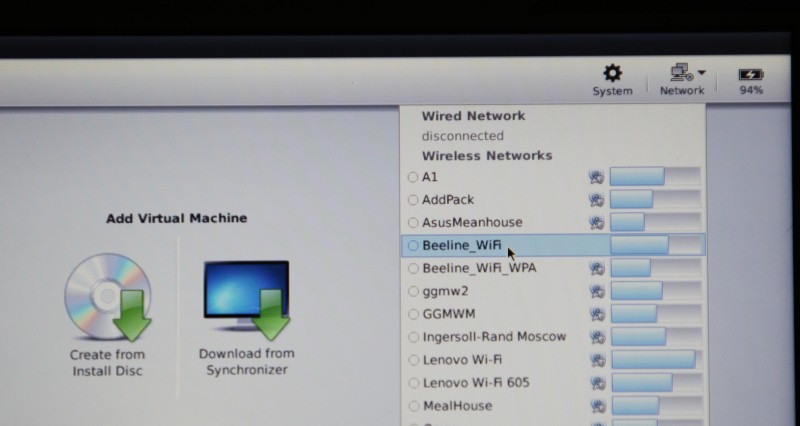
XenClient recognized the Intel WiFi / WiMAX 6250 card installed in the laptop without any problems. However, you cannot connect directly to the WiMAX network from the hypervisor - this feature is not yet supported. But this can be done in a virtual OS, but more on that later. In the meantime, our first virtual OS needs to be created:
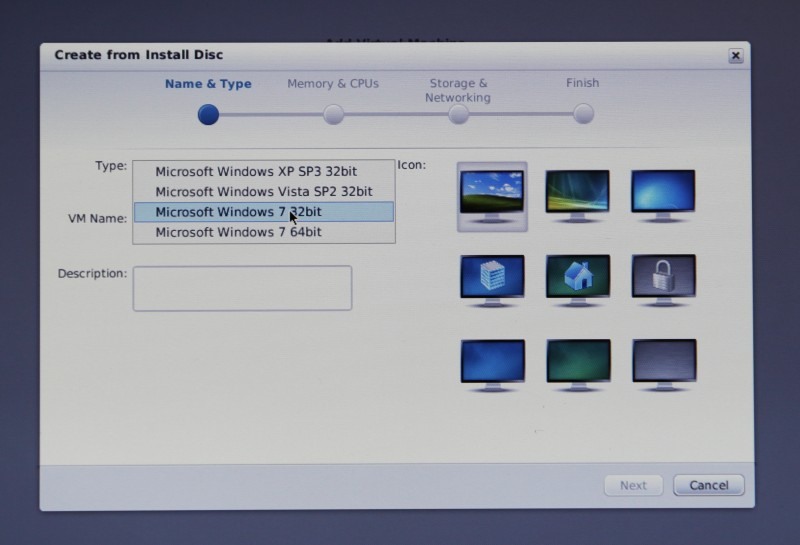
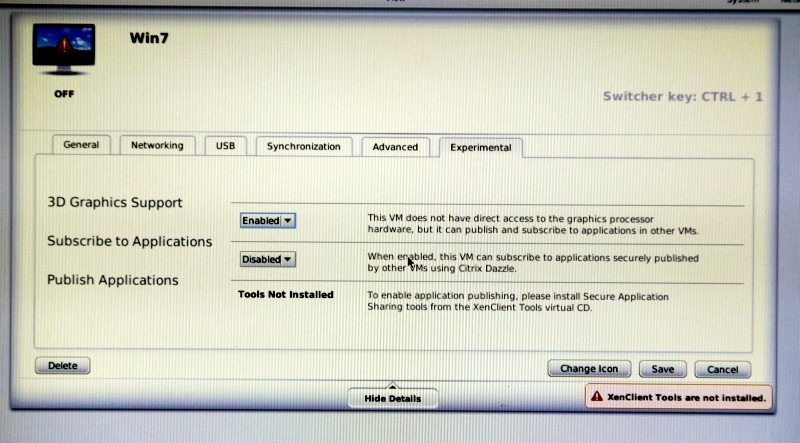
XenClient only supports the latest versions of Windows, with both 32-bit and 64-bit modifications. There is no official Linux support, but in principle nothing prevents you from downloading an installation CD with Ubuntu to a virtual machine. The problem is that there is no set of tools for working in the virtual Linux OS yet.
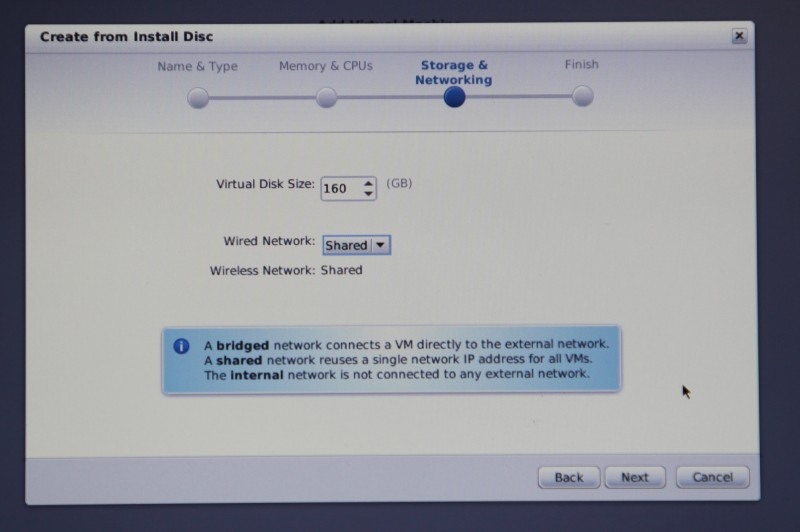
Then everything is simple: choose the amount of memory for the virtual machine, the number of virtual processors and the amount of hard disk. Looking ahead, I want to say that I could not run two operating systems with a 2 gigabyte memory at the same time. For each virtual system, a certain amount of RAM is reserved, which must be physically present in the system.
And finally, the most interesting: support for 3D graphics. You can enable it only after installing the OS and XenClient Tools tools. Next, I inserted a Windows distribution disk into the DVD-ROM drive and started the virtual machine. After the standard procedure of installing the OS and rebooting, I got a completely normal operating system:

As you can see, Windows defines a “real” laptop processor. But for the time being some drivers have not been installed. A virtual drive with XenClient Tools is already connected to our VM, all that remains is to launch the installer. After installing the OS and rebooting, the XenClient menu appeared at the top of the desktop, and all drivers were installed. Only the sound chip for some reason required an additional installation - it was enough to go into the task manager and select the “Update driver” option.
Mastering and Tests
Returning to the issue of supporting 3D effects. After installing the virtual Windows 7 and utilities XenClient Tools in the properties of the video card, we see the following:

The most basic virtual graphics adapter does not even allow switching to the Aero interface. But it is enough to turn off the virtual machine and install 3D support in its properties. After loading we see a completely different picture:
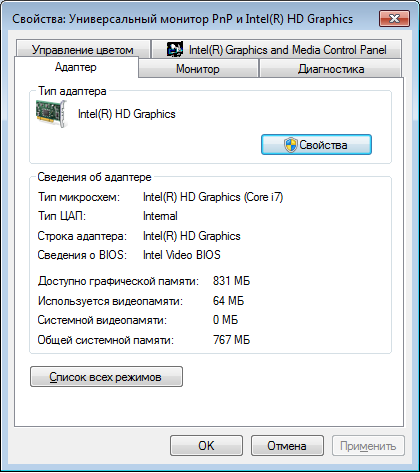
Virtual Windows gets direct access to Intel graphics. Interface Aero earned without problems. For another test, I put Media Player Classic and tried to start a movie with a resolution of 1080p:

The idea was a success, but only partly: the playback was not smooth, and periodically the player lost a couple of frames. When you run the same video without hardware acceleration, the result was better - the processor power is enough. Next, let's do just performance.
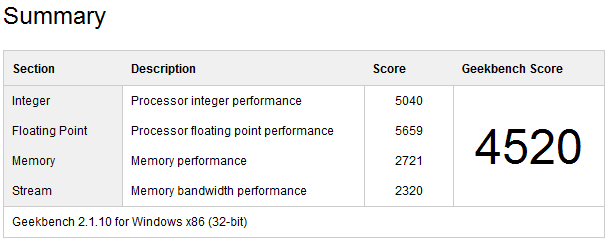
This is the result of the GeekBench benchmark, evaluating the performance of the processor and RAM, conducted in Windows 7 Pro 32bit, running directly on hardware. Now we will try to run the same test in virtual Windows 7, allocating 2 virtual processors and 2 gigabytes of RAM to the machine.
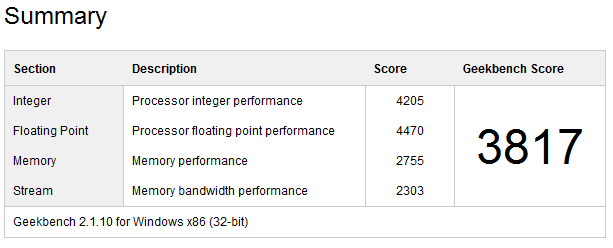
We get the figure by 16% less, and only due to a decrease in processor performance. Performance indicators of RAM practically did not change compared with the previous test. Let's try to increase the number of virtual processors to 4:
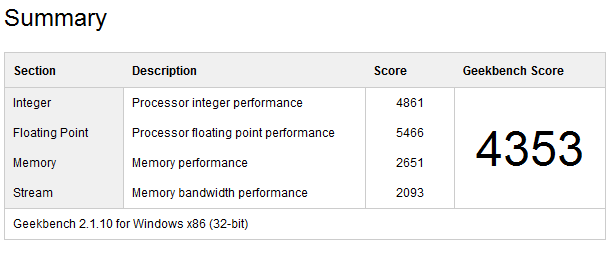
We get a decrease in performance of less than 4 percent, compared with Windows, running on real hardware. Excellent result, showing that the virtual OS works with almost the same performance as the "real". But the advantage of XenClient is the ability to work simultaneously in two virtual OSes at once. How well can they get along in one laptop?
In order to verify this, you need to create a second virtual machine. Of course, I could have done the simplest method, and reinstall Windows 7 from the distribution DVD. But I wanted to simplify and accelerate this process. This is where my Linux experience came in handy.
In the XenClient menu, which you can always switch to by pressing Ctrl + 0, press the Ctrl + Shift + T keys and get into a regular console. Here you need to enter the administrator password that was set when the hypervisor was installed. The .VHD files with virtual OS images are located in the / storage / disks folder. Here, while there is only one file with the following name:

The file size corresponds to the size of the virtual system hard disk that was specified when it was created. Next, using standard XenClient tools, we create another virtual OS, but choose the option to create without downloading the distribution from the DVD. The second VHD file appears in the disks folder, and now it remains to make a copy of our original virtual machine with the same name.
As a result, I received two identical virtual OSs, each of which was allocated two virtual processors and one gigabyte of RAM. You can switch between them by pressing Ctrl-1, Ctrl-2 (and so on, if there are more virtual machines). We start both systems, and in one of them we perform the standard WinRAR archiver test:
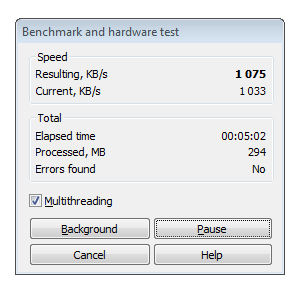
We get the result in 1075 kilobytes per second. Next, we run a similar test in the second virtual OS, and we get the following result:
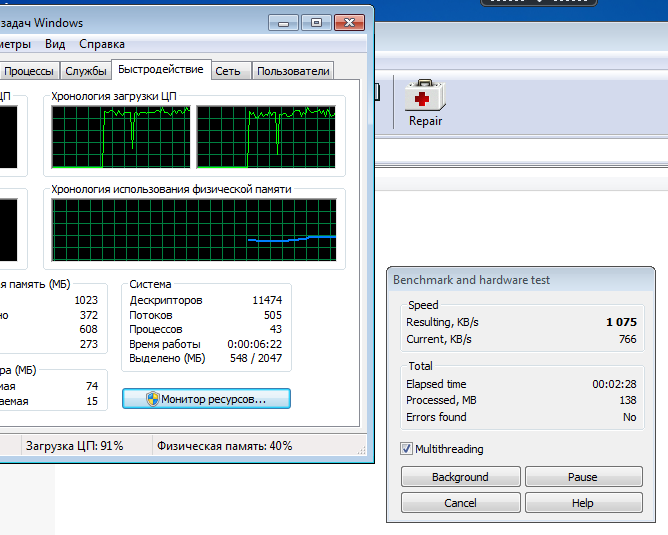
The performance of each test fell by about a third, but at the same time both virtual OSs worked fine: the time to switch from one to the other did not change, the programs were started without any problems.
Work with iron
I tried to connect all the USB devices that were at hand: starting with a flash drive and ending with an inkjet printer. With a USB flash drive and an external hard disk, it’s quite simple: the virtual OS that is in focus at the time of connection receives access to them. If you wish, you can go to the XenClient menu and connect or disconnect the necessary device in the virtual machine settings. With all other devices that require driver installation, working is not much more difficult. In the VM settings, we connect the necessary device, then install the drivers in the operating system itself and use it. It's simple! In the same way, you can connect the built-in X201 Bluetooth-module or even a WiFi module. In this case, it will not be available in XenClient (and it will not be possible to distribute the Internet to all virtual OS), but you can connect to the Internet through WiMAX operators. Perhaps there may be problems with quite tricky USB-devices, but I apparently did not get such.
Summary
Honestly, starting to install XenClient, I was preparing for what usually accompanies installing and configuring a Linux distribution: to thoughtful reading of forums and instructions, active work in the console and so on. Everything turned out to be much simpler: it was established and earned. I made sure that XenClient allows you to work with two virtual operating systems on one laptop without any problems, without serious losses in performance and functionality. The next step is to set up a working environment and remote access to corporate resources, with appropriate security policies. About this - in the next article in the blog Citrix and in the New Year. Holiday greetings!
Source: https://habr.com/ru/post/110970/
All Articles