Qt + QML on a simple example
 Qt is a convenient and flexible tool for creating cross-platform software. The included QML provides complete freedom of action when creating a user interface.
The usability of the Qt and QML bundles has already been mentioned more than once, so I will not go further about the pros and cons, but I’ll give, step by step, an example of a simple Qt application.
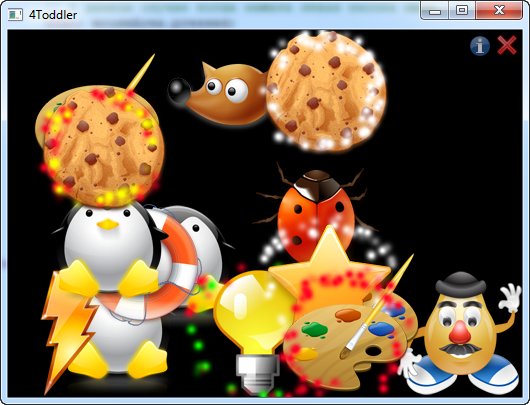
It will be a minimalistic application, its meaning is simple - when you press any key on the keyboard, a random image will appear on the screen and a random sound effect will be played again.
The user interface will be fully implemented in QML, the software part in Qt.
For those who do not have Qt installed, go to the qt.nokia.com/downloads download page and download the binaries for their platform in the " Qt SDK: Complete Development Environment " section. And, in fact, install.
')
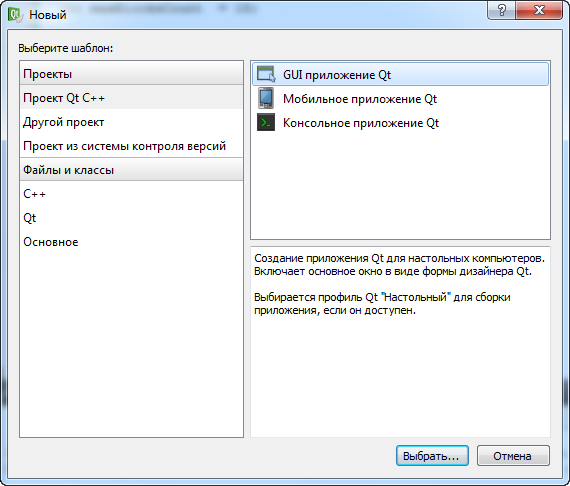
Launch Qt Creator, select the menu item File -> New File or Project . In the newly opened Qt C ++ Project -> Gui application, the Qt application , then the Select button.
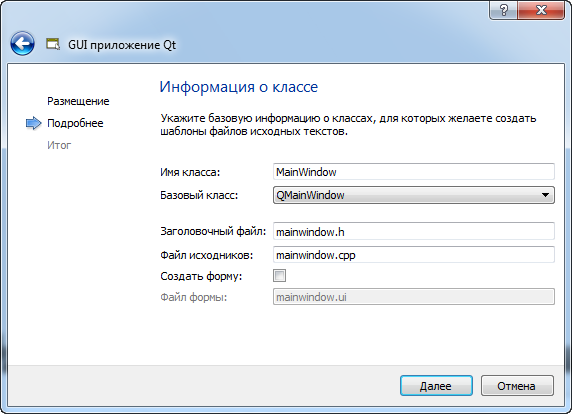
In the new window, enter the name of the project, specify the path to the project, click Next .
In the next window, uncheck Create Form , it is not useful for us, Next . And in the latter, just press the Finish button. Everything, the framework of our application is created.
First we add the qt-declarative module to our project, for this, in the project file ( 4Toddler.pro ), to the line
QT += core guiadd declarative
QT += core gui declarativeNext, change the base class for our main window, replace QMainWindow with QDeclarativeView and enable the QDeclarativeView header file
#include <QDeclarativeView>

class MainWindow : public QDeclarativeView
{
...
}
We will cut off the implementation of the constructor, which has become unnecessary, the initialization of the base class QMainWindow (parent) .
If you now build and run the project, we will see an empty window. So it should be, because we have not created or initialized the Qml interface.
Add a new QML file to the project. To do this, right-click on the project.
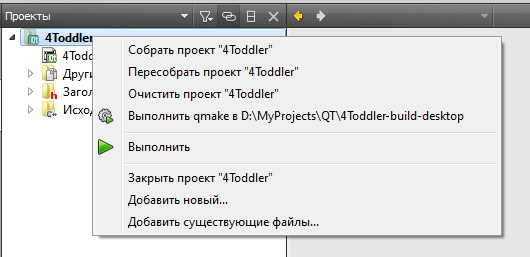
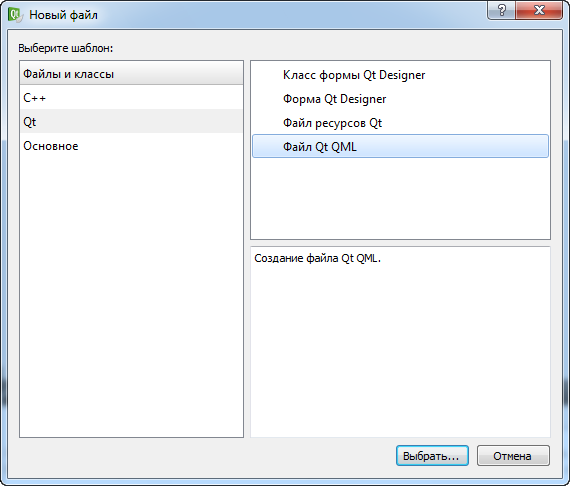
Add a new ... , then select the Qt section, the Qt QML file template. We give it the name main , then Next and Finish .
The wizard has created us a file containing one Rectangle element, it will be the main element for our user interface. Add a few new properties and set their value.
Rectangle
{
// ,
//
id: canvas;

// ,
color: "black"

//
//
anchors.fill: parent

//
focus: true
}
So far, nothing special, just a black background. Add the code to download the QML file to see what we did. To do this, we add a new method to our window.
void MainWindow::Init()
{
// , QML
QString contentPath;

#ifdef QT_DEBUG
//
contentPath = "D:/MyProjects/QT/4Toddler" ;
#else
// ,
contentPath = QApplication::applicationDirPath();
#endif

setFocusPolicy(Qt::StrongFocus);
// QML
// ,
// QDeclarativeView::SizeViewToRootObject
setResizeMode(QDeclarativeView::SizeRootObjectToView);

// QML
setSource(QUrl::fromLocalFile(contentPath + "/main.qml" ));
}
Now replace the line in the main.cpp file
int main( int argc, char *argv[])
{
...
w.show();
...
}
on
int main( int argc, char *argv[])
{
...
w.showFullScreen();
...
}
The window will expand to full screen. Before launching the application, let's add a button with which you can close the window. Looking ahead, I’ll say that there will be two buttons in the window, in order not to write the same code several times, add a new QML file to the project, and call it WindowButton .
The WindowButton element will be reused, changing only certain properties of each instance. The buttons will be made in the form of icons, with each of them we will set the path to the icon file and change the handler for clicking with the left mouse button. Below is the finished item code with comments.
Image
{
//
id: button

// , ""
MouseArea
{
//
// Image
anchors.fill: parent

id: mouseArea

// callback
onClicked: callback()
}
}
Add a couple of buttons to our window.
//
//
Row
{
//
//
anchors.right: parent.right;
// , 4
anchors.rightMargin: 4;
//
//
anchors.top: parent.top;
// , 4
anchors.topMargin: 4;

//
spacing: 4

WindowButton
{
// " "
id: about;

//
// ,
// QML
source: "about.png" ;

// ,
//
// onClicked: callback()
function callback()
{
}
}

WindowButton
{
//
id: exit;

source: "exit.png" ;

function callback()
{
}
}
}
In order that what we did earns, it remains for us to implement both callback methods for each button. To close the window, we call the Quit method, which we implement in the window class. To do this, add the class to the declaration.
Q_INVOKABLE void Quit();Then we implement this method.
void MainWindow::Quit()
{
QApplication::quit();
}
It remains to make this method visible from QML. In the Init method, add one single line that will make an instance of our window visible in QML.
rootContext()->setContextProperty( "window" , this );We can access this object by name - window , the name is arbitrary. Add an implementation for the close window button.
function callback()
{
window.Quit();
}
Note that you can only call methods that are declared as Q_INVOKABLE , i.e. from the Init method, the main window cannot be called.
Done, launch, see the black screen, all we can do now is to close the window by pressing the exit button. We pressed and we see that the state of the button when you hover the cursor and when pressed does not change at all, it looks like “non-living”. Revive it by adding states:
Image
{
...
states:[
State
{
//
name: "hovered" ;
// ,
//
when: mouseArea.pressed;
//
//
PropertyChanges { target: button; opacity: 1;}
},
State
{
name: "normal"
//
//
when: mouseArea.pressed == false ;
PropertyChanges { target: button; opacity: 0.7; }
}
]
}
An element can go to a specific state either automatically when the condition specified in when is met, or manually, by changing the state property.
Launched, clicked, the transparency changes, it's better, but not enough smoothness. Add the following code:
Image
{
...
Behavior on opacity
{
// 100
// 100
// 0,1
NumberAnimation { duration: 100 }
}
}
Behavior is a very useful element for creating animations, allowing you to specify how the specified property will change, in this case the transparency of the button.
We start and look, quite another thing, a smooth transition from a semi-transparent to an opaque state.

The program window will be implemented entirely in QML. This will be a modal window that will appear when you click on the about button. When you click the left mouse button anywhere in the window, it will disappear. Add a new QML file About.qml to the project.
I will give at once all the code of this window with explanations
//
Rectangle
{
id: about
//
//
function show()
{
about.opacity = 1;
}
//
function hide()
{
about.opacity = 0;
}
//
color: "transparent"
//
opacity: 0
//
//
// id: canvas
width: parent.width
height: parent.height
//
// opacity > 0
visible: opacity > 0
// ,
Rectangle
{
anchors.fill: parent
opacity: 0.5
color: "gray"
}
//
// " ..."
Rectangle
{
id: dialog
//
width: 360
height: 230
//
//
// ,
x: parent.width / 2 - dialog.width / 2;
y: parent.height / 2 - dialog.height / 2;
// z ,
// z ,
//
z: 10
border.color: "gray"
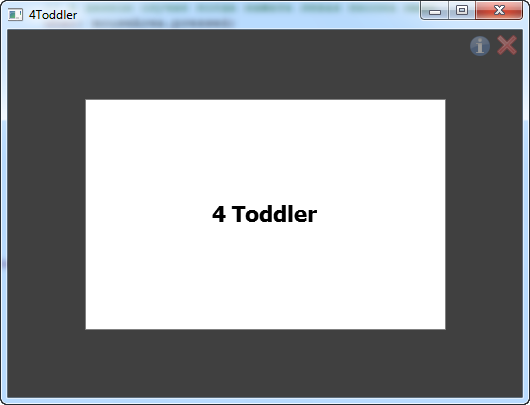
Text
{
text: "4 Toddler"
font.bold: true
font.pixelSize: 22
//
anchors.horizontalCenter: parent.horizontalCenter
anchors.verticalCenter: parent.verticalCenter
}
}
Behavior on opacity
{
NumberAnimation { duration: 100 }
}
MouseArea
{
//
anchors.fill: parent;
//
onClicked: hide();
}
}First I would like to draw attention to the property
width: parent.widthThis is not just an assignment of width, if during the display the width of the parent element changes, then the width of the child will be recalculated. I don’t know about you, but this feature pleasantly surprised me in the process of “picking” QML. The following line is also interesting:
visible: opacity > 0The property can be not only defined, but also calculated.
It remains to add the dialog and code to display it when you click about . Add the code to the Main.qml file at the end of the canvas element
Rectangle
{
id: canvas
..
About
{
id: aboutDlg
}
}
In order for the window to be displayed add a line
aboutDlg.show();to the callback function of the about button
WindowButton
{
id: about;
...
function callback()
{
aboutDlg.show();
}
}
Now we will add, actually the main functionality. Let's start by displaying a random picture when pressing any key. The image will be an element of Image , we define this element in a separate file. Add a Block.qml file to the project .
Image
{
id: block;

// ,
//
property bool remove: false
//
property bool show: false

opacity: 0;
fillMode: Image.Stretch;

states: [
State
{
// ,
// ,
name: "remove" ; when: remove == true ;
PropertyChanges { target: block; opacity: 0 }
StateChangeScript { script: block.destroy(1000); }
},
State
{
// ,
// ,
name: "show" ; when: show == true ;
PropertyChanges { target: block; opacity: 1 }
}
]

Behavior on opacity { NumberAnimation { duration: 300 } }
}
When you press any key on the keyboard, a block with an arbitrary picture will be displayed. Add a new main.js file to the project . In it, we define a keystroke handler on the keyboard.
//
var component = Qt.createComponent( "block.qml" );

//
var maxBlocksCount = 10;

// ,
var blocksArray = new Array();

//
function handleKey()
{
// x - 0
var x = Math .floor( Math .random() * canvas.width);
// y - 0
var y = Math .floor( Math .random() * canvas.height);

// ,
//
createNewBlock(x, y);
}

//
function createNewBlock(x, y)
{
if (component.status != Component.Ready)
{
return false ;
}

//
if (blocksArray.length > maxBlocksCount)
{
removeAllBlocks();
}

var newBlock = component.createObject(canvas);

if (newBlock == null )
{
return false ;
}

//
// randomIcon
var iconFile = window.randomIcon;

newBlock.source = ( "Icons/" + iconFile);

newBlock.x = x;
newBlock.y = y;

// show
newBlock.show = true ;

blocksArray.push(newBlock);

//
window.PlaySound();

return true ;
}

//
function removeAllBlocks()
{
for ( var i = 0; i < blocksArray.length; ++i)
{
blocksArray[i].remove = true ;
}

while (blocksArray.length != 0)
{
blocksArray.pop();
}
}
As you can see from the code, we still need to implement the randomIcon property and the PlaySound function of the main window.
Add a property to the declaration of the class MainWindow
Q_PROPERTY(QString randomIcon READ RandomIcon)And function declaration
QString RandomIcon();Then the implementation:
QString MainWindow::RandomIcon()
{
QStringList iconFilesList;
QString searchPath = m_ContentPath + "/Icons/" ;

QDir directory = QDir(searchPath);
QStringList filters;
filters << "*.png" ;
directory.setNameFilters(filters);
// png
iconFilesList = directory.entryList(QDir::AllEntries);

//
int fileIdx = qrand() % iconFilesList.count();

//
return iconFilesList.at(fileIdx);
}
Now add a function to the header file to play the sound effect.
Q_INVOKABLE void PlaySound();and implementation
void MainWindow::PlaySound()
{
QStringList soundFilesList;
QDir directory = QDir(m_ContentPath + "/Sounds/" );
QStringList filters;
filters << "*.wav" ;
directory.setNameFilters(filters);

// wav
soundFilesList = directory.entryList(QDir::AllEntries);
//
int fileIdx = qrand() % soundFilesList.count();

//
QString soundFile = m_ContentPath + "/Sounds/" + soundFilesList.at(fileIdx);
//
QSound::play(soundFile);
}
Almost everything, it remains to add a keystroke handler to our root element to call the function of creating a new element. In the beginning of the file main.qml we make visible our script in the file main.qml
import Qt 4.7
import "main.js" as Main
and the handler itself inside the canvas element
Rectangle
{
id: canvas
...
Keys.onPressed: { if ( event .isAutoRepeat == false ) { Main.handleKey(); } }
That's all - we can run and admire.
As I promised, the program is simple, but, in my opinion, this is a rather interesting “game” platform for those who are just starting to learn QML. There is no limit to perfection, who knows, maybe someone will develop it into something more worthwhile.
Archive with the project can be downloaded here.
Source: https://habr.com/ru/post/110544/
All Articles