Creating Doctrine YAML via MySQL Workbench
Recently began to use the program MySQL Workbench. I was very pleased with the application, it is very convenient to design the database structure, which can then be easily exported to a database server (Forward Engineering). You can also use reverse engineering (Reverse Engineering): creating an ER diagram using the existing database structure. In addition, the application has a synchronization of the model and the existing database, which is also very convenient during development.
But since we are developing our products using ORM Doctrine, besides the database structure, it was necessary to create models for data access. As it turned out, there is an add-on for Workbench, which Doctrine YAML creates right from the application. A little searching in the internet, the plugin was successfully found. The developer page is right here .
Using this plugin is very convenient and you can quickly create schemes for future models.
Available stable versions can be found on this page . At the time of this writing, the current version was 0.4.1 of January 03, 2010. The latest developer version is 0.4.2. I advise you to use it. Available at http://mysql-workbench-doctrine-plugin.googlecode.com/svn/trunk/DoctrineExport.grt.lua
')
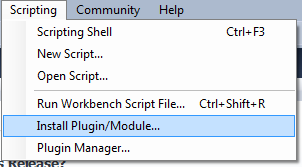
After unpacking the archive, you will find the file “DoctrineExport.grt.lua” - this is the necessary plugin. Now it needs to be installed in MySQL Workbench. To do this, run the application and go to the menu "Scripting" - "Install Plugin / Module", specify the file with the plugin. Do not forget to specify the type of the plug-in added “lua files (* .lua)”. After that, the plugin will be successfully added.
Restart the Workbench application so that the plugin is activated.
In the next step, create a simple ER diagram (if you don’t have an existing connection to the Database server, create it in the “SQL Development” section - “New Connection”) To do this, after starting the application, in the “Data modeling” section, click “Create New EER Model.
After opening a new window, you can either create the necessary tables first, and then go on to create an ER diagram, or go directly to the modeling and in parallel create the tables. We will immediately use the second method. To do this, at the very top click on the icon "Add diagram".
A design workspace opens.
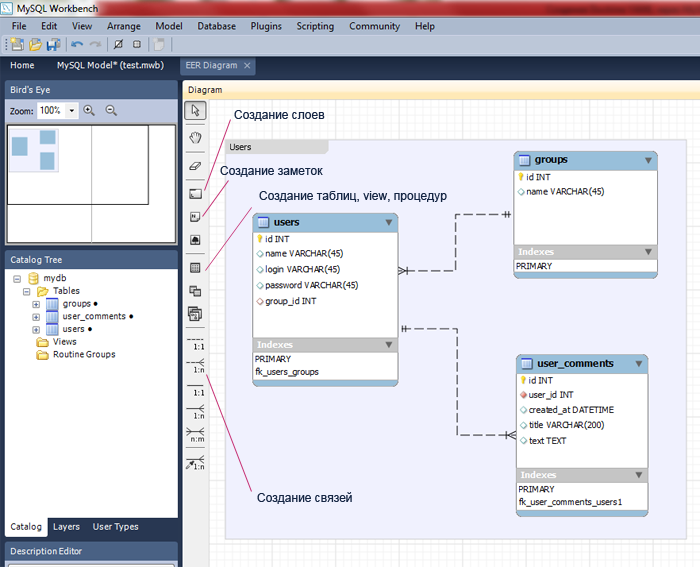
Create tables and draw links between them. There is a table of users, groups and comments. Each user is a member of a group (one-to-many relationship). Users can leave comments (one-to-many communication). Do not forget that foreign keys are not possible when working with MyISAM. By default, MySQL Workbench works with InnoDB.
After designing, you can export the created structure to the Database server using the “Database” - “Forward Engineer” menu.
To create Doctrine YAML in the top menu, open the “Plugins” section - “Catalog” - “Doctrine Export: Copy Generated Schema to Clipboard”. And the scheme of the models will fall into the clipboard Also, in this section of the menu, you can specify which file to upload data to.
As a result, we have obtained this data scheme (presented below). The plugin correctly processed the tables and created models without multiple terminations. So if the table is called “users”, then the future model will be called “user” - this is very nice. In addition, when I created the model I needed, the plugin also correctly processed the name “categories” and created a schema called “category”. And, as you can see, all links are set correctly. “ForeignAlias” is immediately registered in the required classes, Doctrine itself does not prescribe this. She writes connections in each scheme separately.
The only thing that did not suit me was that the first letter of the models is in lower case, and we work according to the Zend notation, where the class name must begin with a capital letter. But this problem was solved in version 0.4.2, which allows the use of various configuration variables. Now, by default, the first letter is capitalized.
To connect your configuration file you need to create the file “doctrinePluginConfig.lua”, which should be placed in the directory “% PROGRAMFILES% / MySQL / Workbench / modules”. The contents of the file can be like this.
Details on configuration options can be found here on this page. HowToUseConfigOptions
The official site on the Wiki describes some additional features of the plugin when working with Doctrine. For example, to add the Doctrine Email Validator, add a comment to the column name.
Resources used
YAML example for User model.
UPD: Who has an error with the getInfoFromTableComment function, then replace it with
getCommentToken in the file "% APPDATA% \ MySQL \ Workbench \ modules \ DoctrineExport.grt.lua". Thank you worker4food
But since we are developing our products using ORM Doctrine, besides the database structure, it was necessary to create models for data access. As it turned out, there is an add-on for Workbench, which Doctrine YAML creates right from the application. A little searching in the internet, the plugin was successfully found. The developer page is right here .
Using this plugin is very convenient and you can quickly create schemes for future models.
Available stable versions can be found on this page . At the time of this writing, the current version was 0.4.1 of January 03, 2010. The latest developer version is 0.4.2. I advise you to use it. Available at http://mysql-workbench-doctrine-plugin.googlecode.com/svn/trunk/DoctrineExport.grt.lua
')
After unpacking the archive, you will find the file “DoctrineExport.grt.lua” - this is the necessary plugin. Now it needs to be installed in MySQL Workbench. To do this, run the application and go to the menu "Scripting" - "Install Plugin / Module", specify the file with the plugin. Do not forget to specify the type of the plug-in added “lua files (* .lua)”. After that, the plugin will be successfully added.
Restart the Workbench application so that the plugin is activated.
In the next step, create a simple ER diagram (if you don’t have an existing connection to the Database server, create it in the “SQL Development” section - “New Connection”) To do this, after starting the application, in the “Data modeling” section, click “Create New EER Model.
After opening a new window, you can either create the necessary tables first, and then go on to create an ER diagram, or go directly to the modeling and in parallel create the tables. We will immediately use the second method. To do this, at the very top click on the icon "Add diagram".
A design workspace opens.
Create tables and draw links between them. There is a table of users, groups and comments. Each user is a member of a group (one-to-many relationship). Users can leave comments (one-to-many communication). Do not forget that foreign keys are not possible when working with MyISAM. By default, MySQL Workbench works with InnoDB.
After designing, you can export the created structure to the Database server using the “Database” - “Forward Engineer” menu.
To create Doctrine YAML in the top menu, open the “Plugins” section - “Catalog” - “Doctrine Export: Copy Generated Schema to Clipboard”. And the scheme of the models will fall into the clipboard Also, in this section of the menu, you can specify which file to upload data to.
As a result, we have obtained this data scheme (presented below). The plugin correctly processed the tables and created models without multiple terminations. So if the table is called “users”, then the future model will be called “user” - this is very nice. In addition, when I created the model I needed, the plugin also correctly processed the name “categories” and created a schema called “category”. And, as you can see, all links are set correctly. “ForeignAlias” is immediately registered in the required classes, Doctrine itself does not prescribe this. She writes connections in each scheme separately.
The only thing that did not suit me was that the first letter of the models is in lower case, and we work according to the Zend notation, where the class name must begin with a capital letter. But this problem was solved in version 0.4.2, which allows the use of various configuration variables. Now, by default, the first letter is capitalized.
To connect your configuration file you need to create the file “doctrinePluginConfig.lua”, which should be placed in the directory “% PROGRAMFILES% / MySQL / Workbench / modules”. The contents of the file can be like this.
local _G = _G

-- do not touch the three points, they are intended
module(...);

-- declare config and add it
-- to the global namespace
_G.extConfig = {
enableRecapitalizeTableNames = "none" –-
}
Details on configuration options can be found here on this page. HowToUseConfigOptions
The official site on the Wiki describes some additional features of the plugin when working with Doctrine. For example, to add the Doctrine Email Validator, add a comment to the column name.
{doctrine:validators}
email: true
{/doctrine:validators}
Resources used
YAML example for User model.
---
detect_relations: true
options:
collate: utf8_bin
charset: utf8
type: InnoDB

User:
tableName: users
columns:
id:
type: integer(4)
primary: true
unsigned: true
notnull: true
autoincrement: true
name:
type: string(45)
login:
type: string(45)
email: true
password:
type: string(45)
group_id:
type: integer(4)
unsigned: true
relations:
group:
class: Group
local: group_id
foreign: id
foreignAlias: users
onDelete: cascade
foreignType: many
owningSide: true
indexes:
fk_users_groups:
fields: [group_id]
UPD: Who has an error with the getInfoFromTableComment function, then replace it with
getCommentToken in the file "% APPDATA% \ MySQL \ Workbench \ modules \ DoctrineExport.grt.lua". Thank you worker4food
Source: https://habr.com/ru/post/110426/
All Articles